Introduction
Welcome to our guide on how to rotate your screen on a Chromebook. Chromebooks are popular devices known for their simplicity, speed, and intuitive interface. Whether you want to change the orientation of your screen for a specific viewing preference or to accommodate different apps or activities, we’ve got you covered.
Rotating your screen on a Chromebook can be useful in various scenarios. For instance, you may want to rotate your screen to better view widescreen videos or presentations, or to have a more comfortable reading experience. Additionally, if you’re using your Chromebook in a tablet mode, rotating the screen can help you adjust to different orientations.
In this article, we will explore several methods to rotate your screen on a Chromebook. We will cover keyboard shortcuts, display settings, the accessibility menu, and even touchpad gestures. You can choose the method that works best for you and easily adjust your screen orientation in just a few simple steps.
Whether you’re a student, a professional, or simply an avid Chromebook user, being able to rotate your screen can greatly enhance your user experience, making tasks more efficient and enjoyable. So, let’s dive in and explore these different methods to rotate your screen on a Chromebook.
Method 1: Keyboard Shortcut
One of the quickest and easiest ways to rotate your screen on a Chromebook is by using a keyboard shortcut. Chromebooks have a dedicated keyboard shortcut that allows you to change the screen orientation with just a few keystrokes.
To rotate your screen using a keyboard shortcut, follow these steps:
- Hold down the Ctrl and Shift keys simultaneously.
- Press the Refresh key (typically located in the top row, near the Esc key). The Refresh key usually has an icon that looks like a circular arrow.
- Your screen will rotate 90 degrees clockwise with each press of the Refresh key. Continue pressing the Refresh key until you reach your desired screen orientation.
It’s important to note that the keyboard shortcut may vary slightly depending on your specific Chromebook model. Some models may require you to press the Ctrl and Shift keys along with the Rotate key (usually indicated by an icon resembling a rectangle rotating).
Rotating your screen using the keyboard shortcut is a convenient and efficient way to quickly change the orientation without having to navigate through menus or settings. This method is especially useful if you frequently switch between landscape and portrait modes for different tasks or preferences.
Now that you know how to rotate your screen using the keyboard shortcut let’s explore another method that involves the display settings.
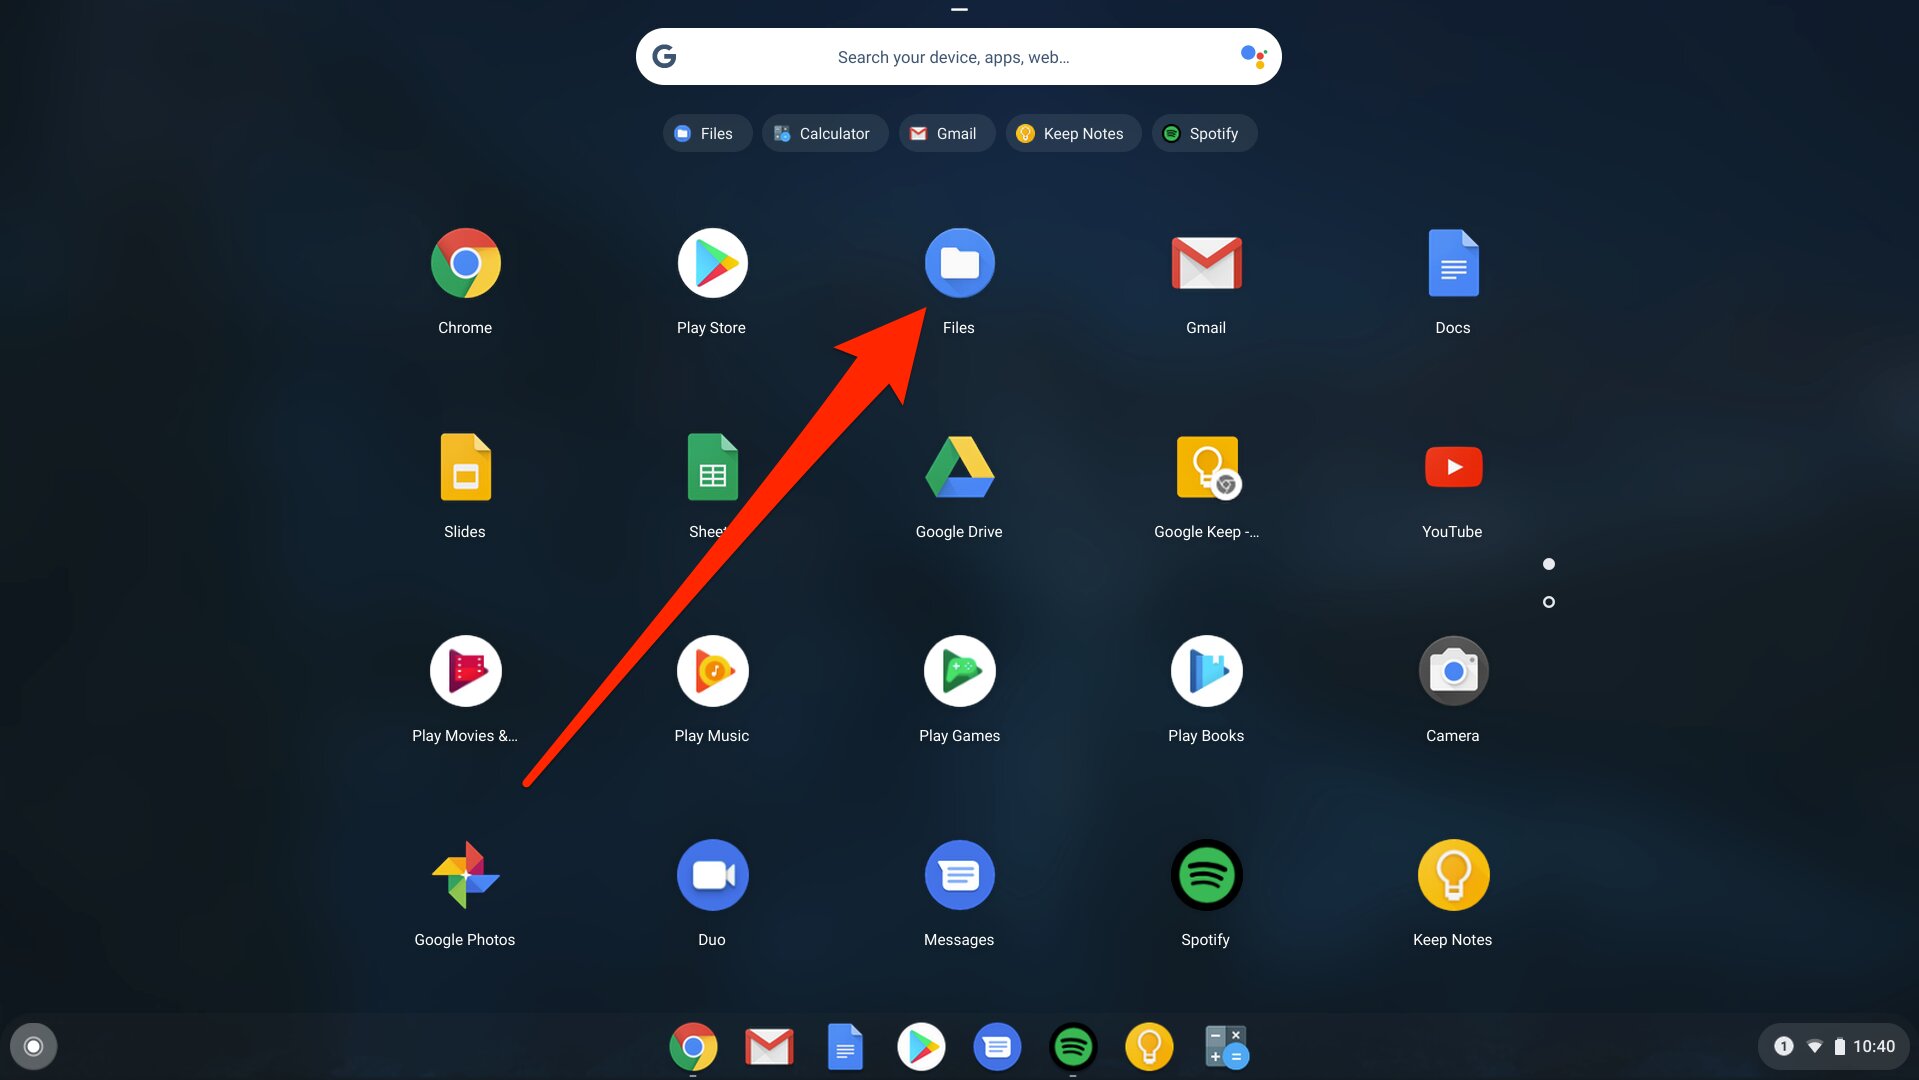
Method 2: Display Settings
If you prefer a more visual and customizable approach, you can rotate your screen on a Chromebook using the display settings. This method allows you to access the display settings menu and manually set the screen orientation to your desired angle.
To rotate your screen using the display settings, follow these steps:
- Click on the system tray in the bottom-right corner of the screen. It looks like a series of icons.
- Click on the Settings gear icon to open the Chromebook settings menu.
- In the settings menu, scroll down and click on Display.
- Under the Orientation section, click on the dropdown menu and select your desired screen orientation: Landscape, Portrait, Landscape (flipped), or Portrait (flipped).
- Your screen will automatically adjust to the selected orientation. If you’re satisfied with the new orientation, simply close the settings menu. If not, repeat the steps and choose a different orientation.
Using the display settings method allows you to have more control over the screen orientation. It’s particularly helpful if you want to set a specific angle or need to fine-tune the orientation to align with your workflow or visual preferences.
Keep in mind that the display settings method may differ slightly depending on your Chromebook model and the version of Chrome OS you’re using. However, the general process is similar across devices.
Now that we’ve explored the display settings method, let’s move on to the next method that involves the accessibility menu.
Method 3: Accessibility Menu
If you prefer a more streamlined and straightforward approach to rotating your screen on a Chromebook, you can utilize the accessibility menu. The accessibility menu provides quick access to a variety of settings, including screen rotation, making it convenient for users with specific accessibility needs.
To rotate your screen using the accessibility menu, follow these steps:
- Click on the system tray in the bottom-right corner of the screen.
- Click on the Accessibility icon. It looks like a person inside a circle.
- In the accessibility menu, click on the Rotate screen option.
- You’ll be presented with four options: Landscape, Portrait, Landscape (flipped), and Portrait (flipped). Choose the desired orientation by clicking on it.
- Your screen will instantly adjust to the selected orientation. If you’re satisfied, you can close the accessibility menu. If you want to switch to a different orientation, follow the same steps and choose a new option.
The accessibility menu method provides a quick and user-friendly way to rotate your screen on a Chromebook. It’s particularly useful for individuals who require easy access to accessibility settings or for those who prefer a simplified interface for managing screen orientation.
Do note that the accessibility menu may vary slightly depending on the version of Chrome OS and your specific Chromebook model. However, the general process remains similar across devices.
Now that we’ve covered the accessibility menu method, let’s move on to the next method that involves a touchpad gesture.
Method 4: Touchpad Gesture
If you prefer a more intuitive and hands-on approach to rotating your screen on a Chromebook, you can utilize a touchpad gesture. This method allows you to use a gesture on your touchpad to quickly change the screen orientation without the need for keyboard shortcuts or menus.
To rotate your screen using a touchpad gesture, follow these steps:
- Place two fingers on your touchpad.
- Rotate your fingers in a clockwise or counterclockwise motion to indicate your desired screen rotation.
- As you rotate your fingers, your screen will adjust accordingly, changing to the selected orientation.
- If you’re not satisfied with the new orientation, simply rotate your fingers in the opposite direction to revert back to the previous orientation or try a different gesture to achieve your desired angle.
The touchpad gesture method offers a seamless and tactile way to change your screen orientation on a Chromebook. It’s especially convenient for users who prefer using touch controls or those who regularly switch between different orientations for various tasks.
However, it’s important to note that not all Chromebooks support touchpad gestures for screen rotation. Make sure to check if your specific Chromebook model has this feature before attempting this method.
Now that we’ve explored the touchpad gesture method, we’ve covered all the different ways you can rotate your screen on a Chromebook. Feel free to experiment with these methods and choose the one that works best for you and your specific usage preferences.
Conclusion
Rotating your screen on a Chromebook can greatly improve your user experience and make certain tasks more efficient and enjoyable. Whether you prefer using keyboard shortcuts for quick adjustments, accessing the display settings for more personalized control, utilizing the accessibility menu for streamlined changes, or using touchpad gestures for an intuitive approach, there are multiple ways to rotate your screen on a Chromebook.
By following the methods outlined in this guide, you can easily switch between landscape and portrait modes or find the perfect screen orientation to suit your specific needs. Whether you’re watching videos, reading documents, giving presentations, or simply rearranging your workspace, having the ability to rotate your screen on a Chromebook provides a flexible and customizable computing experience.
Remember, the exact steps may vary slightly depending on your specific Chromebook model and the version of Chrome OS you’re using. However, the general principles remain the same across devices.
So go ahead and give these methods a try! Explore the keyboard shortcuts, delve into the display settings, dive into the accessibility menu, or experiment with touchpad gestures to find the method that works best for you. Enjoy the freedom to adjust your screen orientation with ease and make the most out of your Chromebook experience.