Introduction
In today’s digital age, keyboards have become an essential tool for communication and productivity. Whether you’re typing out an important document or engaging in a thrilling gaming session, a broken keyboard key can be a frustrating obstacle. Luckily, with a little know-how and the right tools, you can fix a broken keyboard key and restore it to its full functionality.
While it may be tempting to immediately reach out for professional assistance or consider purchasing a new keyboard altogether, repairing a broken key is often a simple and cost-effective solution. So, in this guide, we will walk you through the step-by-step process of fixing a broken keyboard key, ensuring that you can get back to typing with ease.
Before we dive into the repair process, it’s essential to note that there are various types of keyboards available in the market, such as mechanical, membrane, or laptop keyboards. The methods we’ll discuss here are generally applicable to most keyboard types, but it’s always a good idea to consult the manufacturer’s instructions or specific keyboard model documentation for any unique steps or considerations.
Now that we understand the importance of a functional keyboard and the need to fix a broken key, let’s move on to the first step of the repair process: assessing the damage.
Step 1: Assess the Damage
The first step in fixing a broken keyboard key is to assess the damage and determine the extent of the problem. There are a few common issues that can cause a key to malfunction:
- Physical damage: The keycap or key switch may be visibly damaged due to a fall, excessive force, or liquid spills.
- Sticking or unresponsive key: The key may stick in an pressed position or not register keystrokes when pressed.
- Keycap detachment: The keycap may have come loose or completely detached from the key switch.
To assess the damage, examine the affected key closely. Look for any visible signs of damage, such as a cracked or broken keycap, or any foreign objects that may be obstructing the key’s movement. Additionally, press the key multiple times to see if it registers keystrokes consistently or if it sticks.
Based on your assessment, you can determine the appropriate course of action. If the keycap is damaged or detached, you may be able to fix it by reattaching it or replacing it altogether. If the key switch is causing the issue, you may need to clean it or consider replacing it if necessary.
It’s important to note that not all keyboard issues can be easily fixed. In some cases, the damage may be too severe or require specialized tools or expertise. If you are unsure or uncomfortable with proceeding, it is best to seek professional help or consider replacing the keyboard entirely.
Now that you have assessed the damage and identified the issue, it’s time to gather the necessary tools to begin the repair process.
Step 2: Gather Necessary Tools
Before you begin the repair process, it’s important to gather the necessary tools to ensure a smooth and successful repair. Here are the tools you will need:
- Flathead screwdriver or a keycap puller: This tool is essential for safely removing the keycap from the keyboard.
- Cotton swabs or soft cloth: These will be used to clean the key switch and remove any debris or dirt that may be causing the issue.
- Isopropyl alcohol or keyboard cleaning solution: This will help in effectively cleaning the key switch and disinfecting the keycap.
- Tweezers: In case there are small debris or foreign objects lodged in the key switch, tweezers can be used to carefully remove them.
- Replacement keycap (optional): If the keycap is damaged beyond repair or you wish to replace it for aesthetic reasons, having a replacement keycap on hand can be helpful.
Ensure that you have all the necessary tools readily available before proceeding with the repair. This will help you work efficiently and minimize any potential damage to the keyboard or key components. If you don’t have certain tools at hand, they can usually be easily acquired from local electronics stores or online retailers.
Remember to work in a well-lit area and handle the tools with care to prevent any accidental damage or injury. Once you have gathered all the required tools, you’re ready to move on to the next step: removing the keycap.
Step 3: Remove the Keycap
Now that you have gathered the necessary tools, it’s time to remove the keycap from the keyboard. Here’s how you can do it:
- Turn off your computer: Before you start, it’s important to shut down your computer or disconnect your keyboard to avoid any accidental keystrokes or system interruptions.
- Locate the broken key: Identify the key that needs to be fixed. This will be the key you assessed in the previous step.
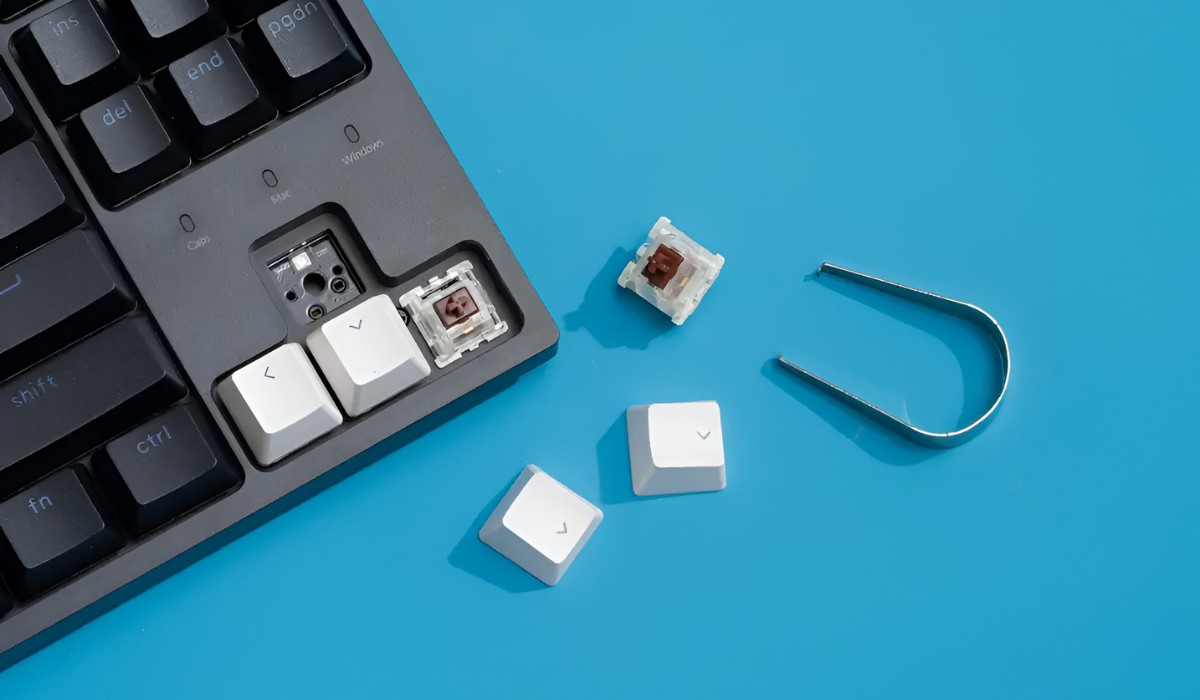
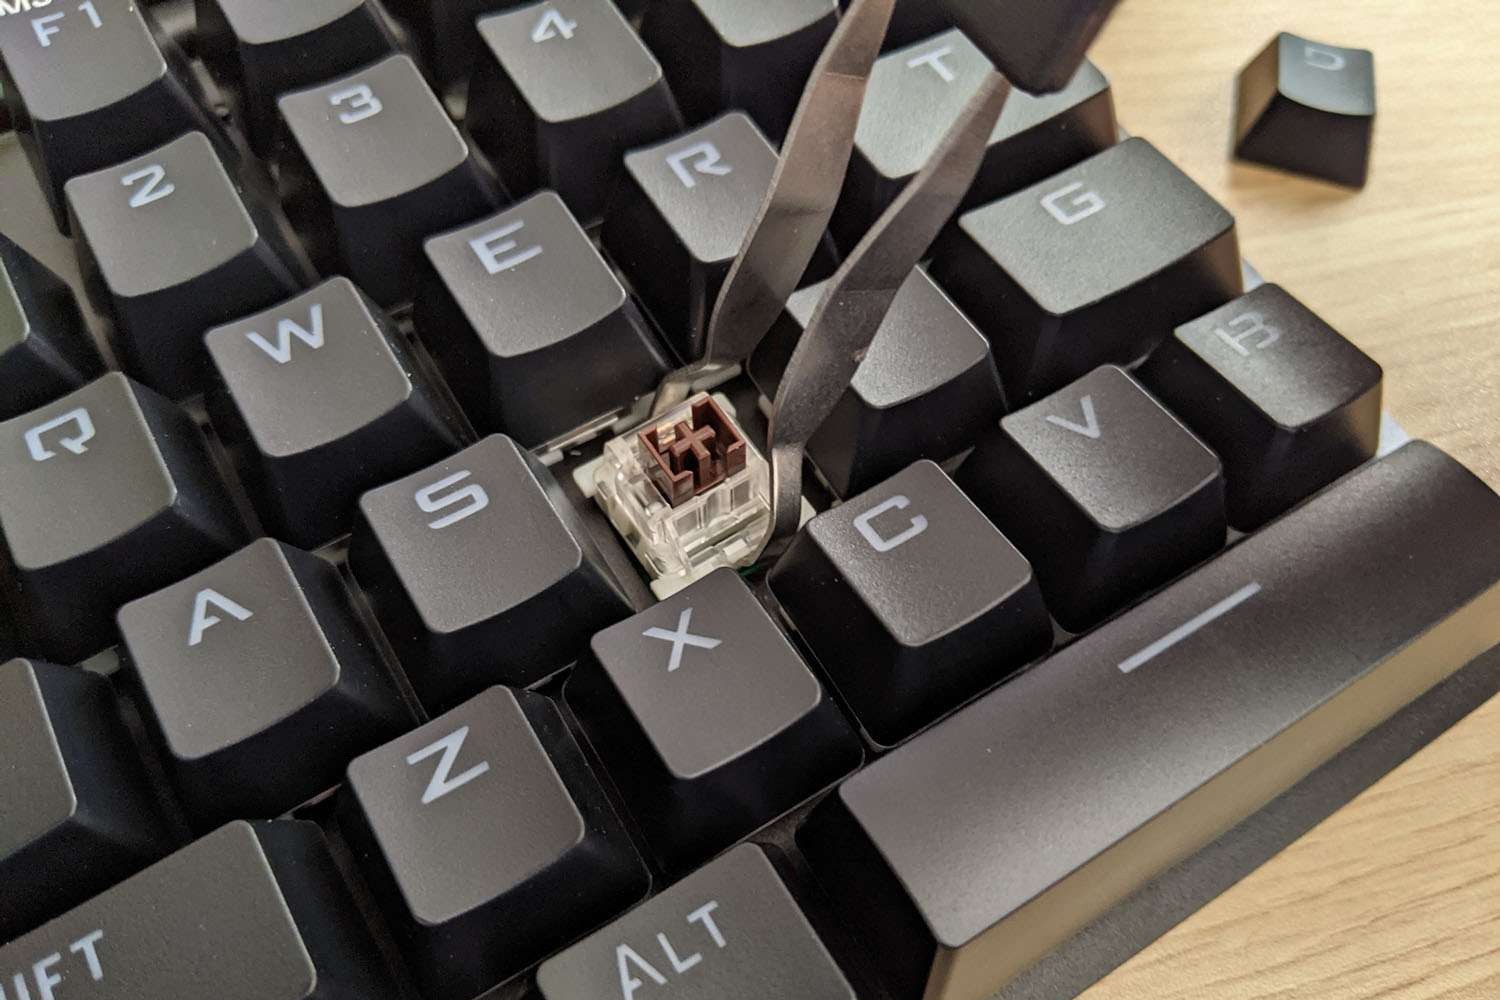
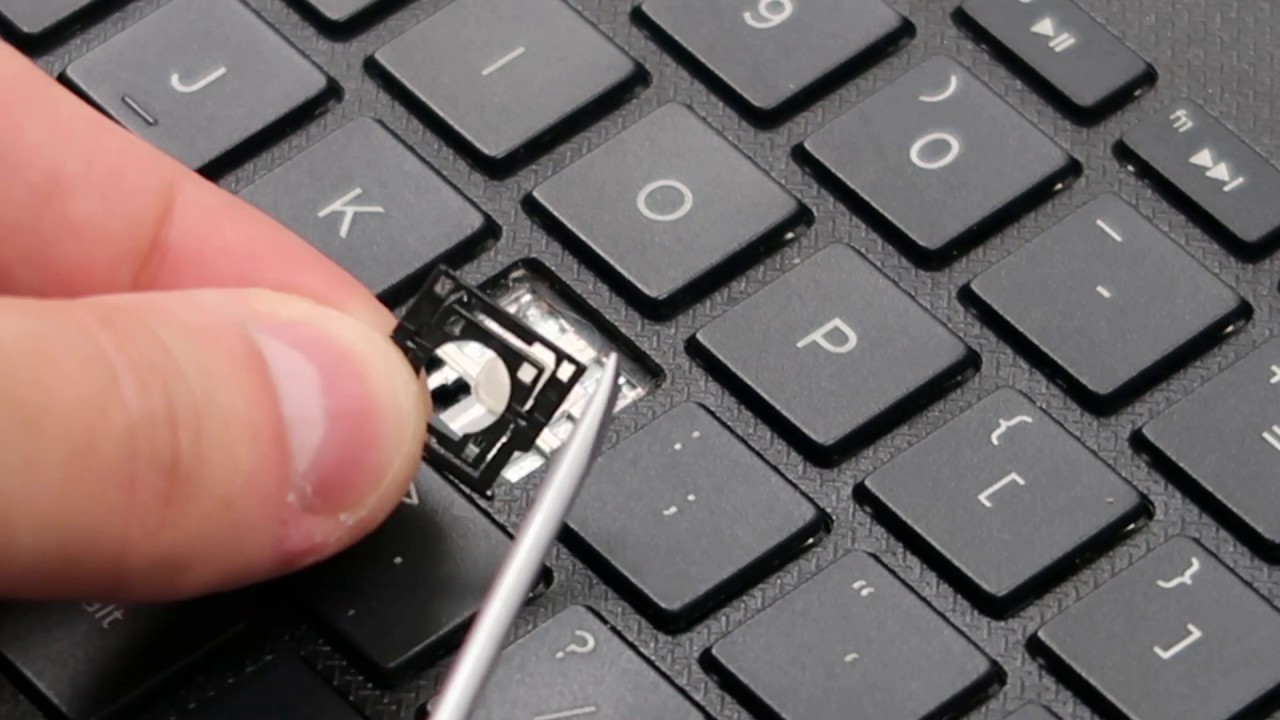
- Use a flathead screwdriver or a keycap puller: Insert the flathead screwdriver or the keycap puller beneath the keycap. Gently wiggle it from side to side until the keycap pops off. Be careful not to apply too much force as this can damage the key switch or surrounding keys.
- Set the keycap aside: Once the keycap is removed, place it in a safe spot where it won’t get lost or damaged. If you have a replacement keycap, now is the time to install it.
Removing the keycap may vary slightly depending on the type of keyboard you have. Some keyboards may have a different mechanism for removing keycaps, such as clips or hinges. If you’re unsure about the process, refer to the keyboard’s documentation or consult the manufacturer’s website for specific instructions.
With the keycap removed, you can now move on to the next step: cleaning the key switch to ensure optimal performance and functionality.
Step 4: Clean the Key Switch
Once you have removed the keycap, it’s time to clean the key switch. Dust, debris, or even spilled liquids can cause keys to stick or become unresponsive. Cleaning the key switch can often resolve these issues. Here’s how you can clean the key switch:
- Dip a cotton swab or soft cloth in isopropyl alcohol or keyboard cleaning solution: Make sure the cotton swab or cloth is lightly damp, not dripping wet.
- Gently rub the key switch surface: Carefully clean the area underneath the keycap and around the key switch by gently rubbing the cotton swab or cloth. This will help remove any dirt, grime, or residue that may be affecting the key’s functionality.
- Use tweezers to remove debris (if necessary): If you notice any small debris or foreign objects lodged in the key switch, you can use tweezers to carefully remove them. Be gentle to avoid damaging the key switch.
- Allow the key switch to dry: After cleaning, give the key switch a few minutes to air dry completely. Ensure that no liquid remains before proceeding to the next step.
Cleaning the key switch can often solve issues related to sticking or unresponsiveness. However, if the key switch is damaged, it may require further interventions such as replacement. Consult the keyboard’s documentation or the manufacturer’s website for specific instructions on replacing the key switch.
Now that the key switch is clean and dried, you can move on to the next step: reattaching or replacing the keycap.
Step 5: Reattach or Replace the Keycap
With the key switch clean and ready, it’s time to reattach or replace the keycap. Follow these steps to ensure a proper fit:
- Align the keycap: Take the keycap and align it with the key switch. Make sure the keycap is positioned correctly, ensuring that any clips or hinges are aligned with their respective slots or pins on the key switch.
- Press down firmly: Once the keycap is aligned, press down firmly on all corners and sides of the keycap. You should feel a gentle snap as the keycap locks into place.
- Test the key: After reattaching the keycap, test the key’s functionality by pressing it multiple times. Ensure that it registers keystrokes consistently and doesn’t stick.
If the keycap was damaged beyond repair or you simply want to change the key’s appearance, you can replace the keycap with a new one. To do so, follow the same steps for aligning and pressing down firmly, but with the replacement keycap instead.
When reattaching or replacing keycaps, it’s important to be gentle and avoid using excessive force. Applying too much pressure can damage the key switch or surrounding keys.
With the keycap reattached or replaced, it’s time to move on to the next step: testing the key functionality.
Step 6: Test the Key Functionality
After reattaching or replacing the keycap, it’s crucial to test the key’s functionality to ensure that the repair was successful. Follow these steps to perform a key functionality test:
- Open a text editor or word processing application: Launch a text editor or any application where you can input text.
- Press the repaired key: Begin by pressing the repaired key multiple times. Observe if the key registers keystrokes consistently without any sticking or unresponsiveness.
- Test adjacent keys: Along with the repaired key, test the functionality of the adjacent keys as well. This will help identify if any other keys are affected or if there is any interference between keys.
- Test different key combinations: Try various key combinations involving the repaired key and adjacent keys. This will ensure that all the keys are functioning properly and there are no issues with multiple key presses.
If the key functions as expected and registers keystrokes accurately, then congratulations – the repair was successful! You can now proceed to the final step: repeating the process if needed.
However, if the key still exhibits any issues, such as sticking or unresponsiveness, it may require further cleaning or in some cases, professional assistance or replacement of the key switch.
Remember that the effectiveness of the repair process may vary based on the nature and severity of the damage. In some cases, more complex repairs may be needed, or it might be more practical to consider replacing the entire keyboard.
Now that you have tested the key functionality, let’s move on to the final step: repeating the process if needed.
Step 7: Repeat the Process if Needed
If for some reason the key is still not functioning properly after following the previous steps, it may be necessary to repeat the repair process. Here’s what you can do:
- Assess the key and identify the issue: Reassess the key and determine if there are any visible signs of damage or if the keycap is securely attached. Consider if further cleaning or potentially replacing the key switch is necessary.
- Follow the repair steps again: Repeat the steps from assessing the damage, gathering the necessary tools, removing the keycap, cleaning the key switch, and reattaching or replacing the keycap.
- Perform another functionality test: Perform a thorough functionality test, as outlined in Step 6, to evaluate if the repeated repair has resolved the issue.
It’s important to note that not all keyboard issues can be easily fixed or may require more advanced techniques. If you have attempted the repair process multiple times and the key is still not functional, it might be best to seek professional help or consider replacing the keyboard.
Remember, patience is key when troubleshooting and repairing a broken key. It may take more than one attempt to fix the issue successfully. If at any point you feel unsure or uncomfortable with the repair process, it’s always recommended to seek professional assistance to avoid causing further damage.
By following these steps and repeating the process if necessary, you can increase your chances of successfully fixing a broken keyboard key and restoring its full functionality.
Conclusion
A broken keyboard key can be a frustrating inconvenience, but with the right knowledge and tools, you can often resolve the issue yourself. By following the step-by-step process outlined in this guide, you can successfully fix a broken keyboard key and restore it to its full functionality.
Throughout the repair process, it’s important to assess the damage, gather the necessary tools, remove the keycap, clean the key switch, and reattach or replace the keycap. Testing the key functionality is crucial to ensure that the repair was successful.
However, it’s important to note that not all keyboard issues can be easily fixed, and more complex repairs may require professional assistance or the replacement of key components. If you are unsure or uncomfortable with the repair process, it’s always best to seek professional help or consider replacing the keyboard.
Remember to handle the tools with care, work in a well-lit area, and exercise patience throughout the repair process. By doing so, you can increase your chances of a successful repair and get back to using your keyboard with ease.
We hope that this guide has been helpful to you and has provided you with the information and confidence to tackle a broken keyboard key. Happy repairing!