Introduction
Are you a devoted mechanical keyboard user who has encountered the frustrating issue of a broken switch on one of your keys? Fear not, as this guide will equip you with the knowledge and skills needed to rectify this problem and restore your keyboard to its optimal functionality. Mechanical keyboards are prized for their durability and tactile feedback, but even the most reliable devices can experience malfunctions over time. Fortunately, with a basic understanding of the keyboard's components and the right tools at your disposal, you can effectively address a broken switch without having to replace the entire keyboard.
A broken switch can manifest in various ways, such as keys failing to register inputs, producing inconsistent responses, or feeling mushy or unresponsive. These issues can significantly impede your typing or gaming experience, making it essential to address them promptly. By following the steps outlined in this guide, you can regain the seamless and satisfying keystrokes that mechanical keyboards are renowned for.
In the following sections, we will delve into the process of identifying and replacing a broken switch on a mechanical keyboard key. You will learn how to disassemble the keycap, pinpoint the faulty switch, and execute the replacement with precision. Additionally, we will cover the crucial step of testing the key to ensure that it functions as intended. With the guidance provided here, you can confidently tackle the task of repairing a broken switch, prolonging the lifespan of your beloved mechanical keyboard and saving on the cost of a full replacement. Let's embark on this journey to restore your keyboard to its former glory.
Understanding the Broken Switch
Before delving into the process of fixing a broken switch on a mechanical keyboard key, it is crucial to grasp the nature of this issue. The switch is a fundamental component responsible for registering keystrokes and transmitting signals to the computer. In a mechanical keyboard, each key is equipped with an individual switch, typically consisting of a housing, a stem, and metal contacts. When a key is pressed, the stem of the switch is actuated, causing the metal contacts to connect and complete the circuit, thus sending the input signal.
A broken switch can manifest in several ways, leading to a range of performance issues. One common issue is a non-responsive key, where pressing the key fails to produce any output on the computer screen. This can be attributed to a faulty connection within the switch, preventing the signal from being transmitted effectively. Additionally, a broken switch may result in inconsistent keystrokes, with the key registering inputs sporadically or producing duplicate characters. Furthermore, the tactile feedback of the key may feel different, becoming mushy or lacking the satisfying click or bump associated with mechanical switches.
Understanding the symptoms of a broken switch is crucial in diagnosing the issue and determining the appropriate course of action. By recognizing the telltale signs of a malfunctioning switch, you can effectively troubleshoot the problem and proceed with the necessary repairs. In the subsequent sections, we will explore the step-by-step process of identifying, replacing, and testing a broken switch, enabling you to restore the seamless functionality of your mechanical keyboard.
Tools and Materials Needed
Before embarking on the task of fixing a broken switch on a mechanical keyboard key, it is essential to gather the requisite tools and materials to ensure a smooth and efficient repair process. Here’s a comprehensive list of what you’ll need:
- Keycap Puller: This tool is essential for safely removing the keycap from the keyboard without causing damage. Keycap pullers come in various designs, including wire-style and ring-style pullers, and are specifically designed for mechanical keyboards.
- Tweezers: Precision tweezers are invaluable for handling small components and navigating the intricate mechanisms of the keyboard switch. They aid in safely extracting the broken switch and inserting the replacement.
- Replacement Switch: Acquire a new switch that is compatible with your mechanical keyboard model. It is crucial to ensure that the replacement switch matches the specifications of the original switch to guarantee seamless integration.
- Soldering Iron and Solder: In cases where the broken switch is soldered to the keyboard’s circuit board, a soldering iron and solder are necessary for desoldering the old switch and soldering the replacement in place.
- Desoldering Pump or Solder Wick: If the broken switch is soldered, a desoldering pump or solder wick is essential for removing the old solder and facilitating the replacement process.
- Work Surface and Lighting: Prepare a well-lit and stable work surface to carry out the repair. Adequate lighting is crucial for precision work, and a stable surface ensures the safety of the keyboard and components.
- Cotton Swabs and Isopropyl Alcohol: These items are useful for cleaning the area around the switch and removing any debris or residue that may affect the keyboard’s performance.
- Optional: Lubricant: If the broken switch has affected the tactile feel of the key, a specialized keyboard switch lubricant can be used to restore the smooth and responsive action of the switch.
By ensuring that you have these tools and materials at your disposal, you will be well-prepared to address the broken switch on your mechanical keyboard key effectively. In the subsequent sections, we will proceed with the step-by-step process of removing the keycap, identifying the broken switch, replacing it, and testing the key to restore optimal functionality to your keyboard.
Removing the Keycap
Before addressing the broken switch on a mechanical keyboard key, the initial step involves removing the keycap to access the underlying switch. This process requires delicacy and precision to prevent damage to the keycap or the keyboard itself. The following steps outline the procedure for safely removing the keycap:
- Assess the Keycap Mounting: Mechanical keyboards feature different types of keycap mounting mechanisms, such as Cherry MX, Topre, or Alps. Determine the specific mounting style of your keyboard, as this will influence the method of keycap removal.
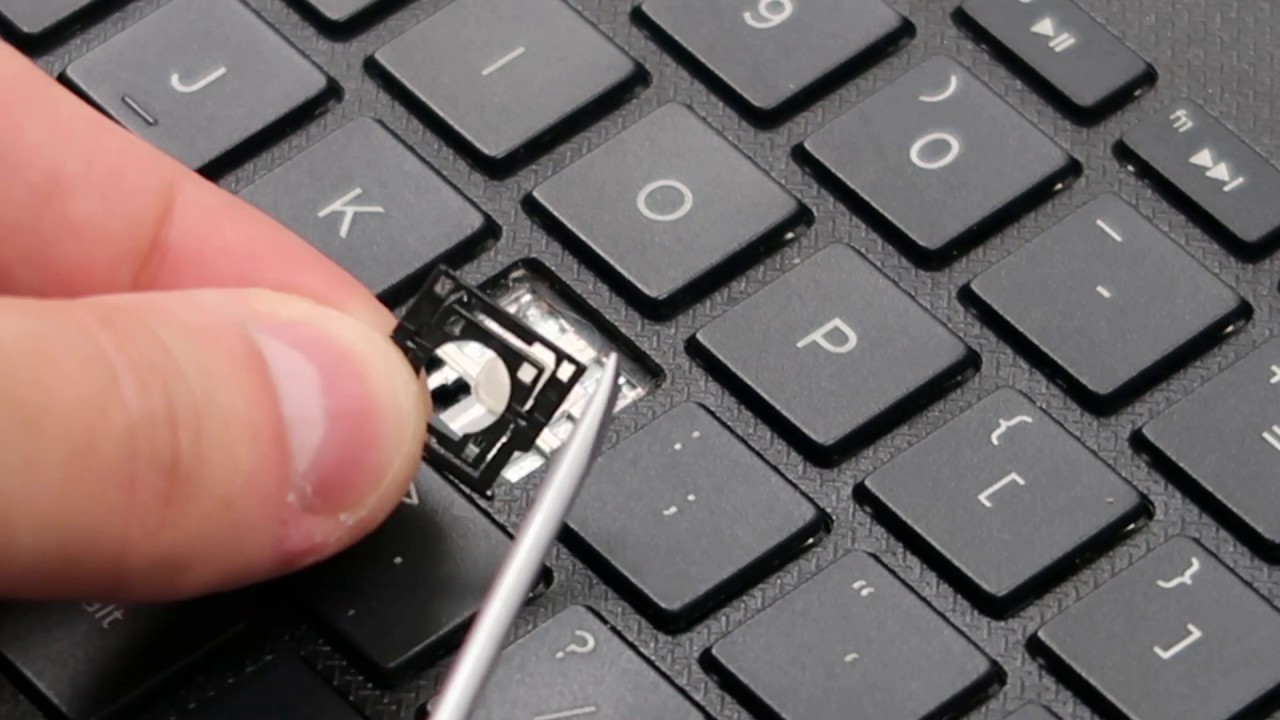
- Use a Keycap Puller: Employ a keycap puller designed for your keyboard’s mounting style. Insert the keycap puller’s prongs or rings around the base of the keycap, ensuring a secure grip without applying excessive force.
- Apply Even Pressure: Gently and evenly pull upwards on the keycap puller to disengage the keycap from the switch and its stabilizers. Avoid tilting or twisting the keycap, as this can lead to damage or breakage.
- Inspect and Store the Keycap: Upon successful removal, carefully examine the keycap and the switch beneath it for any debris or signs of damage. Store the keycap in a safe location to prevent misplacement or damage during the repair process.
By meticulously following these steps, you can safely remove the keycap from your mechanical keyboard key, paving the way for the subsequent tasks of identifying and replacing the broken switch. With the keycap removed, you gain access to the intricate components of the switch, allowing for a thorough assessment and targeted repairs. In the following sections, we will proceed with the process of identifying the broken switch and executing the replacement, ultimately restoring the seamless functionality of your keyboard.
Identifying the Broken Switch
Once the keycap has been safely removed, the next critical step in addressing a broken switch on a mechanical keyboard key is to identify the specific switch that requires replacement. The following guidelines will aid you in pinpointing the faulty switch:
- Visual Inspection: Carefully examine the exposed switches on the keyboard, paying close attention to any irregularities such as visible damage, debris, or discoloration. These visual cues can indicate a malfunctioning switch that requires attention.
- Test for Responsiveness: With the keycap removed, lightly press on the stem of each switch using your fingers or a pair of tweezers. Observe the response of the switch and take note of any keys that feel mushy, unresponsive, or produce inconsistent tactile feedback. These symptoms can signify a broken switch.
- Keystroke Testing: Connect the keyboard to a computer and perform a comprehensive test of each key’s functionality. Take note of any keys that fail to register inputs, register duplicate inputs, or exhibit erratic behavior. These anomalies can signal the presence of a broken switch.
- Continuity Testing (Optional): If you possess a multimeter or continuity tester, you can conduct a continuity test on the suspected switches to verify their electrical connectivity. A lack of continuity or irregular readings may indicate a defective switch.
By systematically assessing the switches based on visual cues, tactile feedback, and electrical responsiveness, you can effectively identify the broken switch that requires replacement. Once the faulty switch has been pinpointed, you can proceed with the process of replacing it with a new, fully functional switch, thereby restoring the optimal performance of your mechanical keyboard. In the subsequent sections, we will guide you through the replacement process and the essential testing of the key to ensure its seamless functionality.
Replacing the Broken Switch
Having identified the faulty switch on your mechanical keyboard, the next crucial step involves replacing the broken switch with a new one to restore the key’s functionality. The following steps outline the process of replacing the broken switch:
- Obtain the Replacement Switch: Ensure that you have a compatible replacement switch that matches the specifications of the original switch. This is essential to guarantee seamless integration and optimal performance.
- Desoldering (If Applicable): If the broken switch is soldered to the keyboard’s circuit board, utilize a soldering iron and desoldering pump or solder wick to carefully remove the old switch and clean the solder pads. Exercise caution to avoid damaging the circuit board or adjacent components.
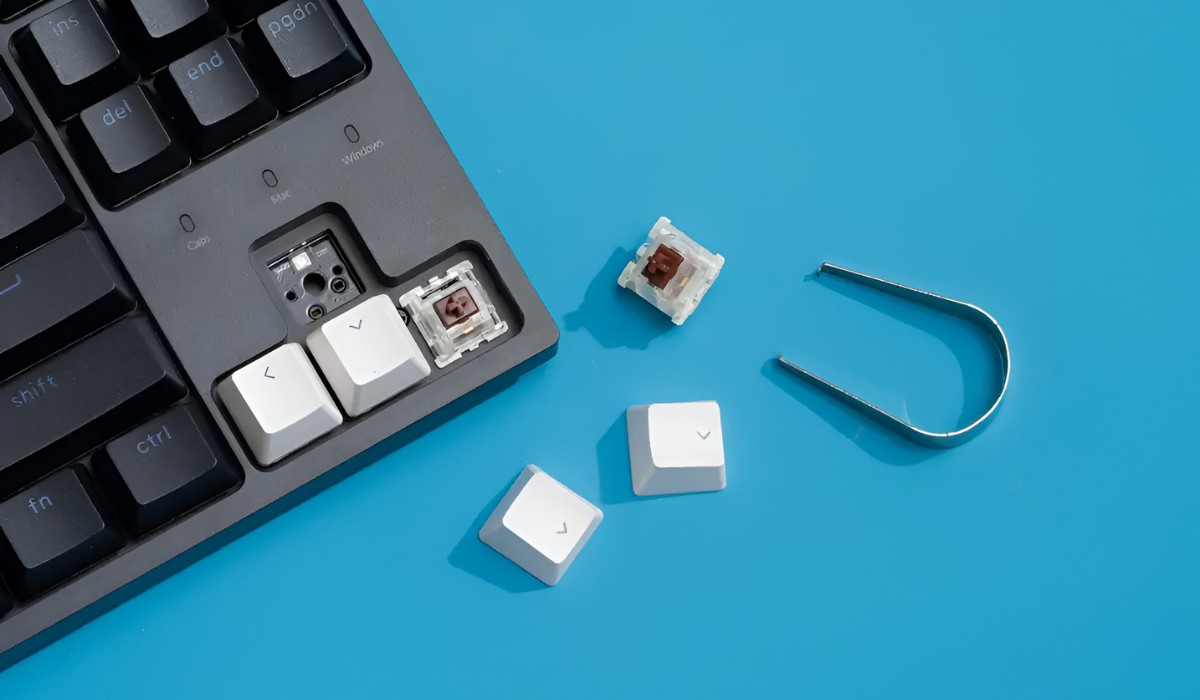
- Inserting the New Switch: Position the new switch into the designated slot on the keyboard, aligning it properly with the corresponding contacts and ensuring a secure fit within the housing. Exercise care to prevent bending or damaging the switch’s delicate components.
- Soldering the New Switch (If Applicable): If the replacement switch requires soldering, carefully solder the switch’s contacts to the designated pads on the keyboard’s circuit board. Apply the solder with precision and avoid creating solder bridges or cold joints that can impede electrical connectivity.
- Testing the Connectivity: Once the new switch is in place, perform a thorough test of the key’s connectivity and responsiveness. Verify that the switch registers inputs consistently and transmits signals effectively, ensuring that the replacement has been executed successfully.
By following these steps with precision and attention to detail, you can effectively replace the broken switch on your mechanical keyboard key, thereby rectifying the performance issues and restoring the seamless functionality of the key. The meticulous execution of the replacement process is pivotal in ensuring that the key operates reliably and delivers the tactile feedback characteristic of a well-maintained mechanical keyboard. In the subsequent section, we will proceed with the essential testing of the key to confirm its optimal functionality.
Testing the Key
Following the replacement of the broken switch on your mechanical keyboard key, it is imperative to conduct a comprehensive testing process to ensure that the key operates seamlessly and delivers the expected performance. The testing phase involves the following steps:
- Keystroke Testing: Press the key repeatedly to assess its responsiveness and tactile feedback. Verify that the key registers inputs consistently and produces the expected keystrokes without any delays or inconsistencies.
- Functional Testing: Connect the keyboard to a computer and perform a series of functional tests, including typing sentences, executing key combinations, and engaging in gaming activities if applicable. Evaluate the key’s performance across various applications to confirm its reliability and accuracy.
- Stress Testing (Optional): If feasible, subject the repaired key to a stress test involving prolonged and intensive usage. This can involve extensive typing or gaming sessions to gauge the durability and longevity of the repaired switch under demanding conditions.
- Feedback Assessment: Pay attention to the tactile feedback and acoustics produced by the repaired key. Ensure that the key delivers the characteristic tactile feel and audible feedback associated with mechanical switches, indicating a successful repair.
By meticulously conducting these tests, you can ascertain the effectiveness of the switch replacement and confirm that the repaired key operates optimally across various usage scenarios. This comprehensive testing phase is essential in validating the success of the repair process and ensuring that the key meets the performance standards expected of a well-maintained mechanical keyboard. In the subsequent section, we will proceed with the reassembly of the keycap, culminating in the restoration of your keyboard to its optimal state.
Reassembling the Keycap
With the repaired switch tested and confirmed to be fully functional, the final step in the process of fixing a broken switch on a mechanical keyboard key involves reassembling the keycap onto the switch. This step requires precision and care to ensure that the keycap is securely and correctly positioned, allowing for seamless and reliable operation. The reassembly process comprises the following steps:
- Aligning the Keycap: Position the keycap over the repaired switch, ensuring that it aligns with the switch stem and stabilizers. Take care to orient the keycap correctly to match its original position and alignment on the keyboard.
- Even Pressure Application: Apply even pressure to the keycap, pressing downwards to engage the switch and its stabilizers. Avoid exerting excessive force or tilting the keycap, as this can lead to misalignment or damage to the switch.
- Tactile Feedback Verification: Upon reassembly, test the keycap to ensure that it delivers the expected tactile feedback characteristic of the mechanical keyboard’s switches. Verify that the keycap produces the satisfying click or bump associated with its original operation.
- Functional Testing: Perform a final round of functional testing to confirm that the reassembled keycap operates seamlessly and registers inputs reliably. Execute typing exercises and application-specific tasks to validate the key’s performance.
By meticulously following these steps, you can successfully reassemble the keycap onto the repaired switch, culminating in the restoration of your mechanical keyboard key to its optimal state. The completion of this reassembly process signifies the successful resolution of the broken switch issue, allowing you to resume using your keyboard with confidence in its reliable performance. With the keycap securely in place and the switch operating seamlessly, your mechanical keyboard is once again ready to deliver the satisfying keystrokes and tactile feedback that enthusiasts cherish.
Conclusion
Embarking on the journey to fix a broken switch on a mechanical keyboard key has equipped you with the knowledge and skills necessary to address this common issue effectively. By understanding the components of the keyboard, gathering the essential tools and materials, and following a systematic approach, you have successfully navigated the process of identifying, replacing, and testing the broken switch, ultimately restoring the seamless functionality of your keyboard.
Throughout this repair process, you have gained insights into the intricate mechanisms of mechanical keyboards, honed your troubleshooting abilities, and developed proficiency in handling delicate components with precision. The careful removal of the keycap, identification of the faulty switch, and meticulous replacement process have culminated in the successful restoration of your keyboard’s optimal performance.
With the keycap securely reassembled and the repaired switch operating reliably, your mechanical keyboard is once again primed to deliver the satisfying tactile feedback and dependable keystrokes that enhance your typing and gaming experiences. By undertaking this repair journey, you have not only saved on the cost of a new keyboard but also deepened your understanding of this integral peripheral, empowering you to address similar issues with confidence in the future.
As you continue to enjoy the responsive and reliable performance of your mechanical keyboard, remember that the knowledge and skills acquired in this process serve as valuable assets, enabling you to maintain and troubleshoot your keyboard effectively. Embrace the satisfaction of having revitalized your keyboard through your own efforts, and carry forth this newfound expertise as you navigate the realm of mechanical keyboards with confidence and proficiency.