Introduction
When it comes to gaming, video editing, or graphic-intensive tasks on your Windows 8 computer, having a powerful and capable graphics card is crucial. Your graphics card is responsible for rendering images, videos, and games, and its performance can significantly impact your overall computing experience.
Being aware of the type of graphics card installed on your Windows 8 system is important, as it can help you identify compatibility issues, determine if an upgrade is necessary, and troubleshoot any performance-related problems. Fortunately, Windows 8 provides several methods to find out what graphics card you have. In this article, we’ll explore various ways to check the graphics card on your Windows 8 computer.
By following the methods outlined in this article, you can easily determine the manufacturer, model, and other important details about your graphics card. Whether you need this information for driver updates, software compatibility, or simply satisfying your curiosity, let’s delve into the different techniques you can use to find out what your graphics card is on Windows 8.
Checking the Graphics Card using Device Manager
The Device Manager utility in Windows 8 is a built-in tool that allows you to view and manage the hardware devices installed on your computer. This includes your graphics card. Here’s how you can use Device Manager to check your graphics card:
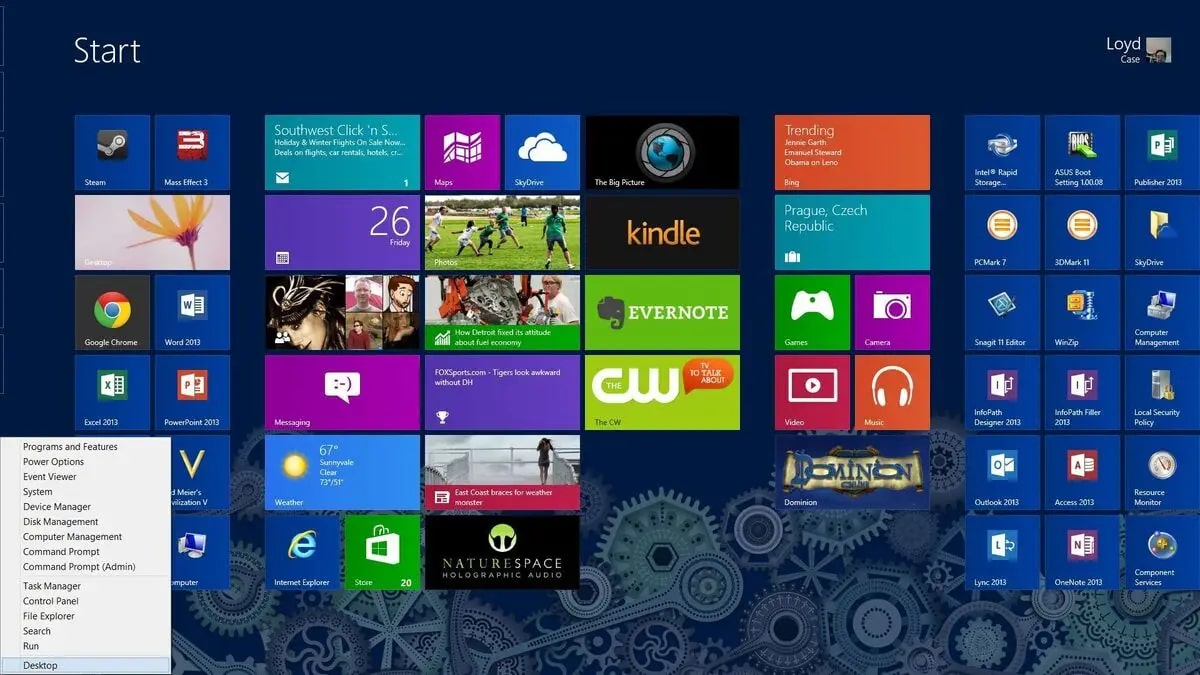
- Press the Windows key + X on your keyboard, then select “Device Manager” from the menu that appears.
- In the Device Manager window, look for the “Display adapters” category and click on the arrow icon to expand it.
- You will see the name of your graphics card listed under the Display adapters category. It may include the manufacturer’s name and the model number.
- To view more details about your graphics card, right-click on its name and select “Properties”. In the Properties window, you can find additional information such as the driver version, device status, and more.
Device Manager provides a quick and straightforward way to check your graphics card. However, please note that the information displayed may not be the most up-to-date. For the most accurate details, you may want to consider using other methods outlined in this article.
Checking the Graphics Card using System Information
Another method to find out what graphics card you have on your Windows 8 system is to use the System Information utility. This tool provides detailed information about your computer’s hardware and software configuration, including the graphics card. Here’s how you can check your graphics card using System Information:
- Press the Windows key + R on your keyboard to open the Run dialog box.
- Type “msinfo32” (without the quotes) and press Enter.
- The System Information window will open. In the left-hand pane, expand the “Components” category, and then click on “Display”.
- In the right-hand pane, you’ll see information about your graphics card under the “Adapter Description” and “Adapter RAM” sections. This will include details such as the manufacturer, model, and the amount of dedicated video memory.
Using the System Information utility provides a more comprehensive view of your graphics card, including specifics about the amount of video memory. This can be helpful when determining whether your graphics card meets the requirements of certain software or games.
Keep in mind that System Information may display technical details that might not be immediately understandable to the average user. If you need to share this information with technical support or for troubleshooting purposes, it can be valuable.
Checking the Graphics Card using DirectX Diagnostic Tool
The DirectX Diagnostic Tool is a utility available in Windows 8 that provides detailed information about the DirectX components installed on your computer, including your graphics card. Here’s how you can check your graphics card using the DirectX Diagnostic Tool:
- Press the Windows key + R on your keyboard to open the Run dialog box.
- Type “dxdiag” (without the quotes) and press Enter.
- The DirectX Diagnostic Tool window will open. It will display information about your system, including the “System” and “Display” tabs.
- Click on the “Display” tab to view information specifically related to your graphics card.
- In the “Device” section, you’ll find details about your graphics card, including the device name, manufacturer, chip type, and driver version.
- Under the “Drivers” section, you can also see information about the DirectX version installed on your system and whether it’s up to date.
The DirectX Diagnostic Tool provides a comprehensive overview of your graphics card and related DirectX components. It also offers valuable insights into the driver version and DirectX compatibility.
This information can be useful when troubleshooting graphics-related issues, as it allows you to ensure that your graphics drivers and DirectX components are up to date and compatible with the software or games you’re using.
Checking the Graphics Card using NVIDIA Control Panel
If you have an NVIDIA graphics card installed on your Windows 8 system, you can use the NVIDIA Control Panel to check the details of your graphics card. The NVIDIA Control Panel provides advanced options for optimizing and customizing your graphics settings. Here’s how you can check your graphics card using the NVIDIA Control Panel:
- Right-click on an empty area of your desktop to open the context menu.
- Select “NVIDIA Control Panel” from the menu.
- In the NVIDIA Control Panel window, click on the “System Information” tab located on the bottom left corner of the window.
- In the “Details” section, you’ll find information about your graphics card, including the name, type, and the amount of memory.
- Additionally, you can click on the “Display” tab to access more specific information and settings related to your graphics card and display configuration.
The NVIDIA Control Panel offers a user-friendly interface to check and manage your NVIDIA graphics card. It not only provides information about your graphics card but also enables you to adjust various graphics settings to enhance performance and customize your visual experience.
By exploring the NVIDIA Control Panel, you can take full advantage of your NVIDIA graphics card’s capabilities and ensure that it is properly configured to suit your needs.
Checking the Graphics Card using AMD Radeon Settings
If you have an AMD Radeon graphics card installed on your Windows 8 system, you can use the AMD Radeon Settings utility to check the details of your graphics card. The AMD Radeon Settings provides a centralized control panel for managing and optimizing your graphics settings. Here’s how you can check your graphics card using AMD Radeon Settings:
- Right-click on an empty area of your desktop to open the context menu.
- Select “AMD Radeon Settings” from the menu.
- In the AMD Radeon Settings window, click on the “System” tab located at the bottom right corner of the window.
- In the “System” tab, you’ll find information about your graphics card under the “Hardware” section. This includes details such as the name, type, and the amount of graphics memory.
- To access more advanced settings and options specific to your graphics card, you can explore the other tabs in the AMD Radeon Settings.
The AMD Radeon Settings utility offers a straightforward way to check and manage your AMD Radeon graphics card. Apart from providing information about your graphics card, it allows you to adjust various settings to enhance performance and customize your visual experience for gaming, video playback, and other graphics-intensive tasks.
By utilizing the AMD Radeon Settings, you can optimize your graphics card’s performance and ensure that it is properly configured to suit your needs and preferences.
Checking the Graphics Card using Intel Graphics Control Panel
If you have an Intel integrated graphics card on your Windows 8 system, you can use the Intel Graphics Control Panel to check the details of your graphics card. The Intel Graphics Control Panel provides a centralized interface for configuring and optimizing your graphics settings. Here’s how you can check your graphics card using the Intel Graphics Control Panel:
- Right-click on an empty area of your desktop to open the context menu.
- Select “Graphics Properties” or “Graphics Options”. The exact option may vary depending on your system.
- In the Intel Graphics Control Panel window, navigate to the “Options and Support” or similar section.
- Look for the “Information Center” or “System Information” option and click on it.
- You will find information about your graphics card, including the name, chipset, and the current driver version.
The Intel Graphics Control Panel provides a convenient way to check and manage your Intel integrated graphics card. While the options may vary depending on your specific system, you can use the Information Center or similar sections to access detailed information about your graphics card.
Using the Intel Graphics Control Panel, you can customize and optimize your graphics settings for smoother visuals and better performance. It allows you to adjust various options such as display resolution, color settings, and power management to suit your preferences.
By leveraging the capabilities of the Intel Graphics Control Panel, you can ensure that your Intel integrated graphics card is running optimally and take advantage of its features to enhance your computing experience.
Conclusion
Knowing what type of graphics card you have on your Windows 8 computer is essential for various reasons, including compatibility, troubleshooting, and performance optimization. Luckily, Windows 8 provides several methods to check your graphics card, each with its own benefits.
Starting with the Device Manager, you can quickly and easily identify your graphics card by expanding the “Display adapters” category. However, for more comprehensive information, you can turn to tools like the System Information utility, which provides detailed hardware and software configurations.
The DirectX Diagnostic Tool offers a dedicated view for DirectX components, including your graphics card, along with information about DirectX versions and compatibility. If you have an NVIDIA graphics card, the NVIDIA Control Panel enables you to not only check your graphics card but also fine-tune advanced settings for optimal performance.
Similarly, if you have an AMD Radeon graphics card, the AMD Radeon Settings utility gives you centralized control over your graphics card settings, allowing for customization and performance optimizations. Lastly, Intel integrated graphics card users can utilize the Intel Graphics Control Panel to check details and fine-tune settings for their graphics card.
By exploring these different methods, you can easily find out what graphics card you have on your Windows 8 system and gather key information such as the manufacturer, model, and driver version. Armed with this knowledge, you can ensure compatibility with software and games, troubleshoot issues, and make informed decisions about hardware upgrades.
Remember, staying up to date with the latest drivers and optimizing your graphics settings can significantly enhance your overall computing experience, whether you’re gaming, video editing, or working with graphic-intensive applications.


