Introduction
Have you ever wondered about the unique identifier that allows your computer to connect to the internet? That identifier is known as the IP address, short for Internet Protocol address. In simple terms, it serves as a digital address for your computer or network, enabling communication with other devices and services on the internet. Knowing your IP address can be helpful for troubleshooting network issues, setting up gaming servers, or accessing your home network remotely.
In this article, we will explore different methods to find your IP address on a Windows 10 operating system. Whether you prefer using the command prompt, control panel, settings app, or network and sharing center, we’ve got you covered.
To ensure a smooth and seamless experience, we will walk you through each method step-by-step, explaining the necessary actions and highlighting important details along the way. Whether you are a tech-savvy individual or a beginner, you’ll find these methods easy to follow and effective in revealing your IP address.
Ready to uncover your IP address? Let’s dive into the different methods available on Windows 10 to help you find this valuable piece of information.
Method 1: Using the Command Prompt
If you are comfortable using the command line interface, the Command Prompt method allows you to quickly retrieve your IP address. Here’s how to do it:
- Press the Windows key on your keyboard or click on the Start button.
- Type ‘Command Prompt’ in the search bar and click on the Command Prompt app from the search results.
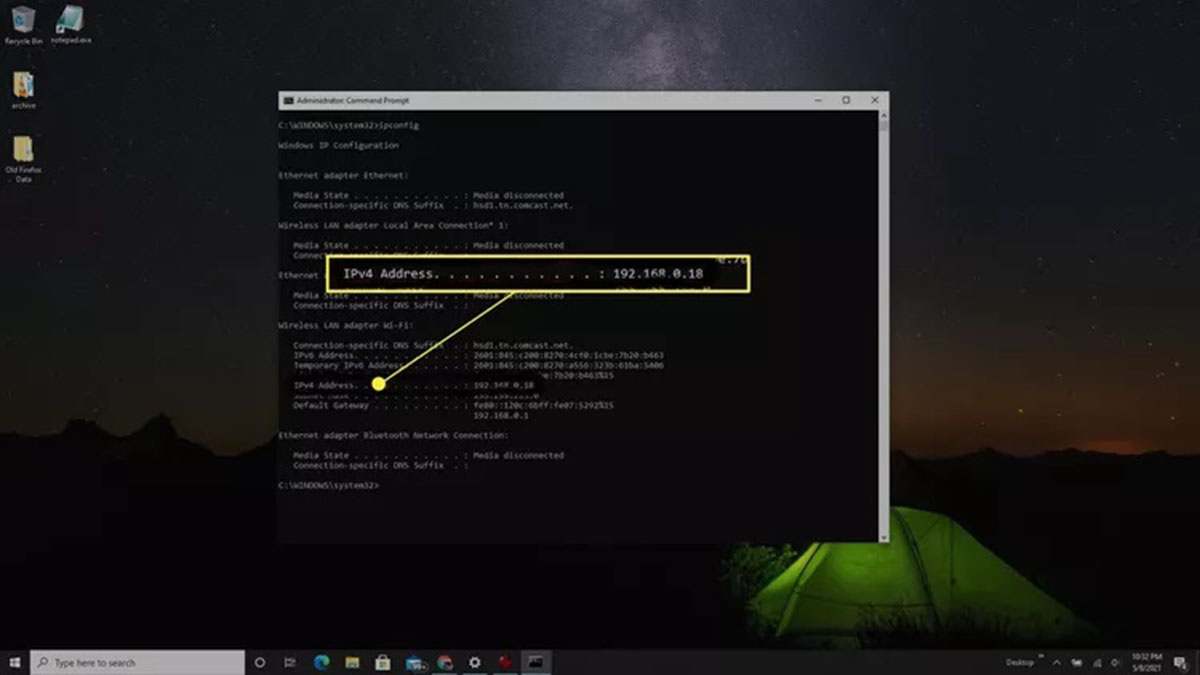
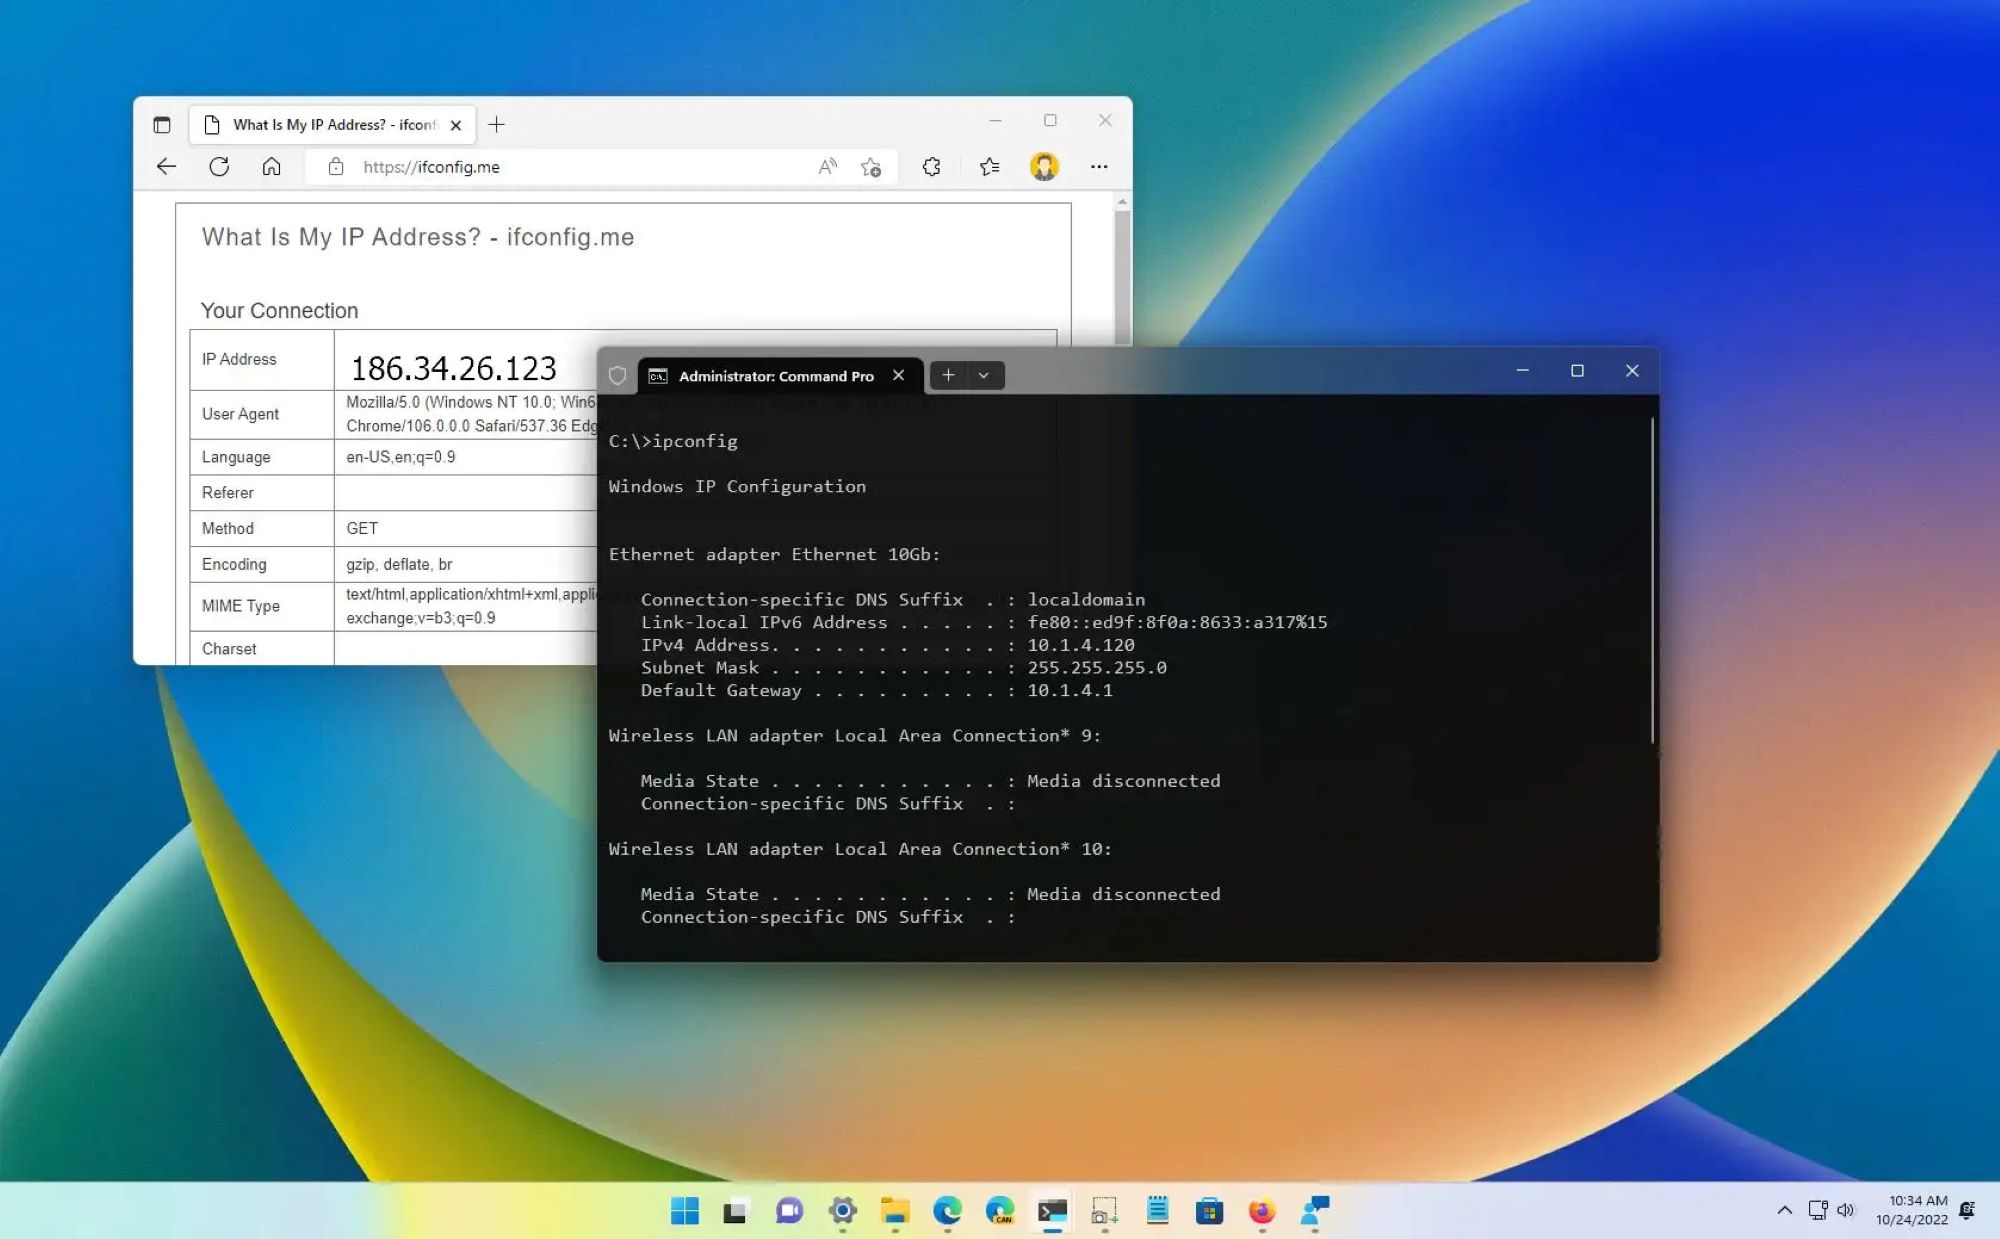
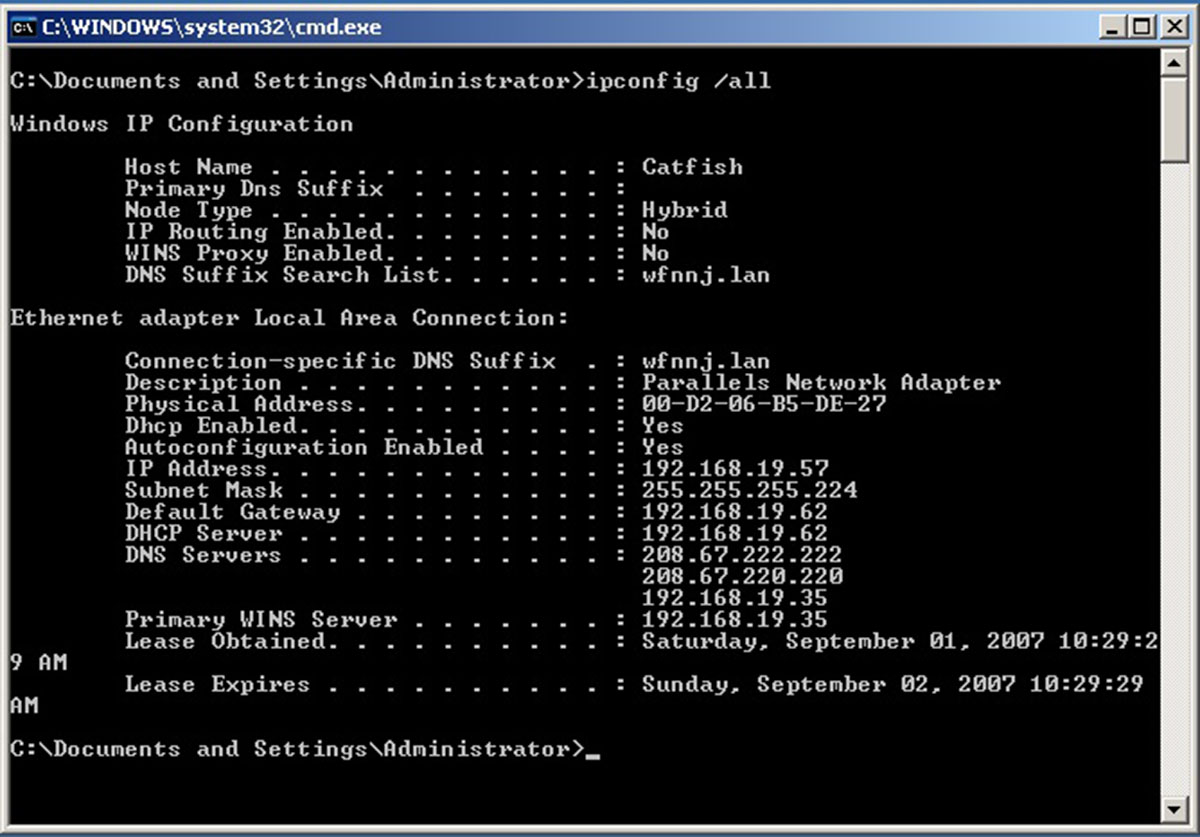
- Once the Command Prompt window opens, type ‘ipconfig’ and press Enter.
- A list of network configurations will appear. Look for the ‘IPv4 Address’ under the adapter you are currently using. It will be displayed in the format xxx.xxx.xxx.xxx.
- This is your IP address. Make a note of it or use it for any required tasks.
It is important to note that if you are connected to a router, the IP address displayed will be your local IP address. If you want to find your public IP address, you can use online services like “What Is My IP” to obtain this information.
The Command Prompt method provides a quick and straightforward way to find your IP address on Windows 10. However, if you prefer a more graphical approach, there are other methods available. Let’s explore the next method using the Control Panel.
Method 2: Using the Control Panel
If you prefer a more user-friendly approach, you can utilize the Control Panel to find your IP address on Windows 10. Here’s how to do it:
- Open the Start menu by clicking on the Windows icon in the bottom-left corner of your screen.
- Search for ‘Control Panel’ and click on the corresponding result to open the Control Panel.
- In the Control Panel window, select the ‘Network and Internet’ category.
- Click on ‘Network and Sharing Center’.
- In the Network and Sharing Center, look for the ‘Connections’ section and click on the name of your network connection. This could be labeled as ‘Wi-Fi’ or ‘Ethernet’ depending on your setup.
- A new window will appear. Click on the ‘Details’ button.
- A list of information will be shown, including your IP address under the ‘IPv4 Address’ or ‘IPv6 Address’ field.
- Note down your IP address for future reference or any required tasks.
Using the Control Panel method, you can easily find your IP address without the need for technical knowledge or command line operations. It provides a graphical interface to navigate through the settings and access your network information. However, if you prefer a more modern approach, our next method using the Settings app will be of interest to you.
Method 3: Using the Settings App
If you prefer a more modern approach, using the Settings app in Windows 10 provides an intuitive way to find your IP address. Follow the steps below:
- Click on the Start button in the bottom-left corner of your screen, and then click on the Settings icon (shaped like a gear).
- In the Settings window, select the ‘Network & Internet’ option.
- In the left-hand sidebar, click on the ‘Status’ tab.
- Scroll down and find the ‘View your network properties’ link. Click on it.
- A new page will open, displaying your network information.
- Under the ‘Properties’ section, locate the ‘IPv4 address’ or ‘IPv6 address’ field. Your IP address will be listed next to it.
- Note down your IP address for future use or any required tasks.
The Settings app offers a modern and user-friendly interface to access various system settings, including network-related information. Using this method, you can effortlessly find your IP address in just a few steps without the need for command line operations or navigating through the Control Panel. However, if you prefer a more comprehensive overview of your network connections, our next method using the Network and Sharing Center might be more suitable for you.
Method 4: Using the Network and Sharing Center
The Network and Sharing Center method provides a comprehensive overview of your network connections, making it a useful option for finding your IP address on Windows 10. Follow the steps below:
- Click on the network icon in the system tray located at the bottom-right corner of your screen. It is usually represented by an icon with Wi-Fi or Ethernet signals.
- A pop-up menu will appear. Click on the ‘Network and Sharing Center’ option.
- In the Network and Sharing Center window, you will see a summary of your network connections. Look for your active connection labeled as ‘Connections’ or ‘Access type’.
- Click on the active connection to open a new window.
- In the new window, click on the ‘Details’ button.
- A list of information will be displayed, including your IP address listed as ‘IPv4 Address’ or ‘IPv6 Address’.
- Note down your IP address for future reference or any required tasks.
The Network and Sharing Center method offers a more detailed view of your network connections, allowing you to access your IP address and other network-related information with ease. It provides a visual representation of your network status and simplifies the process of finding your IP address. Now that you have learned various methods to find your IP address on Windows 10, you can choose the one that suits your preferences and technical expertise.
Conclusion
Knowing your IP address is essential for various networking tasks, troubleshooting issues, or accessing your network remotely. In this article, we explored four different methods to find your IP address on Windows 10.
Using the Command Prompt method allows for a quick and straightforward way to retrieve your IP address using the command line interface. The Control Panel method provides a user-friendly approach, guiding you through the network settings to find your IP address. The Settings app offers a modern and intuitive interface to access your network properties and locate your IP address. Finally, the Network and Sharing Center method provides a comprehensive overview of your network connections, making it ideal for accessing your IP address and other network-related information.
By following the step-by-step instructions in this article, you can easily find your IP address on Windows 10, regardless of your technical expertise. Whether you prefer the command line, graphical interfaces, or detailed network views, there is a method that suits your needs.
Remember that your IP address may differ depending on your network configuration and whether you are connected to a router. If you need to access your public IP address, online services can provide this information for you.
Now that you have learned how to find your IP address, you can confidently perform network-related tasks or troubleshoot connection issues on your Windows 10 system. So go ahead, and make the most of your network with your newfound IP knowledge!