Introduction
When troubleshooting network issues or setting up network connections, one of the first things you might be asked to provide is the IP address of your Windows 7 computer. The IP address is a unique identifier that allows devices to communicate on a network. Knowing your IP address can be helpful for various reasons, such as configuring network settings, diagnosing connectivity problems, or identifying your computer on a local network.
Fortunately, finding the IP address on a Windows 7 computer is a straightforward process. In this article, we will explore different methods to easily locate your IP address in Windows 7.
We will cover four methods to find the IP address on Windows 7: using the Command Prompt, Control Panel, Network and Sharing Center, and Windows PowerShell. These methods offer flexibility and cater to users with varying technical skills, so you can choose the one that suits you best.
Whether you’re a tech-savvy individual troubleshooting network issues or a novice user trying to set up a new connection, this article will guide you through the step-by-step process of finding your IP address on a Windows 7 computer. So, let’s get started!
Method 1: Using the Command Prompt
If you’re comfortable with the command line interface, using the Command Prompt is a quick and efficient way to find your IP address on Windows 7.
Follow these steps to find your IP address using the Command Prompt:
- Open the Start menu by clicking on the Windows logo located at the bottom left corner of your screen.
- Type “cmd” in the search bar and press Enter to open the Command Prompt.
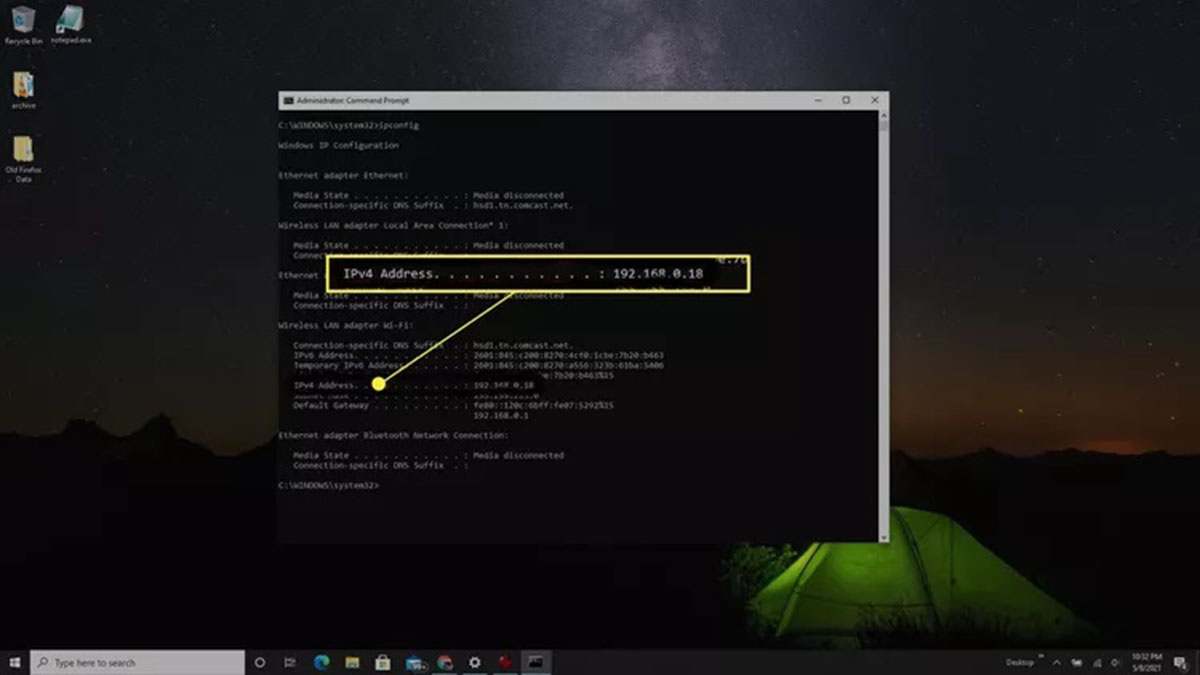
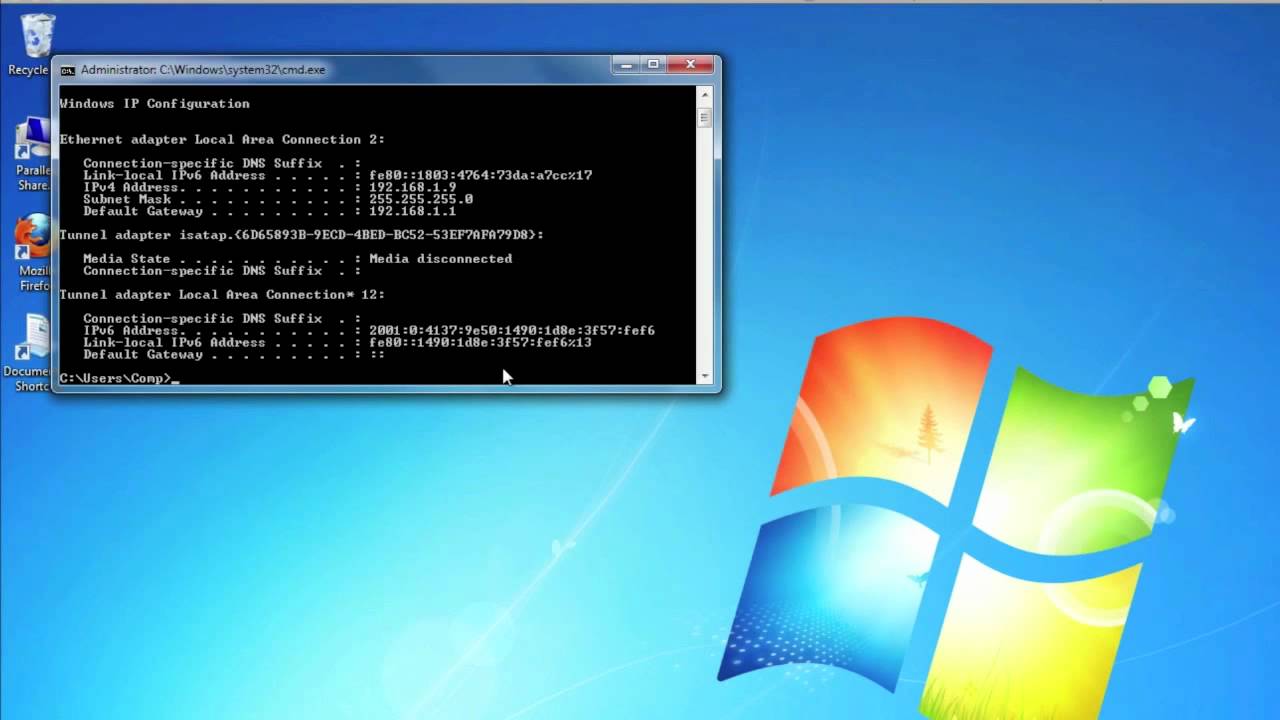
- In the Command Prompt window, type “ipconfig” and press Enter. This command displays detailed information about your network connections.
- Look for the “IPv4 Address” under the network adapter you are currently connected to. The value next to it is your IP address.
- Note that if your computer is connected to multiple networks, you may have multiple IP addresses listed. Make sure to identify the IP address corresponding to the network you are interested in.
Using the Command Prompt provides you with precise information about your IP address and other network settings. It’s a powerful tool favored by advanced users and network administrators.
Once you have located your IP address, you can note it down or use it for configuring network connections or troubleshooting network-related issues.
Now that you know how to find your IP address using the Command Prompt, let’s move on to the next method to explore an alternative way in Windows 7.
Method 2: Using the Control Panel
If you prefer a graphical user interface (GUI) approach instead of the command line, using the Control Panel in Windows 7 is an excellent option to find your IP address.
Follow these steps to find your IP address using the Control Panel:
- Click on the Start menu located at the bottom left corner of your screen.
- Select “Control Panel” from the menu to open the Control Panel window.
- In the Control Panel, navigate to the “Network and Internet” category and click on “Network and Sharing Center.”
- In the Network and Sharing Center, click on the active network connection name next to “Connections.”
- A new pop-up window will appear. Click on the “Details” button.
In the Details window, you will find several pieces of information related to your network connection, including your IP address. Look for the “IPv4 Address” field, and the value next to it is your IP address.
If you are connected to multiple networks, make sure to select the correct network connection to view the corresponding IP address.
Using the Control Panel offers a user-friendly interface and is suitable for those who prefer a more visual approach. This method allows you to quickly find your IP address and other network-related information without the need for command-line instructions.
Now that you have learned how to find your IP address using the Control Panel, let’s move on to the next method to explore an alternative way in Windows 7.
Method 3: Using the Network and Sharing Center
The Network and Sharing Center in Windows 7 provides an intuitive way to find your IP address. This method is especially useful if you prefer a visual representation of your network connections.
Follow these steps to find your IP address using the Network and Sharing Center:
- Click on the network icon located in the lower-right corner of the taskbar. This icon may appear as a computer monitor or a Wi-Fi signal symbol, depending on your connection type.
- A pop-up menu will appear. Click on “Open Network and Sharing Center.”
- In the Network and Sharing Center window, you will see an overview of your network connections. Look for the “Connections” section and click on the active network connection name.
- A new window will open, displaying detailed information about your connection. Click on the “Details” button.
The Details window will show various network settings, including your IP address. Look for the “IPv4 Address” field, and the value next to it is your IP address.
Remember to choose the correct network connection if you are connected to multiple networks to view the corresponding IP address.
The Network and Sharing Center is a user-friendly method that provides an overview of your network connections and allows you to find your IP address easily. This approach is especially helpful for individuals who prefer navigating through visual interfaces.
Now that you have discovered how to find your IP address using the Network and Sharing Center, let’s explore the final method in Windows 7.
Method 4: Using the Windows PowerShell
If you’re comfortable with using the Windows PowerShell, you can find your IP address with just a few commands. PowerShell is a powerful scripting language and command-line shell that provides advanced system administration features.
Follow these steps to find your IP address using the Windows PowerShell:
- Open the Start menu by clicking on the Windows logo located at the bottom left corner of your screen.
- Type “PowerShell” in the search bar and press Enter to open the Windows PowerShell.
- In the PowerShell window, type the command “Get-NetIPAddress | Where-Object { $_.AddressFamily -eq ‘IPv4’ } | Select-Object -ExpandProperty IPAddress” and press Enter.
The PowerShell command will retrieve your IPv4 address and display it in the PowerShell window.
Using the Windows PowerShell provides a robust and efficient way to find your IP address. It allows you to customize your commands and perform advanced network-related tasks.
Now that you have learned how to find your IP address using the Windows PowerShell, you have explored four different methods in Windows 7. Choose the one that suits your preference and technical skills. Whether you prefer the simplicity of the Command Prompt, the graphical interface of the Control Panel and Network and Sharing Center, or the flexibility of the Windows PowerShell, you can easily find your IP address and handle various network-related tasks.
Conclusion
Locating your IP address in Windows 7 is a fundamental step when it comes to troubleshooting network issues or configuring network settings. By knowing your IP address, you can easily identify your computer on a network and diagnose connectivity problems.
In this article, we explored four different methods to find your IP address in Windows 7: using the Command Prompt, Control Panel, Network and Sharing Center, and Windows PowerShell. Each method offers its own advantages and caters to different preferences and technical abilities.
If you are comfortable with the command line interface, using the Command Prompt provides a quick and precise way to find your IP address. On the other hand, if you prefer a graphical user interface, the Control Panel and Network and Sharing Center offer intuitive ways to locate your IP address.
For advanced users and system administrators, the Windows PowerShell provides powerful scripting capabilities and flexibility for managing network settings.
Remember that the methods outlined in this article are specific to Windows 7. If you are using a different version of Windows, the steps may vary slightly.
Now that you have learned these methods, you can confidently find your IP address in Windows 7 and navigate through network troubleshooting with ease. Whether you’re a tech-savvy individual or a novice user, you have the tools to tackle network-related tasks and ensure smooth connectivity.
So, the next time you need to provide your IP address for network configuration or troubleshooting purposes, refer back to this article and choose the method that suits your needs. Happy networking!