Introduction
Welcome to the world of technology, where connectivity is key. In our increasingly connected world, knowing your IP address has become essential. Whether you’re troubleshooting network issues or setting up a new device, being able to find your IP address is a valuable skill.
An IP address, or Internet Protocol address, is a unique numerical identifier that is assigned to every device connected to a computer network. It serves two main purposes: to identify devices and to facilitate communication between them. Think of it as your device’s digital address in the vast network of the internet.
Understanding your IP address is crucial for a variety of reasons. Firstly, it enables devices to communicate with each other, allowing you to send and receive data. Whether you’re browsing the web, streaming videos, or sending emails, your IP address plays a vital role in establishing these connections.
Secondly, knowing your IP address is essential for troubleshooting network issues. If you’re experiencing slow internet speeds or connectivity problems, being able to locate your IP address is the first step in diagnosing the problem. It allows you to identify any conflicts or configuration issues that might be affecting your network.
Now that we understand the significance of knowing your IP address, let’s explore how you can find it. The process may vary depending on the device and operating system you’re using, so we’ll cover the steps for Windows, macOS, iOS, Android, and Linux.
What is an IP Address?
An IP address, short for Internet Protocol address, is a unique numerical identifier assigned to every device connected to a computer network. It serves as the device’s virtual “address” on the internet, allowing it to send and receive data.
IP addresses are essential for establishing communication between devices in a network. They act as the digital fingerprints that distinguish one device from another, ensuring that data packets are sent to the intended recipient.
An IP address consists of a series of four numbers separated by dots, such as “192.168.0.1”. Each number in the sequence can range from 0 to 255, providing a broad range of possible combinations. This allows for over four billion unique IP addresses, which should be sufficient for most networks.
There are two main types of IP addresses: IPv4 and IPv6. IPv4 addresses are the most common and have a 32-bit format, allowing for approximately 4.3 billion unique addresses. However, with the rapid growth of internet-connected devices, the pool of available IPv4 addresses is running out.
To address this issue, IPv6 was introduced. IPv6 addresses use a 128-bit format, providing an almost limitless supply of unique addresses. This ensures that the expanding number of devices can be connected to the internet without running out of available IP addresses.
IP addresses are not random; they are assigned by Internet Service Providers (ISPs) or network administrators. When a device connects to a network, it is allocated a unique IP address to identify itself and facilitate communication. This address can change over time, depending on the network configuration and assignment methods.
Understanding IP addresses is essential for troubleshooting network issues, configuring network settings, and ensuring secure communication. By knowing your IP address, you can identify and resolve conflicts or connectivity problems, allowing for a seamless online experience.
Why do you need to know your IP address?
Knowing your IP address has several practical benefits and is essential for various reasons. Let’s explore why it is important to be aware of your IP address:
1. Network Troubleshooting: If you’re experiencing connectivity issues or slow internet speeds, knowing your IP address is the first step in diagnosing the problem. By identifying your IP address, you can check for conflicts, network configuration issues, or firewall settings that may be affecting your connection.
2. Setting Up Devices: When setting up a new device on your network, such as a printer, gaming console, or smart home device, knowing your IP address is crucial. It allows you to configure the device to connect to your network correctly and ensure smooth communication with other devices.
3. Remote Access: If you want to access your home network or devices remotely, knowing your IP address is necessary. Whether you’re setting up remote desktop access or controlling your security cameras from a different location, your IP address is required to establish a secure connection.
4. Understanding Geolocation: Your IP address can reveal general information about your location. While it may not pinpoint your exact address, it can provide an idea of the region or city from where your device is connected. This information can be useful for localized services or when troubleshooting location-specific issues.
5. Internet Service Provider (ISP) Tracking: Knowing your IP address can help you monitor your internet usage and identify any suspicious activity. If you suspect unauthorized access to your network or excessive data consumption, checking your IP address can assist you in determining whether it matches your ISP’s records.
6. Security and Privacy: Understanding your IP address can help you take steps to enhance your online security and privacy. By being aware of your IP address, you can configure firewalls, set up VPNs, and implement other security measures to protect your network and personal data from potential threats.
7. Tech Support Assistance: When seeking technical support for network-related issues, knowing your IP address can provide valuable information to the support team. They can use your IP address to diagnose problems, guide you through troubleshooting steps, and offer specific solutions tailored to your network configuration.
Knowing your IP address ensures smooth network operation, helps you troubleshoot connectivity issues, and enhances your overall online experience. It empowers you with the knowledge needed to configure devices, protect your network, and troubleshoot any problems that arise.
How to find your IP address?
Finding your IP address is a straightforward process that varies slightly depending on the device and operating system you’re using. Here, we’ll outline the steps to find your IP address on Windows, macOS, iOS, Android, and Linux:
On Windows:
- Open the Start menu and type “cmd” in the search bar.
- Click on the Command Prompt result to open the command line interface.
- In the command prompt, type “ipconfig” and press Enter.
- Look for the “IPv4 Address” or “Default Gateway” under your network adapter. This will display your IP address.
On macOS:
- Click on the Apple menu in the top-left corner of the screen.
- Select “System Preferences” and click on “Network”.
- Choose the network connection you’re using (Ethernet, Wi-Fi, etc.) from the left sidebar.
- Your IP address will be displayed on the right side next to “IP Address”.
On iOS:
- Open the “Settings” app on your iPhone or iPad.
- Tap on “Wi-Fi” and find the network you are connected to.
- Tap on the “i” icon next to the network name.
- Your IP address will be displayed under “IP Address”.
On Android:
- Open the “Settings” app on your Android device.
- Tap on “Wi-Fi” or “Network & internet” depending on your device.
- Select the network you are connected to and tap on “Details” or “Advanced”.
- Your IP address will be listed under “IP address”.
On Linux:
- Open the Terminal.
- Enter the command “ifconfig” or “ip addr show” and press Enter.
- Look for the network adapter (eth0, wlan0, etc.) you are using.
- Your IP address will be displayed next to “inet” or “inet addr”.
By following these steps, you can easily find your IP address on various devices and operating systems. Remember that your IP address may change over time, so it’s always a good idea to check it periodically, especially when troubleshooting or setting up new devices on your network.
On Windows
Windows provides a simple way to find your IP address using the Command Prompt. To find your IP address on Windows, follow these steps:
- Open the Start menu by clicking on the Windows icon in the bottom-left corner of the screen.
- Type “cmd” in the search bar.
- Click on the “Command Prompt” result to launch the command line interface.
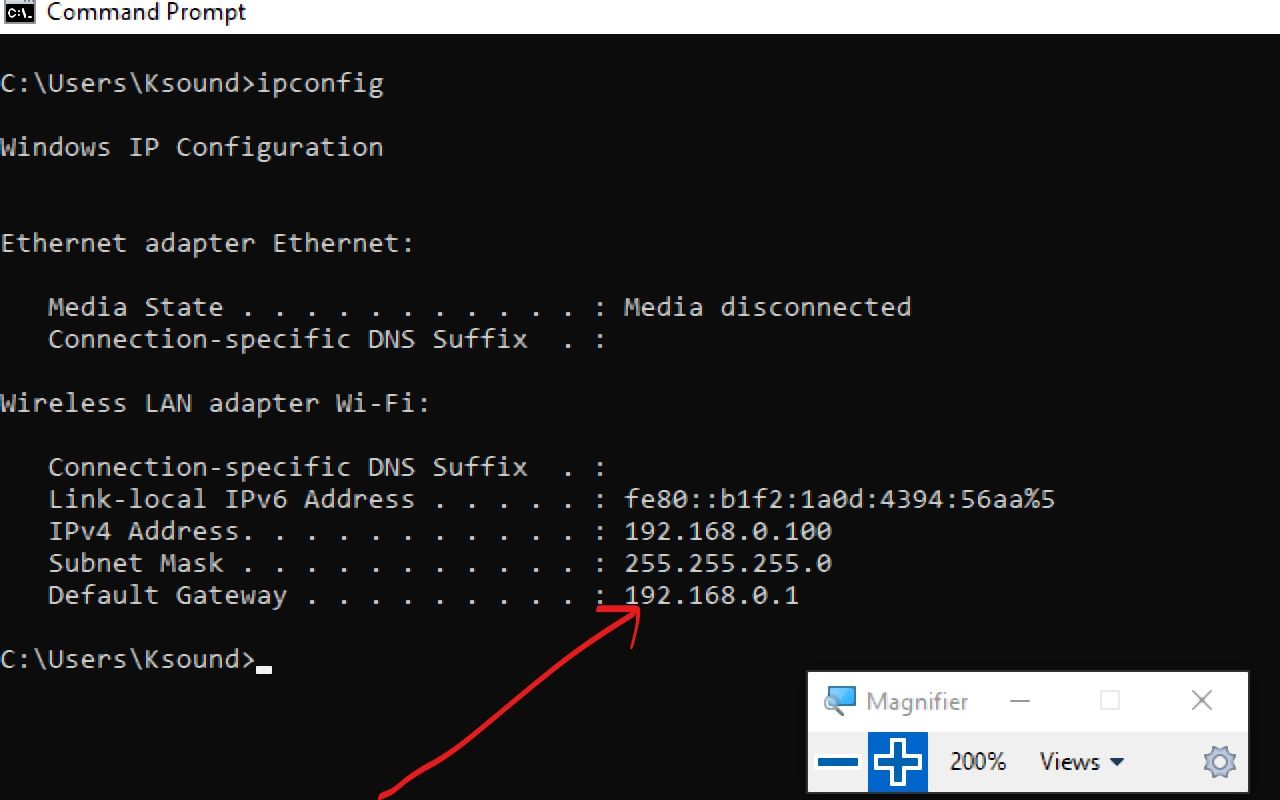
- In the command prompt window, type “ipconfig” and press Enter.
- You will see a list of network adapters and their configurations. Look for the one you are currently connected to, such as “Wireless LAN adapter Wi-Fi” or “Ethernet adapter Ethernet”.
- Under the adapter you are using, you will find the IPv4 Address or Default Gateway. The IPv4 Address represents your IP address.
For example, if you see “IPv4 Address: 192.168.1.23”, then “192.168.1.23” is your IP address.
It’s worth noting that if your computer is connected to the internet through a router, both your computer and the router have IP addresses. The IP address you see using the method above is your computer’s IP address on the local network.
If you want to find your public IP address, which is the IP address assigned to your router by your Internet Service Provider (ISP), you can simply type “what is my IP address” in a search engine, and the search results will display your public IP address.
Finding your IP address on Windows is a quick and straightforward process using the Command Prompt. It’s useful for troubleshooting network issues, configuring network settings, or simply knowing your device’s address on the local network.
On macOS
On macOS, finding your IP address is a simple process that can be done through your system preferences. Follow these steps to find your IP address on macOS:
- Click on the Apple menu in the top-left corner of the screen.
- From the dropdown menu, select “System Preferences”.
- In the System Preferences window, click on the “Network” icon.
- You’ll see a list of available network connections on the left side of the Network window. Select the connection you are currently using, such as “Wi-Fi” or “Ethernet”.
- On the right side, you’ll find information about the selected network connection. Your IP address will be displayed next to “IP Address” or “IPv4 Address”.
For example, if you see “IP Address: 192.168.1.23”, then “192.168.1.23” is your IP address.
If you are using both Wi-Fi and Ethernet on your macOS device, you will see separate network connections for each. Make sure to select the connection you are currently using to see the corresponding IP address.
Knowing your IP address on macOS is useful for various purposes, such as troubleshooting network issues, configuring network settings, or ensuring proper communication between devices on your network. It provides essential information about your device’s connection and allows you to identify and resolve any network-related problems.
On iOS
On iOS devices, finding your IP address is a straightforward process that can be done through the device’s settings. Here’s how you can find your IP address on iOS:
- Unlock your iPhone or iPad and go to the home screen.
- Tap on the “Settings” app, which is represented by a gear icon.
- In the Settings menu, scroll down and tap on “Wi-Fi”.
- You’ll see a list of available Wi-Fi networks. Find the network you are currently connected to and tap on the small “i” icon next to it.
- A new window will appear with details about the selected Wi-Fi network.
- Your IP address will be displayed under the “IP Address” section.
For example, if you see “IP Address: 192.168.1.23”, then “192.168.1.23” is your IP address.
Knowing your IP address on iOS is useful for various reasons. It helps with troubleshooting network issues, setting up devices, or configuring specific network settings. Additionally, if you need to access your iOS device remotely or establish a secure connection, knowing your IP address is crucial.
Remember that your IP address may change if you switch Wi-Fi networks or toggle your device’s network connection. Checking your IP address periodically can be helpful, especially when you encounter network problems or need to configure your device’s network settings.
On Android
On Android devices, finding your IP address is a simple process that can be done through the device’s settings. Here’s how you can find your IP address on Android:
- Unlock your Android device and go to the home screen.
- Swipe down from the top of the screen to open the notification panel.
- Tap on the gear icon or “Settings” to open the Settings menu.
- In the Settings menu, scroll down and tap on “Wi-Fi” or “Network & internet” depending on your device.
- You’ll see a list of available Wi-Fi networks. Find the network you are currently connected to and tap on it.
- A new window will appear with information about the selected Wi-Fi network.
- Your IP address will be listed under the “IP address” section.
For example, if you see “IP Address: 192.168.1.23”, then “192.168.1.23” is your IP address.
Finding your IP address on Android is helpful for various purposes, such as troubleshooting network issues, setting up devices, or configuring network settings. It provides vital information about your device’s connection and allows you to identify and resolve any network-related problems.
Keep in mind that your IP address might change if you switch Wi-Fi networks or if your device is assigned a dynamic IP address by your network. If you are trying to access your Android device remotely or establish a secure connection, it’s essential to check your IP address periodically.
On Linux
Finding your IP address on Linux is a relatively simple process that you can do through the terminal. Follow these steps to find your IP address on Linux:
- Open the Terminal on your Linux distribution. You can usually find it in the Applications menu or by pressing Ctrl+Alt+T.
- In the Terminal, type either “ifconfig” or “ip addr show” and press Enter. This command will display information about your network interfaces.
- Look for the network interface that you are currently using, such as “eth0” for Ethernet or “wlan0” for Wi-Fi.
- Under the corresponding network interface, you will find your IP address listed next to “inet” or “inet addr”.
For example, if you see “inet 192.168.1.23” or “inet addr:192.168.1.23”, then “192.168.1.23” is your IP address.
Keep in mind that Linux gives you more flexibility regarding network configuration. You can have static or dynamic IP addresses based on your network setup and preferences. Therefore, it’s essential to check your IP address if you encounter network issues or need to configure network-related settings.
Finding your IP address on Linux is a valuable skill, allowing you to troubleshoot network connectivity problems, configure network settings, or set up servers and other network-related tasks.
Checking your IP address on different browsers
In addition to finding your IP address through the device’s settings, you can also check it directly within various web browsers. Here’s how you can do it:
Google Chrome:
- Open Google Chrome on your device.
- In the address bar, type “chrome://settings” and press Enter.
- Scroll down and click on the “Advanced” section.
- Under the “Privacy and Security” category, click on “Security”.
- Click on “Manage certificates”.
- In the “Certificate Manager” window, go to the “Details” tab.
- Scroll down until you find the “Subject Alternative Name” section. Your IP address will be listed under “IP Address”.
Mozilla Firefox:
- Launch Mozilla Firefox on your device.
- In the address bar, type “about:config” and press Enter.
- Click on the “Accept the Risk and Continue” button.
- In the search bar, enter “myip” and press Enter.
- The IP address associated with your device will be displayed in the “Value” column.
Microsoft Edge:
- Open Microsoft Edge on your device.
- In the address bar, type “myip.ms” and press Enter.
- The “My IP Address” page will load, displaying your IP address.
Safari:
- Launch Safari on your device.
- In the address bar, type “ip-address.com” and press Enter.
- The “What Is My IP Address?” page will load, showing your IP address.
Opera:
- Open Opera on your device.
- In the address bar, type “opera://about” and press Enter.
- Scroll down to the “Network” section.
- Your IP address will be displayed next to “Local IP address” or “IPv4/IPv6 address.
Checking your IP address through different browsers can be helpful when you specifically want to know the IP address associated with your browsing session. It can be useful for troubleshooting purposes, accessing location-restricted content, or verifying your IP address when using a VPN or proxy server.
Remember that the IP address displayed in the browser might be different from your device’s IP address, as it represents the IP address used for your internet connection at that moment.
Google Chrome
Google Chrome provides a straightforward method to check your IP address through its settings. Follow these steps to find your IP address in Google Chrome:
- Open Google Chrome on your device.
- In the address bar, type “chrome://settings” and press Enter.
- Scroll down to the bottom of the page and click on the “Advanced” section.
- Under the “Privacy and Security” category, click on “Security”.
- Scroll down to find the “Manage certificates” option and click on it.
- The “Certificate Manager” window will open, showing a list of certificates.
- Go to the “Details” tab, which displays the details of the selected certificate.
- Scroll down until you find the “Subject Alternative Name” section.
- Your IP address will be listed under “IP Address”.
By following these steps, you can easily find your IP address in Google Chrome. This information can be useful for various purposes, such as troubleshooting network issues, verifying your IP address for specific services, or ensuring proper network configuration.
Keep in mind that the IP address displayed in Google Chrome represents the IP address associated with your browsing session at that time, which may differ from your device’s actual IP address. It is important to note that your IP address might change when you move to a different network or when your internet service provider assigns a new IP address.
Knowing your IP address in Google Chrome can help you troubleshoot any browsing-related issues or assist you in accessing location-restricted content by using VPNs or proxy servers.
Mozilla Firefox
Mozilla Firefox provides a simple way to check your IP address directly through its browser settings. Follow these steps to find your IP address in Mozilla Firefox:
- Launch Mozilla Firefox on your device.
- In the address bar, type “about:config” and press Enter.
- Click on the “Accept the Risk and Continue” button.
- In the search bar at the top, enter “myip” and press Enter.
- The search results will display a preference name called “browser.display.show_private_ip_address”.
- In the “Value” column, you’ll find your IP address associated with your browsing session.
By following these steps, you can easily find your IP address in Mozilla Firefox. This information can be helpful for various reasons, such as troubleshooting network issues, verifying your IP address for specific services, or ensuring proper network configuration.
Keep in mind that the IP address displayed in Mozilla Firefox represents the IP address used for your browsing session at that time, which might not reflect your device’s actual IP address. Note that your IP address may change when switching networks or if your internet provider assigns a new IP address to your device.
Knowing your IP address in Mozilla Firefox can be valuable for troubleshooting issues related to browsing, accessing location-restricted content, or verifying your IP address when using VPNs or proxy servers.
Microsoft Edge
Microsoft Edge offers a simple method to check your IP address directly within the browser settings. Here’s how you can find your IP address in Microsoft Edge:
- Open Microsoft Edge on your device.
- In the address bar, type “myip.ms” and press Enter.
- The “My IP Address” webpage will load, displaying your IP address.
By following these steps, you can quickly find your IP address in Microsoft Edge. This information can be useful for various reasons, such as troubleshooting network issues, accessing location-restricted content, or verifying your IP address for specific services.
Keep in mind that the IP address displayed in Microsoft Edge reflects the IP address associated with your browsing session and may differ from your device’s actual IP address. Note that your IP address can change when you switch networks or when your internet service provider assigns a new IP address.
Knowing your IP address in Microsoft Edge can assist you in troubleshooting browsing-related issues or verifying your IP address when utilizing VPNs or proxy servers. It provides vital information about your current internet connection and aids in maintaining accurate network configurations.
Safari
Safari, the default web browser on Apple devices, allows you to check your IP address directly through the browser. Follow these steps to find your IP address in Safari:
- Launch Safari on your device.
- In the address bar, type “ip-address.com” and press Enter.
- The “What Is My IP Address?” webpage will load, displaying your IP address.
By following these steps, you can easily find your IP address in Safari. This information can be helpful for various purposes, such as troubleshooting network issues, accessing location-restricted content, or verifying your IP address for specific services.
Keep in mind that the IP address displayed in Safari reflects the IP address associated with your browsing session and may differ from your device’s actual IP address. It’s important to note that your IP address can change when you switch networks or when your internet service provider assigns a new IP address.
Knowing your IP address in Safari can assist you in troubleshooting browsing-related issues or verifying your IP address when using VPNs or proxy servers. It provides valuable information about your internet connection and helps ensure accurate network configurations.
Opera
Opera browser provides a convenient way to check your IP address directly within its browser settings. Here’s how you can find your IP address in Opera:
- Open Opera on your device.
- In the address bar, type “opera://about” and press Enter.
- Scroll down to the “Network” section.
- Your IP address will be displayed next to “Local IP address” or “IPv4/IPv6 address”.
By following these steps, you can quickly find your IP address in Opera. This information can be useful for various reasons, such as troubleshooting network issues, accessing location-restricted content, or verifying your IP address for specific services.
Keep in mind that the IP address displayed in Opera represents the IP address associated with your browsing session at that time, which may differ from your device’s actual IP address. Note that your IP address can change when switching networks or if your internet service provider assigns a new IP address.
Knowing your IP address in Opera can be valuable for troubleshooting browsing-related issues, accessing geo-restricted content, or verifying your IP address when using VPNs or proxy servers. It provides essential information about your current internet connection and aids in maintaining accurate network configurations.
IP address troubleshooting tips
Encountering issues with your IP address can disrupt your network connectivity and cause frustration. However, there are several troubleshooting tips you can follow to resolve common IP address-related problems. Here are some tips to help you troubleshoot IP address issues:
1. Updating your Wi-Fi router firmware:
Outdated router firmware can sometimes cause IP address conflicts or connectivity issues. Check the manufacturer’s website for firmware updates for your router model and follow the instructions to update it. This can resolve compatibility issues and improve network performance.
2. Restarting your Wi-Fi router:
If you’re experiencing IP address conflicts or connectivity problems, a simple router restart can often resolve the issue. Unplug the power cable from your router, wait for a few seconds, and then plug it back in. This will clear any temporary network glitches and allow your router to establish a fresh connection with your devices.
3. Checking your network settings:
If you suspect there’s an issue with your network settings, verify that your devices are set up correctly. Make sure that your device is configured to obtain an IP address automatically through DHCP (Dynamic Host Configuration Protocol). You can find this setting in the network settings of your device’s operating system.
4. Releasing and renewing your IP address:
If you’re experiencing IP address conflicts or are unable to connect to the network, releasing and renewing your IP address can help. In Windows, open the Command Prompt and type “ipconfig /release” followed by “ipconfig /renew” and press Enter. On macOS or Linux, open the Terminal and type “sudo dhclient -r” followed by “sudo dhclient” and press Enter. This will release your current IP address and request a new one from the DHCP server.
5. Resetting your network settings:
If all else fails, you can consider resetting your network settings. This can be done through the network settings menu of your device. Keep in mind that resetting your network settings will remove all saved Wi-Fi networks, VPN configurations, and other network-related preferences. After resetting, you’ll need to reconnect to your Wi-Fi network and reconfigure any necessary settings.
By following these troubleshooting tips, you can address common IP address-related issues and restore network connectivity. However, if the problem persists or you’re facing more complex network issues, it may be advisable to contact your Internet Service Provider (ISP) or seek professional technical support for assistance.
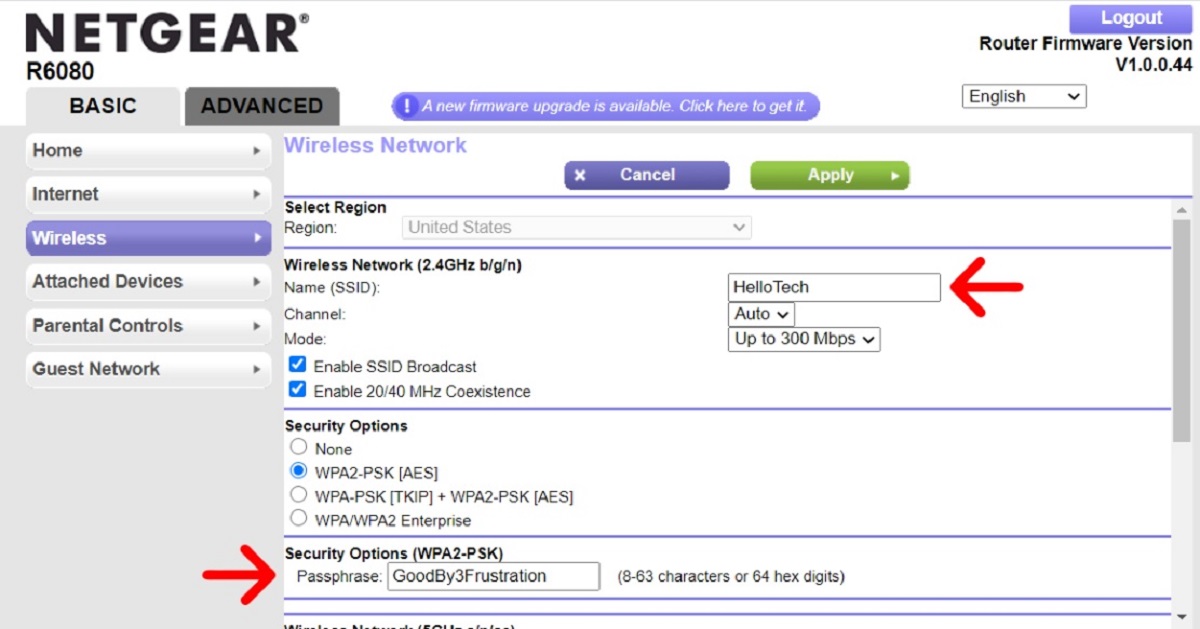
Updating your Wi-Fi router firmware
Keeping your Wi-Fi router firmware up to date is essential for maintaining a stable and secure network. Router manufacturers periodically release firmware updates to address known issues, enhance performance, and improve security measures. Here’s why it is important to update your Wi-Fi router firmware and how to do it:
Why update your Wi-Fi router firmware?
1. Security: Firmware updates often include security patches to protect your network from potential vulnerabilities. Outdated firmware can leave your network susceptible to cyber threats and unauthorized access. Keeping your firmware updated ensures you have the latest security measures in place.
2. Performance improvements: Firmware updates may include optimizations that improve the overall performance of your router. These updates can enhance network speed, stability, and reliability, leading to a better browsing and streaming experience.
3. Bug fixes: Firmware updates often address known bugs or issues that users may encounter. Updating your router firmware can help resolve connectivity problems, intermittent disconnections, or other network-related issues you may be experiencing.
How to update your Wi-Fi router firmware:
1. Check for firmware updates: Visit the website of your router’s manufacturer and navigate to the support or downloads section. Look for firmware updates specific to your router model. Note that different manufacturers may have different methods for firmware updates.
2. Download the firmware: Once you’ve located the correct firmware update for your router model, download it to your computer. Ensure that you choose the appropriate firmware version to avoid compatibility issues.
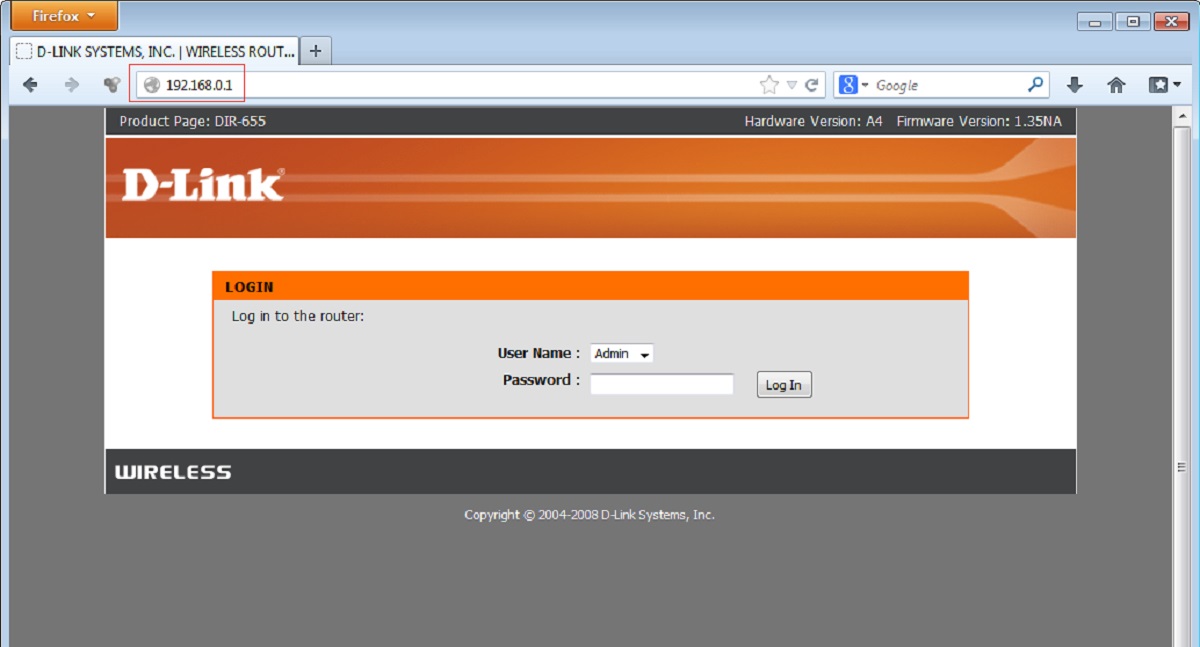
3. Access the router’s web interface: Open a web browser on your computer and type the router’s IP address in the address bar. This IP address is typically printed on the router itself or mentioned in the user manual. Press Enter to access the router’s web interface.
4. Log in to the router: Enter the username and password for your router. If you haven’t changed these credentials, they can usually be found on a sticker attached to the router or in the user manual. If you’ve changed the credentials and can’t remember them, you may need to perform a router reset to restore the default login details.
5. Navigate to the firmware upgrade section: Once logged in, look for the firmware upgrade or update section in the router settings. This may be labeled differently depending on the router manufacturer. Follow the on-screen instructions to proceed with the firmware update.
6. Upload the firmware: Choose the firmware file you previously downloaded from the manufacturer’s website and upload it to the router. This process may take a few minutes. Avoid interrupting the update or turning off the router during this time, as it could potentially brick the device.
7. Reboot the router: After the firmware update is successfully uploaded, the router will reboot to apply the changes. Allow some time for the reboot process to complete.
8. Verify the firmware update: Log in to your router’s web interface again and navigate to the firmware section to confirm that the update was successful. Ensure that the latest firmware version is now installed.
Regularly checking and updating your Wi-Fi router firmware ensures that your network remains secure and operates at its full potential. By following the steps provided by your router manufacturer, you can easily update your router firmware and enjoy a more reliable and secure network connection.
Restarting your Wi-Fi router
Restarting your Wi-Fi router is a simple yet effective troubleshooting step that can help resolve various network connectivity issues. Restarting the router clears temporary glitches, resets connections, and allows the device to establish a fresh connection with your devices. Here’s how you can restart your Wi-Fi router:
1. Locate the power source:
Find the power adapter cable connected to your Wi-Fi router. It is usually a small, black cable connected to the back of the router or located near the power input port.
2. Turn off the router:
Unplug the power adapter from the power outlet or the back of the router. Some routers may have a power button that you can press to turn it off. Make sure the router is completely disconnected from the power source.
3. Wait for a few seconds:
Leave the router unplugged for at least 10-15 seconds. This gives the router time to fully power down and allows any residual electrical charges to dissipate.
4. Reconnect the power:
Plug the power adapter back into the power outlet or into the back of the router, depending on how it was disconnected. Ensure that the cable is securely plugged in.
5. Power on the router:
Turn on the router by pressing the power button, if available, or by waiting for it to power on automatically after plugging in the power adapter. Wait for the router to fully boot up and establish a connection. This process may take a few minutes.
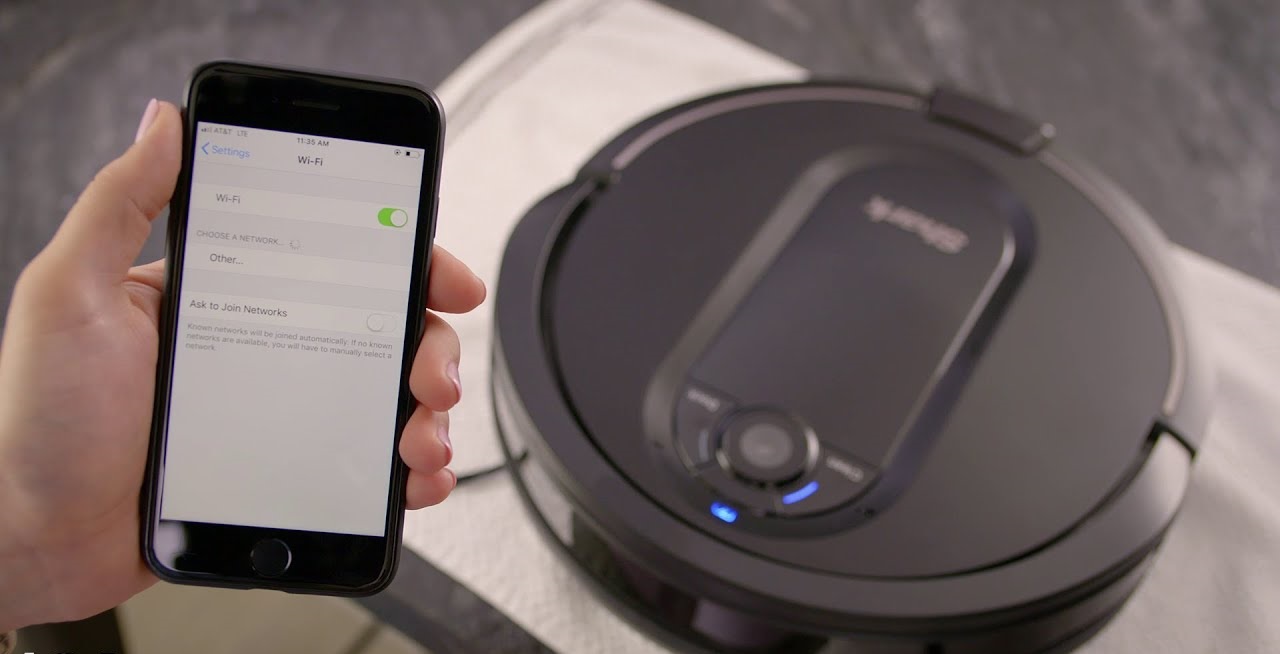
6. Reconnect devices:
Once the router has restarted and established a connection, reconnect your devices to the Wi-Fi network. Locate the Wi-Fi network name (SSID) in the list of available networks on your devices and connect using the appropriate passphrase or security key.
By restarting your Wi-Fi router, you can clear any temporary network issues, refresh the router’s memory, and establish a fresh connection. This can help resolve issues such as slow internet speeds, intermittent connections, or devices not being able to connect to the network.
If restarting the router does not resolve the issue, it may be beneficial to check for firmware updates, perform a factory reset, or contact your internet service provider (ISP) for further assistance.
Checking your network settings
When experiencing network issues, checking your network settings can help identify and resolve problems related to IP address configuration and connectivity. Here are some steps to guide you:
1. IP address assignment:
Ensure that your device is set to obtain an IP address automatically through DHCP (Dynamic Host Configuration Protocol). This setting allows your router to assign an IP address to your device automatically. To check this setting:
- On Windows: Go to Control Panel > Network and Internet > Network and Sharing Center. Click on “Change adapter settings,” right-click on your network adapter, and select “Properties.” Under “This connection uses the following items,” ensure that “Internet Protocol Version 4 (TCP/IPv4)” is selected and set to “Obtain an IP address automatically.”
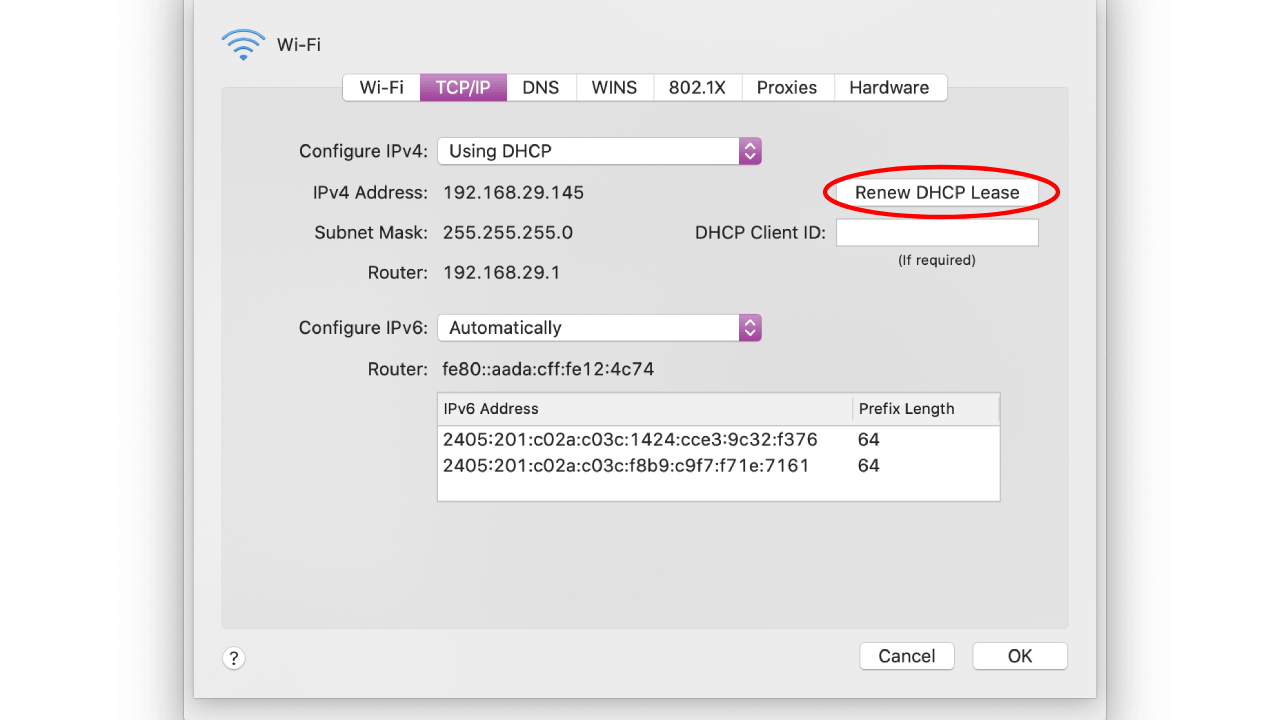
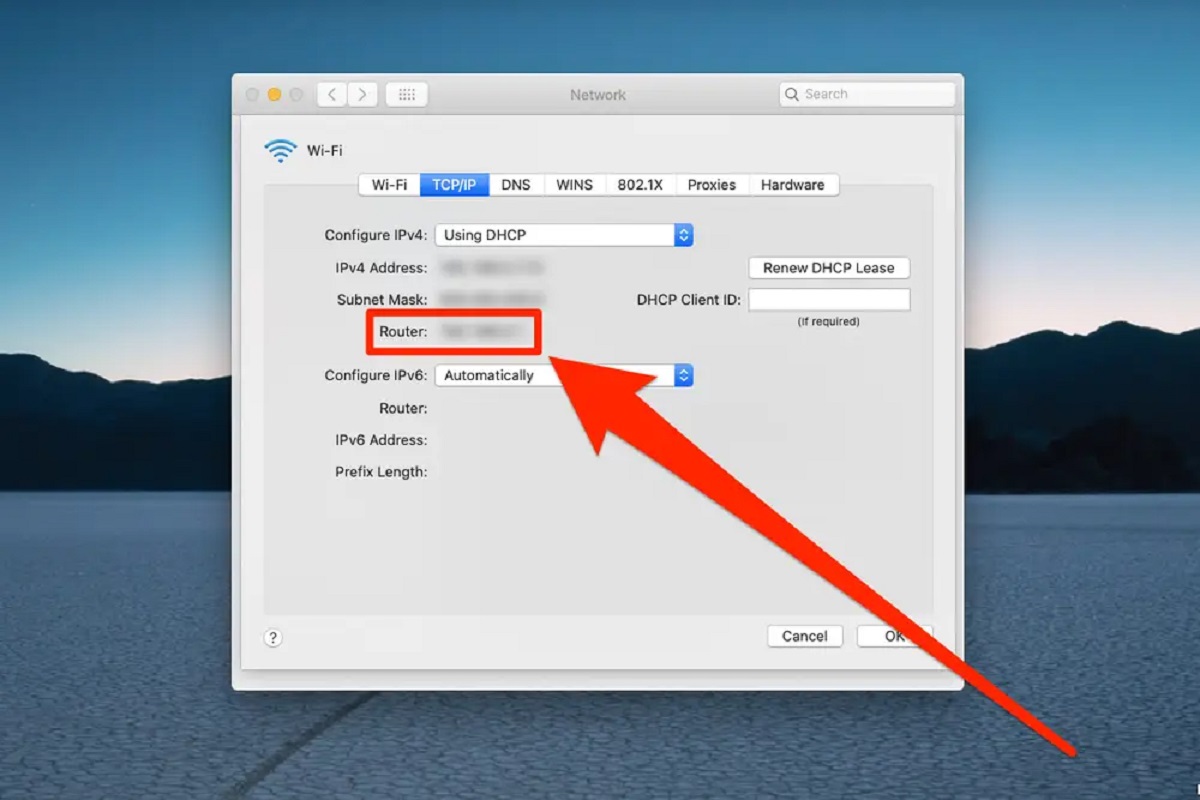
- On macOS: Go to System Preferences > Network. Select your network connection (Wi-Fi or Ethernet) and click on “Advanced.” Go to the “TCP/IP” tab and check that “Configure IPv4” is set to “Using DHCP.”
- On iOS: Go to Settings > Wi-Fi. Tap on the connected Wi-Fi network and make sure “Configure IP” is set to “Automatic.”
- On Android: Go to Settings > Network & internet > Wi-Fi. Tap on the connected Wi-Fi network and check that “IP settings” is set to “DHCP.”
- On Linux: Open the terminal and enter the command “ifconfig” or “ip addr show” to display network configurations. Ensure that your network interface is configured to obtain an IP address automatically, usually through DHCP.
2. DNS settings:
Incorrect DNS (Domain Name System) settings can cause issues with accessing websites or resolving domain names. Ensure that your device is set to obtain DNS server addresses automatically or use preferred DNS servers. Here’s how to check the DNS settings:
- On Windows: Follow the same steps as in the IP address assignment section above. In the network adapter properties, make sure the DNS settings are set to “Obtain DNS server address automatically.”
- On macOS: Go to System Preferences > Network. Select your network connection, click on “Advanced,” and go to the “DNS” tab. Ensure that DNS server addresses are obtained automatically or manually configured correctly.
- On iOS: Go to Settings > Wi-Fi. Tap on the connected Wi-Fi network, select “Configure DNS,” and make sure it is set to “Automatic.”
- On Android: Go to Settings > Network & internet > Wi-Fi. Tap on the connected Wi-Fi network, select “Advanced options,” and check the DNS settings. Choose “Automatic” or manually enter the correct DNS server addresses.
- On Linux: DNS settings are typically defined in the “/etc/resolv.conf” file. You can check and modify the file manually or use network configuration tools specific to your Linux distribution.
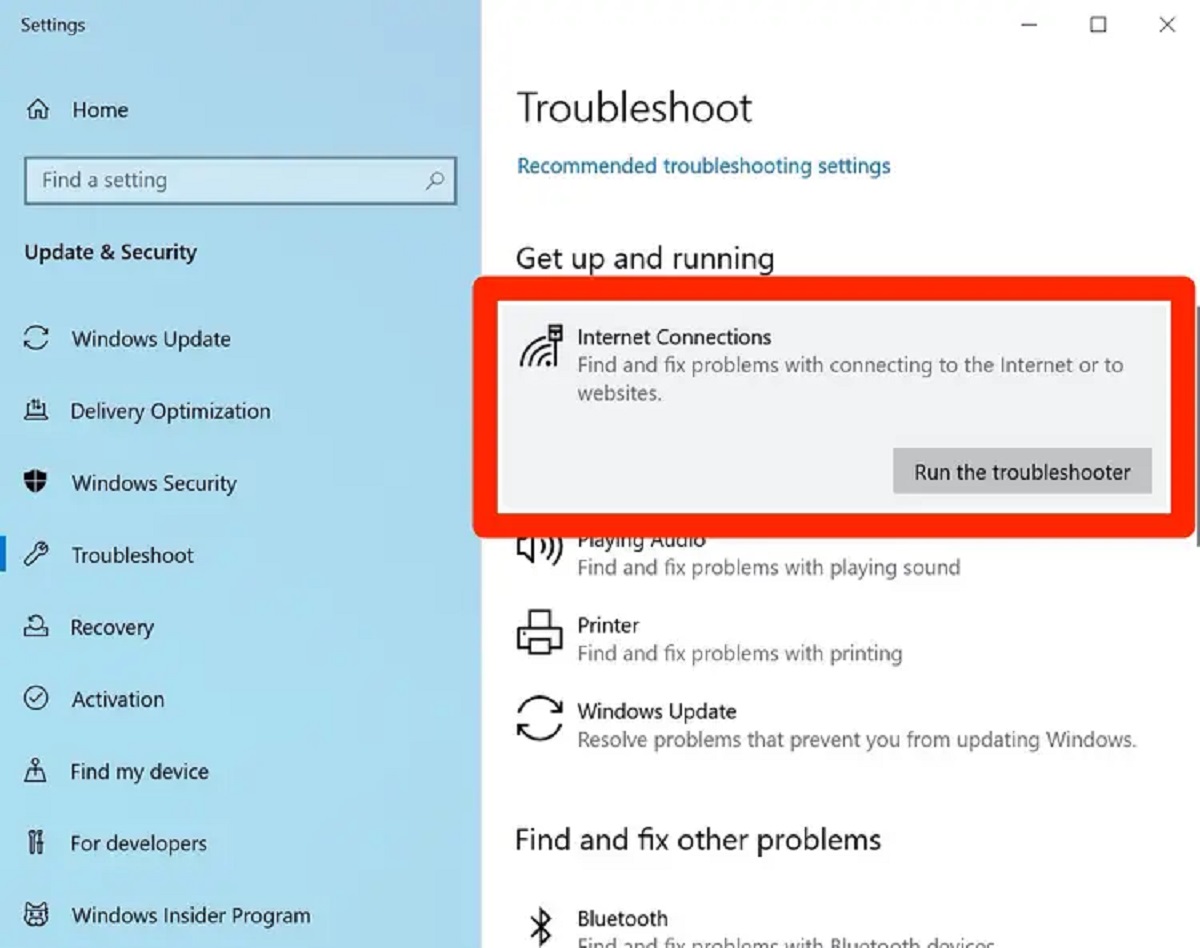
3. Network troubleshooter:
Operating systems often provide built-in network troubleshooters that can identify and fix common network problems. If you’re experiencing network issues, run the network troubleshooter on your device to automatically diagnose and attempt to resolve the problem. Look for network troubleshooting options in the settings menu or control panel of your operating system.
By checking your network settings, you can ensure that your device is properly configured to obtain an IP address automatically and that DNS settings are correctly assigned. This can help resolve issues related to IP address conflicts, connectivity problems, and network configuration errors. If the problem persists, you may need to contact your internet service provider (ISP) for further assistance.
Conclusion
Knowing your IP address is crucial for troubleshooting network issues, configuring network settings, and ensuring proper communication between devices in a network. By following the steps outlined in this guide, you can easily find your IP address on different devices and operating systems, such as Windows, macOS, iOS, Android, and Linux.
Additionally, checking your IP address through different web browsers allows you to verify the IP address associated with your browsing session and can assist in troubleshooting and accessing location-restricted content.
When encountering IP address-related problems, implementing troubleshooting tips like updating your Wi-Fi router firmware, restarting your router, checking your network settings, and releasing and renewing your IP address can help resolve common issues and restore network connectivity.
It’s important to note that IP addresses can change over time, especially if you switch networks or if your internet service provider assigns a new IP address. Periodically checking your IP address ensures you have the most up-to-date information for troubleshooting and network configuration purposes.
By understanding IP addresses and following the troubleshooting steps in this guide, you can effectively manage network issues, optimize network performance, and ensure a seamless browsing and connectivity experience across your devices.