Introduction
Welcome to our guide on how to renew your IP address! In this digital age, our devices are constantly connected to the internet, and every device that connects to the internet is assigned a unique identifier called an IP address. This IP address allows devices to communicate with each other and access online services.
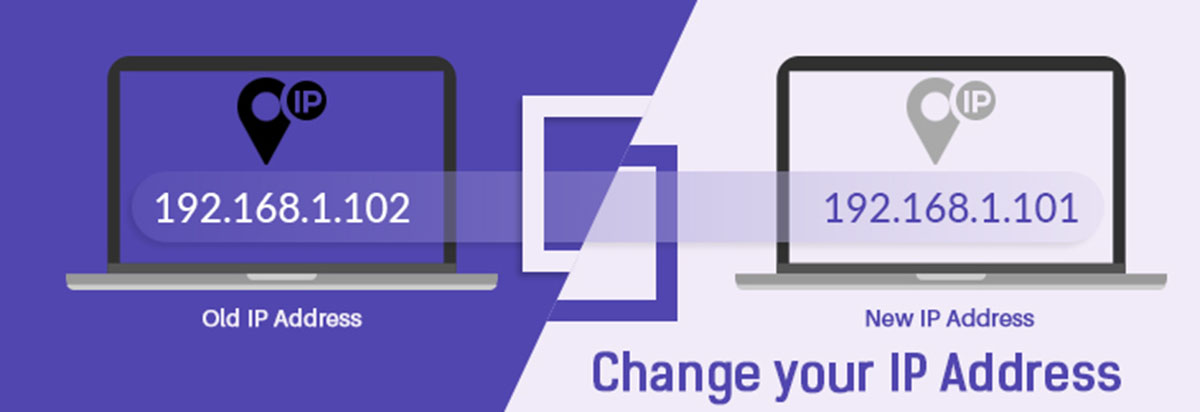
However, there may be instances where you encounter network connectivity issues or experience a slow internet connection. One troubleshooting step that can help resolve these issues is renewing your IP address. Renewing your IP address can refresh your network connection and resolve any conflicts or connectivity problems that may arise.
In this article, we will provide step-by-step instructions on how to renew your IP address on various operating systems, including Windows, Mac, Linux, Android, and iOS. Whether you are experiencing connection issues or simply want to optimize your network performance, this guide will help you renew your IP address and get your devices back online.
Before we dive into the specifics, let’s take a moment to understand what an IP address is and why it is important.
What is an IP Address?
An IP address, short for Internet Protocol address, is a unique numerical label assigned to every device connected to a computer network that uses the Internet Protocol for communication. It serves two main purposes: identifying the host or network interface and providing the location of the device in the network.
An IP address consists of a series of numbers separated by periods, with each number ranging from 0 to 255. For example, a typical IP address may look like this: 192.168.0.1. This address format, known as IPv4, is the most widely used and recognized. However, with the growth of the internet and the increasing number of connected devices, a newer format called IPv6, which uses a longer alphanumeric string, is being increasingly deployed to accommodate more unique addresses.
IP addresses play a crucial role in establishing communication between devices on the internet. When you enter a website’s URL in your web browser, your device sends a request to the website’s server, and the server sends back the requested information. This communication happens using the IP addresses of both your device and the server.
There are two types of IP addresses: public and private. Public IP addresses are unique and visible to other devices on the internet. They are assigned by your Internet Service Provider (ISP) and are used to identify your device across the internet. On the other hand, private IP addresses are assigned within local networks, such as your home or office network. These addresses are used for communication among devices within the network, but they are not accessible from the outside world.
Understanding IP addresses is essential, as they enable devices to interact with each other and the internet. Now that you have a basic understanding of IP addresses, let’s move on to why you might need to renew your IP address.
Why Would You Need to Renew Your IP Address?
There are several reasons why you might need to renew your IP address. While IP addresses are typically assigned dynamically and automatically by your router or network provider, occasionally issues can arise that require you to manually renew the IP address. Here are a few common scenarios where renewing your IP address can be helpful:
1. Network Connectivity Issues: If you are experiencing connectivity problems, such as slow internet speeds, intermittent disconnections, or inability to connect to certain websites or online services, renewing your IP address can help refresh your network connection. This process can resolve any conflicts or issues that may be causing the connectivity problems.
2. IP Address Conflict: In some cases, multiple devices on the same network may end up with the same IP address, resulting in network conflicts and connectivity issues. Renewing your IP address can help resolve these conflicts by assigning each device a unique address.
3. Router or Network Modifications: If you have made changes to your router settings, such as replacing the router or modifying the network configuration, renewing the IP address can ensure that these changes take effect and your devices are properly connected to the network.
4. Troubleshooting Network Issues: When troubleshooting network issues, renewing your IP address can be a crucial step in diagnosing and resolving the problem. It helps in resetting network settings and establishing a fresh connection to your router and the internet.
5. Privacy and Security: Renewing your IP address can also provide a layer of privacy and security. By getting a new IP address, you can prevent any potential tracking or identification of your device or location. This can be particularly helpful when accessing public Wi-Fi networks or when you want to maintain a certain level of anonymity online.
Renewing your IP address is a straightforward process, and it can often resolve common network issues and improve your overall internet experience. In the following sections, we will provide step-by-step instructions on how to renew your IP address on different operating systems and devices.
How to Renew Your IP Address on Windows
Renewing your IP address on Windows can help resolve network connectivity issues and optimize your internet connection. Here are the steps to renew your IP address on Windows:
- Open the Start menu and type “Command Prompt” in the search bar.
- Right-click on “Command Prompt” and select “Run as administrator”.
- In the Command Prompt window, type the following command and press Enter:
ipconfig /release - Wait for the process to complete. This command will release the current IP address assigned to your computer.
- Once the release process is finished, type the following command and press Enter:
ipconfig /renew - Windows will now attempt to acquire a new IP address from your router or network provider.
- Wait for the process to complete. Once the renewal is successful, you will see a new IP address assigned to your computer in the Command Prompt window.
- Close the Command Prompt window.
By following these steps, you have successfully renewed your IP address on Windows. This process can help resolve network connectivity issues and optimize your internet connection. If you are still experiencing issues after renewing your IP address, you may want to consider restarting your router or contacting your Internet Service Provider (ISP) for further assistance.
How to Renew Your IP Address on Mac
If you are using a Mac and experiencing network connectivity issues or want to refresh your IP address, you can easily renew your IP address using the following steps:
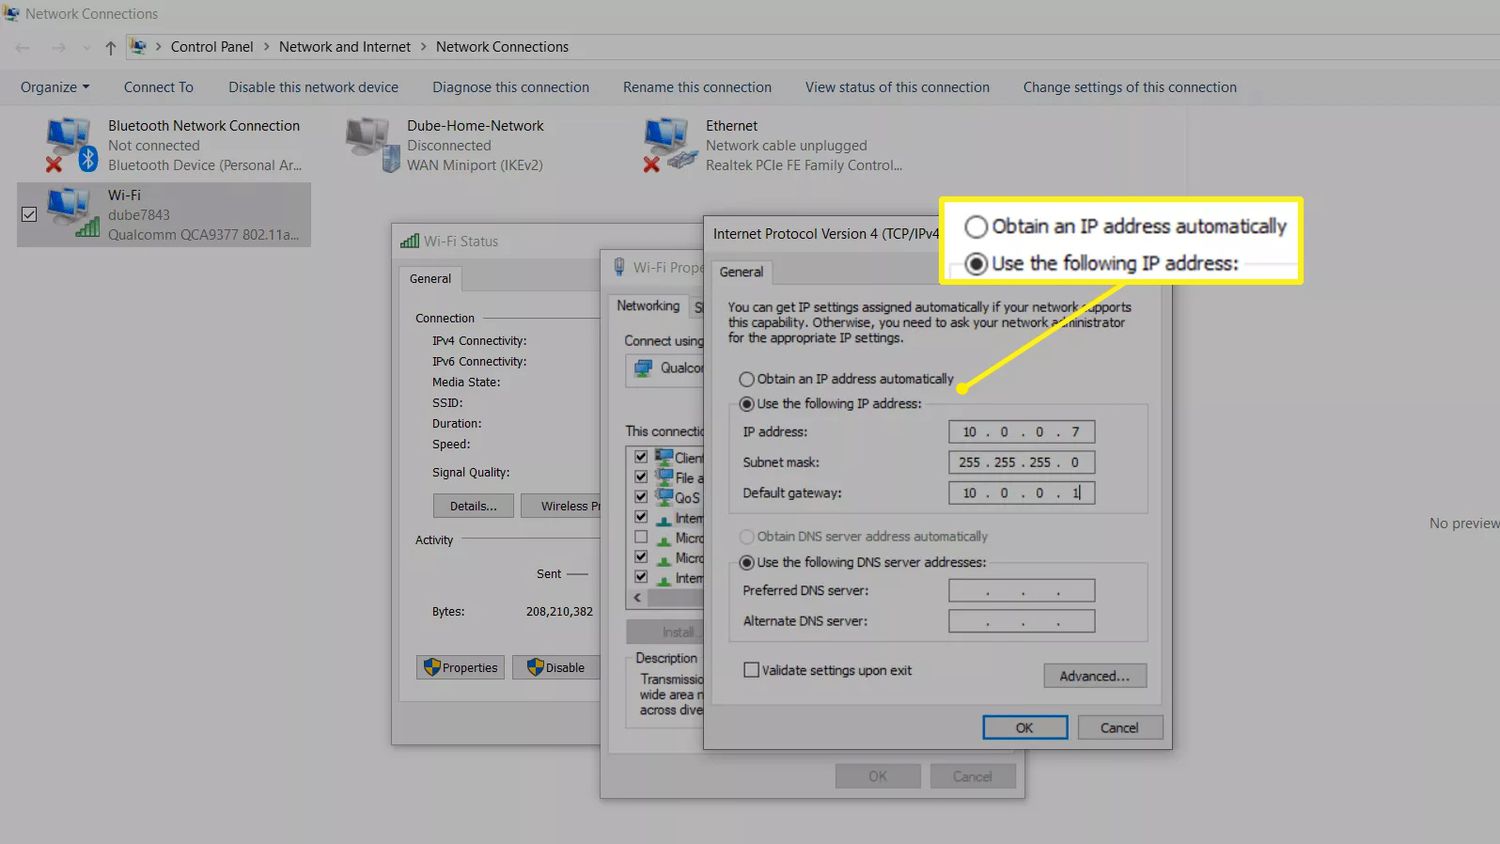
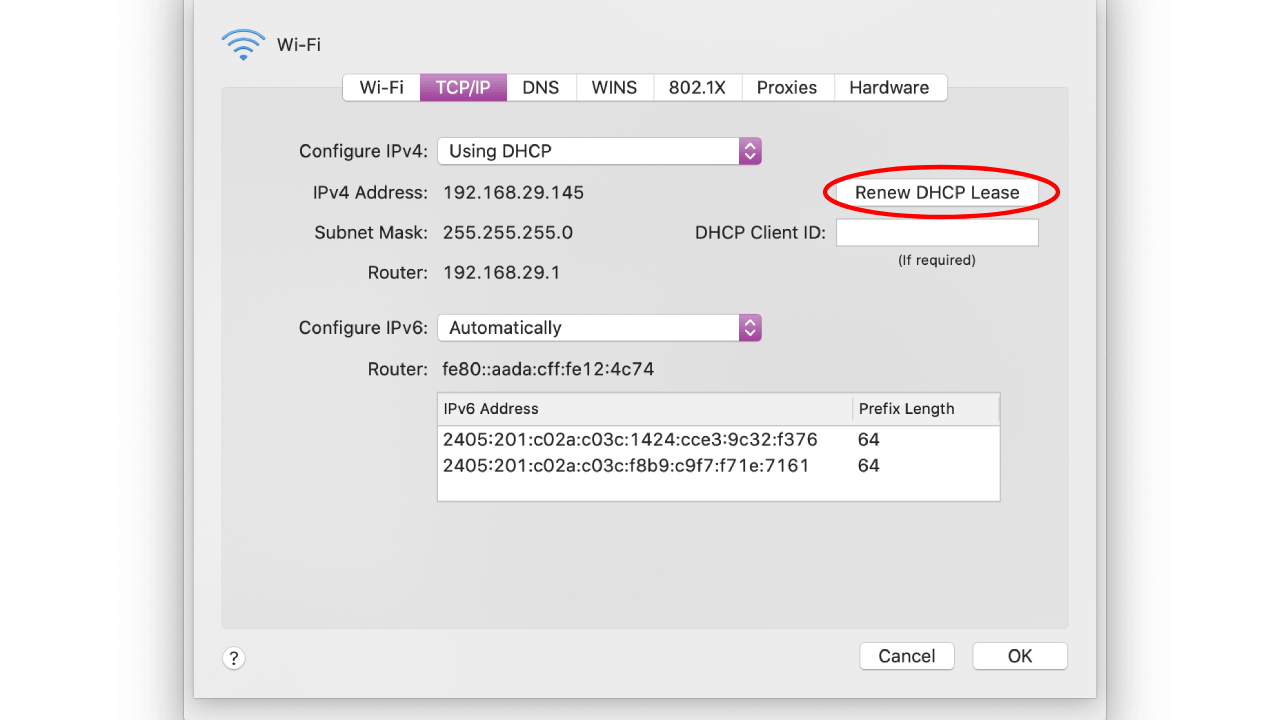
- Click on the Apple menu in the top-left corner of your screen and select “System Preferences”.
- In the System Preferences window, click on “Network”.
- Select your active network connection from the list on the left-hand side of the window. It could be Ethernet, Wi-Fi, or any other active network connection.
- Click on the “Advanced” button located at the bottom-right corner of the window.
- In the Advanced settings window, navigate to the “TCP/IP” tab.
- Click on the “Renew DHCP Lease” button.
- Wait for the process to complete. Your Mac will now request a new IP address from your router or network provider.
- Once the renewal is successful, you will see the new IP address assigned to your Mac in the TCP/IP tab.
- Close the Network settings window.
Following these steps will allow you to renew your IP address on your Mac. This process can help resolve network connectivity issues and ensure optimal internet connection. If you are still encountering problems after renewing your IP address, you can try restarting your router or contacting your Internet Service Provider (ISP) for further assistance.
How to Renew Your IP Address on Linux
If you are using a Linux-based operating system and need to renew your IP address, you can easily accomplish this by following these steps:
- Open a terminal window. You can do this by pressing Ctrl+Alt+T or by searching for “Terminal” in your applications.
- In the terminal, type the following command and press Enter:
sudo dhclient -r - Enter your password when prompted. This command will release your current IP address.
- Next, type the following command and press Enter:
sudo dhclient - Linux will now request a new IP address from your router or network provider.
- Wait for the process to complete. Once the renewal is successful, you will see the new IP address assigned to your Linux machine in the terminal output.
- You can close the terminal window once the process is finished.
By following these steps, you have successfully renewed your IP address on Linux. Renewing your IP address can help resolve network connectivity issues and ensure a stable and optimized internet connection. If you continue to experience issues, you may want to consider restarting your router or reaching out to your network administrator for further assistance.
How to Renew Your IP Address on Android
If you are using an Android device and need to renew your IP address, you can easily do so by following these steps:
- Open the Settings app on your Android device.
- Scroll down and tap on “Wi-Fi” or “Network & Internet”, depending on your device’s settings.
- Tap and hold on your connected Wi-Fi network until a context menu appears.
- Tap on “Forget network” or “Disconnect” to disconnect from the Wi-Fi network.
- Next, tap on the same Wi-Fi network again to reconnect to it.
- Enter the Wi-Fi network password if prompted.
- Your Android device will now attempt to obtain a new IP address from the router.
- Wait for the process to complete. Once the renewal is successful, you will see the new IP address assigned to your Android device.
By following these steps, you have successfully renewed your IP address on your Android device. Renewing your IP address on Android can help resolve network connectivity issues and optimize your internet connection. If you are still experiencing issues, you may want to consider restarting your router or contacting your Internet Service Provider (ISP) for further assistance.
How to Renew Your IP Address on iOS
If you are using an iOS device, such as an iPhone or iPad, and need to renew your IP address, you can do so by following these steps:
- Open the Settings app on your iOS device.
- Tap on “Wi-Fi” to access the Wi-Fi settings.
- Find your connected Wi-Fi network in the list and tap on the (i) icon next to it.
- In the Wi-Fi settings, tap on “Renew Lease” or “Forget This Network”.
- If you choose to renew lease, your iOS device will attempt to obtain a new IP address from the router.
- Wait for the process to complete. Once the renewal is successful, you will see the new IP address assigned to your iOS device.
- If you choose to forget the network, tap on “Forget This Network” and then reconnect to the Wi-Fi network by selecting it from the list and entering the password.
- Your iOS device will now obtain a new IP address as it connects to the network again.
By following these steps, you have successfully renewed your IP address on your iOS device. This can help resolve network connectivity issues and optimize your internet connection. If you continue to experience issues after renewing your IP address, you may want to consider restarting your router or contacting your Internet Service Provider (ISP) for further assistance.
Troubleshooting Tips for IP Address Renewal
While renewing your IP address can help resolve network connectivity issues, there may be instances where the renewal process does not go as expected. Here are some troubleshooting tips that can help you overcome common challenges:
1. Restart Your Device: Sometimes, a simple restart can fix temporary network issues. Before attempting to renew your IP address, try restarting your device and see if the connectivity problem resolves on its own.
2. Power Cycle Your Router: Unplug your router from the power source, wait for about 30 seconds, and then plug it back in. This can refresh the router’s settings and help resolve any issues that may have been causing the IP address renewal problem.
3. Double-check Network Settings: Ensure that your device is connected to the correct network and that the Wi-Fi credentials are entered correctly. Sometimes, incorrect network settings can prevent the IP address renewal process from being successful.
4. Update Network Drivers or Firmware: Outdated or incompatible network drivers or router firmware can cause connectivity problems. Check for updates for your network drivers on your computer or update the firmware on your router to ensure compatibility and optimal performance.
5. Disable Firewall or Security Software: Firewalls and security software can interfere with the IP address renewal process. Temporarily disable any firewall or security software on your device and try renewing your IP address again.
6. Reset Network Settings: If you are still experiencing issues, you can reset your network settings to their default state. This can be done through the settings menu on your device or by using the “ipconfig” command on Windows or the “networksetup” command on Mac.
7. Contact Your Internet Service Provider (ISP): If none of the above troubleshooting steps work, it’s advised to reach out to your ISP for further assistance. They can provide specific instructions based on your network setup and troubleshoot any potential issues on their end.
By following these troubleshooting tips, you can increase the chances of successfully renewing your IP address and resolving any network connectivity issues you may be experiencing. It’s important to note that complex network setups or specific software configurations may require advanced troubleshooting or professional assistance.
Conclusion
Renewing your IP address can be a helpful troubleshooting step when you encounter network connectivity issues or want to optimize your internet connection. Whether you are using Windows, Mac, Linux, Android, or iOS, the process of renewing your IP address is relatively straightforward and can often resolve common network problems.
In this guide, we have covered the step-by-step instructions for renewing your IP address on various operating systems and devices. We explored how to renew your IP address on Windows, Mac, Linux, Android, and iOS, providing you with the necessary information to perform the renewal process.
Remember that renewing the IP address can help refresh your network connection, resolve conflicts, and improve your internet performance. However, it’s important to note that IP address renewal may not always be the solution for complex network issues. If you continue to experience problems even after renewing your IP address, it’s recommended to try additional troubleshooting steps or seek assistance from your Internet Service Provider (ISP) or network administrator.
By following the instructions provided in this guide, you can take control of your network connectivity and optimize your internet experience. Renewing your IP address is just one of the many tools at your disposal when it comes to troubleshooting and maintaining a stable and reliable network connection.
Remember to always refer to your specific operating system or device’s documentation for accurate and up-to-date instructions on IP address renewal. With a refreshed IP address, you can enjoy a smooth and uninterrupted internet experience.