Introduction
Managing files and data is an essential part of our digital lives, and sometimes we find ourselves needing to download files from cloud storage platforms like Dropbox. While Dropbox offers a convenient way to store and access files, you may prefer to have a local copy on an external hard drive for various reasons, such as backup or portability. In this article, we will guide you on how to download files from Dropbox to an external hard drive.
Downloading files from Dropbox to an external hard drive can be a straightforward process, but it requires a few steps to ensure a successful transfer. We will walk you through each step, from connecting the external hard drive to your computer to verifying the downloaded files on the external hard drive. Whether you are using a Windows or Mac computer, our instructions will help you navigate the process seamlessly.
Before we begin, make sure you have your external hard drive ready and enough free space to accommodate the files you want to download. Additionally, ensure you have a stable internet connection to avoid any interruptions during the file transfer process. Now, let’s dive into the step-by-step guide on how to download files from Dropbox to an external hard drive.
Step 1: Connect External Hard Drive to Computer
The first step in downloading files from Dropbox to an external hard drive is to ensure that the external hard drive is properly connected to your computer. This will allow you to transfer the files from Dropbox to the external hard drive seamlessly.
If you’re using a Windows computer, connect the external hard drive to an available USB port on your computer. Most external hard drives have a USB cable that you can use to connect them. Once connected, you should see a notification or hear a sound indicating that the external hard drive has been detected by your computer.
For Mac users, you will need to connect the external hard drive using a USB or Thunderbolt port, depending on the type of external hard drive you have. Again, upon connecting the external hard drive, you should see a notification or icon appearing on your desktop indicating that the drive is ready to use.
It’s worth noting that some external hard drives may require additional power, especially if they have their own power supply. In such cases, make sure to connect the power cord and ensure that the drive is powered on before proceeding to the next steps.
Once you have successfully connected the external hard drive to your computer, it’s essential to verify that it’s recognized by the operating system. To do this, you can go to “My Computer” on Windows or “Finder” on Mac and check if the external hard drive appears as a connected device.
With the external hard drive properly connected and recognized by your computer, you are now ready to proceed to the next step: logging in to your Dropbox account and locating the file you want to download.
Step 2: Log in to Dropbox and Locate the File
In order to download files from Dropbox to your external hard drive, you will need to log in to your Dropbox account and locate the specific file or files you want to download.
Start by opening your preferred web browser and navigating to the Dropbox website. Once there, enter your login credentials to access your Dropbox account. If you don’t have an account yet, you will need to create one before proceeding.
After successfully logging in, you will be presented with your Dropbox dashboard. This is where all your uploaded files and folders are organized. Take a moment to familiarize yourself with the dashboard layout and navigation options.
To locate the specific file you want to download, you have a couple of options. You can either browse through your files and folders manually or use the search function to quickly find the desired file. If you have saved the file in a specific folder, navigate to that folder and locate the file. If you aren’t sure where the file is located, you can use the search bar and enter keywords related to the file’s name.
Once you have found the file you wish to download, you may want to double-check that it is the correct file. Look for the file name, file size, and any other relevant details to confirm its identity. Additionally, ensure that you have the necessary permissions to access and download the file.
With the file identified and ready for download, it’s time to move on to the next step: actually downloading the file from Dropbox to your external hard drive.
Step 3: Download the File from Dropbox
Now that you have located the file you want to download from Dropbox to your external hard drive, it’s time to initiate the download process. Follow these steps to successfully download the file:
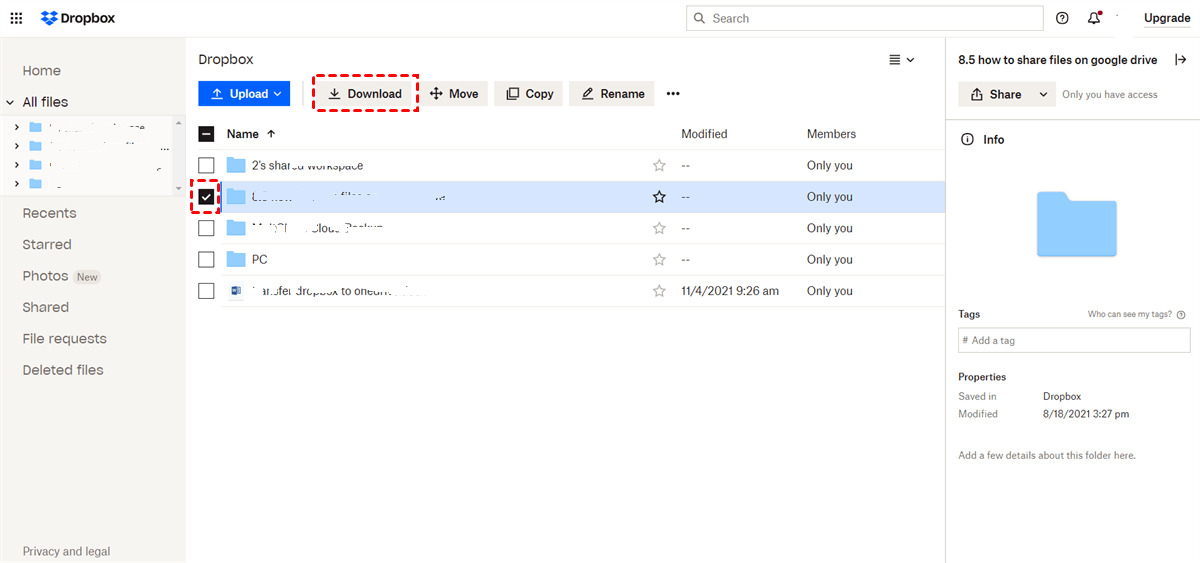
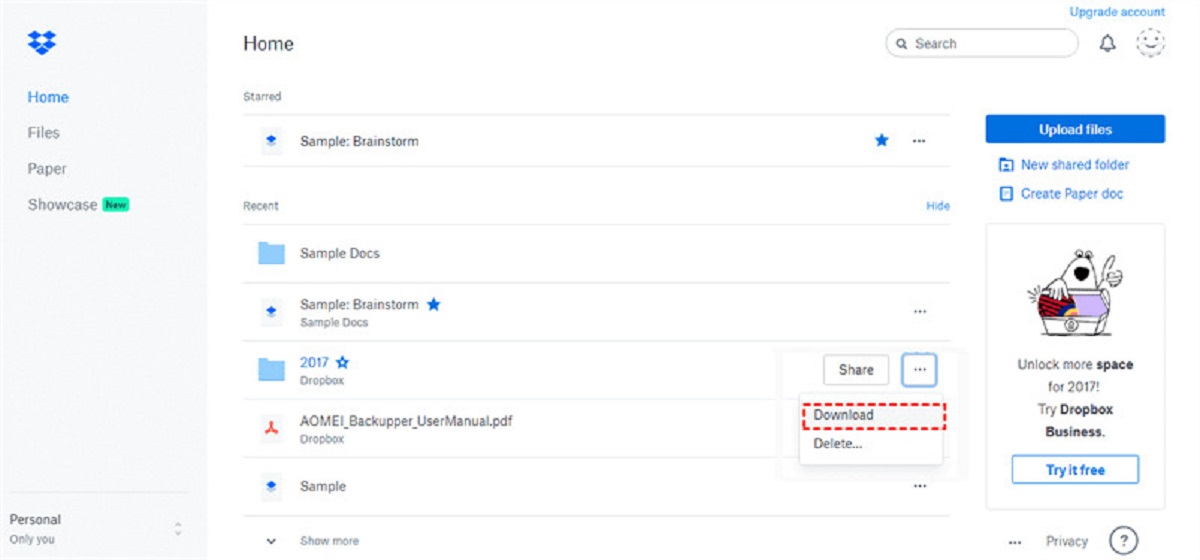
- Hover your cursor over the file you want to download, and you will see a checkbox appearing on the left side of the file. Click on the checkbox to select the file. If you want to download multiple files, repeat this step for each file you want to download.
- Once you have selected the file or files, you will see a toolbar appearing at the top of the Dropbox dashboard. In the toolbar, click on the “Download” button. Alternatively, you can right-click on the selected file(s) and choose the “Download” option from the context menu.
- Depending on the browser you are using, you may be prompted to choose a location to save the downloaded file. If prompted, select the external hard drive as the destination for the file. This will ensure that the file is directly downloaded to your external hard drive instead of being saved to your computer’s local storage.
- After confirming the download location, the file transfer process will begin. The time it takes to complete the download will depend on the file size and your internet connection speed. Make sure to keep your internet connection stable during the download to avoid any interruptions.
- Once the download is complete, you will receive a notification or see a progress indicator indicating that the file has been successfully downloaded. If you downloaded multiple files, the process will be repeated for each file.
By following these steps, you can easily download files from Dropbox directly to your external hard drive. Now that you have successfully downloaded the file(s), it’s time to choose the specific destination on your external hard drive where you want to save the file(s). We will cover this in the next step.
Step 4: Choose the Destination on External Hard Drive
After downloading the file from Dropbox, the next step is to choose the destination on your external hard drive where you want to save the file. Follow these instructions to select the appropriate location:
- Open the file explorer or finder on your computer. You can do this by clicking on the corresponding icon in your taskbar (for Windows) or the dock (for Mac).
- Locate your external hard drive in the list of connected devices. It is usually labeled with the name or model of the external hard drive.
- Click on the external hard drive to open it and explore its contents. This will display all the existing files and folders stored on the external hard drive.
- Navigate to the folder or create a new folder where you want to save the downloaded file from Dropbox. This will help you keep your external hard drive organized and make it easier to locate files in the future.
Choosing a specific destination folder is particularly helpful if you are downloading multiple files from Dropbox, as it allows you to keep them organized within the same location on your external hard drive.
If you decide to create a new folder, right-click on an empty space within the external hard drive’s window and select the option to “New Folder” or “Create New Folder”. Give the new folder a descriptive name related to the files you downloaded from Dropbox.
Once you have selected the appropriate folder or created a new one, you are ready to proceed to the next step: initiating the file transfer process to save the downloaded file(s) to your chosen destination on the external hard drive.
Step 5: Start the File Transfer Process
With the destination on your external hard drive selected, it’s time to initiate the file transfer process to save the downloaded files from Dropbox. Follow these steps to complete the transfer:
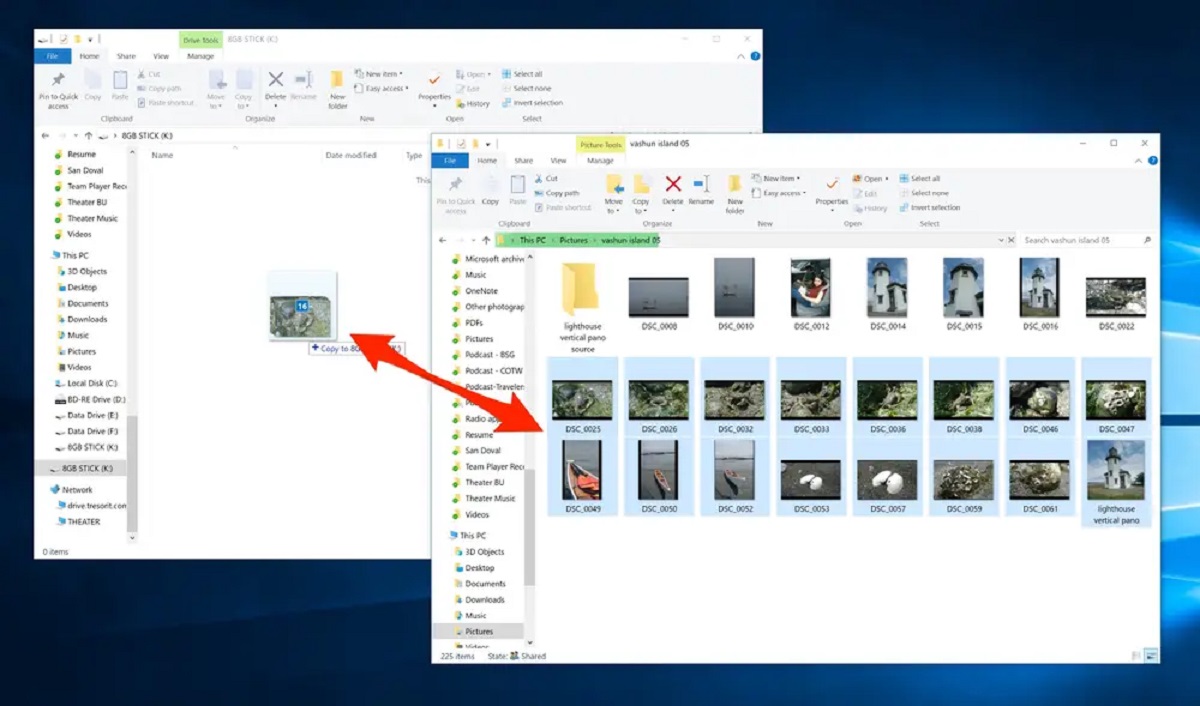
- Go back to the file or files you downloaded from Dropbox and select them. You can do this by holding down the Ctrl key (Windows) or the Command key (Mac) and clicking on each file. Alternatively, you can click and drag your mouse cursor to select multiple files at once.
- Once the files are selected, right-click on any one of them and choose the “Copy” option from the context menu. Alternatively, you can use the keyboard shortcut Ctrl+C (Windows) or Command+C (Mac) to copy the files.
- Now, navigate back to the external hard drive window and open the folder where you want to save the downloaded files.
- Right-click within the folder window and select the “Paste” option from the context menu. Alternatively, you can use the keyboard shortcut Ctrl+V (Windows) or Command+V (Mac) to paste the files into the folder.
- The file transfer process will begin, and you will see a progress indicator showing the status of the transfer. This may take some time, depending on the size and number of files being transferred, as well as the speed of your computer and external hard drive.
- Once the transfer is complete, you will see the copied files appear in the selected folder on your external hard drive. You can verify the successful transfer by checking the file names, sizes, and timestamps.
Repeat these steps for each file you downloaded from Dropbox to ensure all files are transferred to the desired location on your external hard drive. Once all the files have been successfully transferred, you can proceed to the final step: verifying the downloaded files on your external hard drive.
Step 6: Check the Downloaded File on External Hard Drive
After completing the file transfer process from Dropbox to your external hard drive, it’s important to verify that the files were successfully downloaded and saved in the designated location. Follow these steps to ensure the integrity of your downloaded files:
- Open the file explorer or finder on your computer.
- Locate your external hard drive in the list of connected devices.
- Click on the external hard drive to open it.
- Navigate to the folder where you saved the downloaded files from Dropbox.
- Here, you will see the files that were transferred from Dropbox. Take a moment to verify that all the files you expected to download are present in the folder.
- You can double-click on each file to open them and ensure their contents are intact.
- Check the file sizes and compare them to the original files on Dropbox. If they match, it indicates a successful download.
By checking the downloaded files on your external hard drive, you can have peace of mind knowing that the files were transferred accurately and are ready for use. If you encounter any issues, such as missing files or corrupted data, you may need to repeat the download process from Dropbox to your external hard drive.
By following these steps, you can confidently download your files from Dropbox to your external hard drive and have a local copy of your important data. This ensures that you have a backup and easy access to your files even without an internet connection.
Now that you have successfully completed all the steps, you are ready to enjoy the convenience and benefits of having your files stored on both Dropbox and your external hard drive.
Conclusion
Downloading files from Dropbox to an external hard drive provides you with a convenient way to have a local backup of your important data and ensure easy access to your files offline. By following the step-by-step guide outlined in this article, you can successfully transfer files from Dropbox to your external hard drive.
We started by connecting the external hard drive to your computer, ensuring that it is recognized by the operating system. Then, we logged in to your Dropbox account and located the specific files you wanted to download. After that, we initiated the download process and chose the destination folder on your external hard drive.
Once the download was complete, we checked the transferred files on the external hard drive to verify their integrity. Finally, we concluded the process by ensuring that the downloaded files are present and accessible on your external hard drive.
Remember to always have enough free space on your external hard drive to accommodate the files you wish to download. Additionally, make sure to maintain a stable internet connection during the download process to ensure uninterrupted transfer.
By following these steps, you can confidently download files from Dropbox to your external hard drive and have peace of mind knowing that your data is safely stored and easily accessible. Whether you need to back up important documents, store large media files, or have a portable copy of your files, this process allows you to have control over your data.
So, make use of the information in this article, and start downloading your files from Dropbox to your external hard drive today. Enjoy the convenience and security of having your files stored locally, ensuring easy access and peace of mind.