Introduction
Welcome to our guide on how to download files directly to an external hard drive. With the exponential growth of digital content and the increasing need for additional storage, it has become essential to find efficient solutions for managing and storing files. By bypassing the default download location on your computer and saving files directly to an external hard drive, you can free up space on your internal storage and keep your files organized in one centralized location.
In this article, we will take you through the step-by-step process of setting up your external hard drive as the default download location and configuring your browser settings to save files directly to the drive. We will also provide tips on organizing and transferring downloaded files on your external hard drive for easy access and retrieval. Whether you are a student, professional, or general computer user, this guide will help you optimize your storage space and streamline your file management process.
Before we dive into the process, it’s important to note that the methods discussed in this guide may differ slightly depending on the operating system and browser you are using. However, the fundamental principles remain the same, and we will provide general instructions that can be adapted to different systems.
Now, let’s explore the benefits of downloading files directly to an external hard drive and how it can simplify your digital life.
Why Downloading Files Directly to an External Hard Drive is Beneficial
Downloading files directly to an external hard drive offers numerous advantages that can greatly enhance your digital experience. Here are some key benefits to consider:
1. Increased Storage Capacity: One of the primary advantages of using an external hard drive for downloads is the additional storage space it provides. Most computers have limited internal storage, and downloading large files directly to your computer can quickly consume available space. By using an external hard drive, you can expand your storage capacity and download files without worrying about running out of space.
2. Improved Performance: Downloading files directly to an external hard drive can also improve the overall performance of your computer. Over time, as your computer’s internal storage becomes filled with files, the system can slow down and experience lag. By offloading large downloads to an external drive, you can free up valuable internal storage, leading to faster and more efficient performance.
3. Seamless File Management: Managing downloaded files becomes much easier when they are stored directly on an external hard drive. With the files organized in a centralized location, you can easily locate and access them whenever needed. This is particularly useful if you frequently work with large files, such as videos, photos, or design projects.
4. Portability and Accessibility: External hard drives are portable by nature, allowing you to carry your downloaded files with you wherever you go. This is especially valuable for individuals who need to access their files on different devices or while traveling. With an external hard drive, you have the freedom to access your files without relying on an internet connection or carrying your computer with you.
5. Backup and Data Security: When you download files directly to an external hard drive, you automatically create a backup copy of those files. This provides an added layer of data security, as you have a duplicate set of files stored separately from your computer’s internal storage. In the event of a system failure or data loss, you can easily recover your files from the external hard drive.
By downloading files directly to an external hard drive, you can enjoy these benefits and optimize your digital workflow. In the following sections, we will walk you through the step-by-step process of setting up your external hard drive as the default download location and configuring your browser settings for direct downloads.
Compatibility Check: Ensure your External Hard Drive is Compatible
Before you begin downloading files directly to your external hard drive, it’s important to verify that your drive is compatible with your computer’s operating system and has the necessary connections to establish a connection. Here are some key factors to consider when performing a compatibility check:
1. Operating System Compatibility: Different external hard drives have varying levels of compatibility with different operating systems. Ensure that your external hard drive is compatible with your computer’s operating system. For example, if you are using a Mac computer, make sure the external hard drive is formatted for Mac OS and vice versa for Windows. This will ensure smooth communication between your computer and the external drive.
2. Connection Type: External hard drives come with different connection types, such as USB, Thunderbolt, or eSATA. Verify the connection types supported by your computer and ensure that your external hard drive has the corresponding port. USB is the most common and widely supported connection type, but it’s always essential to double-check compatibility before making a purchase.
3. Power Requirements: Some external hard drives draw power directly from the computer, while others require an external power source. Check the power requirements of your external hard drive and ensure that your computer can provide the necessary power or that you have access to an external power supply if needed.
4. Storage Capacity: Determine the size and storage capacity of the external hard drive that best suits your needs. Consider the types of files you will be downloading and the amount of storage space they require. It’s wise to choose a drive with ample storage capacity to avoid frequent file transfers or the need for additional drives in the future.
5. Compatibility with File Systems: Different file systems, such as NTFS, FAT32, or exFAT, may have limitations regarding file size and compatibility with different operating systems. Check if your external hard drive’s file system is compatible with your computer’s operating system to ensure seamless file transfer and access.
By thoroughly confirming the compatibility of your external hard drive with your computer’s operating system, connection type, power requirements, storage capacity, and file system, you can ensure a smooth and hassle-free experience when downloading files directly to your external drive. In the next section, we will guide you through the process of connecting your external hard drive to your computer.
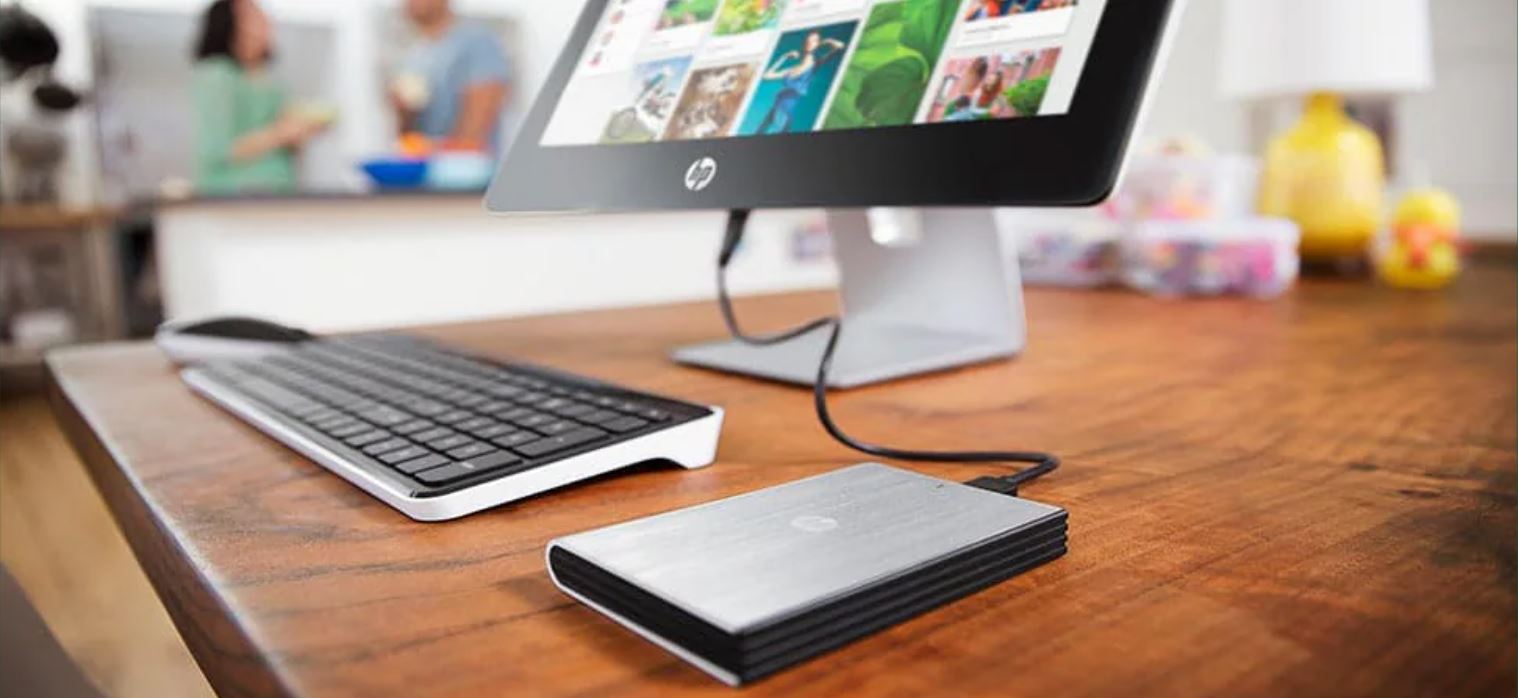
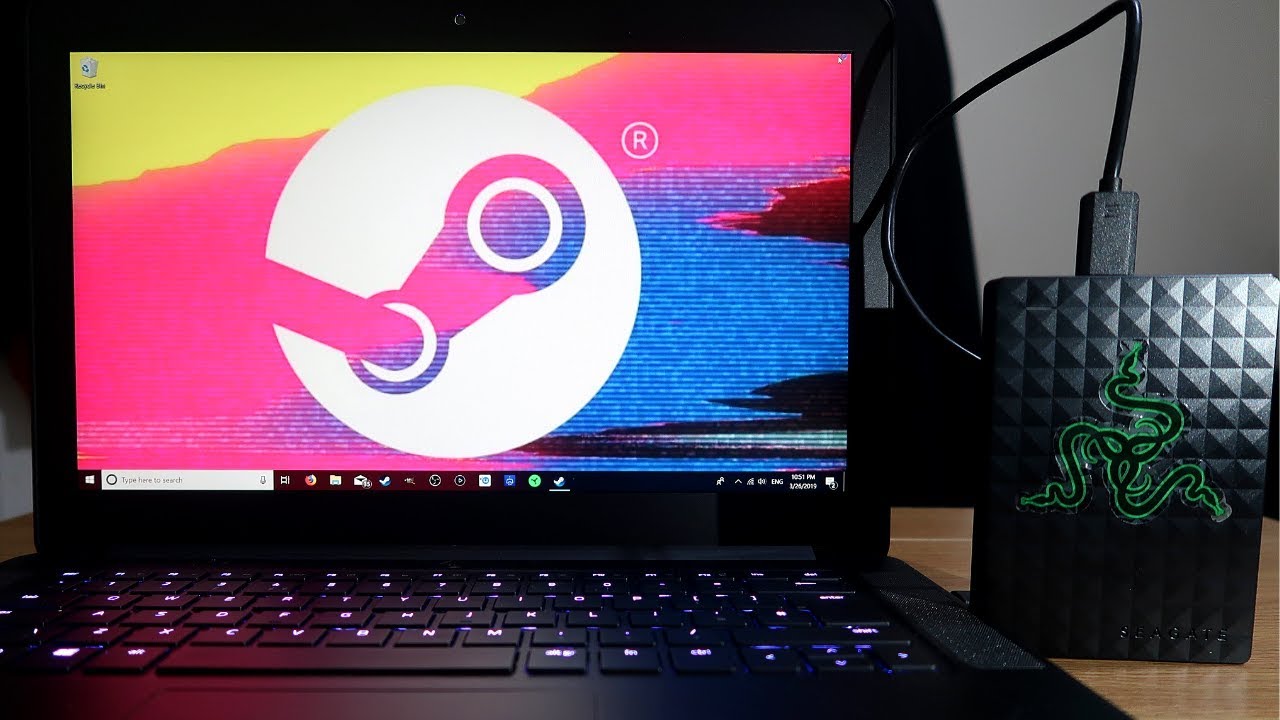
Step 1: Connect Your External Hard Drive to Your Computer
The first step in downloading files directly to your external hard drive is to establish a connection between the drive and your computer. Follow these steps to connect your external hard drive:
1. Locate the appropriate ports: Identify the USB, Thunderbolt, or eSATA port on your computer where you will connect your external hard drive. The type of port will depend on the connection available on your external hard drive and your computer.
2. Plug in the external hard drive: Connect one end of the cable to the external hard drive and the other end to the corresponding port on your computer. Make sure the connection is secure. If your external hard drive requires external power, connect it to an electrical outlet as well.
3. Power on the external hard drive: Some external hard drives power on automatically when connected, while others require you to press a power button. Refer to the manufacturer’s instructions to power on the drive if necessary.
4. Wait for computer recognition: After connecting the external hard drive, your computer should recognize it and display a notification or a new drive icon. This may take a few moments, so be patient. Once recognized, your external hard drive is ready to be configured as the default download location.
It’s important to ensure that the connection between your external hard drive and your computer is stable throughout the download process to avoid any interruptions. If you encounter any issues with the connection, double-check the cables and ports, and consult your external hard drive’s user manual for troubleshooting guidance.
In the next section, we will guide you through the process of setting your external hard drive as the default download location on your computer, allowing you to download files directly to the drive.
Step 2: Set Your External Hard Drive as the Default Download Location
Setting your external hard drive as the default download location ensures that all files you download will be saved directly to the drive. Follow these steps to configure your computer to save downloads to your external hard drive:
1. Open File Explorer (Windows) or Finder (Mac): Navigate to the file explorer or finder window on your computer. You can typically find these applications in your computer’s taskbar or dock.
2. Locate the external hard drive: In the file explorer or finder window, look for the external hard drive under the “Devices” or “External Drives” section. It is usually represented by a drive letter (e.g., “D:”, “E:”, etc.) or a name assigned to the drive.
3. Right-click (Windows) or Control-click (Mac): Right-click the external hard drive icon (or control-click if you are using a Mac) to open a context menu.
4. Select “Properties” (Windows) or “Get Info” (Mac): From the context menu, choose the “Properties” option in Windows or “Get Info” in Mac. This will open a window with detailed information about the external hard drive.
5. Set as default download location: In the properties or info window, navigate to the “Location” or “General Information” tab. Look for an option that allows you to set the default download location. Check the box or select the external hard drive as the destination for downloaded files.
6. Confirm the changes: Click “Apply” or “OK” to save the changes and set the external hard drive as the default download location. This ensures that any files you download will be saved directly to the drive.
By setting your external hard drive as the default download location, you can bypass the default download folder on your computer and directly save files to the external drive. This will help you save space on your computer’s internal storage and keep your downloads organized in one central location.
In the next section, we will explore how you can adjust your browser settings to enable direct downloading to your external hard drive.
Step 3: Adjust Your Browser Settings for Direct Downloading
Once you have set your external hard drive as the default download location on your computer, you need to configure your web browser to save downloads directly to the drive. Follow these steps to adjust your browser settings for direct downloading:
1. Open your web browser: Launch your preferred web browser, such as Google Chrome, Mozilla Firefox, or Microsoft Edge.
2. Access the browser settings: Click on the menu icon (three horizontal lines or dots) located in the upper-right corner of the browser window. From the dropdown menu, select “Settings” or “Preferences.”
3. Navigate to the download settings: Within the browser settings, find the section related to downloads. It may be labeled as “Downloads” or “Downloads and Files.”
4. Choose the download location: Look for an option that allows you to specify the download location. Select the option to “Ask where to save each file” or “Choose a specific folder.” By choosing this option, the browser will prompt you to select the download location each time you initiate a download.
5. Set the external hard drive as the default: When prompted to choose a download location, navigate to the external hard drive and select it as the default location. This ensures that all future downloads will be saved directly to the external drive.
6. Save the settings: After selecting the external hard drive as the default download location, save the settings in your browser. Look for a “Save” or “Apply” button within the settings page and click on it to confirm the changes.
By adjusting your browser settings to save downloads directly to your external hard drive, you ensure that all downloaded files are stored directly on the drive without the need for manual transfer. This streamlines the download process and keeps your files organized in one central location.
In the next step, we will guide you on how to download files directly to your external hard drive.
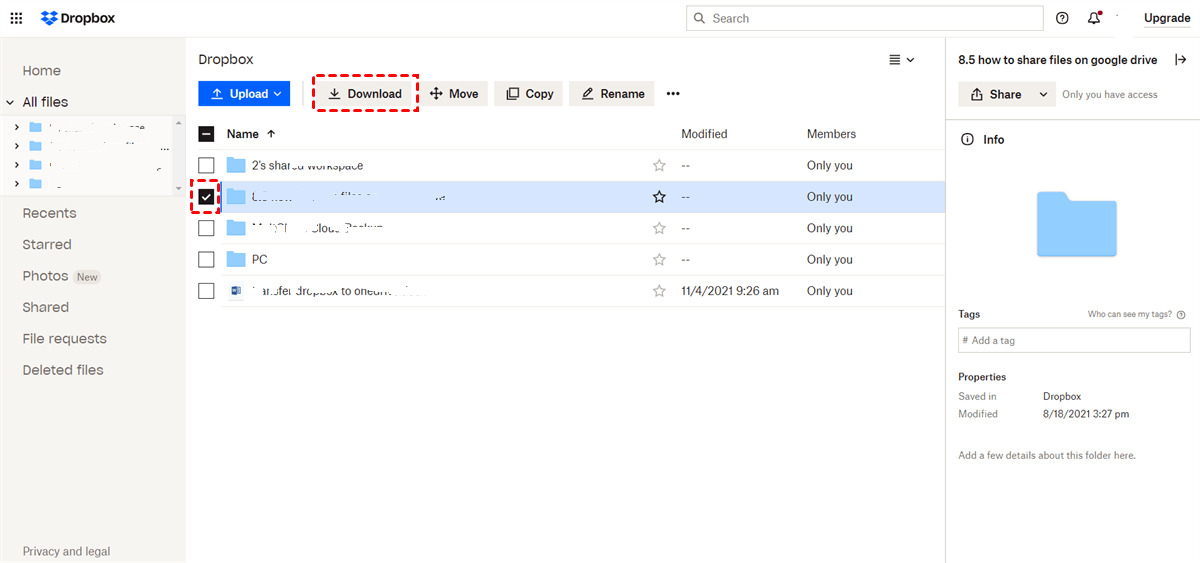
Step 4: Download Files Directly to Your External Hard Drive
Now that you have set up your external hard drive as the default download location and adjusted your browser settings, you can start downloading files directly to the drive. Follow these steps to download files directly to your external hard drive:
1. Browse the internet: Open your web browser and navigate to the website or source from which you want to download a file.
2. Initiate the download: Locate the file you want to download and click on the download link or button. The file may be a document, image, video, or any other type of downloadable content.
3. Choose the download location: When prompted to choose a download location, ensure that the external hard drive is selected as the destination. This is where the files will be saved on your external hard drive.
4. Monitor the download progress: Once you have selected the download location, the file will start downloading. Monitor the progress of the download, which is usually indicated by a progress bar or percentage.
5. Wait for the download to complete: Allow the download to complete fully. The speed of the download will depend on your internet connection and the size of the file.
6. Verify the downloaded file: Once the download is complete, navigate to the designated download location on your external hard drive to ensure that the file has been successfully saved. Check the file size and ensure that it matches the expected size.
Repeat these steps for each file you want to download directly to your external hard drive. By downloading files directly to the drive, you avoid cluttering your computer’s internal storage and keep your files organized in one central location for easy access and management.
In the next step, we will discuss how to organize and transfer downloaded files on your external hard drive for optimal file management.
Step 5: Organize and Transfer Downloaded Files on Your External Hard Drive
Once you have downloaded files directly to your external hard drive, it’s important to organize them for easy access and efficient file management. Follow these steps to organize and transfer downloaded files on your external hard drive:
1. Create folders: Create folders on your external hard drive to categorize your files. You can create folders based on file types, projects, or any other organizational structure that suits your needs.
2. Name your folders: Give meaningful names to your folders to make it easier to identify and locate files. Use descriptive names that accurately represent the content or purpose of the files within each folder.
3. Move files to the appropriate folders: Once you have created folders, navigate to the download location on your external hard drive and move the downloaded files into their respective folders. Drag and drop the files or use the cut-and-paste commands to transfer the files.
4. Delete unnecessary files: Review the downloaded files and remove any files that are no longer needed or duplicates. This will help declutter your storage space and make it easier to locate and manage your files.
5. Implement a file naming convention: Consider implementing a consistent file naming convention to keep your files organized within each folder. Use descriptive names that include relevant details such as date, project name, or keywords.
6. Regularly backup your external hard drive: To safeguard your downloaded files, establish a backup routine to ensure that you have a copy of your files stored in a separate location. This can be in the form of cloud storage, another external hard drive, or a network-attached storage device.
By organizing and transferring downloaded files on your external hard drive, you can maintain a well-structured file system that allows for easy retrieval and efficient file management. This will enhance your productivity and reduce the time spent searching for specific files.
In the next section, we will discuss common issues that you may encounter when downloading files directly to your external hard drive and provide troubleshooting solutions.
Troubleshooting: Common Issues and Solutions
While downloading files directly to your external hard drive can streamline your file management, you may encounter some common issues along the way. Here are a few troubleshooting solutions to help you resolve these issues:
1. Slow download speeds: If you experience slow download speeds, check your internet connection to ensure it’s stable and capable of handling the download. Additionally, make sure your external hard drive is connected properly to the computer and has sufficient free space.
2. Unrecognized external hard drive: If your computer fails to recognize the external hard drive, try disconnecting and reconnecting the drive. If the issue persists, check the cable connections and try using a different USB port. Alternatively, you can try accessing the drive on another computer to determine if the problem lies with the external hard drive or the computer itself.
3. Insufficient storage space: If you receive an error message indicating insufficient storage space on your external hard drive, check the available free space. If you are running low on space, consider deleting unnecessary files or transferring them to another storage device to free up space.
4. Corrupted or incomplete downloads: If a downloaded file appears to be corrupted or incomplete, try re-downloading the file. Ensure that the internet connection is stable and try using a different browser or download manager if the issue persists.
5. File organization issues: If you find it difficult to locate and manage your downloaded files, review your folder structure and file naming conventions. Consider revising the organizational system to make it more intuitive and efficient for your specific needs.
6. Errors during file transfer: If you encounter errors or interruptions while transferring files to your external hard drive, verify the connection between the computer and the hard drive. Check the cable connections and ensure that the drive has adequate power if it requires an external power source.
If you continue to experience issues or encounter specific error messages when downloading files directly to your external hard drive, consult the manufacturer’s documentation or support resources for guidance and assistance.
In the next section, we will conclude our guide on how to download files directly to an external hard drive and summarize the key points discussed.
Conclusion
Downloading files directly to an external hard drive offers numerous benefits, including increased storage capacity, improved performance, seamless file management, portability, and enhanced data security. By setting up your external hard drive as the default download location and configuring your browser settings, you can easily download files directly to the drive, bypassing your computer’s internal storage.
Throughout this guide, we have walked you through the step-by-step process of connecting your external hard drive to your computer, setting it as the default download location, adjusting your browser settings for direct downloading, and organizing and transferring downloaded files on your external hard drive.
We also provided troubleshooting solutions for common issues such as slow download speeds, unrecognized drives, insufficient storage space, corrupted downloads, file organization problems, and errors during file transfer.
By following these steps and implementing the best practices outlined, you can streamline your file management process, optimize your storage space, and maintain a well-organized collection of downloaded files on your external hard drive.
Remember to regularly back up your external hard drive to ensure the safety and availability of your files. Additionally, periodically review your file organization system to ensure it remains efficient and suits your evolving needs.
We hope this guide has provided you with the knowledge and tools to download files directly to your external hard drive successfully. Enjoy the benefits of increased storage capacity, improved performance, and simplified file management as you streamline your digital experience.