Introduction
Welcome to this guide on how to check storage on an external hard drive. External hard drives are incredibly useful for expanding the storage capacity of your computer or backing up important files. However, it’s crucial to keep track of the available storage space on your external drive to ensure you don’t run out of space or encounter any issues.
Knowing how to check the storage on your external hard drive is essential for effectively managing your data. By checking the storage, you can determine how much space is available, identify which files or folders are taking up the most space, and make informed decisions about organizing or deleting files to free up storage capacity. In this guide, we will explore several methods for checking the storage on an external hard drive, depending on whether you are using a Windows or Mac operating system.
Whether you are a professional who relies on external storage for work-related projects, a student who needs additional space for academic resources, or a casual user who wants to keep their personal files organized, this guide will provide you with the necessary steps to check the storage on your external hard drive.
It’s worth noting that the steps provided in this guide may vary slightly depending on the version of the operating system you are using. However, the general principles and methods remain the same across different versions. With that said, let’s dive into the different methods you can use to check the storage on your external hard drive!
Methods for Checking Storage on External Hard Drive
There are multiple methods available for checking the storage on an external hard drive, depending on the operating system you are using. In this section, we will explore four common methods, two for Windows users and two for Mac users. Let’s take a closer look:
-
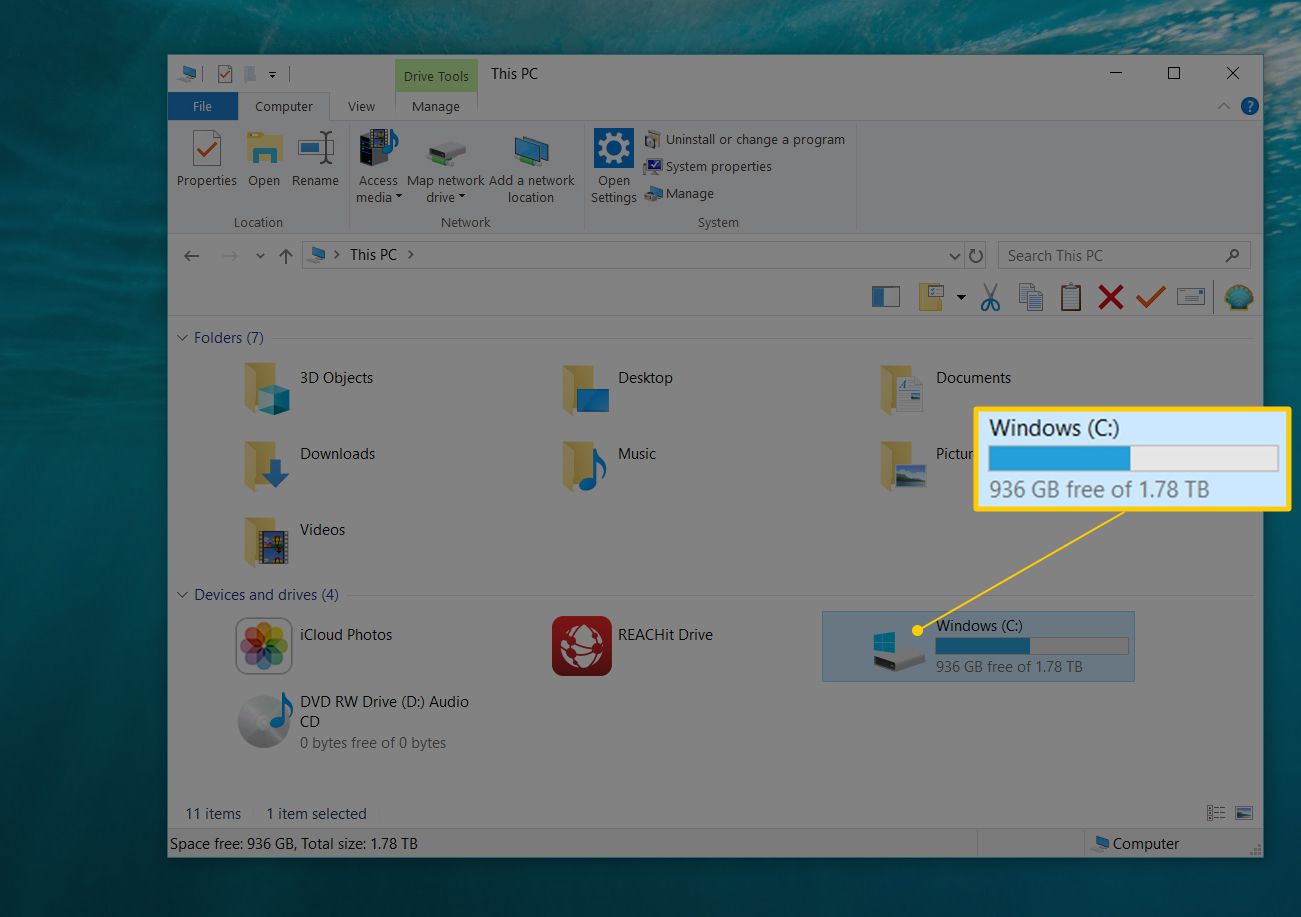
Method 1: Using File Explorer (Windows)
If you are using a Windows computer, one of the simplest methods to check the storage on your external hard drive is by using the File Explorer. Simply connect your external hard drive to your computer and open the File Explorer. Under the “This PC” section, you should see your external drive listed as a separate storage device. Right-click on your external hard drive and select “Properties”. In the Properties window, you will find detailed information about the storage capacity, used space, and available free space on your external drive.
-
Method 2: Using Finder (Mac)
For Mac users, checking the storage on an external hard drive can be done through the Finder. Connect your external hard drive to your Mac and open a Finder window. Look for your external drive in the sidebar under the “Devices” section. Click on the drive, and you will see an overview of the storage details, including the capacity, available space, and used space, displayed at the bottom of the Finder window.
-
Method 3: Using Disk Utility (Mac)
Another method specific to Mac users is to utilize the built-in Disk Utility. Launch Disk Utility, which can be found in the “Utilities” folder within the “Applications” folder, or by using Spotlight search. Once Disk Utility is open, select your external hard drive from the list of devices on the left-hand side. The storage information, including the capacity, used space, and available space, will be displayed on the right-hand side of the window.
-
Method 4: Using Command Prompt (Windows)
Windows users who prefer using command-line tools can check the storage on their external hard drive through Command Prompt. Connect your external drive to your computer and open Command Prompt. Type
dirand press Enter. You will see a list of files and directories on your external drive, along with their sizes. At the bottom of the list, you will also find a summary that includes the total size, number of files, and number of folders.
By using one of these methods, you can easily check the storage on your external hard drive, gain insights into your data usage, and manage your files more efficiently. Choose the method that matches your operating system and preferences, and start keeping track of your external storage with ease!
Method 1: Using File Explorer (Windows)
Checking the storage on your external hard drive using File Explorer in Windows is a straightforward process. Follow the steps below:
- Connect your external hard drive to your computer using the appropriate USB cable.
- Open File Explorer by clicking on the folder icon in the taskbar or by pressing the Windows key + E.
- In the left-hand sidebar of File Explorer, locate the “This PC” section. Here, you will find a list of all connected drives, including your external hard drive.
- Right-click on your external hard drive. A context menu will appear.
- Select “Properties” from the context menu.
- In the Properties window that appears, you will see several tabs. Click on the “General” tab, if it’s not already selected.
- Under the “Capacity” section, you will find the total storage capacity of your external hard drive.
- Under the “Used space” section, you will see the amount of space currently being used on your external drive.
- Under the “Free space” section, you will see the amount of available free space left on your external hard drive.
By following these steps, you can quickly determine the storage capacity, used space, and available free space on your external hard drive using File Explorer in Windows. This information will help you keep track of your data and make informed decisions about managing your files.
Method 2: Using Finder (Mac)
If you’re using a Mac computer, checking the storage on your external hard drive can be easily done through the Finder. Follow the steps below:
- Connect your external hard drive to your Mac using the appropriate cable.
- Open a Finder window by clicking on the blue smiling face icon located on your dock.
- In the sidebar of the Finder window, under the “Devices” section, you should see your external hard drive listed.
- Click on the name of your external hard drive.
- At the bottom of the Finder window, you will see an overview of your external drive’s storage details.
- The capacity of your external drive will be displayed as well as the amount of space available and space that is currently being used.
By following these steps, you can quickly check the storage status of your external hard drive using Finder on your Mac. This information will help you keep track of your data usage and manage your files effectively.
Method 3: Using Disk Utility (Mac)
Mac users have another convenient method for checking the storage on their external hard drives, and that is by using the built-in Disk Utility. Here’s how you can do it:
- Connect your external hard drive to your Mac using the appropriate cable.
- Open Disk Utility by going to the “Applications” folder, then the “Utilities” folder, and selecting Disk Utility.
- In the Disk Utility window, you will see a list of available drives and volumes on the left-hand side. Look for your external hard drive and select it.
- On the right-hand side of the Disk Utility window, you will see detailed information about your external drive.
- The capacity of your external hard drive will be displayed, along with the amount of space used and the available space.
Using Disk Utility provides you with a comprehensive view of your external hard drive’s storage details. It allows you to not only check the capacity and available space but also perform additional tasks like verifying and repairing the drive if needed.
With Disk Utility, Mac users can easily keep track of their external drive’s storage status and ensure its optimal performance.
Method 4: Using Command Prompt (Windows)
For Windows users who prefer using the command-line interface, checking the storage on an external hard drive can be done using Command Prompt. Here’s how you can do it:
- Connect your external hard drive to your Windows computer using the appropriate USB cable.
- Open the Command Prompt by pressing the Windows key + R, typing “cmd” in the Run dialog, and pressing Enter.
- In the Command Prompt window, type
dirfollowed by the drive letter assigned to your external hard drive, for example,dir E:. Press Enter. - You will see a list of files and directories on your external hard drive, along with their sizes.
- At the bottom of the list, you will find a summary that includes the total size of your external drive, as well as the number of files and folders.
Using Command Prompt provides you with a quick and efficient way to retrieve information about the storage of your external hard drive. It allows you to view the size of individual files and folders and get an overview of the total storage usage.
By utilizing Command Prompt, Windows users can easily keep track of their external drive’s storage status and make informed decisions regarding file organization and management.
Conclusion
Checking the storage on your external hard drive is crucial for effectively managing your files and ensuring you have enough space for your data. In this guide, we explored four different methods for checking the storage on an external hard drive, depending on whether you are using a Windows or Mac operating system.
For Windows users, the File Explorer and Command Prompt methods provide quick and accessible ways to check the storage. By using File Explorer, you can easily view the available free space, used space, and total capacity of your external hard drive. Command Prompt allows you to retrieve a detailed list of files and folders, along with their sizes.
Mac users, on the other hand, have the option to use Finder or Disk Utility to check the storage on their external hard drives. Finder provides an overview of the storage details at the bottom of the window, while Disk Utility offers a comprehensive view of the drive’s storage status, as well as additional functions for drive maintenance.
By regularly checking the storage on your external hard drive, you can stay organized, identify files or folders that are taking up excessive space, and make informed decisions about file management and organization. Whether you’re using your external hard drive for work, school, or personal purposes, maintaining adequate storage space is essential for smooth and efficient operation.
Remember, always be mindful of your storage capacity and consider regularly backing up your important files to avoid potential data loss. With the methods outlined in this guide, you can easily stay on top of your external hard drive’s storage situation and ensure that you have sufficient space for your files and data.