Introduction
Graphs are a powerful way to visually represent data and gain insights from it. They are widely used in various fields, including finance, science, and statistics. PHP, being a versatile scripting language, allows developers to easily create and customize graphs to suit their specific needs.
In this tutorial, we will explore how to create a graph in PHP from scratch. We will cover the entire process, including setting up the environment, creating data arrays, initializing the graph, defining dimensions, drawing axes and labels, plotting data points, and adding titles and legends. By the end of this tutorial, you will have a solid understanding of how to create dynamic and visually appealing graphs in PHP.
Before we dive into the technical details, it’s important to note that basic knowledge of PHP and HTML is required to follow along with this tutorial. Additionally, having a local development server set up with PHP support is necessary to run the code snippets provided. Let’s get started by ensuring that we have the required environment set up.
Through this tutorial, we will be using the GD extension, which is a library in PHP that provides functions for image manipulation. GD allows us to create and manipulate images, making it an ideal tool for generating graphs dynamically.
Now that we have a brief overview of what we will be covering in this tutorial, let’s move on to setting up our development environment.
Setting up the Environment
Before we start creating graphs in PHP, we need to ensure that our development environment is properly set up. Here are the steps to follow:
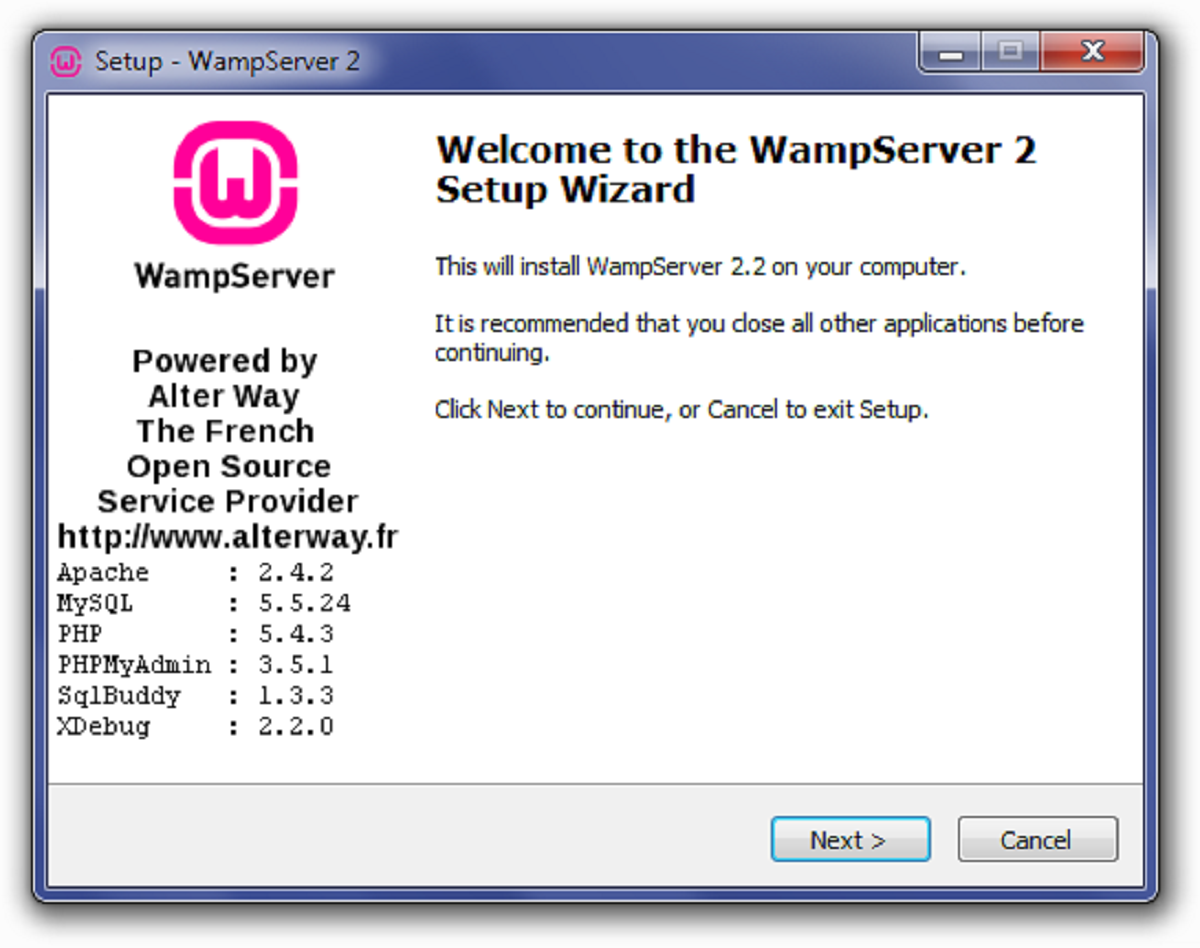
- Install PHP: If you don’t already have PHP installed on your system, you can download and install it from the official PHP website (php.net). Make sure to choose the version that is compatible with your operating system.
- Enable GD extension: The GD extension is required for manipulating images in PHP. To enable it, you need to locate your php.ini file and uncomment or add the following line:
extension=gd. Once you’ve made the changes, restart your web server. - Verify the installation: To ensure that PHP and the GD extension are installed correctly, create a PHP file with the following code:
php
Save the file with a .php extension and open it in your web browser. You should see a detailed page with information about your PHP installation. Look for the GD section to confirm that the extension is enabled.
With PHP and the GD extension properly installed and enabled, we can now move on to creating our graph. In the next sections, we will cover the step-by-step process of creating a graph from scratch using PHP.
Creating a Data Array
Before we can create a graph, we need to have data to plot on it. In this section, we will discuss how to create a data array that contains the values we want to display on our graph.
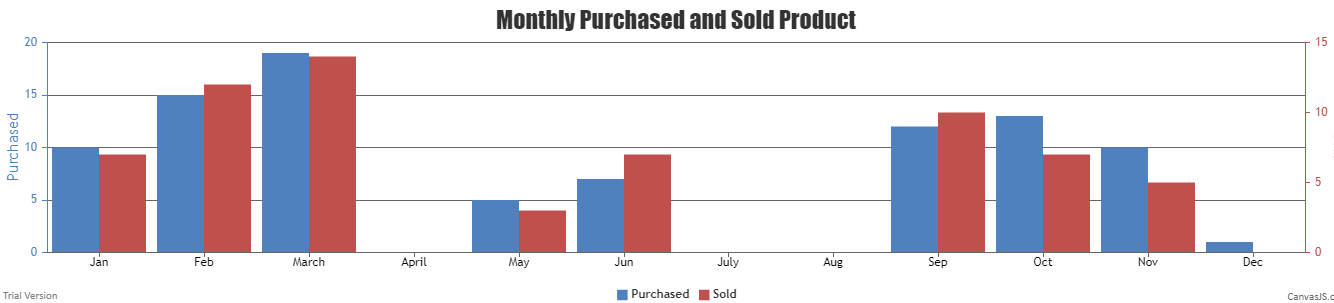
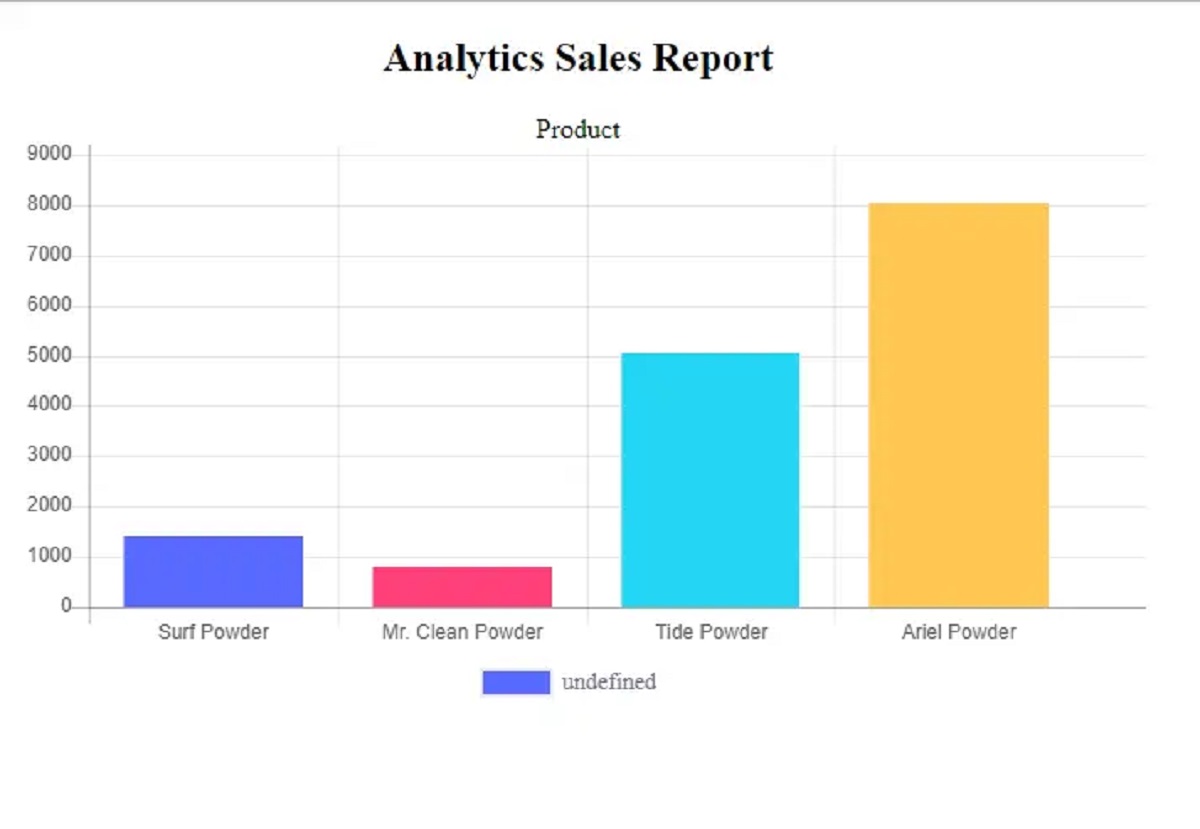
A data array is essentially a collection of data points, where each data point represents a value to be plotted. For example, if we want to create a bar graph showing the sales figures for a particular product over a period of time, our data array would include the sales figures for each corresponding time period.
To create a data array in PHP, we can use a simple associative array where the keys represent the categories or labels, and the values represent the corresponding data points. Here’s an example:
php
$data = array(
“January” => 150,
“February” => 200,
“March” => 180,
“April” => 250,
“May” => 300
);
In the above example, we have created a data array with month names as labels and corresponding sales figures as values. You can customize the array to fit your specific data requirements.
It is important to note that the data array should be created dynamically, by fetching the values from a database or some other data source. This allows you to update the graph with live data whenever necessary.
Once we have our data array, we can move on to initializing the graph and setting the dimensions. We will cover this in the next section.
Initializing the Graph
Now that we have our data array ready, we can proceed to initialize the graph itself. In this section, we will discuss how to create a blank canvas for our graph using PHP and the GD library.
The first step is to create a new image using the imagecreate() function. This function takes in the width and height of the image as parameters, which will be the dimensions of our graph. Here’s an example:
php
$width = 800; // Set the width of the graph
$height = 400; // Set the height of the graph
$graph = imagecreate($width, $height);
In the above code snippet, we create a new image with a width of 800 pixels and a height of 400 pixels. You can adjust these values according to your requirements.
Next, we need to specify the background color for our graph using the imagecolorallocate() function. This function takes in the image resource, followed by the RGB values for the desired color. Here’s an example:
php
$bgColor = imagecolorallocate($graph, 255, 255, 255); // Set the background color to white
In the above code, we allocate the color white (RGB values 255, 255, 255) for the background of our graph. Again, you can customize this color to your preference.
Finally, we need to fill the image with the specified background color using the imagefill() function. This function takes in the image resource and the starting x and y coordinates for the fill area. In our case, we will fill the entire image with the background color. Here’s an example:
php
imagefill($graph, 0, 0, $bgColor); // Fill the image with the background color
With these steps, we have successfully initialized our graph and set the background color. In the next section, we will define the dimensions of our graph and create a background grid to provide a frame of reference for our data.
Defining the Graph Dimensions
After initializing the graph, the next step is to define its dimensions. In this section, we will discuss how to set the dimensions of our graph and determine the size and positioning of the data plot area.
The dimensions of the graph include its width, height, and margins. We can specify these values based on our requirements and the available space for displaying the graph.
Let’s consider an example where we want our graph to have a width of 800 pixels, a height of 400 pixels, and a margin of 50 pixels on all sides. We can define these values as follows:
php
$width = 800; // Set the desired width of the graph
$height = 400; // Set the desired height of the graph
$margin = 50; // Set the desired margin size
$plotWidth = $width – (2 * $margin); // Calculate the width of the data plot area
$plotHeight = $height – (2 * $margin); // Calculate the height of the data plot area
$plotX = $margin; // X-coordinate for the top-left corner of the data plot area
$plotY = $margin; // Y-coordinate for the top-left corner of the data plot area
In the above code snippet, we calculate the width and height of the data plot area by subtracting twice the margin from the total width and height. We then set the x and y coordinates for the top-left corner of the data plot area to the same value as the margin.
By defining the dimensions of the graph and the data plot area, we can ensure that our graph is appropriately sized and positioned within the image canvas. In the next section, we will create a background grid to provide a visual reference for the data points on our graph.
Creating a Background Grid
To enhance the visual appeal and readability of our graph, we can create a background grid that provides a reference for the data points. In this section, we will discuss how to create a background grid using PHP and the GD library.
The background grid consists of horizontal and vertical lines that intersect at regular intervals, forming a grid-like pattern. The spacing between these lines can be adjusted based on the desired granularity of the grid.
Here’s an example of how to create a background grid for our graph:
php
$gridColor = imagecolorallocate($graph, 200, 200, 200); // Set the color for the grid lines
$spacingX = $plotWidth / ($numDataPoints – 1); // Calculate the horizontal spacing between grid lines
$spacingY = $plotHeight / $numVerticalLines; // Calculate the vertical spacing between grid lines
// Draw horizontal lines
for ($y = $plotY; $y <= $plotY + $plotHeight; $y += $spacingY) {
imageline($graph, $plotX, $y, $plotX + $plotWidth, $y, $gridColor);
}
// Draw vertical lines
for ($x = $plotX; $x <= $plotX + $plotWidth; $x += $spacingX) {
imageline($graph, $x, $plotY, $x, $plotY + $plotHeight, $gridColor);
}
In the above code snippet, we first allocate a color for the grid lines using the imagecolorallocate() function. Then, we calculate the horizontal and vertical spacing between the grid lines based on the dimensions of the data plot area and the desired number of grid lines.
Next, we use a loop to draw horizontal lines across the graph at the calculated vertical intervals. Similarly, we draw vertical lines at the calculated horizontal intervals. The imageline() function is used to draw lines on the graph.
By adding a background grid, we provide a visual reference that helps in interpreting the data on the graph. In the next section, we will discuss how to draw axes and labels to further enhance the readability and understanding of the graph.
Drawing Axes and Labels
Axes and labels are essential components of a graph as they provide a reference for interpreting the data. In this section, we will discuss how to draw axes and labels using PHP and the GD library.
The first step is to draw the x-axis and the y-axis. We can accomplish this by using the imageline() function to draw straight lines on the graph image. Here’s an example:
php
$axisColor = imagecolorallocate($graph, 0, 0, 0); // Set the color for the axes
// Draw the x-axis
imageline($graph, $plotX, $plotY + $plotHeight, $plotX + $plotWidth, $plotY + $plotHeight, $axisColor);
// Draw the y-axis
imageline($graph, $plotX, $plotY, $plotX, $plotY + $plotHeight, $axisColor);
In the above code snippet, we first allocate a color for the axes using the imagecolorallocate() function. Then, we use the imageline() function to draw a line from the starting point to the ending point, representing the x-axis and y-axis respectively.
Once the axes are drawn, we can proceed to add labels to the graph. Labels help in identifying the data points on the graph and provide information about the axes. Here’s an example of how to add labels:
php
$labelColor = imagecolorallocate($graph, 0, 0, 0); // Set the color for labels
$labelFont = ‘path/to/font.ttf’; // Specify the path to the font file
$labelX = $plotX + ($plotWidth / 2); // X-coordinate for labeling x-axis
$labelY = $plotY + $plotHeight + 30; // Y-coordinate for labeling y-axis
// Add label for x-axis
imagettftext($graph, 12, 0, $labelX, $labelY, $labelColor, $labelFont, ‘X-axis label’);
// Add label for y-axis
imagettftext($graph, 12, -90, $plotX – 40, $plotY + ($plotHeight / 2), $labelColor, $labelFont, ‘Y-axis label’);
In the above code snippet, we allocate a color for the labels and specify the path to a TrueType font file for the label font. We then use the imagettftext() function to add text labels to the graph at the specified coordinates. The function allows you to customize the font, size, angle, and other properties of the labels.
By drawing axes and adding labels, we make our graph more informative and user-friendly. In the next section, we will discuss how to plot the data points on the graph.
Plotting Data Points
Now that we have our graph set up with axes and labels, the next step is to plot the data points on the graph. In this section, we will discuss how to plot the data points using PHP and the GD library.
To plot the data points, we can use various visual representations such as dots, bars, or lines, depending on the type of graph we want to create. Here’s an example of how to plot data points as dots on a graph:
php
$dotColor = imagecolorallocate($graph, 255, 0, 0); // Set the color for the data points
// Plot data points as dots
foreach ($data as $x => $y) {
$pointX = $plotX + ($x * $spacingX);
$pointY = $plotY + $plotHeight – ($y * $spacingY);
imagefilledellipse($graph, $pointX, $pointY, 6, 6, $dotColor);
}
In the above code snippet, we allocate a color for the data points using the imagecolorallocate() function. Then, we iterate through the data array and calculate the x and y coordinates for each data point based on the spacing between the grid lines.
We use the imagefilledellipse() function to draw filled circles representing the data points. The function takes in the image resource, the x and y coordinates of the center of the circle, and the width and height of the ellipse to be drawn.
Depending on the type of graph you want to create, you can customize the visualization of the data points by using different functions, such as imageline() for lines or imagefilledrectangle() for bars.
With the data points plotted on the graph, we have successfully visualized our data. In the next section, we will add a title and a legend to provide additional information and context for the graph.
Adding a Title and Legend
To provide more context and enhance the understanding of the graph, it is essential to add a title and a legend. In this section, we will discuss how to add a title and a legend to our graph using PHP and the GD library.
The title of the graph identifies the subject or the purpose of the data being presented. Here’s an example of how to add a title to our graph:
php
$titleColor = imagecolorallocate($graph, 0, 0, 0); // Set the color for the title
$titleFont = ‘path/to/font.ttf’; // Specify the path to the font file
$titleX = $plotX + ($plotWidth / 2); // X-coordinate for the title
$titleY = $plotY – 40; // Y-coordinate for the title
// Add the title
imagettftext($graph, 18, 0, $titleX, $titleY, $titleColor, $titleFont, ‘Graph Title’);
In the above code snippet, we allocate a color for the title and specify the path to a TrueType font file for the title font. We then use the imagettftext() function to add the title to the graph at the specified coordinates. You can customize the font, size, angle, and other properties of the title according to your preferences.
The legend of the graph provides a key for understanding the different elements or data series represented on the graph. Here’s an example of how to add a legend:
php
$legendX = $plotX + 20; // X-coordinate for the legend
$legendY = $plotY + 20; // Y-coordinate for the legend
// Add the legend
foreach ($data as $label => $value) {
$legendText = $label . ‘: ‘ . $value;
imagettftext($graph, 12, 0, $legendX, $legendY, $labelColor, $labelFont, $legendText);
$legendY += 20; // Adjust the Y-coordinate for the next legend item
}
In the above code snippet, we iterate through the data array and create a legend item for each label-value pair. The legend items are added to the graph using the imagettftext() function. The Y-coordinate is adjusted for each legend item to position them vertically below each other.
By adding a title and a legend, we provide additional information and context to help interpret the graph. You can customize the formatting, styling, and positioning of the title and legend to match your desired design.
With the title, legend, and data points added, our graph is now complete. In the next section, we will discuss how to save the graph as an image file for further use and sharing.
Saving the Graph as an Image
Once we have created our graph with all the necessary elements, it’s important to save it as an image file for future use or sharing with others. In this section, we will discuss how to save the graph as an image using PHP and the GD library.
The GD library provides a function called imagepng() that allows us to save the graph as a PNG image file. Here’s an example of how to save our graph:
php
$imagePath = ‘path/to/save/graph.png’; // Specify the path to save the image
// Save the graph as a PNG image
imagepng($graph, $imagePath);
// Free up memory by destroying the graph image resource
imagedestroy($graph);
In the above code snippet, we specify the path and filename to save the graph as a PNG image. The image file extension can be changed to other supported formats like JPEG or GIF if desired. We then use the imagepng() function, passing the graph image resource and the file path, to save the graph as an image.
It’s important to note that before saving the graph, we should free up memory by destroying the graph image resource using the imagedestroy() function. This ensures that the memory used by the graph is released.
Once the graph is saved as an image file, you can use it in your web applications, documents, or share it with others as needed.
With the graph saved as an image, we have successfully completed the process of creating, customizing, and saving a graph in PHP. You can now apply your newfound knowledge to create dynamic and visually appealing graphs based on your own data and requirements.