Introduction
Welcome to the world of Smart TVs, where entertainment is at your fingertips. Connecting your Smart TV to Wi-Fi opens up a whole new world of streaming, browsing, and personalized content. Whether you want to stream your favorite shows and movies, browse the internet, or access various apps, a stable and secure Wi-Fi connection is a must.
In this guide, we will walk you through the steps to connect Wi-Fi in your Smart TV. Whether you’re a tech-savvy individual or a beginner, fear not – the process is simple and straightforward. By following these steps, you’ll be able to enjoy all the features and benefits that a Wi-Fi connection brings to your Smart TV.
Before we dive into the steps, make sure you have your Wi-Fi network name (SSID) and password handy. This information is usually found on the back of your router or in the documentation provided by your Internet Service Provider (ISP).
So, let’s get started and get your Smart TV connected to Wi-Fi in no time!
Step 1: Enable Wi-Fi on your Smart TV
The first step in connecting your Smart TV to Wi-Fi is to ensure that the Wi-Fi functionality is enabled on your device. This allows your Smart TV to detect nearby Wi-Fi networks and establish a connection. Here’s how you can enable Wi-Fi on your Smart TV:
- Turn on your Smart TV and navigate to the settings menu. The exact steps may vary depending on the brand and model of your Smart TV, but you can usually find the settings menu by pressing the “Menu” or “Settings” button on your remote control.
- In the settings menu, look for the “Network” or “Network Settings” option. Select it to access the network settings.
- Within the network settings, you should see an option to enable Wi-Fi. Toggle the switch to turn on Wi-Fi functionality. Your Smart TV will now start scanning for available Wi-Fi networks.
Once the Wi-Fi is enabled, you’ll be ready to move on to the next step of the setup process. Keep in mind that some older Smart TV models may not have built-in Wi-Fi capabilities. In this case, you may need to use an external Wi-Fi adapter to connect your Smart TV to a wireless network.
Now that Wi-Fi is enabled on your Smart TV, you’re ready to move on to the next step: finding and connecting to your Wi-Fi network.
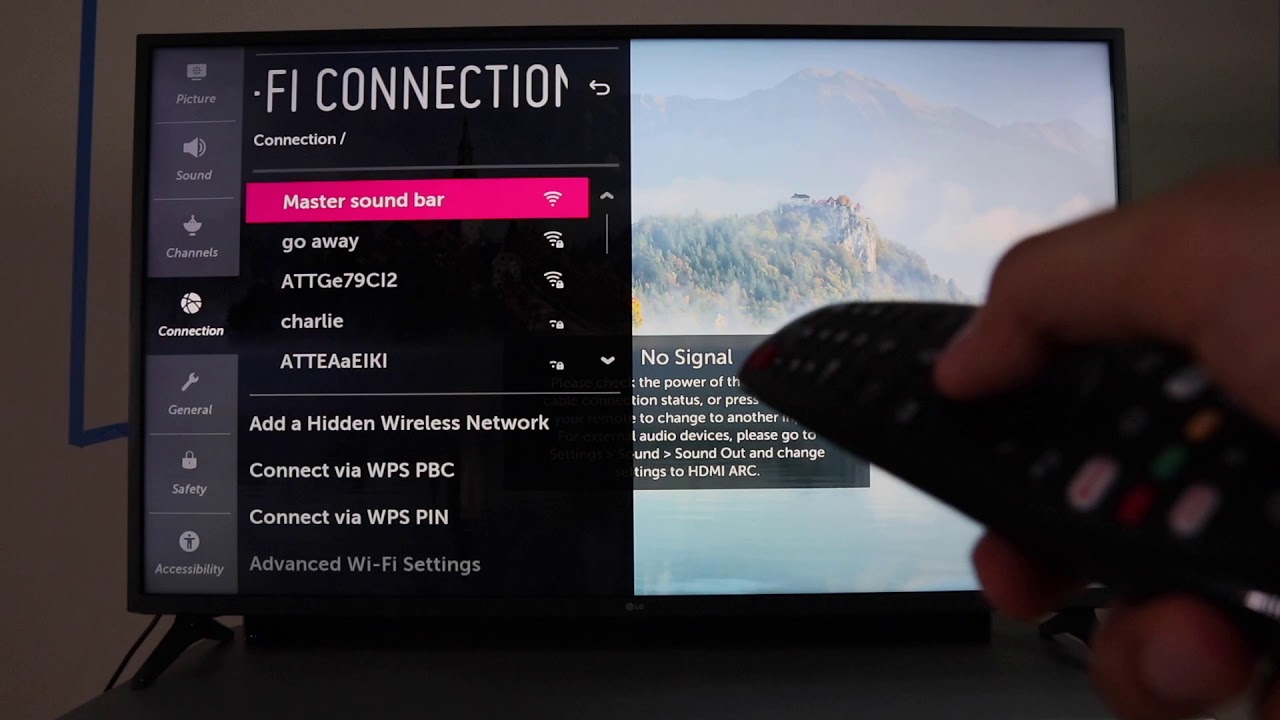
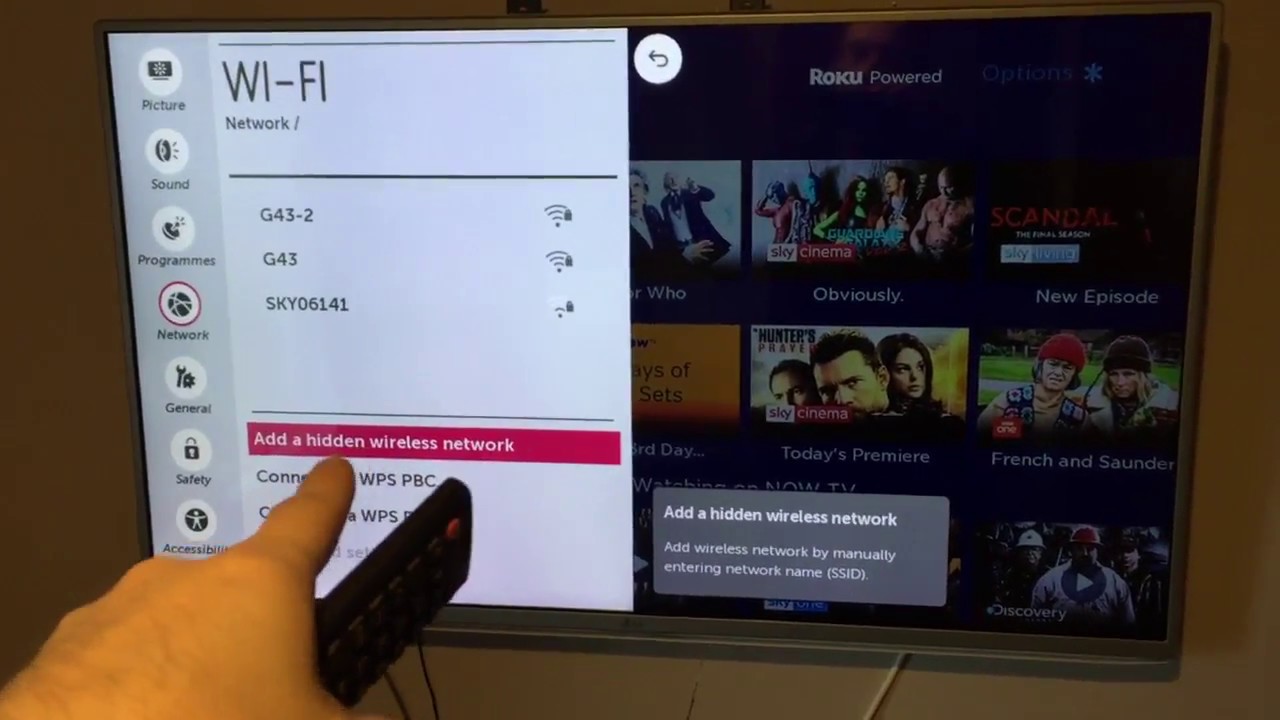
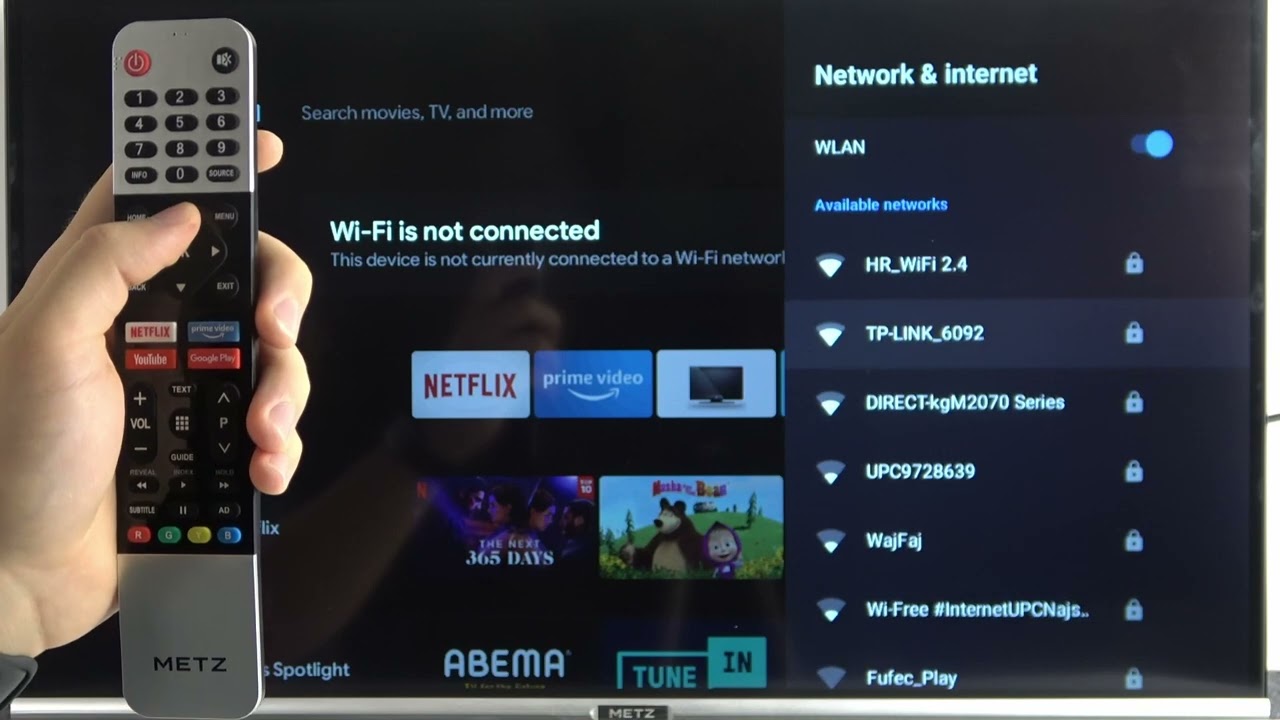
Step 2: Find and connect to your Wi-Fi network
With Wi-Fi enabled on your Smart TV, it’s time to locate and connect to your specific Wi-Fi network. Follow these steps to find and connect to your Wi-Fi network:
- Access the settings menu on your Smart TV, as mentioned in the previous step.
- Navigate to the network settings and select the option to “Search for Wi-Fi networks” or “Scan for networks”. Your Smart TV will start scanning for available networks in the vicinity.
- After a moment, a list of detected Wi-Fi networks will appear on the screen. Look for the name (SSID) of your Wi-Fi network in the list. If you can’t find it, make sure your router is turned on and broadcasting the Wi-Fi signal.
- Use the arrow buttons on your remote control to highlight your Wi-Fi network and press the “Enter” or “Select” button.
If your Wi-Fi network is not visible, you can try the following:
- Move your Smart TV closer to the router to ensure a stronger signal.
- Restart your router to refresh the Wi-Fi signal.
- Check if the Wi-Fi network is hidden and manually enter the network name (SSID).
Once you’ve selected your Wi-Fi network, the Smart TV will attempt to establish a connection. This process may take a few moments, so be patient. Once the connection is established, you’ll be prompted to enter the Wi-Fi password.
Let’s move on to the next step – entering the Wi-Fi password.
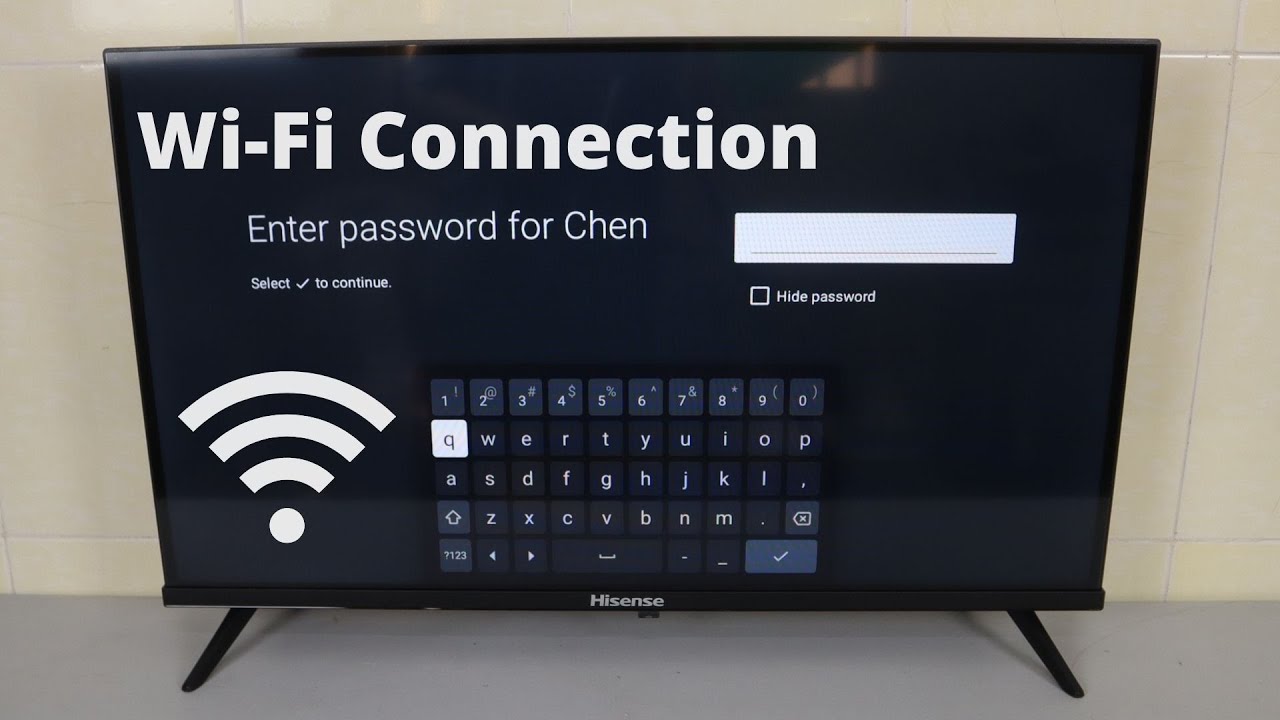
Step 3: Enter the Wi-Fi password
After selecting your Wi-Fi network, your Smart TV will prompt you to enter the Wi-Fi password. Follow these steps to enter the correct password:
- Using your remote control, navigate to the on-screen keyboard that appears on your Smart TV. This keyboard may be different depending on your Smart TV model, but it typically resembles a virtual keyboard on a smartphone or tablet.
- Use the arrow buttons on your remote to move the cursor and select each character of the password. Use the “OK” or “Enter” button to confirm each character.
- Make sure to enter the password exactly as it appears and pay attention to capitalization. Wi-Fi passwords are case-sensitive, so enter uppercase and lowercase letters accordingly.
- Once you’ve entered the password, make sure to double-check for any mistakes. Select the “Connect” or “OK” button to proceed.
Your Smart TV will now attempt to connect to the Wi-Fi network using the entered password. This process may take a few moments, so please be patient. If the password is correct and the Wi-Fi signal is strong, your Smart TV will successfully establish a connection to the network.
If you encounter any issues, double-check that you’ve entered the correct password and that the Wi-Fi network is functioning properly. You may also want to restart your Smart TV and router and try again.
Once the connection is established, you’re ready to move on to the next step: testing the Wi-Fi connection.
Step 4: Test the Wi-Fi connection
After successfully connecting your Smart TV to the Wi-Fi network, it’s important to test the connection to ensure a stable and reliable connection. Here’s how you can test the Wi-Fi connection on your Smart TV:
- Access the settings menu on your Smart TV using the remote control.
- Navigate to the network or connection settings. Here, you should find an option to “Test Wi-Fi Connection” or something similar.
- Select the “Test Wi-Fi Connection” option and wait for the process to complete. It may take a few moments for the Smart TV to assess the connection quality.
- Once the test is complete, the Smart TV will display the results, indicating the network’s signal strength and overall connection quality.
If the test reveals a strong and stable connection, congratulations! You’re all set to enjoy a seamless streaming experience on your Smart TV. However, if the test shows a weak or unstable connection, you may need to take some additional steps to improve the Wi-Fi performance.
To improve your Wi-Fi connection, consider the following tips:
- Reposition your router: Ensure that your router is placed in a central location, away from obstructions, and at a suitable height. This can help improve coverage and signal strength.
- Reduce interference: Keep your Smart TV away from other devices that may cause interference, such as cordless phones, microwaves, and baby monitors.
- Upgrade your router: If you consistently experience poor Wi-Fi performance, consider upgrading to a newer router that offers improved speed and coverage.
- Use a Wi-Fi extender: If your Smart TV is located far from the router, you may benefit from installing a Wi-Fi extender to amplify the signal and improve coverage in that area.
By following these tips, you can optimize your Wi-Fi connection and ensure a smooth streaming experience on your Smart TV.
Now that you’ve tested the Wi-Fi connection, it’s time to move on to the next step: troubleshooting tips for connecting Wi-Fi in a Smart TV.
Step 5: Troubleshooting tips for connecting Wi-Fi in Smart TV
While connecting your Smart TV to Wi-Fi is generally a straightforward process, sometimes you may encounter issues that prevent a successful connection. Here are some troubleshooting tips to help you resolve common Wi-Fi connectivity problems:
- Restart your Smart TV and router: This simple step can often fix minor connection issues. Power off both your Smart TV and router, wait for a few seconds, and then power them back on.
- Check Wi-Fi signal strength: Ensure that your Smart TV is within range of your Wi-Fi router. Walls, distance, and other obstacles can weaken the signal. Consider repositioning the router or using a Wi-Fi extender to improve the signal strength.
- Verify Wi-Fi credentials: Double-check that you’re entering the correct Wi-Fi network name (SSID) and password. Make sure to enter them without any typos or mistakes.
- Update the firmware: Check if there are any firmware updates available for your Smart TV. Updating the firmware can often resolve compatibility issues and improve overall performance.
- Disable MAC filtering: If you have enabled MAC address filtering on your router, make sure to add your Smart TV’s MAC address to the allowed devices list. Alternatively, you can temporarily disable MAC filtering to test the connection.
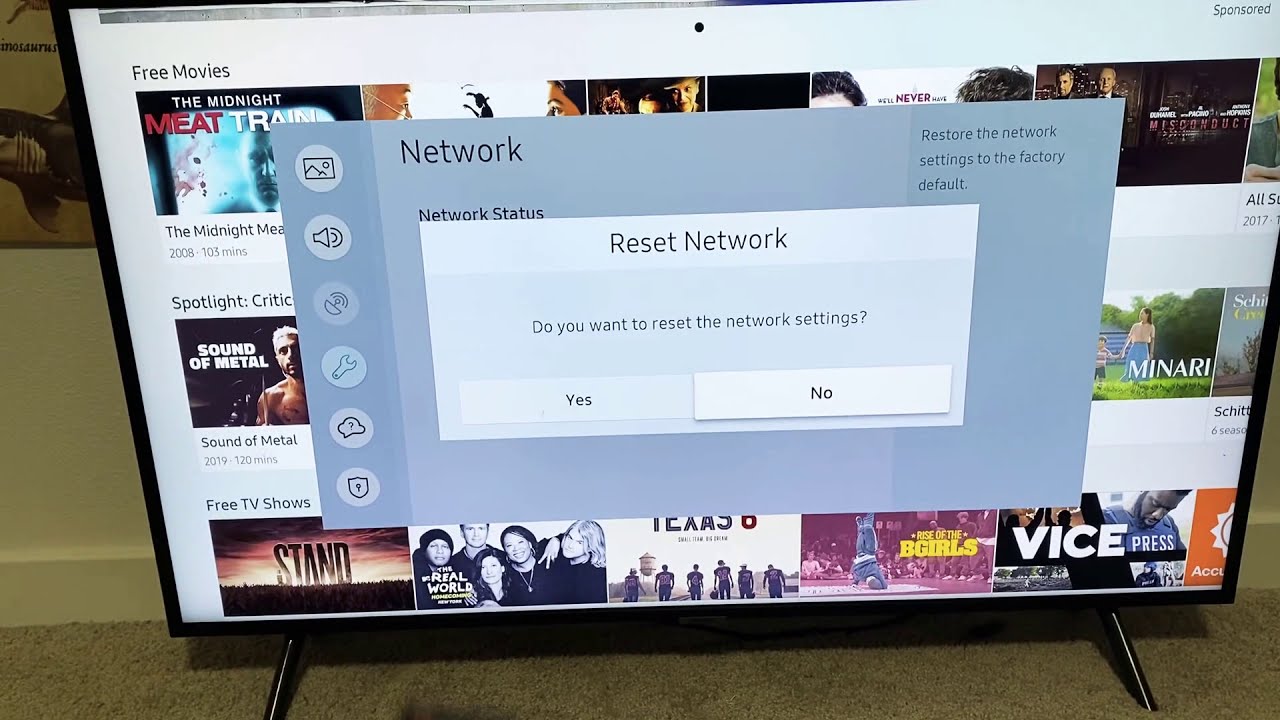
- Reset network settings: If all else fails, you can try resetting the network settings on your Smart TV. This will remove any saved Wi-Fi networks and configurations, allowing you to set up the connection from scratch.
If you have tried the troubleshooting tips above and are still unable to connect your Smart TV to Wi-Fi, it may be worth contacting your Internet Service Provider (ISP) or the technical support of your Smart TV manufacturer for further assistance.
Remember, each Smart TV model may have slight variations in the steps and settings, so consult your user manual or the manufacturer’s website for specific instructions based on your device.
By following these troubleshooting tips, you increase the chances of resolving any Wi-Fi connectivity issues and enjoy uninterrupted streaming and browsing on your Smart TV.
Conclusion
Congratulations! You have successfully connected your Smart TV to Wi-Fi, opening up a world of entertainment possibilities. With a stable and secure Wi-Fi connection, you can now stream your favorite shows and movies, browse the internet, and access a wide range of apps on your Smart TV.
In this guide, we covered the essential steps to connect Wi-Fi to your Smart TV. We started by enabling Wi-Fi functionality on the device, followed by locating and connecting to your Wi-Fi network. Then, we entered the Wi-Fi password and tested the connection to ensure a reliable performance. Lastly, we provided troubleshooting tips to resolve common connectivity issues.
Remember, every Smart TV model may have slight variations in the setup process, so consulting your device’s user manual or the manufacturer’s website can provide specific instructions tailored to your device.
By following these steps and troubleshooting tips, you can ensure a smooth and seamless Wi-Fi connection on your Smart TV. Whether you’re streaming your favorite shows, exploring new content, or enjoying interactive features, a reliable Wi-Fi connection is essential for an enhanced entertainment experience.
Now, sit back, relax, and enjoy all the benefits that your Smart TV and Wi-Fi connection have to offer!