Connecting to Wi-Fi on Samsung Smart TV
Connecting your Samsung Smart TV to Wi-Fi allows you to access a world of online content, streaming services, and interactive features. Follow these step-by-step instructions to connect your Smart TV to Wi-Fi:
- Turn on your Samsung Smart TV and navigate to the Settings menu. This can usually be found by pressing the Home button on your remote control and selecting the Settings icon.
- In the Settings menu, select Network. This will display available network options.
- Choose the Wi-Fi option to enable the wireless connection on your TV.
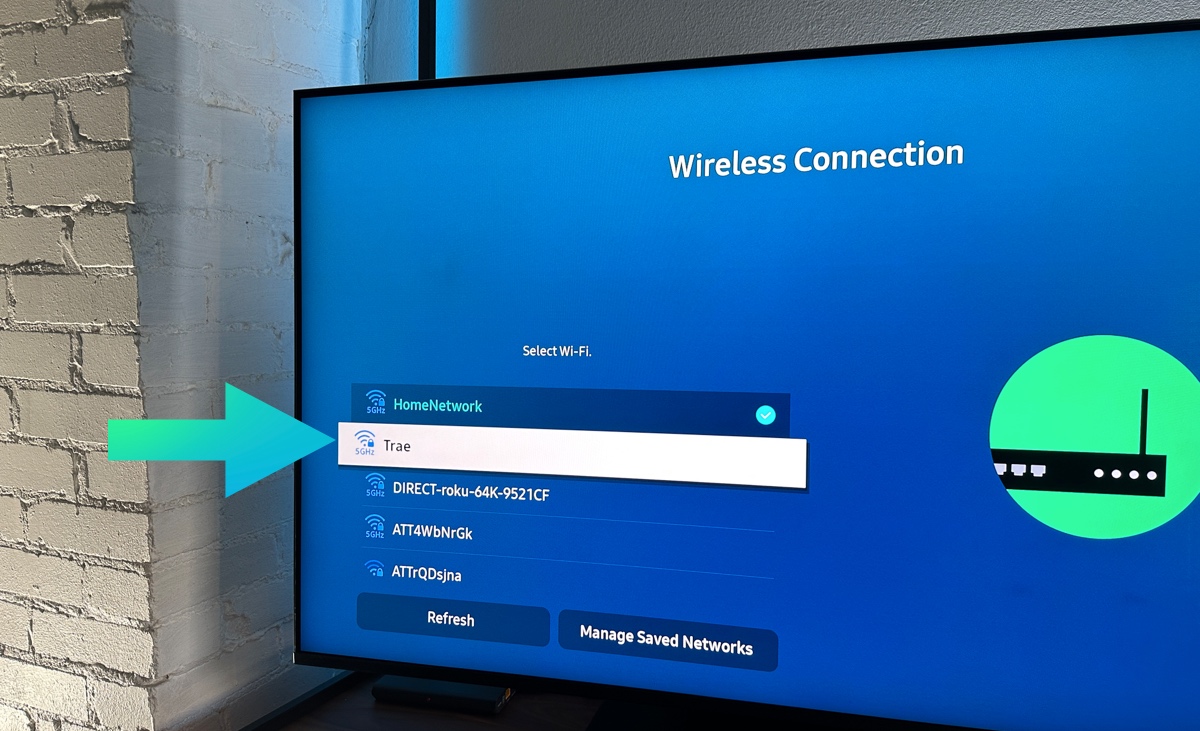
- A list of available Wi-Fi networks will appear on the screen. Select your desired network from the list.
- If your Wi-Fi network is secured with a password, you will be prompted to enter it. Use the on-screen keyboard to input your Wi-Fi password, then press Enter to proceed.
- Once your password is entered, select Connect. Your Samsung Smart TV will attempt to connect to the selected Wi-Fi network.
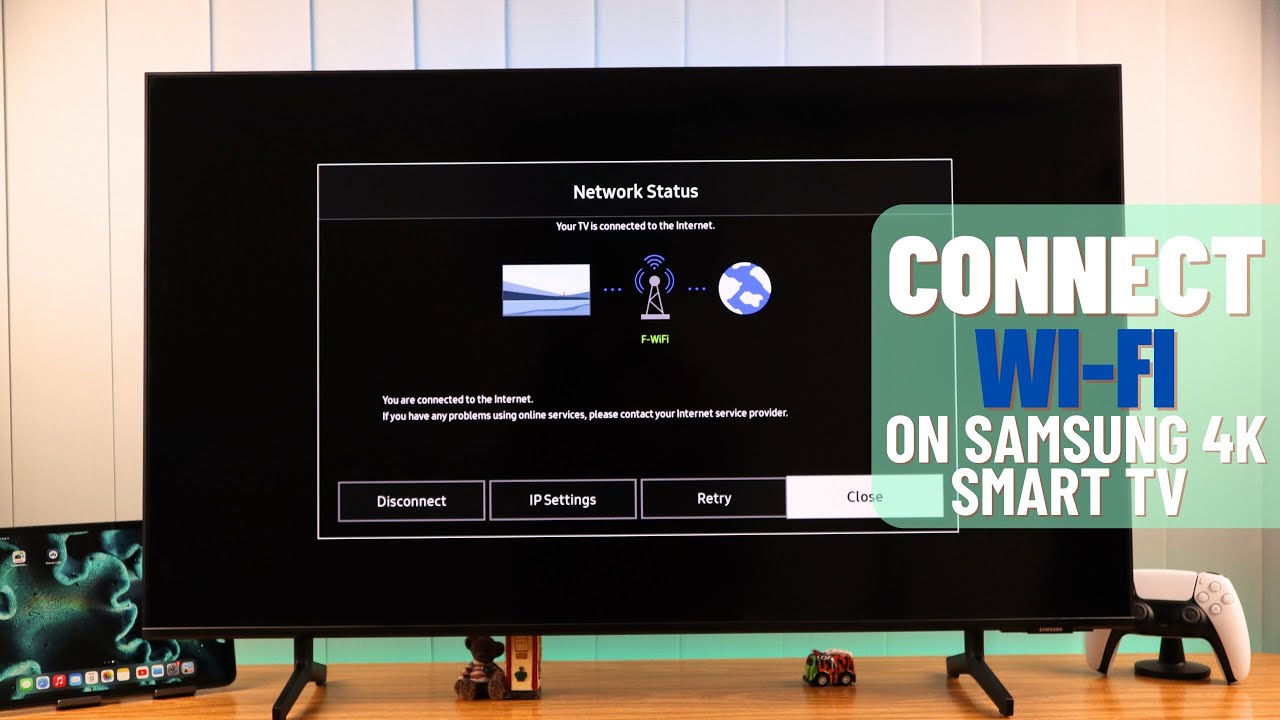
- If the connection is successful, you will see a confirmation message on the screen. Your Smart TV is now connected to Wi-Fi.
It is important to note that the process may vary slightly depending on the model and operating system of your Samsung Smart TV. However, the general steps outlined above should apply to most devices.
By connecting your Smart TV to Wi-Fi, you can take advantage of a multitude of features and services. Stream movies and TV shows on popular platforms like Netflix, Hulu, or Amazon Prime Video, browse the Internet, or access apps specifically designed for Smart TVs. Enjoy the convenience and entertainment options that come with a Wi-Fi-connected Samsung Smart TV.
Troubleshooting Wi-Fi Issues on Samsung Smart TV
Having trouble with your Wi-Fi connection on your Samsung Smart TV? Follow these troubleshooting steps to get your Smart TV back online:
- Check your Wi-Fi signal: The first step is to ensure that your Wi-Fi signal is strong enough for your Smart TV to connect. Move your router closer to the TV or consider using a Wi-Fi extender to boost the signal if the connection is weak.
- Power cycle your devices: Power off your Smart TV, router, and modem. Wait for a few minutes, then power them back on. This simple step can resolve many connectivity issues.
- Check your network settings: Access the Settings menu on your Samsung Smart TV and go to the Network section. Ensure that the network is set to Wi-Fi and that the correct network is selected.
- Update your TV’s software: Outdated software can sometimes cause connectivity problems. Check for updates in the System or Support section of the Settings menu and install any available updates.
- Re-enter your Wi-Fi password: If you recently changed your Wi-Fi password, ensure that you have entered it correctly on your Smart TV. Mistyping the password can prevent the TV from connecting to the network.
- Reset your network settings: If all else fails, you can try resetting the network settings on your Smart TV. This will erase all Wi-Fi networks saved on the TV, so you’ll need to set up the connection from scratch.
- Contact your internet service provider: If none of the above steps resolve the issue, there may be a problem with your Wi-Fi network or internet service. Contact your internet service provider for further assistance.
Wi-Fi connectivity issues can be frustrating, but by following these troubleshooting steps, you should be able to resolve most problems. Enjoy uninterrupted streaming and online content on your Samsung Smart TV.
Updating Wi-Fi Settings on Samsung Smart TV
If you need to update or change the Wi-Fi settings on your Samsung Smart TV, follow these simple steps:
- Turn on your Samsung Smart TV and press the Home button on your remote control. This will take you to the Smart Hub.
- Navigate to the Settings menu by selecting the Settings icon, usually represented by a gear or cogwheel.
- In the Settings menu, select Network. This will display the available network options.
- Choose the Wi-Fi option to enable the wireless connection on your TV.
- Select the network that you want to update or change. If the network is secured with a password, you will be prompted to enter it using the on-screen keyboard.
- Once connected to the network, select the Edit option next to the network name.
- Make the necessary changes to the Wi-Fi settings, such as updating the network name (SSID) or password.
- After making the desired changes, select Done or Save to save the updated Wi-Fi settings.
It is important to note that the steps may vary slightly depending on the model and operating system of your Samsung Smart TV. However, the general process outlined above should apply to most devices.
Updating your Wi-Fi settings on your Samsung Smart TV allows you to easily connect to your desired network and enjoy a seamless streaming experience. Whether you’re changing networks or updating your Wi-Fi password, following these steps will help you stay connected and enjoy all the features of your Smart TV.
Connecting to a Hidden Wi-Fi Network on Samsung Smart TV
If you have a hidden Wi-Fi network and want to connect your Samsung Smart TV to it, you can follow these steps:
- Power on your Samsung Smart TV and press the Home button on your remote control to access the Smart Hub.
- Using the directional keys on your remote, navigate to the Settings menu, usually represented by a gear or cogwheel icon.
- In the Settings menu, select Network, and then choose the Wi-Fi option to enable the wireless connection on your TV.
- A list of available Wi-Fi networks will appear. Scroll down to the bottom of the list and select Add Network manually.
- You will be prompted to enter the Network Name (SSID) of your hidden Wi-Fi network. Use the on-screen keyboard to input the name accurately.
- After entering the network name, select the Security Type that is used by your hidden Wi-Fi network. Choose the appropriate option from the drop-down menu.
- If required, enter the Password for your hidden Wi-Fi network. Again, use the on-screen keyboard to accurately input the password.
- Select Connect to initiate the connection process.
Once the connection process is complete, your Samsung Smart TV will be connected to the hidden Wi-Fi network. It may take a few moments for the TV to establish the connection.
Connecting to a hidden Wi-Fi network on your Samsung Smart TV allows you to access your network’s internet connection without broadcasting its name. By following these steps, you can enjoy the convenience of a hidden network while enjoying the benefits of Smart TV features and online content.
Resetting the Network Settings on Samsung Smart TV
If you’re experiencing persistent issues with your network connection on your Samsung Smart TV, resetting the network settings can often resolve the problem. Here’s how you can reset the network settings on your Smart TV:
- Start by turning on your Samsung Smart TV and accessing the Home menu by pressing the Home button on your remote control.
- Using the directional keys, navigate to the Settings menu, typically represented by a gear or cogwheel icon.
- In the Settings menu, select Network and then choose the Network Status option to view the current network settings.
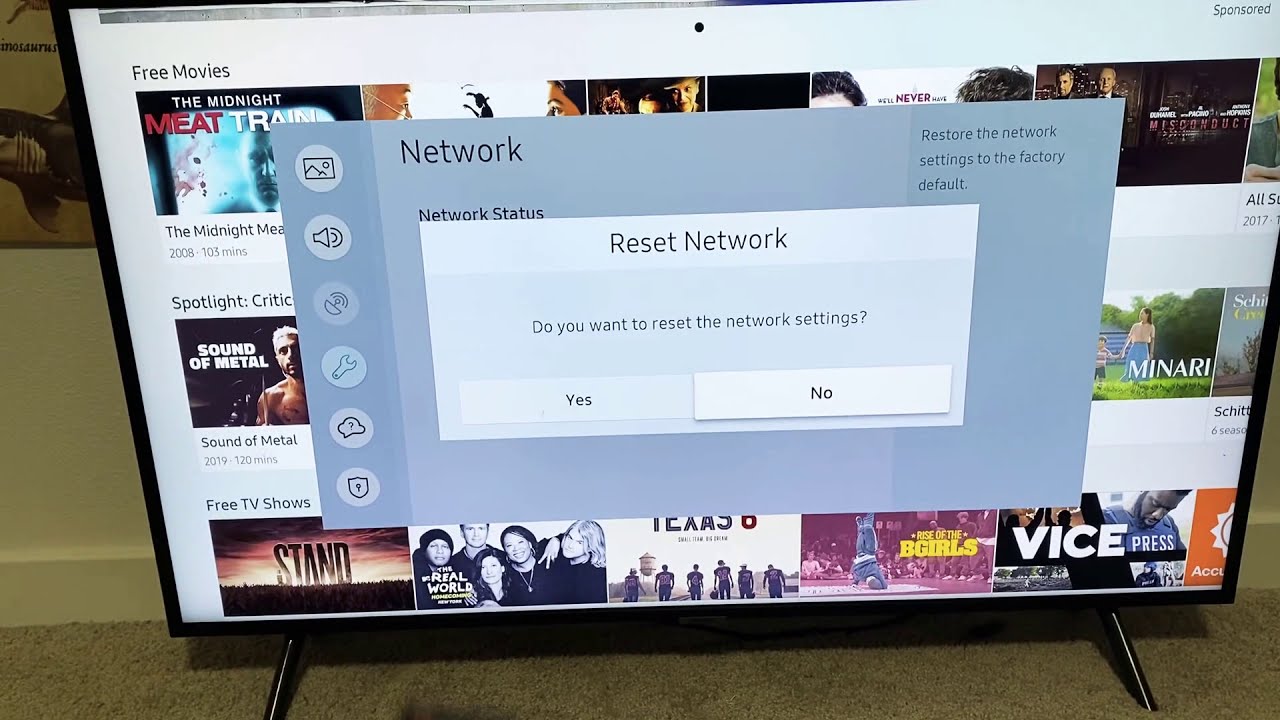
- Scroll down and select the Reset Network option. You may be prompted to enter your TV’s PIN or parental control password.
- After confirming the reset action, your Samsung Smart TV will restart, and the network settings will be reset to their default values.
- Once the TV has restarted, you will need to reconnect to your Wi-Fi network. Follow the initial setup process as if you were connecting to a new network.
Resetting the network settings can help resolve network connectivity issues such as intermittent or sluggish connections, Wi-Fi authentication failures, or problems with network detection. However, please note that resetting the network settings will also remove any saved Wi-Fi networks and custom network configurations you had previously set up. You will need to re-enter the necessary information to reconnect to your Wi-Fi network.
If resetting the network settings doesn’t resolve your network issues, it’s advisable to contact your internet service provider or Samsung customer support for further assistance. They can help troubleshoot any underlying network or hardware problems that may be affecting your Smart TV’s connectivity.
Improving Wi-Fi Signal Strength on Samsung Smart TV
A strong and stable Wi-Fi signal is essential for a seamless streaming experience on your Samsung Smart TV. If you’re experiencing weak or intermittent Wi-Fi signal, there are several steps you can take to improve the Wi-Fi signal strength:
- Position your Router: Ensure that your router is placed in a central location in your home. This helps to maximize coverage and reduce signal interference from walls or obstructions. Avoid placing the router near electronic devices that may cause interference, such as cordless phones or microwaves.
- Reduce Signal Interference: Keep your Wi-Fi router away from other wireless devices or sources of electromagnetic interference. Additionally, consider using a 5GHz Wi-Fi frequency if your router supports it, as it generally provides better signal strength and bandwidth compared to the 2.4GHz frequency.
- Update Firmware: Check for firmware updates for your Wi-Fi router and ensure that it is running the latest version. Firmware updates can often address performance issues and optimize signal strength.
- Use a Wi-Fi Extender: If your Wi-Fi signal doesn’t reach certain areas of your home where the Smart TV is located, consider using a Wi-Fi extender or a mesh Wi-Fi system. These devices help extend the range of your Wi-Fi network and improve signal strength in areas with poor coverage.
- Adjust Router Antennas: If your router has adjustable antennas, try positioning them in different angles to find the best Wi-Fi signal reception. Experimenting with antenna placement can significantly improve signal strength.
- Reduce Wi-Fi Channel Congestion: Use a Wi-Fi analyzer app to check for nearby networks operating on the same channel as your Wi-Fi. If there’s congestion, switch to a less crowded channel to minimize interference and improve signal stability.
- Consider Wired Connection: For the most stable and reliable connection, you may want to consider using an Ethernet cable to directly connect your Samsung Smart TV to the router. This eliminates signal interference and provides a consistent internet connection.
By following these tips, you can optimize your Wi-Fi signal strength and ensure a smooth and uninterrupted streaming experience on your Samsung Smart TV.
Using a Wi-Fi Extender with Samsung Smart TV
If you’re experiencing weak Wi-Fi signal in certain areas of your home where your Samsung Smart TV is located, using a Wi-Fi extender can help improve the signal strength and extend the coverage. Here’s how you can use a Wi-Fi extender with your Smart TV:
- Choose the Right Wi-Fi Extender: Select a Wi-Fi extender that is compatible with your existing Wi-Fi router. Look for one that supports the same Wi-Fi standards and frequencies as your router for optimal compatibility.
- Placement of the Wi-Fi Extender: Position the Wi-Fi extender in an area where the Wi-Fi signal strength is still strong but close enough to the Smart TV. Plug the extender into an electrical outlet and follow the setup instructions provided by the manufacturer.
- Pair the Wi-Fi Extender with your Router: Most Wi-Fi extenders come with a setup process that involves connecting the extender to your existing Wi-Fi network. This is typically done by pressing the WPS button on your router and then on the extender. Alternatively, you can manually connect the extender to your Wi-Fi network using the provided instructions.
- Connect your Smart TV to the Wi-Fi Extender: Once the extender is successfully connected to your router, navigate to the network settings on your Smart TV. Select the Wi-Fi option and search for available networks. You should see the extended network name of the Wi-Fi extender. Choose this network and enter the password if prompted.
- Test the Connection: After connecting your Smart TV to the Wi-Fi extender, perform a network test to ensure that the signal strength and connection are stable. You should notice an improvement in signal strength and performance compared to earlier.
Using a Wi-Fi extender can help eliminate Wi-Fi dead zones and provide a stronger and more reliable signal to your Samsung Smart TV. This ensures a seamless streaming experience even in areas of your home with weaker Wi-Fi coverage.
Remember to choose a high-quality Wi-Fi extender and position it strategically for the best results. Experiment with different placements to find the optimal spot that maximizes the Wi-Fi signal coverage in the area where your Smart TV is located.
Connecting to a Mobile Hotspot on Samsung Smart TV
If you don’t have access to a Wi-Fi network but have a mobile hotspot through your smartphone or tablet, you can still connect your Samsung Smart TV to the internet. Here’s how you can connect your Smart TV to a mobile hotspot:
- On your smartphone or tablet, enable the mobile hotspot feature in the device settings. This will create a wireless network that your Smart TV can connect to.
- On your Samsung Smart TV, access the Home menu by pressing the Home button on your remote control.
- Using the directional keys, navigate to the Settings menu, usually represented by a gear or cogwheel icon.
- In the Settings menu, select Network and then choose the Wi-Fi option to enable the wireless connection on your TV.
- A list of available Wi-Fi networks will appear. Scroll through the list and select your mobile hotspot from the options.
- If your mobile hotspot is secured with a password, you will need to enter it using the on-screen keyboard.
- Once the correct password is entered, select Connect to establish a connection to your mobile hotspot.
After successfully connecting, your Samsung Smart TV will be using your mobile hotspot as the internet source. Please note that using a mobile hotspot may consume a significant amount of data, so ensure that you have a sufficient data plan to avoid any additional charges.
It’s important to mention that the mobile hotspot feature may vary depending on your mobile device and carrier. Refer to the user manual or contact your mobile service provider for specific instructions on enabling the mobile hotspot on your device.
Connecting your Samsung Smart TV to a mobile hotspot allows you to enjoy online content, streaming services, and other internet-based features even if a traditional Wi-Fi network is not available. However, keep in mind the potential data usage and associated costs when using a mobile hotspot as your Smart TV’s internet source.
Configuring Advanced Wi-Fi Settings on Samsung Smart TV
While connecting to a Wi-Fi network on your Samsung Smart TV is usually a straightforward process, you may encounter scenarios where you need to configure advanced Wi-Fi settings. Here’s how you can do it:
- Begin by turning on your Samsung Smart TV and accessing the Home menu by pressing the Home button on your remote control.
- Using the directional keys, navigate to the Settings menu, typically represented by a gear or cogwheel icon.
- In the Settings menu, select Network and then choose the Wi-Fi option to enable the wireless connection on your TV.
- A list of available Wi-Fi networks will appear. Scroll down and select the network you want to configure advanced settings for.
- Select the Edit option next to the network name to access the advanced configuration settings.
- Within the advanced settings, you can modify various parameters such as IP settings, proxy configurations, and DNS settings.
- To configure the IP settings, you can choose between dynamic (DHCP) or static IP address assignment. DHCP is the recommended option for most users, as it automatically obtains network settings from the router.
- If required, you can set up a proxy server by entering the corresponding address and port number provided by your network administrator or internet service provider.
- Modify DNS settings by selecting Manual and entering the preferred and alternate DNS server addresses. You can use public DNS servers like Google DNS (8.8.8.8 and 8.8.4.4) or OpenDNS (208.67.222.222 and 208.67.220.220).
- Once you have made the necessary changes, select Save or Apply to save the advanced Wi-Fi settings.
Configuring advanced Wi-Fi settings on your Samsung Smart TV allows you to customize network parameters based on your specific requirements. However, it’s important to note that these settings may not be necessary for typical home users and should be modified with caution.
If you’re unsure about the advanced Wi-Fi settings or their impact, it’s recommended to consult with your network administrator or refer to the user manual for further guidance.
By configuring advanced Wi-Fi settings, you can fine-tune the network connectivity on your Samsung Smart TV to optimize performance and troubleshoot specific issues that may arise.
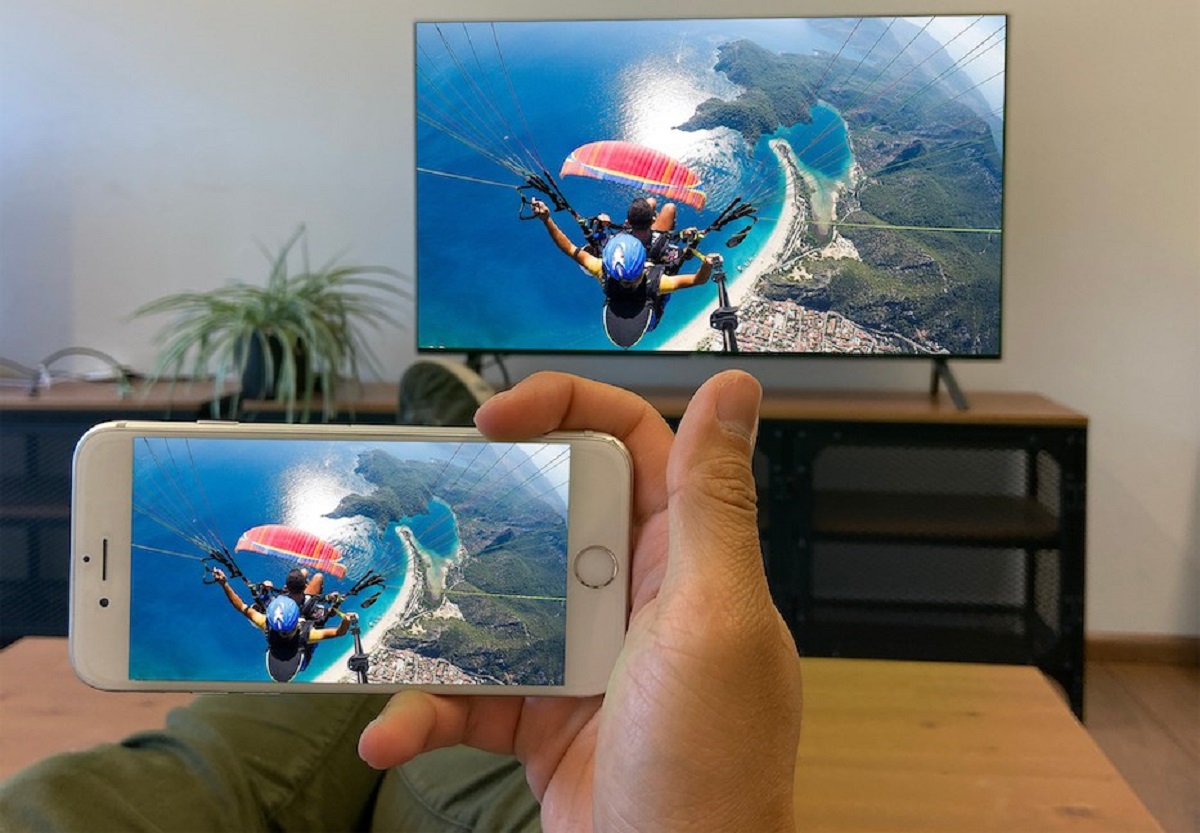
Using SmartThings App for Wi-Fi on Samsung Smart TV
Samsung SmartThings is a powerful app that allows you to control and manage various smart devices, including your Samsung Smart TV. With the SmartThings app, you can also conveniently connect your TV to your Wi-Fi network. Here’s how you can use the SmartThings app for Wi-Fi on your Samsung Smart TV:
- Download and install the SmartThings app on your smartphone or tablet from the Google Play Store or the Apple App Store.
- Make sure your Samsung Smart TV is turned on and connected to the same Wi-Fi network as your mobile device.
- Open the SmartThings app on your mobile device and follow the initial setup process to create an account and connect your Smart TV.
- Once the app is set up, tap on the “Devices” tab at the bottom of the screen and select your Smart TV from the list of connected devices.
- In the TV control panel, navigate to the “Network & General” or “Settings” section to access Wi-Fi settings.
- Within the Wi-Fi settings, you can select your preferred Wi-Fi network from the available options.
- If required, enter the Wi-Fi password for the network.
- Select “Connect” to establish the Wi-Fi connection between your Smart TV and the chosen network.
By using the SmartThings app for Wi-Fi on your Samsung Smart TV, you can easily manage your network connections, switch between different Wi-Fi networks, and troubleshoot any Wi-Fi-related issues. The app provides a user-friendly interface that allows you to control and configure various settings on your Smart TV with ease.
Additionally, the SmartThings app offers additional features beyond Wi-Fi connectivity. You can use it to control other smart devices in your home, such as smart lights, thermostats, or security systems, all from a single app.
With the SmartThings app, connecting your Samsung Smart TV to Wi-Fi and managing network settings becomes a seamless and convenient experience. Enjoy the flexibility of controlling your Smart TV and other smart devices effortlessly from the palm of your hand.