Introduction
Connecting your Roku TV to Wi-Fi is essential to fully enjoy the streaming capabilities of your device. However, what do you do if you can’t find the remote control? Don’t worry, there are alternative ways to connect your Roku TV to Wi-Fi without a remote. In this article, we will explore five different methods that will help you get back to streaming your favorite shows and movies in no time.
Whether you’ve misplaced your remote or it’s malfunctioning, these solutions will allow you to establish a Wi-Fi connection without relying on the traditional remote control. From using the Roku mobile app to utilizing an Ethernet connection or a universal remote, there are multiple options to choose from.
By following these methods, you’ll be able to regain access to your Roku TV and enjoy a seamless streaming experience. So let’s dive in and explore the alternative ways to connect your Roku TV to Wi-Fi without a remote.
Alternative Ways to Connect Roku TV to Wi-Fi without a Remote
If you find yourself without the Roku remote, don’t fret! There are several alternative methods you can try to connect your Roku TV to Wi-Fi. These methods will ensure that you can continue streaming your favorite shows and movies without interruption. Let’s explore them below:
1. Using the Roku Mobile App: The Roku mobile app is a convenient and easy way to control your Roku TV without the physical remote. Download and install the app on your smartphone or tablet, and make sure that your mobile device is connected to the same Wi-Fi network as your Roku TV. Open the app, and you’ll be able to navigate through the Roku interface, including connecting to a Wi-Fi network.
2. Using an Ethernet Connection: If you have an Ethernet port available on your Roku TV and a cable, you can connect your TV directly to your router for a stable internet connection. Simply connect one end of the Ethernet cable to your Roku TV and the other end to your router. Your TV will automatically detect the connection and configure the necessary settings.
3. Using a Universal Remote: If you have a universal remote that is compatible with Roku devices, you can use it to connect your Roku TV to Wi-Fi. Check the instructions for your specific universal remote to learn how to enter the Roku TV setup menu. Once in the setup menu, you can select the Wi-Fi network and enter the password to establish a connection.
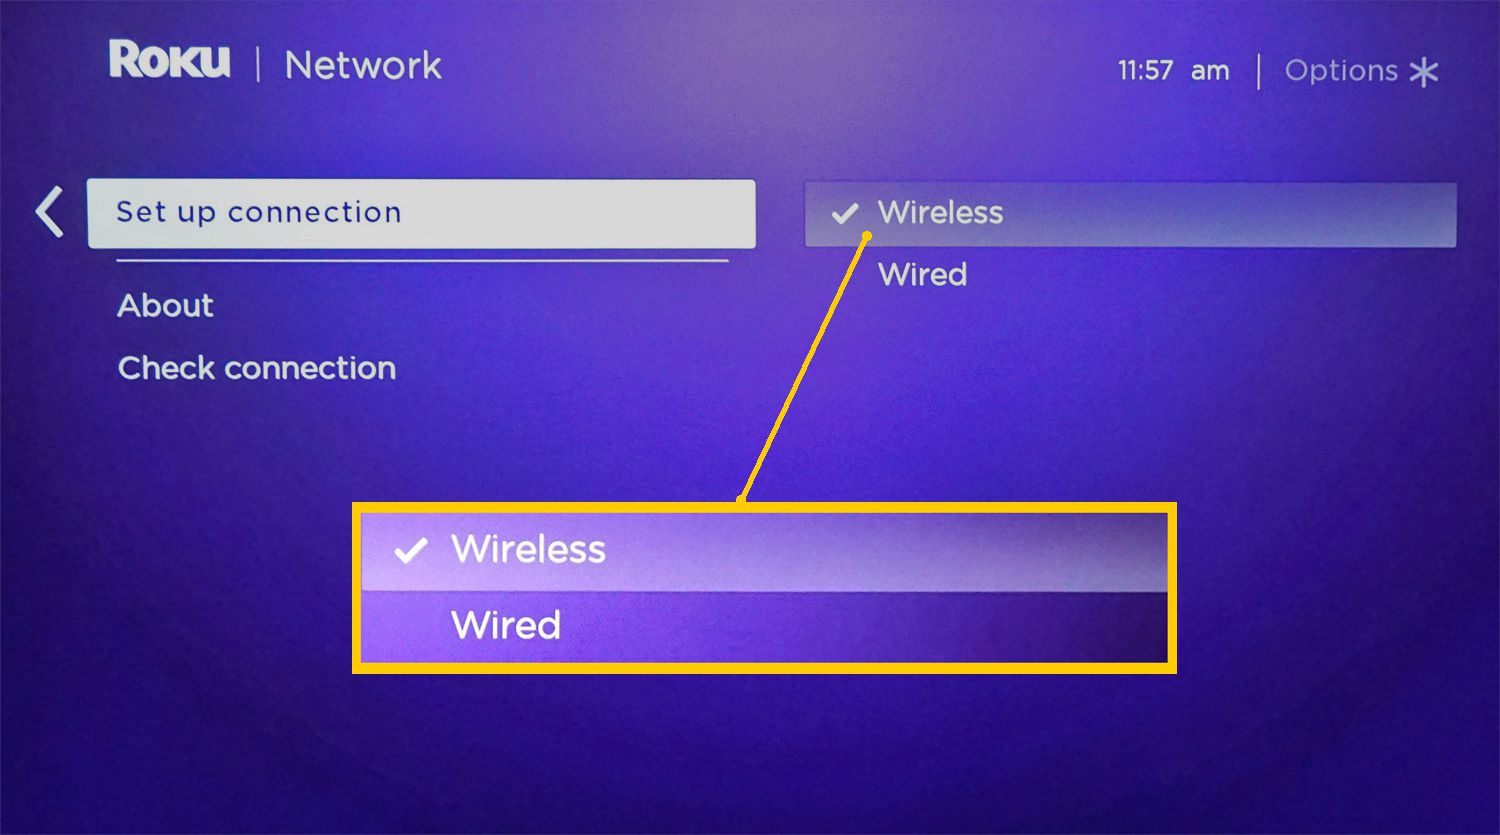
4. Using HDMI-CEC: HDMI-CEC (Consumer Electronics Control) is a feature available on most modern TVs and devices, including Roku TVs. If your TV and HDMI-connected device (such as a cable box or gaming console) support HDMI-CEC, you can use the remote control of the HDMI-connected device to control your Roku TV. Navigate to the Roku TV settings, select Network, and then choose “Set Up Connection” to connect to your Wi-Fi network.
5. Using WPS (Wi-Fi Protected Setup): If your router supports WPS, you can utilize this feature to connect your Roku TV to Wi-Fi. Press the WPS button on your router and then quickly initiate the WPS connection on your Roku TV. The TV will automatically detect and connect to the available Wi-Fi network.
These alternative methods provide you with options to connect your Roku TV to Wi-Fi even when you don’t have the remote. Choose the method that is most convenient and accessible for your situation, and you’ll be back to streaming your favorite content in no time.
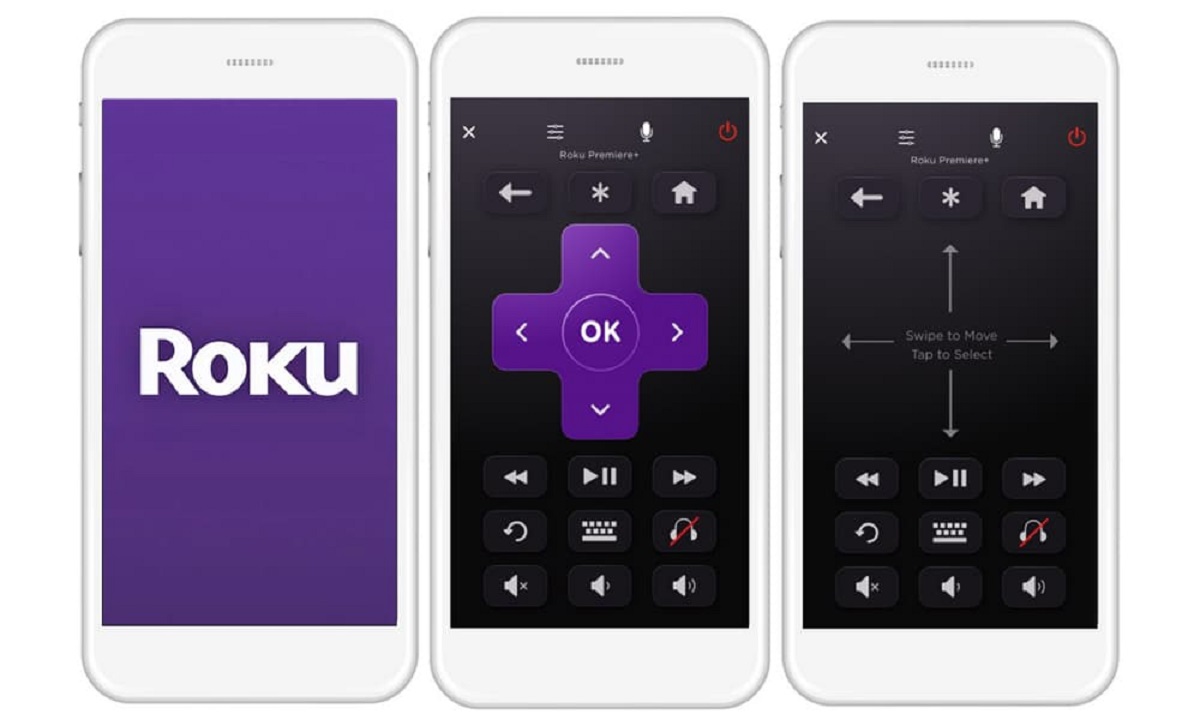
Method 1: Using the Roku Mobile App
If you have misplaced or can’t find your Roku remote, don’t worry! The Roku mobile app is a fantastic solution that allows you to control your Roku TV directly from your smartphone or tablet. Follow these simple steps to connect your Roku TV to Wi-Fi using the Roku mobile app:
Step 1: Start by downloading and installing the Roku mobile app on your smartphone or tablet. The app is available for both iOS and Android devices and can be found in the respective app stores.
Step 2: Make sure that your mobile device is connected to the same Wi-Fi network as your Roku TV. This is crucial for establishing a successful connection between the app and your TV.
Step 3: Open the Roku mobile app and navigate to the “Remote” tab. This tab will give you access to all the remote control features.
Step 4: On the remote control screen, you will find options to navigate through the Roku interface, including the ability to enter text and control volume. To connect your Roku TV to Wi-Fi, tap on the “Settings” icon, which looks like a gear.
Step 5: In the settings menu, select “Network” and then “Wireless (Wi-Fi).” The app will display a list of available Wi-Fi networks in your vicinity.
Step 6: Tap on your network name and enter the password if prompted. The Roku TV will then attempt to connect to the selected Wi-Fi network using the credentials you provided.
Step 7: Once the connection is established, you will be taken back to the settings menu. You can now enjoy streaming your favorite content on your Roku TV using the Wi-Fi network you have connected to.
The Roku mobile app is a convenient and reliable way to control your Roku TV and connect it to Wi-Fi when you’re unable to locate the physical remote. It gives you access to all the necessary features, ensuring a seamless streaming experience directly from your mobile device.
Method 2: Using an Ethernet Connection
If you find yourself in a situation where you can’t connect your Roku TV to Wi-Fi due to a missing remote, using an Ethernet connection is a viable alternative. This method allows you to establish a wired connection between your Roku TV and your router. Follow these steps to connect your Roku TV to Wi-Fi using an Ethernet cable:
Step 1: Check if your Roku TV has an Ethernet port. Most Roku TVs have an Ethernet port located at the back or side of the device. It looks like a slightly wider phone jack.
Step 2: Locate an available Ethernet cable. Standard Ethernet cables, also known as Cat-5 or Cat-6 cables, can be easily purchased online or at your local electronics store.
Step 3: Connect one end of the Ethernet cable to the Ethernet port on your Roku TV and the other end to an available port on your router. Make sure both ends are securely inserted.
Step 4: Once the cable is connected, your Roku TV will automatically detect the Ethernet connection. It will configure the necessary settings and establish a connection to your router.
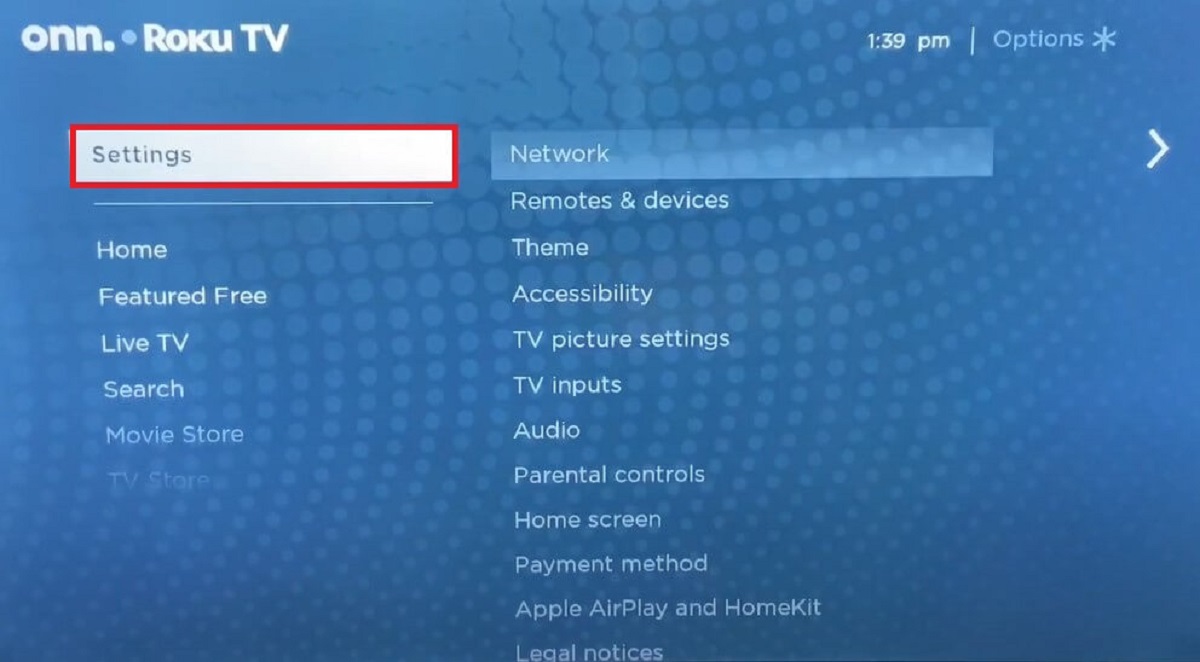
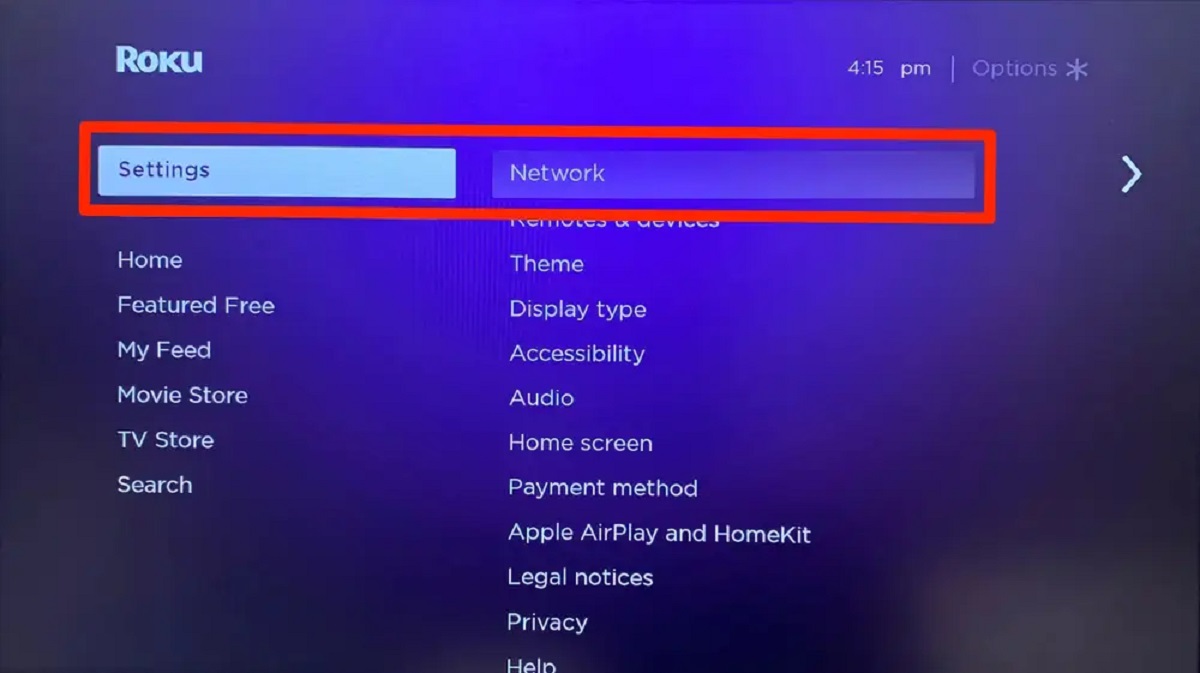
Step 5: After the connection is established, navigate to the Roku TV settings. On your Roku TV remote, press the Home button and go to “Settings” using the directional buttons on the remote.
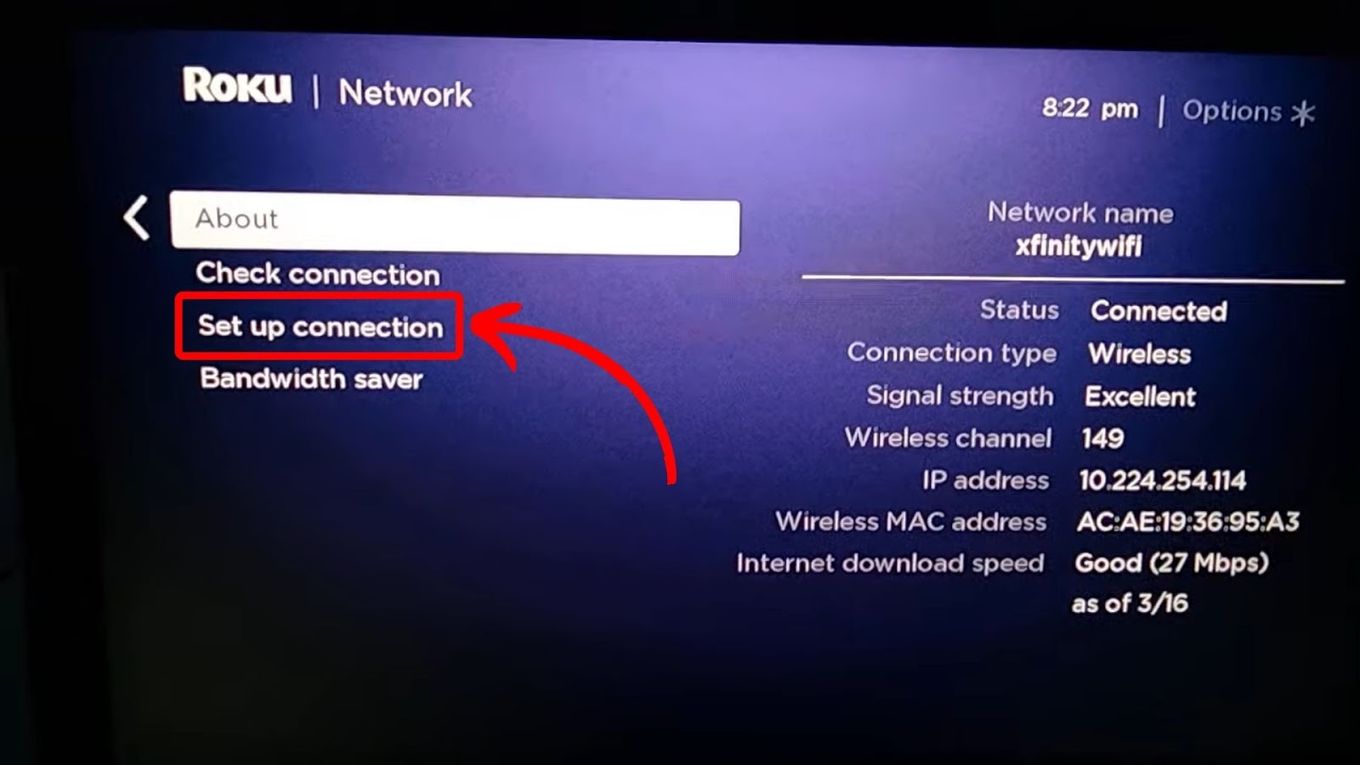
Step 6: In the settings menu, select “Network,” and then choose either “Wired” or “Ethernet” as the network type. This confirms that your Roku TV is connected via the Ethernet cable.
Step 7: Finally, provide any additional network details, such as static IP or DNS settings, if required by your network setup. Otherwise, your Roku TV should automatically obtain the necessary network information.
By using an Ethernet connection, you can bypass the need for a remote control to connect your Roku TV to Wi-Fi. This method offers a stable and reliable internet connection, ensuring uninterrupted streaming of your favorite content.
Method 3: Using a Universal Remote
If you’ve lost your Roku remote or it’s not functioning properly, don’t worry! You can still connect your Roku TV to Wi-Fi using a universal remote. Follow these steps to connect your Roku TV to Wi-Fi using a universal remote:
Step 1: Check if your universal remote is compatible with Roku devices. Most universal remotes allow for Roku control, but it’s always a good idea to double-check the compatibility with your specific remote model.
Step 2: Refer to the instructions manual that came with your universal remote to find the setup process for Roku devices. The setup process may vary depending on the brand and model of the universal remote.
Step 3: Start the setup process by entering the Roku TV setup menu. To do this, you may need to press a combination of buttons specified in the universal remote’s instructions. Look for buttons with labels such as “Menu,” “Settings,” or “Setup.”
Step 4: Within the setup menu, locate the option to connect to a Wi-Fi network. The exact location of this option will depend on the Roku TV model and the remote control brand.
Step 5: Select the appropriate option to connect to Wi-Fi, and the universal remote will prompt you to enter the network name (SSID) and password. Use the directional buttons on the remote to navigate and select the characters.
Step 6: Enter the Wi-Fi network name and password accurately, taking care to enter each character correctly. The universal remote will transmit this information to your Roku TV.
Step 7: Once you have entered the Wi-Fi details, confirm the settings, and allow your Roku TV to establish the Wi-Fi connection. The TV will connect to the specified network and obtain the necessary IP address and other network configurations.
Using a compatible universal remote to connect your Roku TV to Wi-Fi is a convenient solution if your original Roku remote is missing or not available. Ensure that your universal remote is programmed correctly and follow the setup prompts to establish a successful Wi-Fi connection.
Method 4: Using HDMI-CEC
If you’re unable to locate your Roku remote, you can still connect your Roku TV to Wi-Fi using HDMI-CEC (Consumer Electronics Control). HDMI-CEC is a feature available on most modern TVs and devices, including Roku TVs. Here’s how you can connect your Roku TV to Wi-Fi using HDMI-CEC:
Step 1: Ensure that both your Roku TV and the HDMI-connected device, such as a cable box or gaming console, support HDMI-CEC. Check the user manuals or specifications for both devices to verify their compatibility.
Step 2: Connect your Roku TV to the HDMI-connected device using an HDMI cable. Make sure the HDMI cable is securely plugged into the HDMI port on both devices.
Step 3: Turn on your Roku TV and the HDMI-connected device. On your Roku TV remote, press the Home button to access the Roku Home screen.
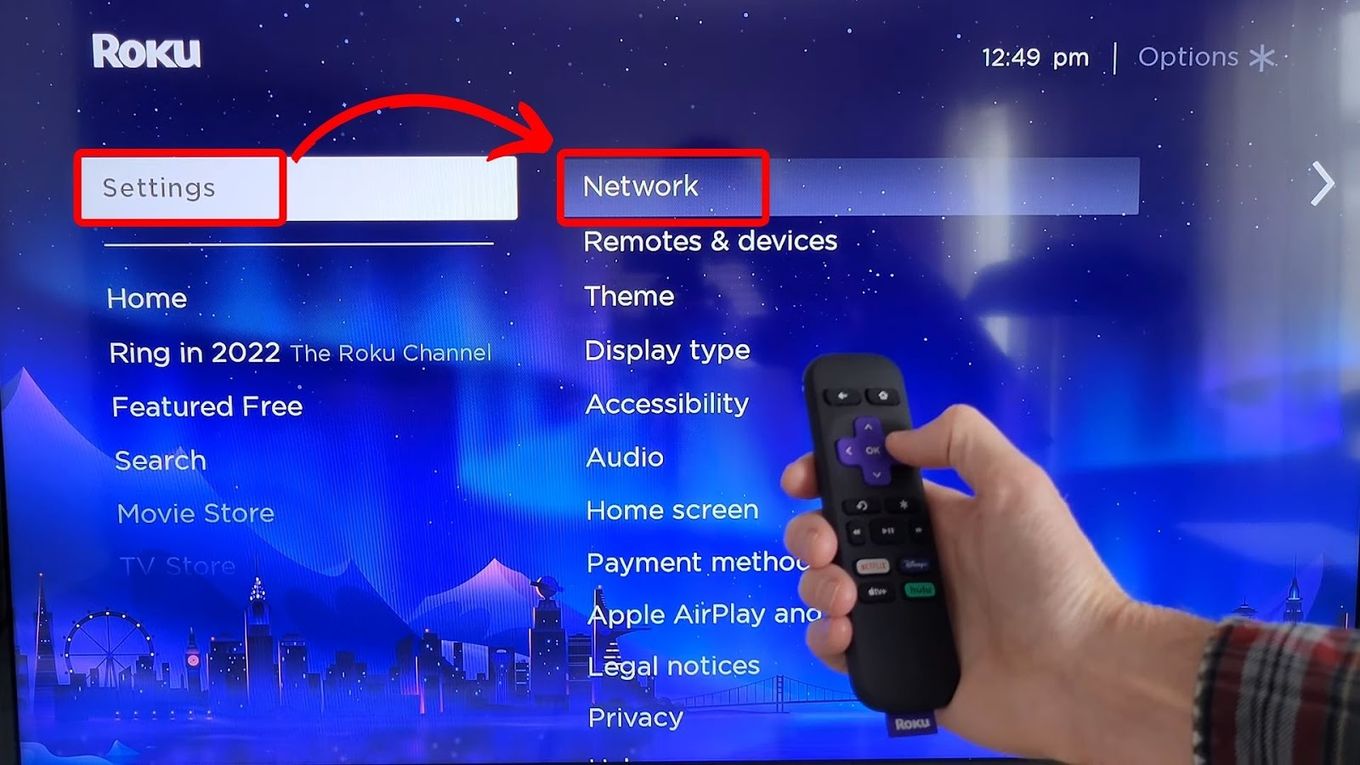
Step 4: Using the Roku remote, navigate to the settings menu. Select “Settings” and then choose “System” from the options.
Step 5: Within the System settings, select “Control other devices (CEC)” and enable the feature. This will allow your Roku TV to communicate with the HDMI-connected device via HDMI-CEC.
Step 6: Return to the Roku Home screen and navigate to the settings menu again. This time, select “Network” and then choose “Set Up Connection.”
Step 7: Follow the on-screen instructions to connect your Roku TV to Wi-Fi. Select your Wi-Fi network from the list, enter the password if required, and complete the setup process.
By utilizing HDMI-CEC, you can use the remote control of the HDMI-connected device to control your Roku TV. This means you can navigate the Roku interface, connect to Wi-Fi, and enjoy streaming without the need for the Roku remote.
Method 5: Using WPS (Wi-Fi Protected Setup)
If you’re unable to connect your Roku TV to Wi-Fi due to a missing remote, you can utilize Wi-Fi Protected Setup (WPS) to establish a connection without the need for manual input. WPS is a convenient feature available on many routers that allows for easy and quick Wi-Fi setup. Follow these steps to connect your Roku TV to Wi-Fi using WPS:
Step 1: Make sure your router supports WPS. Look for a physical WPS button on your router or check the router’s user manual to confirm its availability.
Step 2: Start the WPS process by pressing the WPS button on your router. The WPS button is typically located on the front or side of the router and may be labeled “WPS” or have the WPS symbol.
Step 3: Immediately after pressing the WPS button on the router, go to your Roku TV and follow the on-screen prompts. Typically, there will be a Wi-Fi setup or WPS option within the Roku TV settings menu.
Step 4: Select the WPS option or the option that mentions “Wi-Fi Protected Setup” on your Roku TV screen. This will initiate the automatic connection process.
Step 5: Allow your Roku TV to communicate with the router using WPS. The TV will automatically detect the available Wi-Fi networks and try to establish a connection with the one your router is broadcasting.
Step 6: Wait for a few seconds while your Roku TV attempts to establish a connection using WPS. Once the connection is successfully established, you’ll receive a confirmation message on your TV screen.
Step 7: After the connection is established, your Roku TV will be ready to stream content over Wi-Fi. Confirm the connection in the Roku TV settings, and you’ll be able to access all the streaming features and content.
Using WPS is a simple and hassle-free method to connect your Roku TV to Wi-Fi when you don’t have access to the remote. It eliminates the need for manual input, making the connection process swift and convenient.
Conclusion
When you find yourself without a remote control for your Roku TV, there’s no need to panic. You have several alternative methods to connect your Roku TV to Wi-Fi and resume enjoying your favorite shows and movies. Whether it’s using the Roku mobile app, an Ethernet connection, a universal remote, HDMI-CEC, or WPS, each method offers a unique solution to connect your Roku TV without a remote.
The Roku mobile app provides a convenient way to control your Roku TV using your smartphone or tablet. Simply download the app, ensure your mobile device is connected to the same Wi-Fi network, and follow the steps to connect your TV to Wi-Fi using the app’s remote control features.
Alternatively, if you have an Ethernet port on your Roku TV, you can directly connect it to your router using an Ethernet cable. This eliminates the need for a Wi-Fi connection and provides a stable internet connection for uninterrupted streaming.
If you have a universal remote that is compatible with Roku devices, you can use it to navigate the Roku TV setup menu and connect to Wi-Fi. Simply follow the instructions provided with your universal remote to enter the network details and establish a Wi-Fi connection.
HDMI-CEC allows you to control your Roku TV using the remote control of an HDMI-connected device, such as a cable box or gaming console. By enabling HDMI-CEC and following the setup process, you can navigate the Roku interface, connect to Wi-Fi, and enjoy streaming without a dedicated Roku remote.
Lastly, if your router supports WPS, you can utilize this feature to connect your Roku TV to Wi-Fi. Press the WPS button on your router and follow the on-screen prompts on your Roku TV to establish a wireless connection quickly and effortlessly.
With these alternative methods at your disposal, you can overcome the absence of a remote control and reconnect your Roku TV to Wi-Fi, bringing back the joy of streaming your favorite content. No matter which method you choose, ensure you follow the steps carefully and enjoy uninterrupted streaming on your Roku TV.