Introduction
Connecting your Amazon tablet to Wi-Fi is a quick and straightforward process that allows you to enjoy the internet and access a wide range of online content. Whether you have just purchased a new Amazon tablet or need to reconnect to a Wi-Fi network, this guide will walk you through the steps to get you connected in no time.
Wi-Fi is essential for enjoying various features on your Amazon tablet, including downloading apps, watching videos, streaming music, and browsing the web. By connecting to a Wi-Fi network, you can also take advantage of over-the-air software updates for your tablet to ensure you have the latest features and security patches.
In this guide, we will provide you with a step-by-step process to connect your Amazon tablet to Wi-Fi. Whether you are at home, in a coffee shop, or traveling, you will be able to access the internet and enjoy your tablet’s functionalities. So let’s dive in and get connected!
Step 1: Go to Settings
The first step to connect your Amazon tablet to Wi-Fi is to navigate to the settings menu. The settings menu allows you to customize various aspects of your tablet’s functionality, including network settings.
To access the settings menu, locate the gear icon on your tablet’s home screen or swipe down from the top of the screen to reveal the quick settings panel and tap on the gear icon. This will open the settings menu, where you can make changes to your device’s configuration.
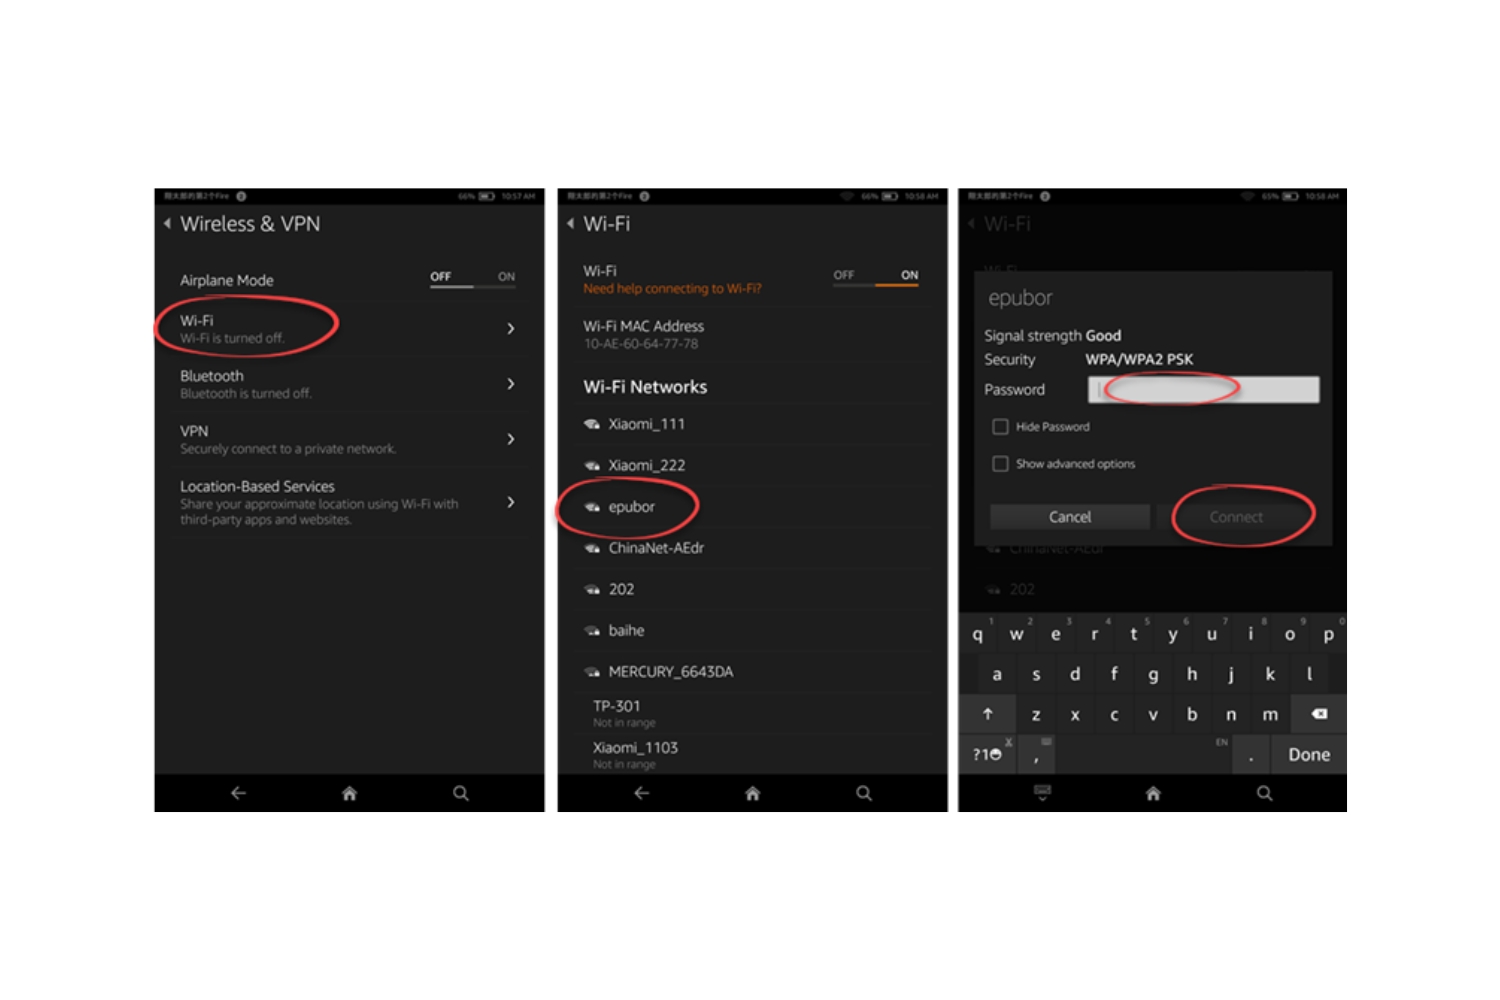
Once you are in the settings menu, you will see a list of options that you can explore. Look for the “Wireless & Networks” or “Wi-Fi” option. The location of these options may vary depending on your tablet model and software version.
Tap on the “Wireless & Networks” or “Wi-Fi” option to proceed to the next step. This will take you to the Wi-Fi settings page, where you can connect to available Wi-Fi networks.
In some cases, you may need to navigate through additional menus, such as “Network & Internet” or “Connections,” before reaching the Wi-Fi settings page. Keep exploring the settings menu until you find the Wi-Fi option.
Once you have successfully reached the Wi-Fi settings page, you are ready to move on to the next step of connecting your Amazon tablet to a Wi-Fi network.
Step 2: Select Wi-Fi
After navigating to the Wi-Fi settings page, you will be presented with a list of available Wi-Fi networks in your vicinity. This step involves selecting the Wi-Fi network that you want to connect to.
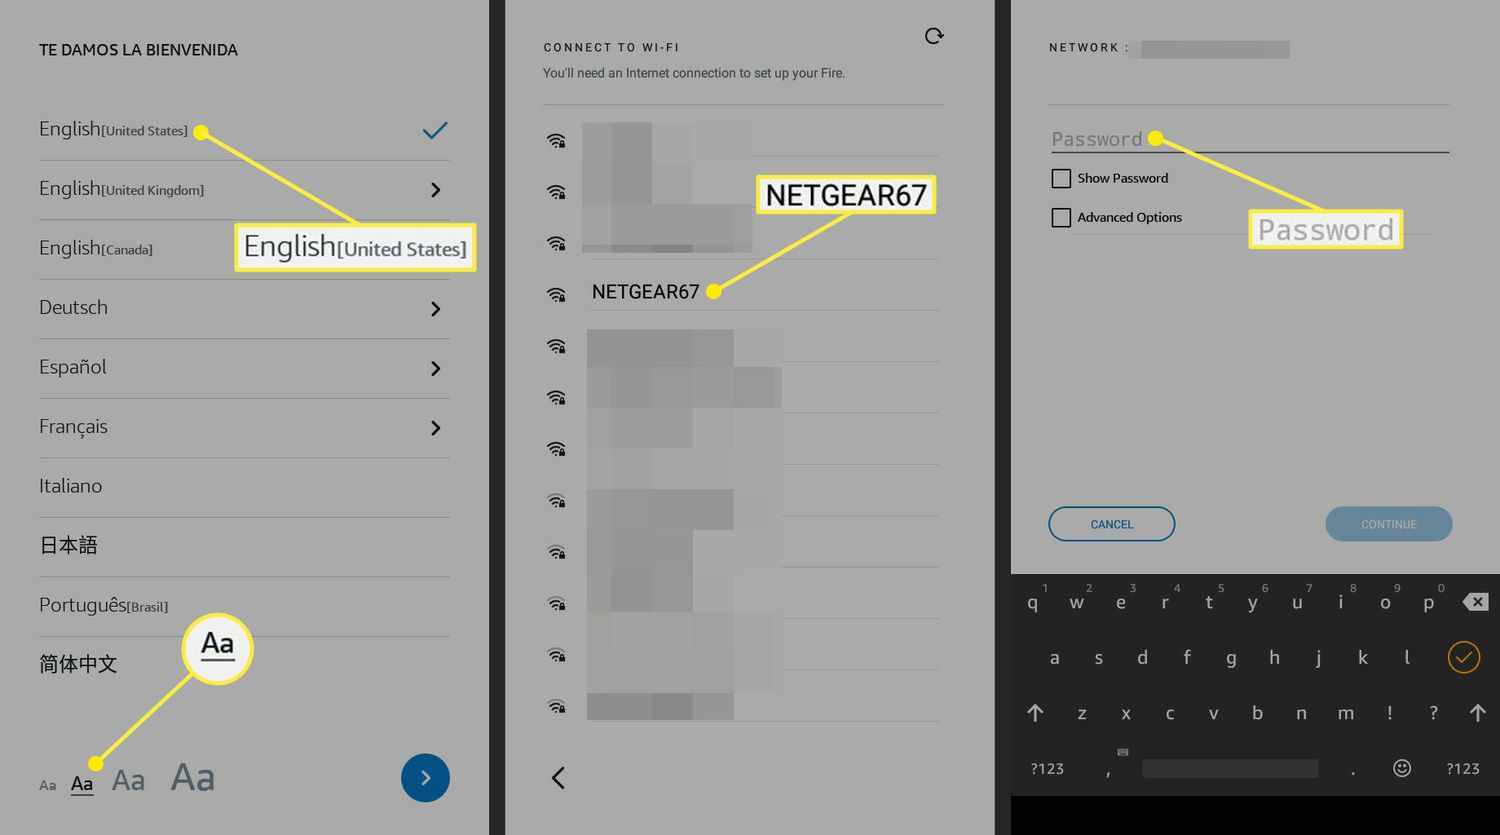
Your Amazon tablet will display a list of nearby Wi-Fi networks, along with other relevant information such as signal strength and network security. Take a moment to review the available networks and choose the one that corresponds to your desired Wi-Fi connection.
Typically, Wi-Fi networks are identified by their unique names, known as SSIDs (Service Set Identifiers). Look for the name of the Wi-Fi network you want to connect to from the list presented on your screen. This can be the name of your home network or the network provided by a public place such as a cafe or hotel.
If you are unsure which Wi-Fi network to select, you can refer to the network name written on your router or consult the network administrator in a public setting. It’s important to choose the correct Wi-Fi network to ensure a successful connection.
Keep in mind that some Wi-Fi networks may require a password to connect. If the network is password protected, you will see a lock icon next to its name. We will cover how to enter the password in the next step.
Make sure to select the Wi-Fi network that you have permission to access and avoid connecting to unknown or suspicious networks. Connecting to a secure and reliable network will ensure a smoother internet experience on your Amazon tablet.
Step 3: Toggle Wi-Fi On
Once you have selected the desired Wi-Fi network, the next step is to toggle the Wi-Fi feature on your Amazon tablet. This will enable your tablet to connect to the chosen network and access the internet.
On the Wi-Fi settings page, you will find a switch or button labeled “Wi-Fi” or “Wi-Fi On/Off.” This switch allows you to turn the Wi-Fi feature on or off. Make sure the switch is in the “On” position to activate Wi-Fi connectivity.
If the switch is already turned on, you can skip this step and proceed to the next one. However, if the switch is off, tap on it to toggle it on. This will activate the Wi-Fi feature and enable your tablet to scan for available networks.
Once the Wi-Fi feature is turned on, your tablet will start searching for available networks in its range. It may take a few moments to detect the nearby Wi-Fi networks, so be patient while the scanning is in progress.
While the Wi-Fi feature is on, your tablet will automatically connect to known networks that you have previously connected to. If you are in range of a known network, your tablet will connect to it without requiring any further input from you.
However, if you are connecting to a new network or a network that requires a password, you will need to follow the remaining steps to complete the connection process.
Step 4: Find Available Networks
Once your Wi-Fi feature is turned on, your Amazon tablet will start searching for available networks in its vicinity. In this step, you will be able to see the list of networks that your tablet has discovered.
On the Wi-Fi settings page, you will see a list of available networks displayed under the “Available Networks” or “Networks” section. This list will show the names of the Wi-Fi networks in range, along with relevant information such as signal strength and network security.
Scan through the list of available networks and look for the name of the network you want to connect to. The network names or SSIDs typically reflect the names of the Wi-Fi networks in your surroundings, such as your home network or the network provided by a public place.
If you don’t immediately see the network you are looking for, you can wait for a few moments as your tablet continues to search for additional networks. Sometimes, it may take a few seconds for all available networks to be displayed on the list.
Make sure to select a network that you have permission to access. Connecting to unknown or unauthorized networks can pose security risks and compromise your personal information.
In the next step, we will guide you through the process of choosing and connecting to the Wi-Fi network of your choice.
Step 5: Choose the Wi-Fi Network
After finding the list of available networks on your Amazon tablet, it’s time to choose the Wi-Fi network that you want to connect to. In this step, you will select the network from the list based on its name and other relevant details.
Review the list of available networks on the Wi-Fi settings page. Each network will be identified by its unique name, known as the Service Set Identifier (SSID). Look for the network name that corresponds to the Wi-Fi network you want to connect to.
If you are connecting to a known network, such as your home network or a network you have connected to before, the network name may already be familiar to you. All you have to do is tap on the network name to select it.
However, if you are connecting to a new network, take a moment to ensure that you have chosen the correct one. If you are in a public location, you can look for signs or ask the network administrator for the name of the Wi-Fi network you should connect to.
Additionally, pay attention to the signal strength of each network. A stronger signal indicates a better connection quality. If you are in close proximity to the Wi-Fi source, selecting a network with a stronger signal will likely provide a more stable and faster connection.
If you are unable to find the network you want to connect to in the available networks list, select the option to “Refresh” or “Scan” for networks. This will prompt your tablet to search again and display any additional networks that may have become available.
Once you have chosen the Wi-Fi network you want to connect to, proceed to the next step to enter the Wi-Fi password if required.
Step 6: Enter Wi-Fi Password
If the Wi-Fi network you have selected is password-protected, you will need to enter the Wi-Fi password in order to establish a connection. In this step, we will guide you through the process of entering the Wi-Fi password on your Amazon tablet.
After selecting the desired Wi-Fi network, your tablet will prompt you to enter the password. This is a security measure implemented by the network owner to protect their Wi-Fi network from unauthorized access.
On the Wi-Fi settings page, you will see a text field or input box where you can enter the Wi-Fi password. Tap on the text field to bring up the on-screen keyboard and then use the keyboard to enter the password.
Be cautious and accurate when entering the password, as it is case-sensitive. Make sure to type each character correctly to avoid any errors. If you are unsure about the characters in the password, you can click on the eye icon to see the entered password as plain text.
If you are entering a long or complex password, it is easy to make mistakes. Take your time and double-check before proceeding to the next step. Remember that the password should exactly match the one provided by the Wi-Fi network owner.
If you have difficulty recalling the Wi-Fi password, you can refer to the password written on your router or ask the network administrator for assistance. It is important to have the correct password to establish a successful connection.
Once you have entered the Wi-Fi password, tap on the “Connect” or “Join” button to proceed with the connection process. Your tablet will then attempt to connect to the Wi-Fi network using the provided password.
In the next step, we will cover the final process of connecting your Amazon tablet to the Wi-Fi network.
Step 7: Connect to Wi-Fi Network
Once you have entered the Wi-Fi password, your Amazon tablet will attempt to connect to the selected Wi-Fi network. This is the final step in the process of connecting your tablet to Wi-Fi.
After tapping on the “Connect” or “Join” button, your tablet will establish a connection with the Wi-Fi network. It might take a few moments for the connection to be established, so be patient during this step.
While the connection is being established, your tablet will display a message indicating the status of the connection process. This message may say “Connecting,” “Obtaining IP address,” or something similar.
If the entered password is correct and the Wi-Fi network is accessible within range, your tablet will soon establish a successful connection. Once connected, your tablet will display a message confirming the connection, such as “Connected” or “Wi-Fi network name – Connected.”
At this point, your Amazon tablet is successfully connected to the Wi-Fi network. You can now enjoy all the benefits of having an internet connection, including browsing the web, streaming media, downloading apps, and more.
Keep in mind that your tablet will automatically reconnect to the same Wi-Fi network whenever it is in range and the Wi-Fi feature is turned on. This allows for seamless connectivity and easy access to the internet.
If you need to connect to a different Wi-Fi network in the future or need to troubleshoot any connectivity issues, you can revisit the Wi-Fi settings page and follow similar steps to establish a connection.
Congratulations! You have successfully connected your Amazon tablet to a Wi-Fi network. Enjoy the world of online possibilities and make the most out of your tablet’s features.
Troubleshooting Tips
While connecting your Amazon tablet to a Wi-Fi network is generally a smooth process, occasionally you may encounter some issues or difficulties. Here are some troubleshooting tips to help you resolve common Wi-Fi connectivity problems:
- Check Wi-Fi Network Availability: Ensure that the Wi-Fi network you are trying to connect to is in range and available. Sometimes, networks may become temporarily unavailable or have intermittent connectivity issues.
- Restart Wi-Fi Router: If you are experiencing connectivity issues, try restarting your Wi-Fi router. Power it off, wait for a few seconds, and then turn it back on. This can help resolve any temporary network conflicts or glitches.
- Double-Check Wi-Fi Password: If you are unable to connect to the Wi-Fi network, make sure you have entered the correct Wi-Fi password. Remember that passwords are case-sensitive, so check for any spelling errors or incorrect capitalization.
- Ensure Correct Security Protocol: Some Wi-Fi networks use specific security protocols, such as WEP, WPA, or WPA2. Make sure that your tablet’s Wi-Fi settings match the security protocol used by the network you are trying to connect to.
- Forget and Reconnect to Network: If you are still experiencing connection issues, try forgetting the Wi-Fi network from your tablet’s Wi-Fi settings and then reconnecting to it. This can help refresh the connection information and resolve any connection conflicts.
- Update Tablet Software: Ensure that your tablet’s software is up to date. Outdated software can sometimes cause compatibility issues with Wi-Fi networks. Check for any available software updates and install them if necessary.
- Reset Network Settings: If all else fails, you can try resetting the network settings on your tablet. This will revert your Wi-Fi settings back to their default configurations. Keep in mind that resetting network settings will remove any saved Wi-Fi networks and you will need to reconnect to them again.
These troubleshooting tips should help you resolve most Wi-Fi connectivity problems on your Amazon tablet. If you continue to experience issues, it may be helpful to seek further assistance from Amazon support or your network administrator.
Conclusion
Connecting your Amazon tablet to a Wi-Fi network is a simple process that allows you to access the internet and enjoy a range of online activities. By following the step-by-step guide provided, you can successfully connect your tablet to Wi-Fi and unlock its full potential.
We started by going to the settings menu and navigating to the Wi-Fi settings page. From there, we selected the desired Wi-Fi network and toggled the Wi-Fi feature on. After finding the available networks, we chose the network we wanted to connect to and entered the Wi-Fi password if necessary. Finally, we connected to the Wi-Fi network and ensured a successful connection.
If you encounter any issues along the way, the troubleshooting tips provided can help you troubleshoot common connectivity problems. Restarting your Wi-Fi router, double-checking the Wi-Fi password, and ensuring the correct security protocol can often resolve issues and ensure a smooth connection process.
Remember, connecting your Amazon tablet to Wi-Fi opens up a world of possibilities. You can browse the web, stream videos, download apps, and take advantage of the tablet’s features and functionalities. Stay connected and enjoy all the benefits that a strong and stable Wi-Fi connection brings.
Now that you have successfully connected your Amazon tablet to a Wi-Fi network, explore and make the most out of your tablet’s capabilities. Get ready to enjoy seamless internet connectivity and access a world of digital content right at your fingertips.