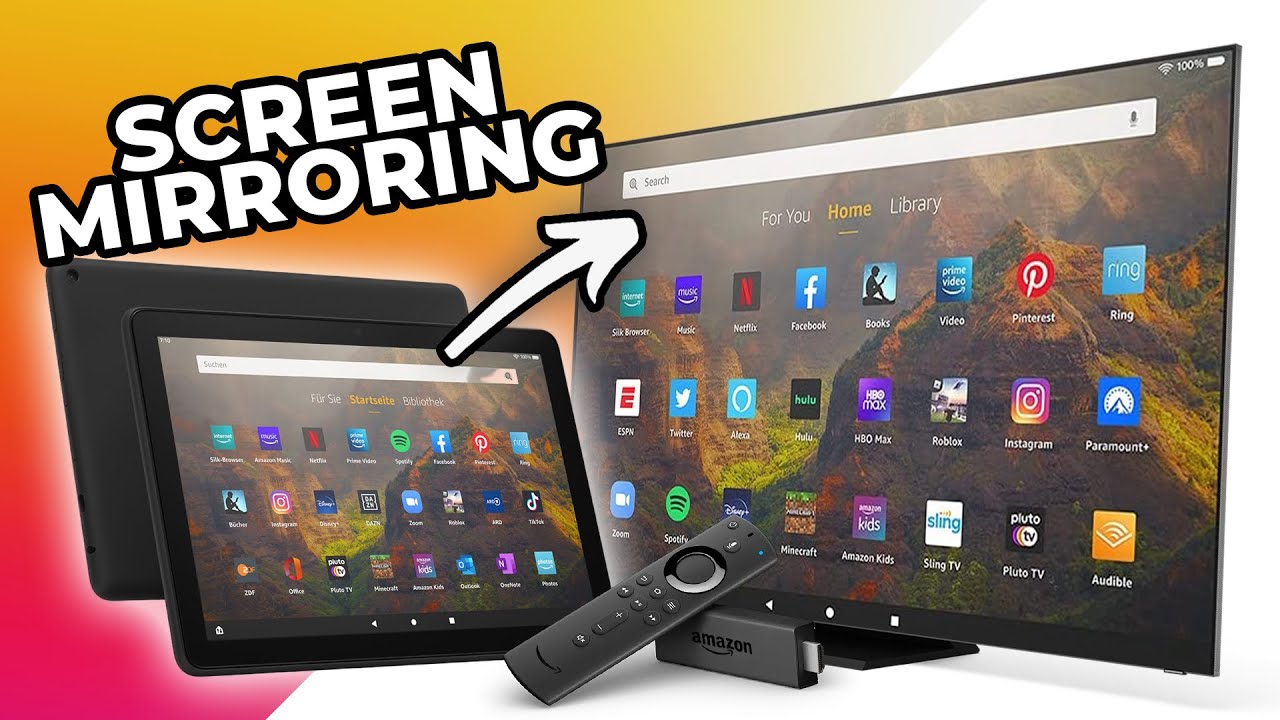
Introduction
Connecting to Wi-Fi on your Amazon Fire Tablet allows you to access the internet, stream videos, download apps, and much more. With a wide range of features and capabilities, the Fire Tablet is a versatile device that can greatly enhance your digital experience. However, establishing a Wi-Fi connection is a vital first step.
In this guide, we will walk you through the process of connecting your Amazon Fire Tablet to a Wi-Fi network. Whether you are setting up your device for the first time or need to reestablish a connection, this step-by-step tutorial will provide you with the necessary instructions.
Having a stable Wi-Fi connection is essential, and by following these steps, you will be able to seamlessly connect and enjoy all the benefits the Fire Tablet has to offer. So, grab your tablet and let’s get started!
Note: The steps mentioned in this guide are applicable to most Amazon Fire Tablet models. However, there might be slight differences depending on the specific model you own.
Step 1: Accessing Wi-Fi Settings
To connect to a Wi-Fi network on your Amazon Fire Tablet, you first need to access the Wi-Fi settings. Follow these simple steps to get started:
1. Swipe Down from the Top of the Screen: Start by swiping down from the top of your Fire Tablet’s home screen to open the quick settings panel.
2. Tap on the “Settings” Icon: Look for the gear-shaped “Settings” icon and tap on it to open the device settings menu.
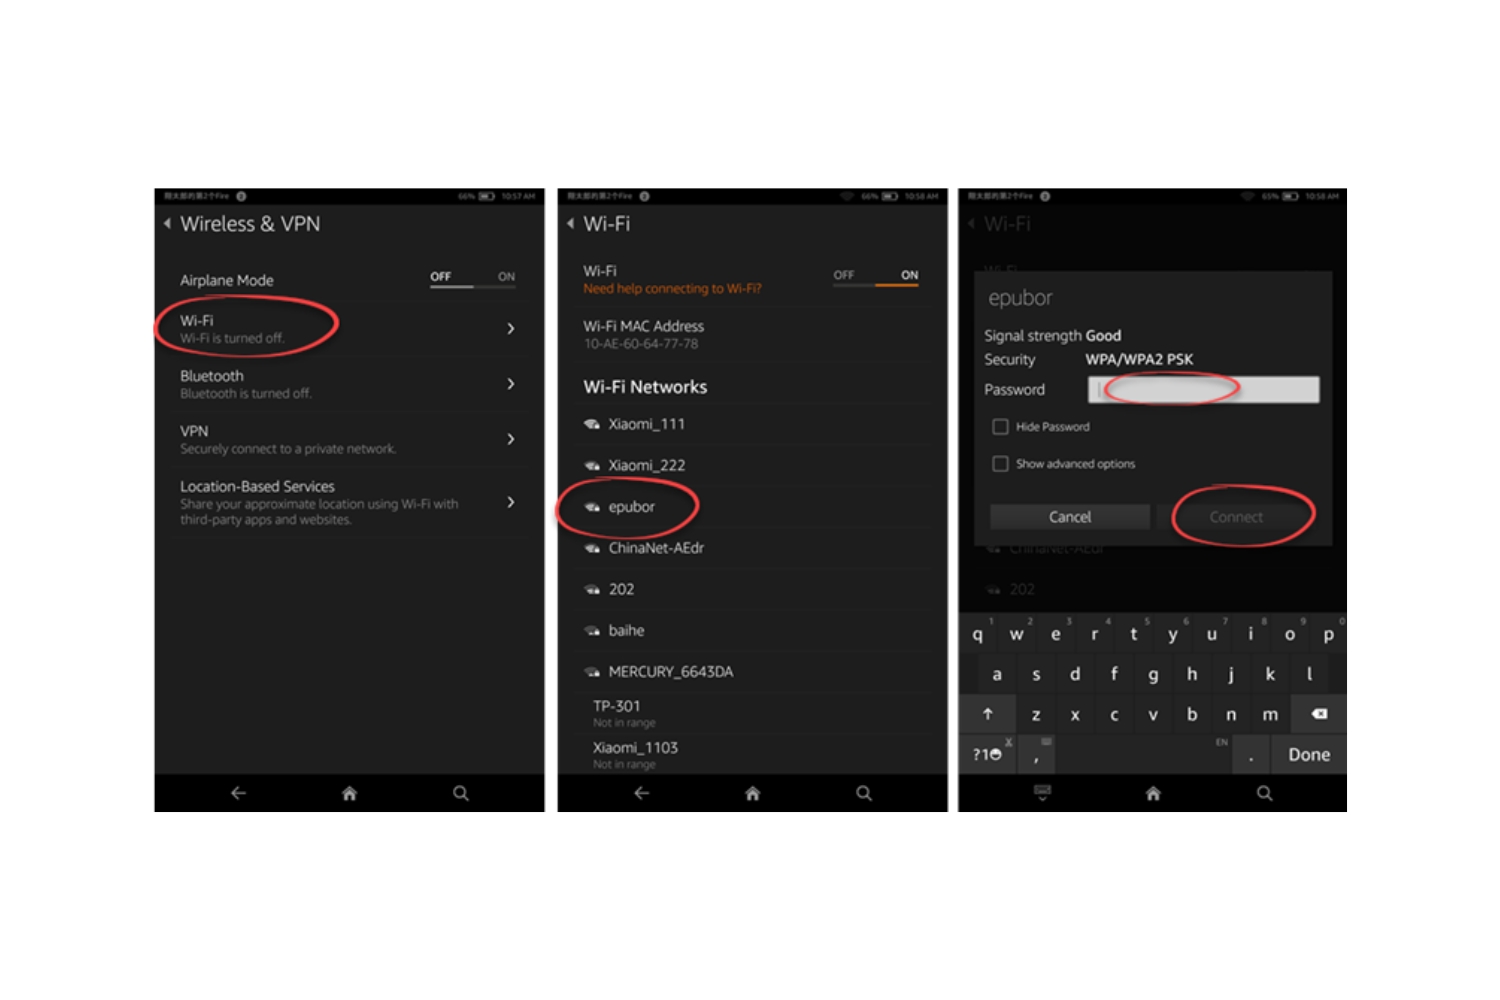
3. Select “Wi-Fi” from the Menu: In the settings menu, you will find various options. Look for the “Wi-Fi” option and tap on it to access the Wi-Fi settings.
4. Enable Wi-Fi: Once you are in the Wi-Fi settings, you will need to make sure that the Wi-Fi is turned on. If it is already enabled, you will see a toggle switch in the “On” position. If it is turned off, tap on the toggle switch to enable Wi-Fi.
5. Wait for Networks to Load: After you enable Wi-Fi, your Fire Tablet will start scanning for available Wi-Fi networks. This may take a few moments, so be patient.
Now that you have accessed the Wi-Fi settings, you are ready to connect to a Wi-Fi network. Proceed to the next step to learn how to connect to an available network.
Remember, if you are connecting to Wi-Fi for the first time, make sure you are within range of a Wi-Fi network. Additionally, if you are connecting to a public network, ensure that you have the necessary credentials or meet any requirements set by the network provider.
Step 2: Turning on Wi-Fi
Before you can connect to a Wi-Fi network on your Amazon Fire Tablet, you need to ensure that the Wi-Fi feature is turned on. Follow these steps to enable Wi-Fi:
1. Access the Quick Settings Panel: Swipe down from the top of your Fire Tablet’s home screen to open the quick settings panel.
2. Tap on the “Wi-Fi” Icon: Look for the Wi-Fi icon, which looks like a signal bar, and tap on it. This will enable or disable the Wi-Fi feature.
3. Check Wi-Fi Status: Once you tap on the Wi-Fi icon, a pop-up window will appear, displaying the current status of your device’s Wi-Fi. If the Wi-Fi is turned off, the pop-up will show “Wi-Fi Off.”
4. Enable Wi-Fi: To turn on Wi-Fi, tap on the “Wi-Fi Off” text in the pop-up window. This will toggle the switch and turn on the Wi-Fi feature of your Fire Tablet.
5. Wait for Networks to Load: After turning on Wi-Fi, your device will start scanning for available Wi-Fi networks. This process may take a few moments, so allow some time for the network list to populate.
By following these steps, you have successfully turned on the Wi-Fi feature on your Amazon Fire Tablet. Now that Wi-Fi is enabled, you can proceed to the next step to learn how to scan for and connect to an available network.
Step 3: Scanning for Available Networks
Once you have turned on the Wi-Fi feature on your Amazon Fire Tablet, it’s time to scan for available Wi-Fi networks. Follow these steps to locate nearby networks:
1. Open Wi-Fi Settings: Access the Wi-Fi settings by swiping down from the top of your Fire Tablet’s home screen and tapping on the “Settings” icon. Then select “Wi-Fi” from the settings menu.
2. Wait for Networks to Load: In the Wi-Fi settings, your device will automatically start scanning for available networks. Wait for a few moments as the list of networks populates.
3. View Available Networks: Once the network scan is complete, you will see a list of available Wi-Fi networks. Each network will be displayed with its name (SSID), signal strength, and security type (if applicable).
4. Sort Networks: To make it easier to find the desired network, you can sort the available networks. Tap on the “Sort by” drop-down menu, usually located at the top right corner of the screen, and choose your preferred sorting option, such as signal strength or network name.
5. Scroll through the List: Scroll through the list of available networks to view all the options in your vicinity. If there are many networks listed, you may need to swipe up or down to see all of them.
By following these steps, you have successfully scanned for available Wi-Fi networks on your Amazon Fire Tablet. Once you have identified the network you want to connect to, proceed to the next step to learn how to establish a connection.
Step 4: Connecting to a Wi-Fi Network
Once you have scanned for available Wi-Fi networks on your Amazon Fire Tablet, it’s time to connect to the desired network. Follow these steps to establish a connection:
1. Select a Network: From the list of available networks, tap on the name (SSID) of the network you want to connect to. Make sure you choose a network that you have the required credentials for, such as a password.
2. Enter Wi-Fi Password (if applicable): If the selected network is password-protected, you will be prompted to enter the Wi-Fi password. Tap on the password field and use the on-screen keyboard to type in the password accurately.
3. Connect to the Network: After entering the correct password (if required), tap on the “Connect” button to establish a connection to the selected Wi-Fi network. Your Amazon Fire Tablet will attempt to connect to the network using the provided information.
4. Wait for Connection: Once you tap on “Connect,” your device will attempt to establish a connection to the selected Wi-Fi network. This process may take a few moments, so be patient as the tablet tries to connect.
5. Successful Connection: If the connection is successful, you will see a “Connected” status next to the network name in the Wi-Fi settings. Additionally, the Wi-Fi icon in the status bar at the top of your device’s screen will show the signal strength of the connected network.
By following these steps, you have successfully connected to a Wi-Fi network on your Amazon Fire Tablet. Now you can enjoy seamless internet access and make the most out of your device’s online capabilities. If you need to connect to a hidden Wi-Fi network, proceed to the next step for detailed instructions.
Step 5: Entering Wi-Fi Password
If you are connecting to a password-protected Wi-Fi network on your Amazon Fire Tablet, you will need to enter the correct Wi-Fi password to establish a connection. Follow these steps to enter the Wi-Fi password:
1. Tap on the Password Field: When you select a password-protected network from the list, a password field will appear on the screen. Tap on the password field to activate the on-screen keyboard.
2. Enter the Wi-Fi Password: Use the on-screen keyboard to enter the Wi-Fi password accurately. Pay attention to uppercase and lowercase letters, as passwords are case-sensitive. If you are unsure about the password, check with the network administrator or refer to the router’s documentation.
3. Verify the Password: Once you have entered the Wi-Fi password, double-check it for accuracy. The password will usually appear as dots or asterisks for security reasons. Make sure that each character is entered correctly to avoid any connection issues.
4. Tap on “Connect”: After verifying the Wi-Fi password, tap on the “Connect” button to initiate the connection process. Your Amazon Fire Tablet will attempt to connect to the Wi-Fi network using the entered password.
5. Wait for Connection: After tapping on “Connect,” your device will try to establish a connection to the password-protected Wi-Fi network. This process may take a few moments, so be patient as the tablet attempts to connect.
6. Successful Connection: If the entered password is correct, your Amazon Fire Tablet will successfully connect to the Wi-Fi network. You will see a “Connected” status next to the network name in the Wi-Fi settings, and the Wi-Fi icon in the status bar will show the signal strength of the connected network.
By following these steps and entering the correct Wi-Fi password, you have successfully connected to a password-protected Wi-Fi network on your Amazon Fire Tablet. Now you can enjoy fast and reliable internet access on your device.
Step 6: Connecting to a Hidden Wi-Fi Network
In addition to connecting to visible Wi-Fi networks, your Amazon Fire Tablet also allows you to connect to hidden or non-broadcasted networks. These networks do not appear in the list of available networks but can still be accessed by manually entering the network information. Follow these steps to connect to a hidden Wi-Fi network:
1. Access Wi-Fi Settings: Start by accessing the Wi-Fi settings on your Amazon Fire Tablet. Swipe down from the top of the screen, tap on the “Settings” icon, and select “Wi-Fi” from the menu.
2. Tap on “Add Network”: In the Wi-Fi settings, you will find an option to “Add Network” or “Other Networks.” Tap on this option to manually add the hidden Wi-Fi network.
3. Enter Network Information: In the network information screen, you will need to enter the details of the hidden Wi-Fi network. This includes the network name (SSID), security type, and the Wi-Fi password (if applicable). Make sure to enter the information accurately, paying attention to uppercase and lowercase letters.
4. Tap on “Connect” or “Save”: Once you have entered the network information, tap on the “Connect” or “Save” button to initiate the connection process. Your Amazon Fire Tablet will attempt to connect to the hidden Wi-Fi network using the provided information.
5. Wait for Connection: After tapping on “Connect” or “Save,” your device will try to establish a connection to the hidden Wi-Fi network. This process may take a few moments, so be patient as the tablet attempts to connect.
6. Successful Connection: If the entered network information is correct, your Amazon Fire Tablet will successfully connect to the hidden Wi-Fi network. You will see a “Connected” status next to the network name in the Wi-Fi settings, and the Wi-Fi icon in the status bar will show the signal strength of the connected network.
By following these steps and entering the correct network information, you have successfully connected to a hidden Wi-Fi network on your Amazon Fire Tablet. Now you can enjoy a secure and private connection on your device, even if the network is not visible to other devices.
Step 7: Troubleshooting Wi-Fi Connection Issues
While connecting to a Wi-Fi network on your Amazon Fire Tablet is usually a seamless process, you might encounter some connection issues. Here are some troubleshooting steps to help you resolve common Wi-Fi connection problems:
1. Check Wi-Fi Signal: Ensure that you are within range of the Wi-Fi network you are trying to connect to. If you are too far away, try moving closer to the router to improve the signal strength.
2. Restart Wi-Fi Router: Sometimes, the Wi-Fi router may experience temporary issues. Try restarting the router by turning it off and then back on. This can often resolve connectivity problems.
3. Restart Amazon Fire Tablet: A simple reboot of your Fire Tablet can also help in resolving Wi-Fi connection issues. Press and hold the power button on your device, then select the “Restart” option from the power menu.
4. Forget Wi-Fi Network: If you are unable to connect to a specific network, try forgetting the network from your Wi-Fi settings. Tap on the network name, then select the “Forget” or “Remove” option. After that, scan for the network again and reconnect by entering the password.
5. Disable and Re-enable Wi-Fi: In the Wi-Fi settings, try toggling the Wi-Fi switch off and then back on. This action can refresh the connection and help establish a stable connection.
6. Reset Network Settings: If you are still experiencing Wi-Fi connection issues, you can try resetting the network settings on your Fire Tablet. Go to the Wi-Fi settings, tap on the three-dot menu icon, and select “Reset Wi-Fi, Mobile & Bluetooth.” Keep in mind that this will erase all saved Wi-Fi networks, so you will have to reconnect to them afterward.
7. Update Software: Ensure that your Amazon Fire Tablet is running the latest software version. Go to the device settings, select “Device Options,” and tap on “System Updates.” If an update is available, download and install it to address any potential bugs or issues.
If you have followed these troubleshooting steps and are still unable to establish a Wi-Fi connection on your Amazon Fire Tablet, it may be helpful to contact Amazon customer support or consult the device’s user manual for further assistance. Remember, the specific steps may vary slightly depending on your device model and software version.
Conclusion
Congratulations! You have successfully learned how to connect to a Wi-Fi network on your Amazon Fire Tablet. By following the step-by-step instructions in this guide, you can now enjoy uninterrupted internet access and make the most out of your device’s capabilities.
Connecting to Wi-Fi is an essential step in maximizing the functionality of your Fire Tablet. Whether you are browsing the web, streaming videos, playing online games, or downloading apps, a stable Wi-Fi connection is vital for a smooth and enjoyable experience.
Throughout this guide, you learned how to access the Wi-Fi settings, turn on Wi-Fi, scan for available networks, connect to a Wi-Fi network, enter the Wi-Fi password, connect to a hidden network, and troubleshoot common connection issues. These steps provide you with the necessary knowledge to connect to and troubleshoot Wi-Fi on your Fire Tablet.
Remember, each Fire Tablet model may have slight variations in the user interface and settings. It’s always a good idea to refer to the device’s user manual or Amazon’s official support resources for specific instructions related to your device.
Now that you are connected to Wi-Fi, you can explore the full range of features and capabilities of your Amazon Fire Tablet. Surf the web, download your favorite apps and games, stream movies and TV shows, and stay connected with friends and family through social media and messaging apps.
If you encounter any further issues or have additional questions about Wi-Fi connectivity on your Fire Tablet, be sure to reach out to Amazon’s customer support for further assistance. They will be able to provide you with personalized guidance to resolve any specific issues you may face.
Enjoy your connected experience with your Amazon Fire Tablet and make the most out of its remarkable features with a stable Wi-Fi connection!