Introduction
Connecting a Blu-ray player to a Smart TV can open up a world of entertainment possibilities. Whether you want to enjoy your favorite movies in stunning high-definition or access streaming services, such as Netflix or Hulu, a Blu-ray player can provide you with a satisfying multimedia experience. However, figuring out how to connect these devices together might seem daunting at first.
In this article, we will guide you through the step-by-step process of connecting your Blu-ray player to your Smart TV. By following our instructions, you will be able to set up the connection and start enjoying your favorite movies and TV shows in no time.
Before we dive into the nitty-gritty of connecting your Blu-ray player to your Smart TV, it’s important to check the compatibility of your devices. Make sure your Smart TV has the necessary ports to connect the Blu-ray player, and that your Blu-ray player supports the appropriate connections for your TV.
Once you have verified the compatibility, the next step is to choose the right cable. HDMI cables are the most common and preferred option for connecting Blu-ray players to Smart TVs as they provide high-quality audio and video signals. However, depending on your devices, you may need to use other types of cables, such as component or composite cables.
Now, let’s get started with the step-by-step instructions to connect your Blu-ray player to your Smart TV. Just follow the sections below, and you’ll be enjoying your favorite movies and shows in no time!
Step 1: Check the Ports on Your TV and Blu-ray Player
The first step in connecting your Blu-ray player to your Smart TV is to check the available ports on both devices. This will help you determine the type of cable you need and ensure compatibility between the devices.
Begin by examining the ports on your TV. Most modern Smart TVs come equipped with HDMI (High-Definition Multimedia Interface) ports, which offer the best audio and video quality. Look for the HDMI ports labeled “Input” on the back or side of your TV. Take note of the number of HDMI ports available, as you may need to free up a port if they are limited.
Next, locate the ports on your Blu-ray player. In most cases, Blu-ray players will also have HDMI ports labeled “Output.” This is where the cable will connect from the player to the TV. Make sure your Blu-ray player has an HDMI output port that matches the HDMI input port on your TV.
If your Blu-ray player or TV does not have HDMI ports, don’t worry. Some Smart TVs and Blu-ray players have other types of ports, such as component or composite ports. These can still provide decent audio and video quality, although not as high as HDMI. Check the labels on the ports to identify the type of connections they support.
Once you have determined the available ports on both your TV and Blu-ray player, it’s time to move on to the next step: choosing the right cable for your setup.
Step 2: Choose the Right Cable
Now that you have identified the ports on your Smart TV and Blu-ray player, it’s time to choose the right cable to connect the two devices. The type of cable you need will depend on the available ports on your TV and Blu-ray player, as well as the desired audio and video quality.
If both your TV and Blu-ray player have HDMI ports, it is highly recommended to use an HDMI cable. HDMI cables offer the best quality in terms of both audio and video transmission. They support high-definition resolutions and can carry both audio and video signals in a single cable, eliminating the need for additional audio cables.
When selecting an HDMI cable, look for the latest version that is compatible with your devices. HDMI 2.0 or higher is ideal for 4K Ultra HD TVs and Blu-ray players, as it can handle the increased bandwidth required for higher resolutions and refresh rates.
If your TV or Blu-ray player doesn’t have HDMI ports, you may need to use alternative cables. Component cables are another common option. They consist of three separate video cables (red, blue, and green) and two audio cables (red and white). Component cables deliver high-quality video but require separate audio cables for sound.
Composite cables, also known as RCA cables, are a basic analog option if you don’t have HDMI or component ports. They have three color-coded plugs (yellow for video, red for right audio, and white for left audio). Composite cables offer lower video quality compared to HDMI or component cables.
Once you have chosen the appropriate cable, make sure you have the correct length to reach between your TV and Blu-ray player. It’s always a good idea to measure the distance beforehand to avoid any inconvenience later on.
Now that you have selected the right cable for your setup, it’s time to move on to the next step: connecting your Blu-ray player to your Smart TV.
Step 3: Connect the Blu-ray Player to Your TV
Now that you have chosen the right cable, it’s time to connect your Blu-ray player to your Smart TV. Follow these simple steps to establish the physical connection between the two devices:
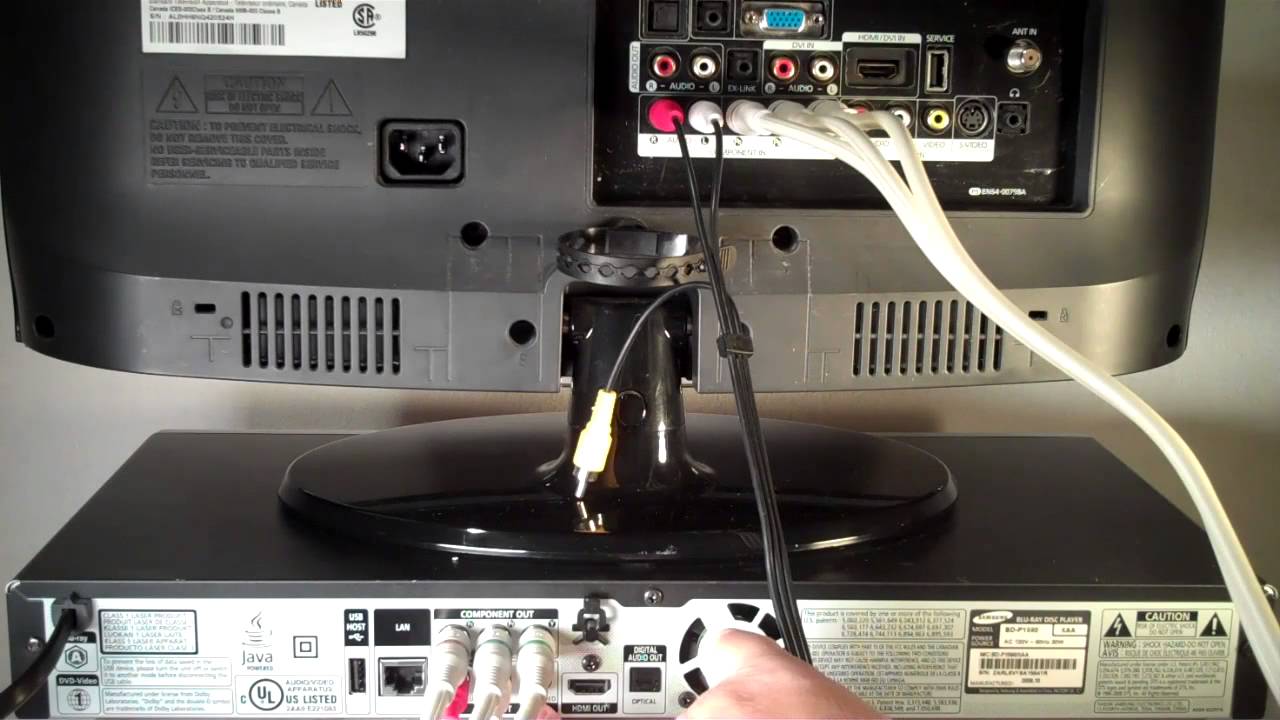
- Locate the HDMI output port on your Blu-ray player. It is usually labeled “HDMI Out” or “Output.”
- Take one end of the HDMI cable and plug it into the HDMI output port on your Blu-ray player. Ensure that it fits securely and that the connectors are aligned correctly.
- Next, locate the HDMI input port on your Smart TV. It is usually labeled “HDMI In” or “Input.” If you have multiple HDMI ports on your TV, choose one that is available and convenient for you.
- Take the other end of the HDMI cable and plug it into the HDMI input port on your Smart TV. Again, ensure that it is firmly connected without any loose connections.
- Once the HDMI cable is securely connected to both the Blu-ray player and the TV, power on both devices.
Depending on your TV, you may need to select the appropriate HDMI input source. Use your TV remote to navigate to the input/source menu and select the HDMI port to which your Blu-ray player is connected.
With the physical connection established, the TV should recognize the Blu-ray player. You may see a notification or an indication that a new device is connected. If not, check the TV’s input/source menu again and ensure that the correct HDMI port is selected.
Congratulations! You have successfully connected your Blu-ray player to your Smart TV. The next step is to set up your Blu-ray player to optimize the viewing experience.
Step 4: Set Up Your Blu-ray Player
After connecting your Blu-ray player to your Smart TV, it’s time to set up the player to ensure the best possible viewing experience. Follow these steps to complete the setup:
- Turn on your TV and Blu-ray player if they are not already powered on.
- On your TV remote, select the HDMI input/source that corresponds to the port where your Blu-ray player is connected.
- On your Blu-ray player remote, navigate to the setup menu. The location and options in the setup menu may vary depending on the make and model of your Blu-ray player.
- Follow the on-screen instructions to configure the basic settings, such as language preferences and screen aspect ratio.
- If prompted, connect the Blu-ray player to your home network. This step is necessary if you wish to access internet-based features, such as streaming services or firmware updates. You can usually connect your Blu-ray player wirelessly or via an Ethernet cable.
- If your Blu-ray player supports it, sign in to your streaming service accounts, such as Netflix, Amazon Prime, or Hulu, to gain access to a wide range of movies and TV shows.
- Check the audio settings on your Blu-ray player to ensure optimal sound quality. You may need to select the preferred audio output format, such as PCM, Bitstream, or DTS, depending on your audio setup.
- Lastly, check for any firmware updates for your Blu-ray player. Manufacturers often release updates to improve performance, add new features, and enhance compatibility with newer Blu-ray discs. Check the manufacturer’s website or the settings menu on your player for any available updates and follow the instructions to install them.
Once you have completed the setup process, your Blu-ray player is ready to deliver an immersive movie-watching experience on your Smart TV. Make sure to explore the various features and settings of your Blu-ray player to customize and enhance your viewing experience further.
With your Blu-ray player set up, it’s time to move on to the next step: adjusting the TV settings to ensure the best picture quality.
Step 5: Adjust the TV Settings
Now that your Blu-ray player is set up, it’s important to adjust the settings on your Smart TV to ensure the best possible picture quality. Follow these steps to optimize the TV settings:
- On your TV remote, navigate to the settings menu. The location and options in the settings menu may vary depending on the make and model of your Smart TV.
- Look for the picture or display settings. Here, you can adjust various factors that influence the overall picture quality, such as brightness, contrast, color, sharpness, and backlight settings.
- Start by adjusting the brightness and contrast levels. These settings control the overall brightness and darkness of the picture. Play around with the values until you achieve a balanced and pleasing picture.
- Next, adjust the color settings. You can increase or decrease the saturation level to make the colors more vivid or more subdued, depending on your personal preference.
- Consider adjusting the sharpness setting as well. However, be cautious not to over-sharpen the image, as it can result in unnatural-looking edges or artifacts.
- If your Smart TV has a backlight setting, you can adjust it to control the brightness of the screen. Higher backlight settings tend to make the image appear brighter, but be careful not to set it too high, as it may lead to washed-out colors.
- While adjusting the settings, refer to a calibration tool or test patterns to ensure accurate and optimal adjustments. These tools can help you achieve more accurate colors, gamma levels, and sharpness.
- Once you are satisfied with the picture settings, save the changes and exit the settings menu.
With the TV settings adjusted, you have optimized the picture quality on your Smart TV for an immersive viewing experience. Now, it’s time to move on to the final step: testing the connection to ensure everything is working correctly.
Step 6: Test the Connection
Now that you have connected your Blu-ray player to your Smart TV and adjusted the settings, it’s important to test the connection to ensure that everything is working as expected. Following these steps will help you confirm the successful setup:
- Power on your Blu-ray player and Smart TV if they are not already turned on.
- Ensure that the TV is set to the correct HDMI input/source that corresponds to the port where your Blu-ray player is connected.
- Insert a Blu-ray disc into the player and wait for it to load. If you don’t have a Blu-ray disc, you can also test the connection using a DVD or a streaming service like Netflix.
- Using the Blu-ray player remote, navigate the menu and select the option to play the disc or start streaming.
- Observe the TV screen and ensure that the movie or content is displayed correctly without any distortion, artifacts, or audio/video syncing issues.
- Listen to the audio and make sure that it is clear and synchronized with the video.
- If you encounter any issues, double-check all the connections between the Blu-ray player and the TV. Ensure that the HDMI cable is securely plugged into both devices.
- If the problem persists, try using a different HDMI port on your TV or a different HDMI cable to see if that resolves the issue.
- If you are using a streaming service, make sure your internet connection is stable and has sufficient bandwidth to support streaming without buffering or interruptions.
By testing the connection and troubleshooting any potential issues, you can ensure that your Blu-ray player is successfully connected to your Smart TV and that you can enjoy your favorite movies or shows without any glitches.
Once you have verified that the connection is working correctly, congratulations! You have successfully connected your Blu-ray player to your Smart TV and can now sit back, relax, and enjoy a cinematic experience from the comfort of your own home.
Conclusion
Connecting a Blu-ray player to a Smart TV may seem like a complicated process, but by following the step-by-step instructions outlined in this article, you can easily set up the connection and start enjoying your favorite movies and TV shows with enhanced audio and video quality.
In summary, here are the key steps to connect a Blu-ray player to a Smart TV:
- Check the ports on your TV and Blu-ray player to ensure compatibility.
- Choose the appropriate cable based on the available ports.
- Connect the Blu-ray player to the TV using the selected cable.
- Set up your Blu-ray player, including language preferences, network connection, and streaming service accounts.
- Adjust the settings on your TV to optimize the picture quality.
- Test the connection by playing a Blu-ray disc or streaming content.
Remember to refer to the user manuals of your specific devices for more detailed instructions, as the steps may vary slightly depending on the make and model.
By following these steps and ensuring a successful connection, you can enjoy a truly immersive movie-watching experience on your Smart TV. Whether you’re watching the latest blockbuster or streaming your favorite TV series, the combination of a Blu-ray player and a Smart TV can offer you endless entertainment possibilities.
Now that you have the knowledge and know-how, go ahead and connect your Blu-ray player to your Smart TV and indulge in a world of high-quality audio and video content.