Introduction:
Welcome to the comprehensive guide on how to check the health of your SSD on your Mac. As solid-state drives (SSDs) become more popular, it is important to ensure that they are functioning optimally to maintain the performance and longevity of your Mac.
SSDs are known for their speed, reliability, and durability compared to traditional hard disk drives (HDDs). However, just like any other hardware component, they can experience issues over time. Monitoring the health and performance of your SSD is crucial to identify any potential problems early on.
In this guide, we will explore various methods to check the health, monitor the performance, and troubleshoot any issues related to your SSD on your Mac. Whether you own a MacBook Pro, iMac, or Mac mini, this guide will provide you with the necessary steps to ensure the smooth functioning of your SSD.
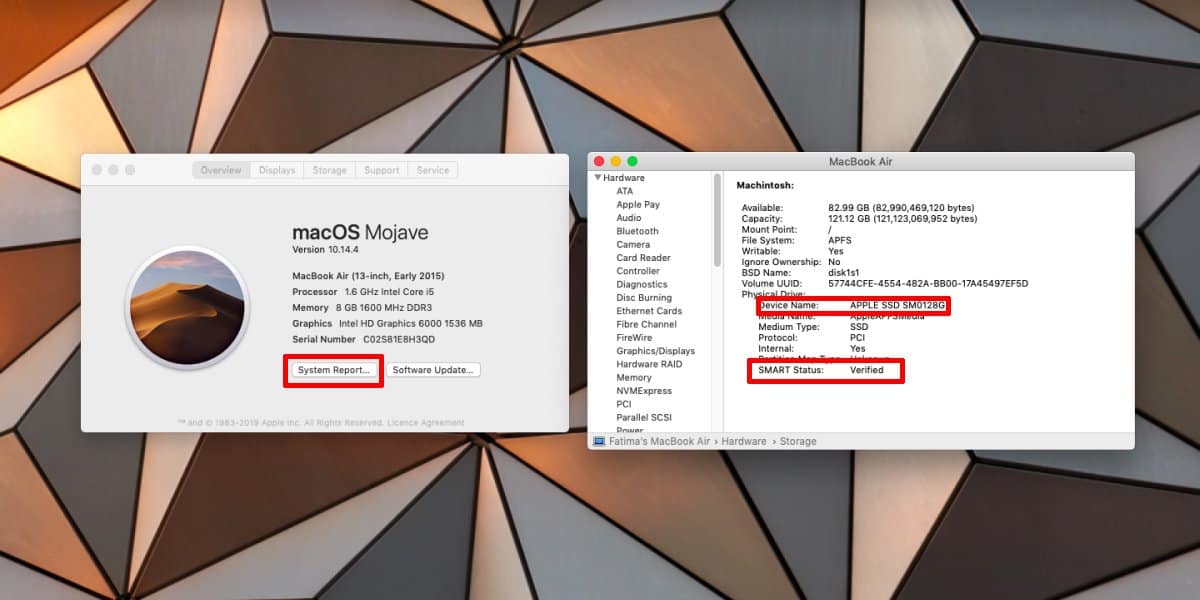
We will start by discussing how to check the health of your SSD on your Mac. This includes understanding the SMART status, which is an industry-standard technology used to monitor the overall health of storage devices. By utilizing the SMART status, you can obtain crucial information about your SSD’s performance and longevity.
Next, we will delve into methods to monitor the performance of your SSD. This includes using benchmarking tools to measure the read and write speeds, as well as examining the disk usage and temperature of your SSD. By regularly monitoring these metrics, you can gain insights into the overall performance of your SSD and take necessary actions if any issues arise.
Lastly, we will explore troubleshooting techniques to address common SSD issues on your Mac. This includes solutions for slow performance, sudden freezes, or unrecognized SSDs. By following these troubleshooting steps, you can identify and resolve any issues that may impact the functioning of your SSD.
By the end of this guide, you will have a comprehensive understanding of how to check the health, monitor the performance, and troubleshoot any problems related to your SSD on your Mac. Let’s dive in and ensure the optimal performance of your SSD!
Part 1: Checking SSD Health on Mac
Checking the health of your SSD is crucial to ensure that it is functioning optimally and to detect any potential issues. Fortunately, Mac provides several built-in tools and third-party applications that can help you assess the health of your SSD. Let’s explore some of these methods:
1. SMART Status: SMART (Self-Monitoring, Analysis, and Reporting Technology) is a technology built into most modern SSDs that allows them to monitor their own health and performance. To check the SMART status of your SSD on macOS, follow these steps:
- Open the “Disk Utility” application. You can find it by navigating to “Applications” > “Utilities.”
- Select your SSD from the list of drives on the left sidebar.
- Click on the “First Aid” tab.
- If the status says “Verified,” it means your SSD is healthy. If it says “Failing,” it indicates that there might be some issues with your SSD.
2. Third-Party SMART Monitoring Tools: While macOS provides basic SMART status information, you can enhance your SSD health monitoring by using third-party applications like DriveDx or SMART Utility. These tools provide more detailed information about your SSD’s health, including temperature, wear level, and error rates.
3. TRIM Support: TRIM is a feature that allows the operating system to communicate with the SSD and optimize its performance over time. To check if TRIM is enabled on your Mac, follow these steps:
- Open “Terminal” from “Applications” > “Utilities.”
- Type the command: “sudo trimforce enable” and press Enter.
- Enter your admin password when prompted.
- If TRIM is already enabled, you will see a message stating that TRIM is enabled. If it was previously disabled, you will be prompted to confirm the action.
4. Drive Health Monitoring Applications: Apart from SMART monitoring tools, you can also install third-party applications like Drive Genius or DrivePulse, which provide comprehensive drive health monitoring and optimization features. These applications can help identify potential issues with your SSD and provide solutions to optimize its performance.
By regularly checking the health of your SSD using these methods, you can stay informed about its performance and take necessary actions to maintain its optimal functionality. Remember that SSDs can wear out over time, so keeping an eye on their health is crucial for their longevity and your overall Mac experience.
Part 2: Monitoring SSD Performance on Mac
Monitoring the performance of your SSD on Mac is essential to ensure that it is operating at its full potential. By regularly assessing its speed, usage, and temperature, you can identify any performance issues and take appropriate actions. Let’s delve into some methods to effectively monitor the performance of your SSD:
1. Benchmarking Tools: Benchmarking tools such as Blackmagic Disk Speed Test or AJA System Test can help measure the read and write speeds of your SSD. These tools provide valuable insights into the performance capabilities of your SSD and allow you to compare it with other drives. Run the benchmark tests periodically to track any changes in performance over time.
2. Activity Monitor: The Activity Monitor utility on your Mac provides a detailed view of the system resources, including disk usage. To monitor your SSD’s performance using Activity Monitor, follow these steps:
- Open “Activity Monitor” from “Applications” > “Utilities.”
- Click on the “Disk” tab.
- Observe the “Data read” and “Data written” values to monitor the activity on your SSD. These figures reflect the amount of data being read from and written to your SSD in real-time.
3. Temperature Monitoring: High temperatures can negatively impact the performance and lifespan of your SSD. To monitor the temperature of your SSD, you can use applications like iStat Menus or Macs Fan Control. These tools display the current temperature of your SSD and provide warnings if it exceeds safe levels. Keeping your SSD at an optimal temperature is vital for maintaining its performance and longevity.
4. Disk Utility: The Disk Utility application on your Mac provides various diagnostic features that can help monitor the performance of your SSD. To access these features, follow these steps:
- Open the “Disk Utility” application from “Applications” > “Utilities.”
- Select your SSD from the list of drives on the left sidebar.
- Click on the “Info” button.
- Check the “S.M.A.R.T. Status” section to see if any warnings or failures are reported.
By regularly monitoring the performance of your SSD using these methods, you can ensure that it is operating at its optimal level. Detecting any performance issues early on can help prevent potential problems and maintain the overall efficiency of your Mac.
Part 3: Troubleshooting SSD Issues on Mac
While SSDs are generally reliable, there may be instances where you encounter issues with your SSD on your Mac. These issues can range from slow performance to unrecognized SSDs. In this section, we will explore some common troubleshooting techniques to address these SSD-related problems:
1. Check Connections: Ensure that the connections between your SSD and the motherboard are secure. Sometimes, loose connections can cause the SSD to be unrecognized or lead to performance issues. Gently disconnect and reconnect the cables to ensure a proper connection.
2. Reset SMC: The System Management Controller (SMC) is responsible for managing various hardware functions, including SSD performance. Resetting the SMC can help resolve issues related to power management and system performance. To reset the SMC on your Mac, follow the instructions specific to your model on the Apple support website.
3. Clear Cache: Clearing the cache on your Mac can help improve SSD performance. To clear the cache, open the Finder, press “Command + Shift + G,” and type “~/Library/Caches” to access the cache folder. Select all the contents and delete them. Restart your Mac to see if the performance improves.
4. Update macOS: Keeping your macOS up to date is essential for optimal SSD performance. Apple regularly releases updates that address system issues, including those related to SSD performance. Check for updates by clicking on the Apple menu and selecting “About This Mac” > “Software Update.” Install any available updates to ensure that your SSD is functioning with the latest improvements and bug fixes.
5. Disk Utility Repair: The Disk Utility application has a built-in repair feature that can help resolve minor issues with your SSD. To repair your SSD using Disk Utility, follow these steps:
- Open the “Disk Utility” application from “Applications” > “Utilities.”
- Select your SSD from the list of drives on the left sidebar.
- Click on the “First Aid” tab.
- Click on “Run” to start the repair process. Disk Utility will attempt to fix any detected issues with your SSD.
If these troubleshooting steps do not resolve the SSD issues on your Mac, it is recommended to consult with an Apple authorized service provider or contact Apple support for further assistance. They can provide personalized guidance and help you resolve any complex issues you may encounter.
By following these troubleshooting techniques, you can address common SSD issues and ensure the smooth functioning of your SSD on your Mac.
Conclusion
Ensuring the health and performance of your SSD is vital for maintaining the optimal functionality of your Mac. In this guide, we have explored various methods to check the health, monitor the performance, and troubleshoot issues related to your SSD on your Mac.
We started by discussing how to check the health of your SSD using the SMART status and third-party monitoring tools. By regularly monitoring the SMART status and enabling TRIM support, you can stay informed about the overall health of your SSD and take necessary actions to maintain its longevity.
Next, we explored methods to monitor the performance of your SSD, including benchmarking tools, Activity Monitor, and temperature monitoring applications. By consistently monitoring the read and write speeds, disk usage, and temperature, you can identify any performance issues and take appropriate measures to optimize your SSD’s performance.
Lastly, we discussed troubleshooting techniques for common SSD issues, such as checking connections, resetting the SMC, clearing cache, updating macOS, and using the Disk Utility repair feature. By following these steps, you can effectively troubleshoot and resolve any problems you may encounter with your SSD on your Mac.
Remember, SSDs are reliable and efficient storage solutions for your Mac. However, occasional issues may arise. By implementing the practices and techniques outlined in this guide, you can ensure that your SSD is functioning optimally and enjoy the benefits of faster speeds, improved performance, and dependable storage.
If you encounter persistent issues or require further assistance, it is recommended to seek help from an Apple authorized service provider or contact Apple support. They have the expertise to provide personalized guidance and solutions to address any complex SSD-related problems.
Thank you for following this guide. By checking the health, monitoring the performance, and troubleshooting any issues with your SSD, you are taking proactive steps towards maintaining the overall efficiency and longevity of your Mac.