Introduction
Welcome to this guide on how to check the health of your Mac’s SSD (Solid State Drive). As we all know, an SSD is a crucial component of any modern computer, responsible for storing your data and ensuring smooth performance. However, like any other piece of hardware, SSDs can experience wear and tear over time, which can affect their overall health and performance.
Checking the health of your Mac’s SSD is essential to ensure that it is functioning optimally. By monitoring the health of your SSD, you can identify any potential issues early on and take the necessary steps to prevent data loss or system malfunctions. In this guide, we will explore different methods to check the health of your Mac’s SSD and interpret the results effectively.
We will discuss various options to check your Mac’s SSD health, including using built-in tools like Disk Utility, Terminal commands, or utilizing third-party software. Each method has its advantages and may provide different levels of insight into the condition of your SSD. By exploring these options, you can choose the one that suits your preferences and technical expertise.
Understanding and monitoring your Mac’s SSD health is not only important for regular users but also for professionals who heavily rely on their machines for work. Whether you use your Mac for creative projects, business, or personal use, knowing the health of your SSD allows you to proactively address any issues and maintain the longevity of your storage device.
In the following sections, we will discuss the reasons why you should check your Mac’s SSD health, the steps to prepare for the health check, and the different options available to perform the check. We will also cover how to interpret the results and take necessary action based on the findings.
So let’s dive in and learn how to monitor and assess the health of your Mac’s SSD to keep your system running smoothly and ensure the safety of your valuable data.
Understanding SSD Health
Before we proceed with checking the health of your Mac’s SSD, it is essential to understand what SSD health means and why it is important.
SSD health refers to the overall condition and functionality of your solid-state drive. It involves assessing various aspects such as the number of read and write operations performed, the number of bad sectors, and the overall lifespan of the drive. Monitoring SSD health allows you to predict potential failures or issues and take appropriate action to prevent data loss or system instability.
Unlike traditional mechanical hard drives, SSDs have no moving parts, which makes them faster and more reliable. However, they have a limited number of write cycles, which means that each memory cell can only be written to a certain number of times before it starts to degrade. This degradation can result in decreased performance and potential data corruption.
SSD health is typically measured using a metric called Wear Leveling Count. This value indicates how evenly the data is distributed across the SSD’s memory cells. A high Wear Leveling Count means that the wear on the SSD is evenly spread, which is generally a good indication of good overall health. On the other hand, a low Wear Leveling Count may suggest that certain memory cells are being overused, indicating potential issues.
Monitoring SSD health is crucial for several reasons. Firstly, it allows you to identify any abnormalities in your drive and address them promptly. By regularly checking the health of your SSD, you can detect problems like bad sectors, file system errors, or even the failure of critical components. Early detection enables you to take necessary action, such as backing up your data or replacing the SSD if needed, to prevent significant data loss or system failures.
Secondly, monitoring SSD health can provide insights into the overall performance of your Mac. As an SSD degrades, its performance may decline, causing slower boot times, application launch delays, or longer file read/write operations. By monitoring the health of your SSD, you can gauge when it’s time to optimize your system or consider upgrading your storage device.
Lastly, by being aware of your SSD’s health, you can make informed decisions about how to prolong its lifespan. This may include implementing proper maintenance practices, such as regular disk cleanup, avoiding excessive writes, and enabling TRIM support. Understanding SSD health empowers you to take control of your storage device and maximize its longevity.
In the next section, we will explore why it is important to check the health of your Mac’s SSD and how it can benefit you in the long run.
Why should you check your Mac SSD health?
Checking the health of your Mac’s SSD is not just a technical exercise, but a critical aspect of maintaining the longevity and reliability of your system. Here are several reasons why it is important to regularly monitor the health of your SSD:
1. Early detection of issues: By checking your Mac’s SSD health on a regular basis, you can identify any potential issues before they escalate. Early detection allows you to take prompt action, such as backing up your data or seeking professional assistance, to prevent data loss or system failures.
2. Preventing data loss: SSD failures can result in permanent data loss. Regularly monitoring the health of your SSD helps you identify warning signs that indicate a higher risk of failure. It enables you to back up your important files and take necessary precautions before it’s too late.
3. Improving system performance: Over time, an SSD’s performance can decline due to wear and tear. Monitoring the health of your SSD allows you to detect performance degradation early on. By identifying potential issues, you can take corrective measures to optimize your system’s performance and maintain a smooth user experience.
4. Maximizing SSD lifespan: SSDs have a limited lifespan in terms of the number of write cycles they can endure. By monitoring the health of your SSD, you can assess its current condition and take proactive steps to maximize its lifespan. This may include implementing proper maintenance practices and adjusting your usage patterns to reduce unnecessary write operations.
5. Making informed upgrade decisions: Knowing the health status of your Mac’s SSD is crucial when considering an upgrade. If your SSD is showing signs of deteriorating health or nearing its maximum write cycles, it may be a good time to consider an upgrade to a larger or more robust storage solution. Regularly checking the health of your SSD helps you plan and budget for upgrades more effectively.
6. Peace of mind: Monitoring the health of your Mac’s SSD gives you peace of mind, knowing that you have taken steps to safeguard your data and ensure the stability of your system. It allows you to stay proactive rather than reactive when it comes to maintaining the health of your storage device.
With the understanding of why checking your Mac SSD health is important, let’s move on to the next section where we will discuss the necessary steps to prepare before checking the health of your Mac’s SSD.
Preparing to Check Mac SSD Health
Before you start checking the health of your Mac’s SSD, it’s important to take a few preparatory steps to ensure accurate results and a smooth process. Here are some essential steps to consider:
1. Back up your data: Before performing any actions related to your SSD, it’s crucial to back up all your valuable data. This ensures that in case of any unexpected issues or data loss during the health check process, you will have a recent copy of your important files and documents. You can use Time Machine or any other reliable backup solution to create a backup of your data.
2. Free up storage space: To improve the efficiency and accuracy of the health check, it’s recommended to have sufficient free space on your Mac’s SSD. This will allow the tool or software you use to perform the check to have enough resources for accurate analysis. Consider removing unnecessary files, clearing caches, and deleting large, unused applications or media files.
3. Update your macOS: It’s always a good practice to keep your macOS up to date. Before checking your Mac’s SSD health, make sure that you have the latest version of macOS installed. Updates often include bug fixes and improvements that can enhance the accuracy and reliability of the health check process.
4. Close unnecessary applications and processes: To avoid any interference during the health check, close all unnecessary applications and processes running in the background. This will ensure that the SSD analysis can be performed without any interruptions or conflicting activities that could affect the accuracy of the results.
5. Understand the chosen method: Depending on the method you choose to check your Mac’s SSD health (such as using Disk Utility, Terminal commands, or third-party software), make sure you have a basic understanding of how the selected method works. This will help you interpret the results accurately and take appropriate actions if any potential issues are detected.
6. Ensure reliable power source: It’s essential to ensure that your Mac is connected to a reliable power source during the health check process. This will prevent any interruptions or unexpected system shutdowns that could lead to data corruption or incomplete analysis of the SSD health.
By following these preparation steps, you can ensure a smoother and more accurate health check of your Mac’s SSD. Once you have everything ready, you can proceed with the chosen method to check the health of your SSD, which will be discussed in the following sections.
Now that we’ve covered the necessary preparation steps, let’s delve into the different options available for checking your Mac’s SSD health.
Option 1: Using Disk Utility
Disk Utility is a built-in utility on macOS that allows you to manage and troubleshoot your Mac’s storage devices, including your SSD. It provides basic disk management features and can also be used to check the health of your SSD. Here’s how you can use Disk Utility to perform an SSD health check:
Step 1: Launch Disk Utility: Open Finder, navigate to “Applications” > “Utilities,” and double-click on “Disk Utility” to launch the application.
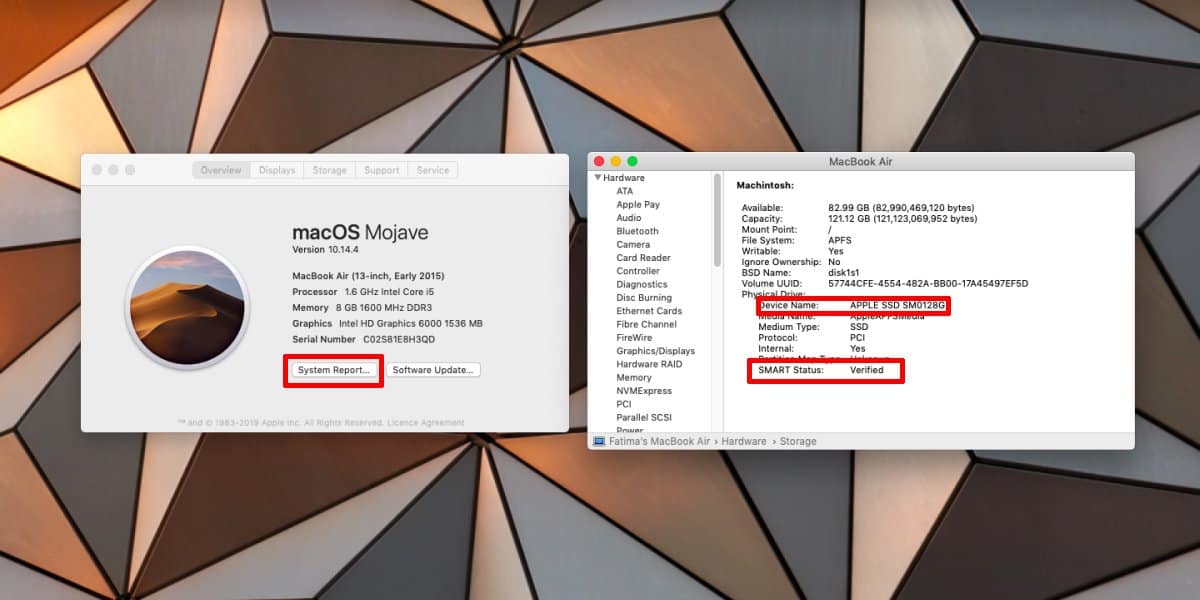
Step 2: Select your SSD: In the Disk Utility window, you will see a list of storage devices connected to your Mac. From the left sidebar, select your SSD. It is often labeled with the manufacturer’s name or the model number.
Step 3: Check the S.M.A.R.T. status: Once you have selected your SSD, click on the “First Aid” tab in the toolbar at the top of the Disk Utility window. Here, you will see the S.M.A.R.T. Status of your SSD. S.M.A.R.T. (Self-Monitoring, Analysis, and Reporting Technology) is a technology that monitors the health of storage devices, including SSDs.
Step 4: Interpret the S.M.A.R.T. status: The S.M.A.R.T. Status will indicate either “Verified” or “Failing.” If the status is “Verified,” it means that your SSD is in good health. However, if the status is “Failing,” it indicates potential issues with the SSD, and you should consider backing up your data and seeking assistance or replacing the drive.
Step 5: Further diagnostics: If the S.M.A.R.T. status is “Failing” or you want more detailed information about your SSD’s health, you can click on the “Info” button next to the S.M.A.R.T. Status. This will open a new window with additional diagnostic information, including the number of bad sectors, overall health assessment, and the estimated lifespan of your SSD.
Step 6: Take necessary action: Based on the S.M.A.R.T. status and the additional diagnostic information, you should take appropriate action. If your SSD is failing or shows signs of deteriorating health, it’s crucial to back up your data immediately and consider replacing the SSD.
Disk Utility provides a simple and convenient way to check the health of your Mac’s SSD. However, it may not provide as detailed information or advanced diagnostic features compared to other methods. If you require more comprehensive analysis of your SSD, you can consider the alternative methods discussed in the following sections.
Now that we’ve covered Disk Utility, let’s explore an option that involves using Terminal commands to check the health of your Mac’s SSD.
Option 2: Using Terminal Commands
If you prefer a more technical approach or want to access more detailed information about your Mac’s SSD, you can use Terminal commands to check its health. Terminal allows you to interact with your Mac’s operating system using text commands. Here’s how you can use Terminal commands to perform an SSD health check:
Step 1: Launch Terminal: Open Finder, navigate to “Applications” > “Utilities,” and double-click on “Terminal” to launch the application.
Step 2: Run the diskutil command: In the Terminal window, type the following command and press Enter:
diskutil info disk0 | grep “SMART Health”
Note: The “disk0” in the command represents the identifier for your SSD. If you have multiple storage devices connected to your Mac, you may need to adjust the command accordingly.
Step 3: Interpret the SMART Health status: Once you run the command, you will see the SMART Health status of your SSD. The status will either be “Verified” or “Failing.” A “Verified” status indicates that your SSD is in good health, while a “Failing” status suggests potential issues. If your SSD is failing, it is crucial to back up your data and consider seeking professional assistance or replacing the drive.
Step 4: Additional diagnostic commands: If you want to access more detailed information about your SSD’s health, you can use other Terminal commands. For example, you can run the following command to view the overall health assessment:
diskutil info disk0 | grep “Overall Health Rating”
This command will give you an assessment of your SSD’s overall health, providing a more in-depth analysis.
Step 5: Take necessary action: Based on the SMART Health status and the additional diagnostic information, you should take appropriate action. If your SSD is failing or shows signs of deteriorating health, it’s crucial to back up your data immediately and consider replacing the SSD.
Using Terminal commands provides a more technical and detailed approach to checking your Mac’s SSD health. However, it requires familiarity with command-line interfaces and may not be as user-friendly as other methods. If you prefer a more user-friendly approach or want additional features, you can consider using third-party software, which will be discussed in the next section.
Now that we’ve covered using Terminal commands, let’s explore another option involving third-party software for checking the health of your Mac’s SSD.
Option 3: Using Third-Party Software
If you’re looking for a user-friendly and comprehensive way to check the health of your Mac’s SSD, you can consider using third-party software. There are several reliable and feature-rich applications available that specialize in analyzing SSD health and providing detailed reports. Here’s how you can use third-party software to perform an SSD health check:
Step 1: Research and choose the software: Look for reputable third-party software applications that are designed for SSD health analysis. Read reviews, compare features, and choose software that suits your requirements and budget.
Step 2: Download and install the software: Visit the official website of the chosen software and download the installation package. Follow the on-screen instructions to install the software on your Mac.
Step 3: Launch the software: Once the installation is complete, launch the software. The interface may vary depending on the software you choose, but you should be able to find an option to scan/check your SSD for health assessment.
Step 4: Start the health check: Follow the prompts provided by the software to initiate the SSD health check. The software will typically analyze various aspects of your SSD, such as the current health status, wear leveling count, bad sectors, and other relevant factors.
Step 5: Interpret the results: After the analysis is complete, the third-party software will present the results in an easy-to-understand format. You can review the health status, any potential issues detected, and other relevant details about your SSD’s performance and lifespan.
Step 6: Take necessary action: Based on the results, you should take appropriate action. If any significant issues are detected or if your SSD is approaching its maximum lifespan, it’s crucial to back up your data and consider replacing the SSD.
Using third-party software provides a user-friendly interface and often includes advanced features for SSD health analysis. However, keep in mind that not all third-party software is created equal, so it’s important to choose reliable and reputable applications from trusted sources.
With the availability of options like Disk Utility, Terminal commands, and third-party software, you can choose the method that best suits your technical expertise and requirements. Monitoring your Mac’s SSD health using these methods ensures that you can take the necessary steps to maintain your SSD’s performance, maximize its lifespan, and safeguard your data.
In the next section, we will explore how to interpret the results of the SSD health check and what actions to take based on the findings.
Interpreting the Results
Interpreting the results of your Mac’s SSD health check is crucial to understanding the current condition of your storage device and determining the appropriate actions to take. Whether you used Disk Utility, Terminal commands, or third-party software, here are some key factors to consider when interpreting the results:
S.M.A.R.T. Status: If your SSD’s S.M.A.R.T. (Self-Monitoring, Analysis, and Reporting Technology) status is “Verified,” it indicates that your SSD is in good health. However, if the status is “Failing” or any other indication of potential issues, it’s crucial to take immediate action.
Overall Health Rating: Some third-party software may provide an overall health rating for your SSD. This rating can give you an overview of your SSD’s condition, usually on a percentage or scale. A higher rating indicates better health, while a lower rating suggests potential issues or deterioration.
Bad Sectors: If your health check reveals the presence of bad sectors, it means that certain areas of your SSD are no longer functioning properly. Bad sectors can lead to data corruption and system instability. If you notice a significant number of bad sectors, it’s recommended to back up your data and consider replacing the SSD.
Wear Leveling Count: The wear leveling count provides information about how evenly data is distributed across memory cells on your SSD. A high wear leveling count indicates that the wear on your SSD is evenly distributed, which is generally a positive sign. However, a low wear leveling count may suggest that certain memory cells are being overused, indicating potential issues.
Estimated Lifespan: Some software or diagnostics may provide an estimate of your SSD’s remaining lifespan based on the current health status. This estimation can give you an idea of how long you can expect your SSD to function reliably. If the estimated lifespan is nearing its end, it’s advisable to start planning for a replacement to avoid any unexpected failures or data loss.
Keep in mind that interpreting the results of the SSD health check requires some technical knowledge and understanding. If you’re unsure about the significance of certain values or need assistance, it’s recommended to consult with a professional or reach out to the support team of the software you used or the manufacturer of your SSD.
Now that you know how to interpret the results, let’s discuss the next steps you should take based on the findings of your Mac’s SSD health check.
Taking Action Based on the Results
After interpreting the results of your Mac’s SSD health check, it’s important to take appropriate action to address any issues or concerns that were identified. The actions you should take will depend on the specific results and the severity of the SSD’s condition. Here are some possible steps to consider:
If the SSD is in good health: If your SSD’s health check reveals that it is in good condition, congratulations! However, it’s still important to continue monitoring its health regularly and follow best practices to maintain its performance. This may include avoiding excessive writes, implementing proper maintenance practices, and ensuring regular backups of your important data.
If potential issues are detected: If the health check indicates potential issues with your SSD, there are several actions you can take:
- Backup your data: Immediately backup all your important data to ensure you have a copy in case of any further complications or failures. Regularly backing up your data is always a good practice, especially when facing potential SSD issues.
- Seek professional assistance: If you’re not confident in diagnosing and resolving the issues yourself, consider reaching out to an authorized service provider or the manufacturer of your SSD for professional assistance.
- Replace the SSD: Depending on the severity of the detected issues and the age of your SSD, it may be necessary to replace it with a new one. Consult with professionals or experienced technicians to identify the most suitable replacement drive for your Mac.
If the SSD is nearing its end of life: If the SSD’s health check reveals that it is nearing its estimated end of life, it’s important to take proactive measures:
- Backup your data: Make sure to create a comprehensive backup of your data to protect it from any potential SSD failures. Regularly backing up your data is crucial, especially as your SSD approaches its maximum lifespan.
- Plan for a replacement: Start considering and planning for a replacement SSD. Research compatible options and consult with professionals or the manufacturer to identify the best replacement drive for your specific Mac model.
- Manage workload: To extend the lifespan of your SSD, consider optimizing your workflow to reduce unnecessary writes. This may involve moving large files or intensive applications to an external drive or cloud storage.
Remember that each situation may be unique, and it’s important to assess your specific circumstances and consult with professionals when making decisions about your Mac’s SSD. Addressing any potential issues promptly and taking proactive measures can help avoid data loss and ensure the continued performance and reliability of your Mac.
Now that you know how to take action based on the SSD health check results, let’s conclude this guide on checking the health of your Mac’s SSD and the importance of monitoring its overall condition.
Conclusion
Monitoring and checking the health of your Mac’s SSD is a crucial aspect of maintaining the performance, reliability, and longevity of your storage device. By regularly assessing the health of your SSD, you can detect potential issues early on, take necessary action to prevent data loss, and plan for upgrades or replacements when needed.
In this guide, we explored different methods for checking the health of your Mac’s SSD, including using built-in tools like Disk Utility, running Terminal commands, or utilizing third-party software. Each method has its advantages and may provide varying levels of insight into your SSD’s condition. It’s important to choose the method that suits your technical expertise and preferences.
We discussed the significance of understanding SSD health, including factors such as S.M.A.R.T. status, overall health rating, bad sectors, wear leveling count, and estimated lifespan. Interpreting the results of the health check allows you to make informed decisions about the actions to take, whether it’s continuing regular maintenance, seeking professional assistance, or considering a replacement.
Remember to always back up your important data regularly, regardless of the health check results. This ensures that your files and documents are protected in case of any unexpected failures or complications.
By following the recommended steps and being proactive in monitoring and maintaining your SSD’s health, you can ensure the stability of your system, maximize the lifespan of your SSD, and safeguard your valuable data.
Keep in mind that if you are unsure about the interpretation of the health check results or if you encounter any complex issues, it is always recommended to seek assistance from authorized service providers or the manufacturer of your SSD.
We hope this guide has provided you with the necessary knowledge and guidance to check the health of your Mac’s SSD. Stay proactive, keep your SSD in good condition, and enjoy a reliable and efficient computing experience.