Introduction
Welcome to a helpful guide on how to change the scroll direction of your Logitech mouse. Whether you’re using a Logitech wireless mouse or a wired one, understanding how to adjust the scroll direction can greatly improve your scrolling experience.
Logitech mice are known for their quality and precision, and they provide users with the option to change the scroll direction to fit their personal preferences. By default, Logitech mice are set to scroll in a particular direction, but fortunately, you can easily change it to your desired direction.
In this guide, we will walk you through the process of changing the scroll direction on both Windows and Mac operating systems. Whether you’re a Windows user or a Mac enthusiast, you’ll be able to follow these step-by-step instructions to customize your Logitech mouse and make it work exactly the way you want it to.
Understanding how to change the scroll direction on your Logitech mouse can be especially beneficial for those who have recently transitioned from a different mouse brand or are used to a different scrolling pattern. With just a few simple adjustments, you can ensure that your mouse scrolling aligns with your natural movements and helps you navigate through documents, web pages, and applications more efficiently.
So, let’s dive in and explore the methods to change the scroll direction on your Logitech mouse based on the operating system you are using and make your scrolling experience as seamless and intuitive as possible.
Understanding Logitech Mouse Scroll Direction
Before we delve into the steps to change the scroll direction of your Logitech mouse, let’s take a moment to understand what scroll direction means and why it is important.
The scroll direction refers to the way content moves on your screen when you scroll using the scroll wheel of your Logitech mouse. By default, Logitech mice typically have the scroll direction set to scroll “up” when you move the scroll wheel away from you and scroll “down” when you move it towards you. However, some users may find this default direction counterintuitive or may have become accustomed to a different scrolling behavior.
To cater to individual preferences, Logitech provides the flexibility to change the scroll direction. This means you have the option to reverse the default scrolling behavior, so moving the scroll wheel away from you makes the content move downward, and moving it towards you makes the content move upward. By adjusting the scroll direction to align with your natural scrolling instinct, you can enhance your overall scrolling experience and productivity.
It’s worth noting that Logitech mice also offer additional features such as horizontal scrolling, smooth scrolling, and customizable scroll speeds. These features can further enhance your scrolling experience, but for the purpose of this guide, we will focus solely on changing the scroll direction.
Now that we have a clear understanding of what scroll direction means and its significance, let’s move on to the step-by-step instructions to change the scroll direction on Logitech mice for both Windows and Mac operating systems.
Changing Logitech Mouse Scroll Direction on Windows
If you’re using a Logitech mouse on a Windows computer, follow these simple steps to change the scroll direction:
- Start by locating the Logitech Options software on your computer. This software allows you to customize various settings for your Logitech mouse.
- If you don’t have the Logitech Options software installed, visit the official Logitech website and download it from the support section specific to your mouse model.
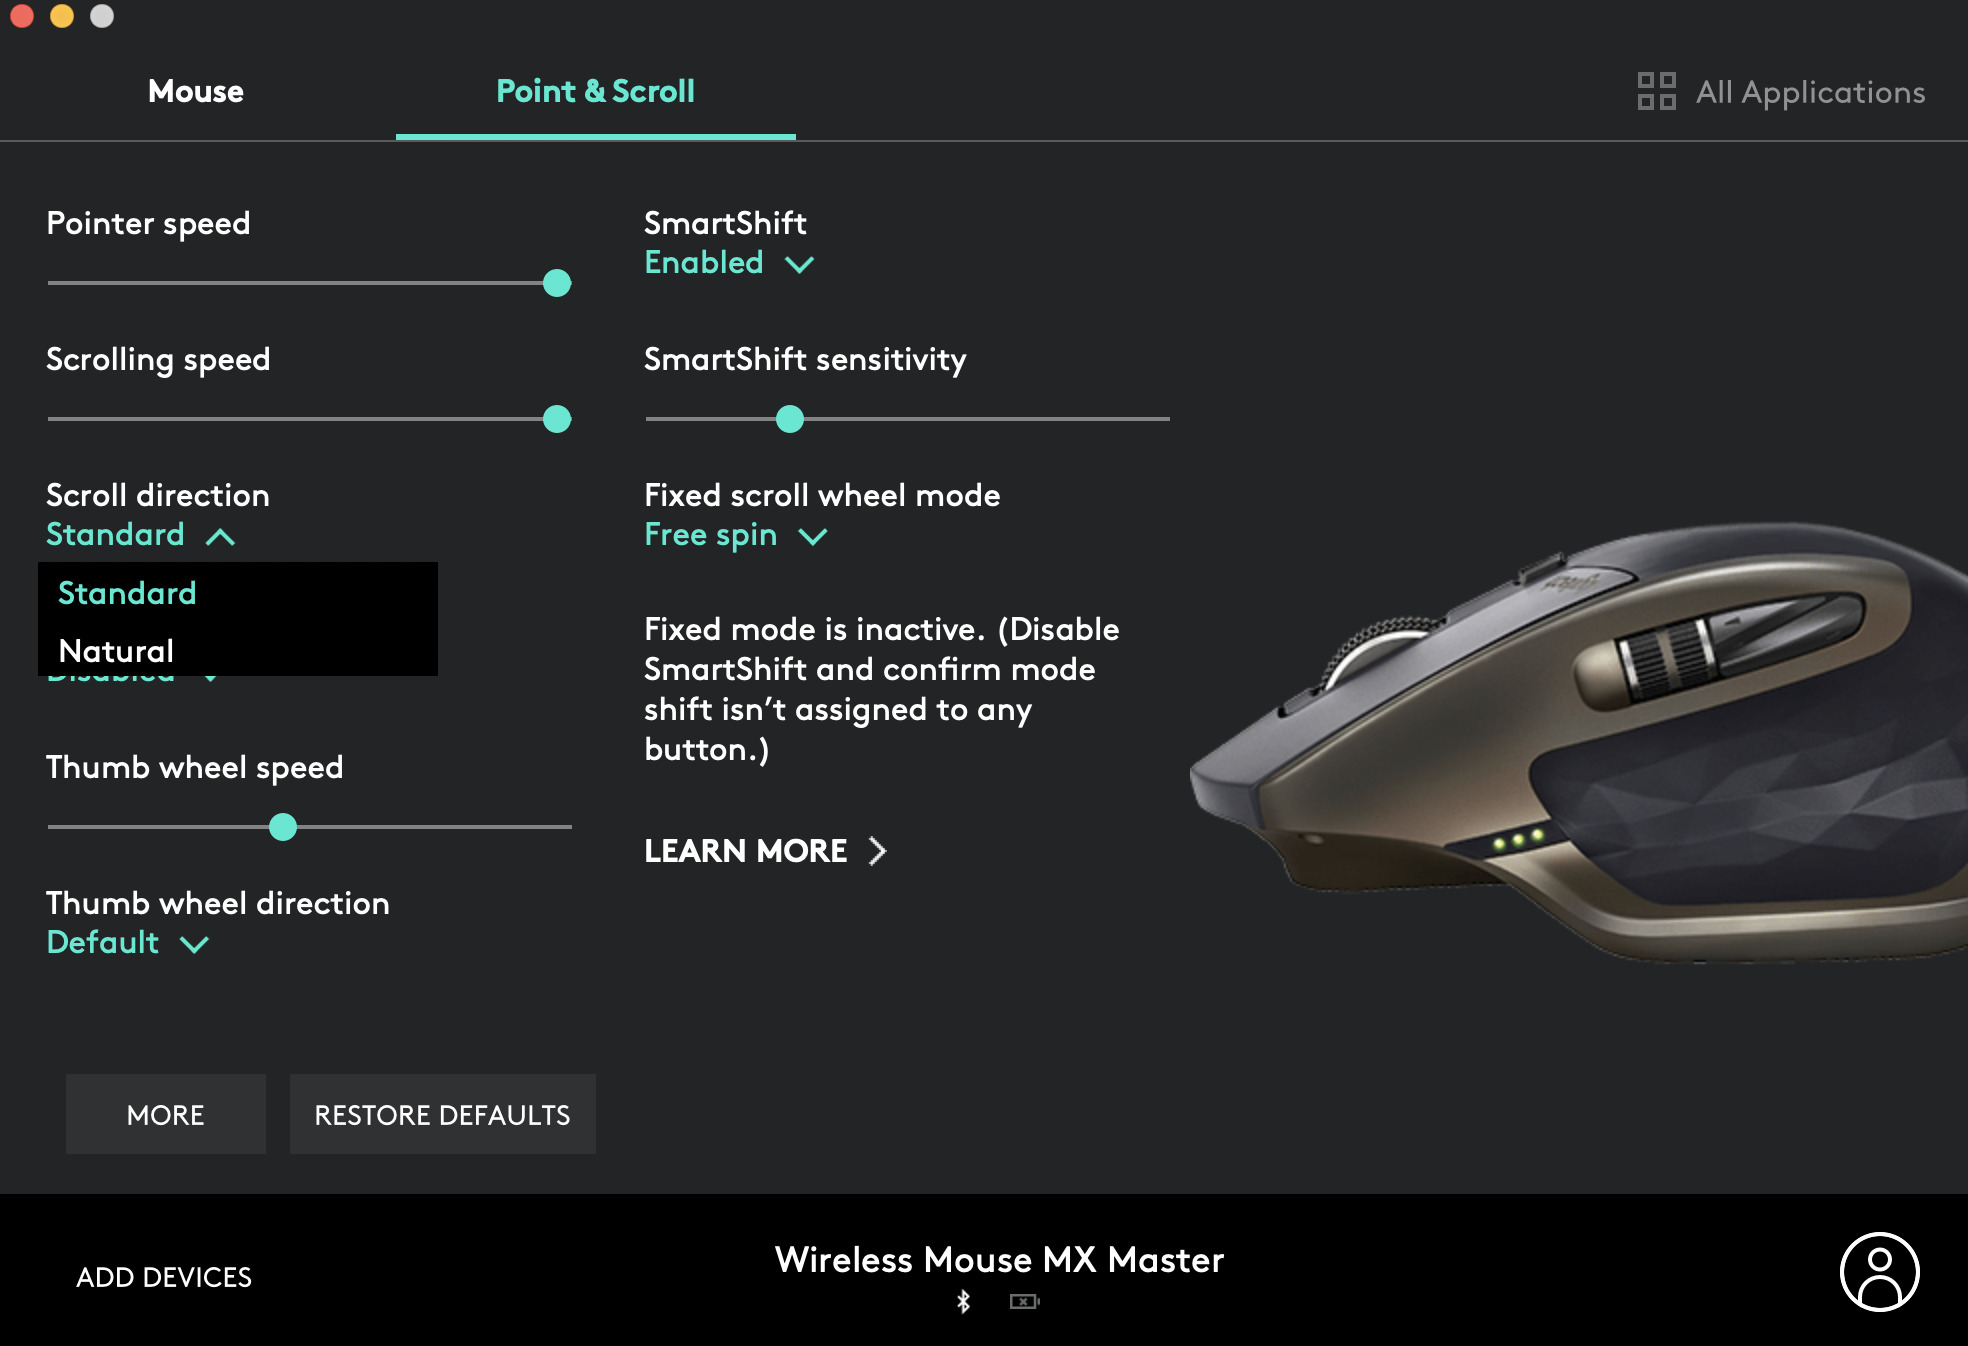
- Once you have the Logitech Options software installed, open it and navigate to the “Point & Scroll” tab or a similar option, depending on the version of the software.
- Look for the scrolling options or settings within the “Point & Scroll” tab. Here, you should find an option for “Scroll Direction” or something similar.
- Select the “Scroll Direction” option and choose the desired scroll direction you want to use. You may have options like “Natural” or “Reversed” scrolling.
- Click on “Apply” or “Save” to save the changes. Your Logitech mouse will now scroll in the newly selected direction.
It’s important to note that the steps may vary slightly depending on the specific Logitech mouse model and the version of the Logitech Options software. However, the general process should remain similar across most Logitech mice.
Once you’ve successfully changed the scroll direction, test it out by scrolling in different applications and web pages to ensure that the new direction feels comfortable to you. If necessary, you can always revisit the Logitech Options software to make further adjustments to the scroll direction or explore other customization options for your Logitech mouse.
Now that you know how to change the scroll direction on Windows, let’s move on to the next section to learn how to change it on Mac operating systems.
Changing Logitech Mouse Scroll Direction on Mac
If you’re using a Logitech mouse with a Mac, you can use the Logitech Options software to change the scroll direction. Follow these steps:
- Locate and open the Logitech Options software on your Mac. If you haven’t installed it yet, you can download it from the official Logitech website.
- Once the Logitech Options software is open, navigate to the “Point & Scroll” tab or a similar option, depending on the version of the software.
- In the “Point & Scroll” tab, look for the scrolling options or settings. You should find an option for “Scroll Direction” or something similar.
- Select the “Scroll Direction” option and choose the desired scroll direction that suits your preference. You may have options like “Natural” or “Reversed” scrolling.
- Click on “Apply” or “Save” to save the changes. Your Logitech mouse will now scroll in the newly selected direction.
Please note that the steps for changing the scroll direction might vary slightly depending on the specific Logitech mouse model and the version of the Logitech Options software. However, the general process should be similar across most Logitech mice.
After you’ve changed the scroll direction, take the time to test it out in different applications and web pages to ensure that the new scrolling behavior is comfortable for you. If needed, you can revisit the Logitech Options software to make further adjustments to the scroll direction or explore other customization options for your Logitech mouse on your Mac.
By customizing the scroll direction to your preference, you can make scrolling with your Logitech mouse on your Mac a more natural and intuitive experience.
Now that you know how to change the scroll direction on both Windows and Mac, let’s move on to the next section where we’ll address some common issues users might encounter and provide troubleshooting tips.
Troubleshooting Common Issues
While changing the scroll direction of your Logitech mouse is generally a straightforward process, you might encounter some common issues along the way. Here are a few troubleshooting tips to help you resolve these issues:
1. Mouse Not Recognized: If your Logitech mouse is not being recognized by your computer, ensure that it is properly connected via USB or that the wireless receiver is connected and functioning correctly. Additionally, make sure the Logitech Options software is installed and up to date.
2. Software Compatibility: Check if the Logitech Options software is compatible with your operating system version. If you’re using an older operating system, make sure to download the appropriate version of the software that supports it.
3. Restart the Computer: Sometimes, a simple restart can resolve connectivity or recognition issues. Restart your computer and try again to see if the mouse is recognized and the scroll direction can be changed.
4. Resetting the Mouse: If you’re still experiencing issues, you can try resetting your Logitech mouse. This can usually be done by removing the batteries or disconnecting it from the USB receiver, waiting for a few seconds, and then reconnecting it.
5. Reinstalling the Software: If none of the above solutions work, uninstall the Logitech Options software and reinstall it from scratch. This can help resolve any software conflicts or corrupted files that might be causing the issue.
If you’ve tried the troubleshooting tips above and are still unable to change the scroll direction of your Logitech mouse, consider reaching out to Logitech customer support for further assistance. They can provide personalized guidance and help resolve any specific issues you’re facing.
Remember, every computer setup is unique, and occasional technical hiccups can occur. However, with patience and the right troubleshooting steps, you should be able to overcome any issues and customize your Logitech mouse’s scroll direction successfully.
Now that we’ve covered troubleshooting common issues, let’s conclude our guide.
Conclusion
Customizing the scroll direction of your Logitech mouse is a simple but powerful way to enhance your scrolling experience. By adjusting the scroll direction to match your preference, you can navigate through documents, web pages, and applications with ease.
In this guide, we explored how to change the scroll direction on Logitech mice for both Windows and Mac operating systems. Whether you’re using a wired or wireless Logitech mouse, the steps provided can help you make the necessary adjustments to suit your scrolling style.
We discussed the importance of understanding scroll direction and why it’s essential to align it with your natural scrolling instincts. Additionally, we addressed common issues that may arise during the process and provided troubleshooting tips to overcome them.
Remember, the steps to change the scroll direction may vary slightly depending on your specific Logitech mouse model and the version of the Logitech Options software. However, the general process remains similar across most Logitech mice.
Now that you have the knowledge to customize your Logitech mouse’s scroll direction, feel free to experiment and find the setting that works best for you. Take the time to explore other customization options that Logitech offers as well, such as horizontal scrolling and customizable scroll speeds, to further customize your scrolling experience.
If you encounter any difficulties or have further questions, don’t hesitate to reach out to Logitech’s customer support for assistance. They are equipped to provide specific guidance and address any concerns you may have.
We hope this guide has been helpful in empowering you to customize your Logitech mouse’s scroll direction and optimize your scrolling experience. Happy scrolling!


