Introduction
Welcome to the world of online meetings and collaborative sessions. With the increasing reliance on virtual communications, platforms like Zoom have become essential tools for work, education, and social interactions. One of the key features that sets Zoom apart is its annotation functionality. Annotating on Zoom allows participants to interact and engage with content, whether it’s a presentation, document, or shared screen, by adding notes, drawings, or spotlighting specific areas.
In this article, we will explore the various annotation tools available on Zoom and provide a step-by-step guide on how to effectively use them. Whether you’re a student attending online classes, a professional conducting virtual meetings, or a participant in an online workshop, mastering the art of annotation on Zoom can greatly enhance your collaboration experience.
Before we dive into the detailed instructions, let’s take a moment to understand why annotation on Zoom is such a valuable feature.
Subheading: Why Annotate on Zoom?
Annotation on Zoom goes beyond simply viewing and discussing shared content. It enables active participation, encourages collaboration, and aids in conveying ideas effectively. Here are a few key reasons why annotating on Zoom can be incredibly beneficial:
- Improved Communication: Annotations allow participants to visually highlight and emphasize specific points, ensuring clear and effective communication during discussions.
- Engagement and Interaction: Annotating encourages active participation from all attendees, creating an inclusive and dynamic virtual environment.
- Enhanced Learning: For students attending virtual classes, annotation tools facilitate note-taking, marking important information, and fostering better understanding of the subject matter.
- Collaboration and Problem Solving: When working on projects or brainstorming sessions, annotation tools enable teams to share ideas, give real-time feedback, and collectively find solutions.
By leveraging the annotation features on Zoom, you can make your virtual meetings, classes, and collaborations more engaging, productive, and interactive. Let’s now explore the basic annotation tools available on Zoom.
Why Annotate on Zoom?
Annotation on Zoom goes beyond simply viewing and discussing shared content. It enables active participation, encourages collaboration, and aids in conveying ideas effectively. Here are a few key reasons why annotating on Zoom can be incredibly beneficial:
- Improved Communication: Annotations allow participants to visually highlight and emphasize specific points, ensuring clear and effective communication during discussions.
- Engagement and Interaction: Annotating encourages active participation from all attendees, creating an inclusive and dynamic virtual environment.
- Enhanced Learning: For students attending virtual classes, annotation tools facilitate note-taking, marking important information, and fostering better understanding of the subject matter.
- Collaboration and Problem Solving: When working on projects or brainstorming sessions, annotation tools enable teams to share ideas, give real-time feedback, and collectively find solutions.
Annotating on Zoom not only facilitates effective communication but also enhances the overall quality of interaction. Presenters can engage their audience by encouraging them to actively participate and annotate on shared content. This level of engagement leads to increased focus, better retention of information, and improved collaboration.
Furthermore, annotation tools on Zoom allow for real-time interaction, breaking down the barriers of physical distance. Participants can annotate simultaneously, regardless of their geographical locations, which opens up new possibilities for remote teamwork and learning.
Whether you are conducting a business meeting, attending an online class, or organizing a virtual workshop, annotating on Zoom can significantly enhance the experience for both presenters and participants. It fosters a sense of connection, boosts engagement, and facilitates effective knowledge sharing.
Now that we understand the importance of annotating on Zoom, let’s explore the basic annotation tools available on the platform.
Basic Annotation Tools on Zoom
Zoom offers a range of annotation tools that allow participants to interact with shared content. These tools enable you to add text, draw on the screen, spotlight specific areas, and more. Here are the basic annotation tools you can find in Zoom:
- Text Tool: The text tool allows you to add comments or notes by typing directly on the screen. You can change the text color, size, and font style to highlight important information or provide additional context.
- Drawing Tool: The drawing tool provides various options, such as pen, highlighter, and shapes, to draw freehand or create structured annotations. You can choose different colors and line thicknesses to make your annotations stand out.
- Spotlight Tool: The spotlight tool lets you highlight a specific area on the shared content, making it more prominent for all participants. This tool is especially useful during presentations or when focusing on a particular element.
- Arrow Tool: The arrow tool allows you to point out specific details or draw attention to a particular spot on the screen. You can customize the color and thickness of the arrow to suit your preference.
- Eraser Tool: The eraser tool comes in handy when you want to remove any annotations or modifications made on the shared content. It allows you to selectively erase specific parts or clear the entire screen.
These annotation tools provide participants with a wide range of options to collaborate effectively, express ideas, and engage with the shared content. They are designed to be user-friendly, allowing even those with little technical knowledge to annotate seamlessly during Zoom sessions.
Now that we have covered the basic annotation tools available on Zoom, let’s explore how to use each tool effectively.
How to Use the Text Tool
The text tool in Zoom allows you to add comments or notes by typing directly on the screen. It can be a valuable tool for providing contextual information or highlighting important points during presentations or collaborative sessions. Here’s a step-by-step guide on how to use the text tool:
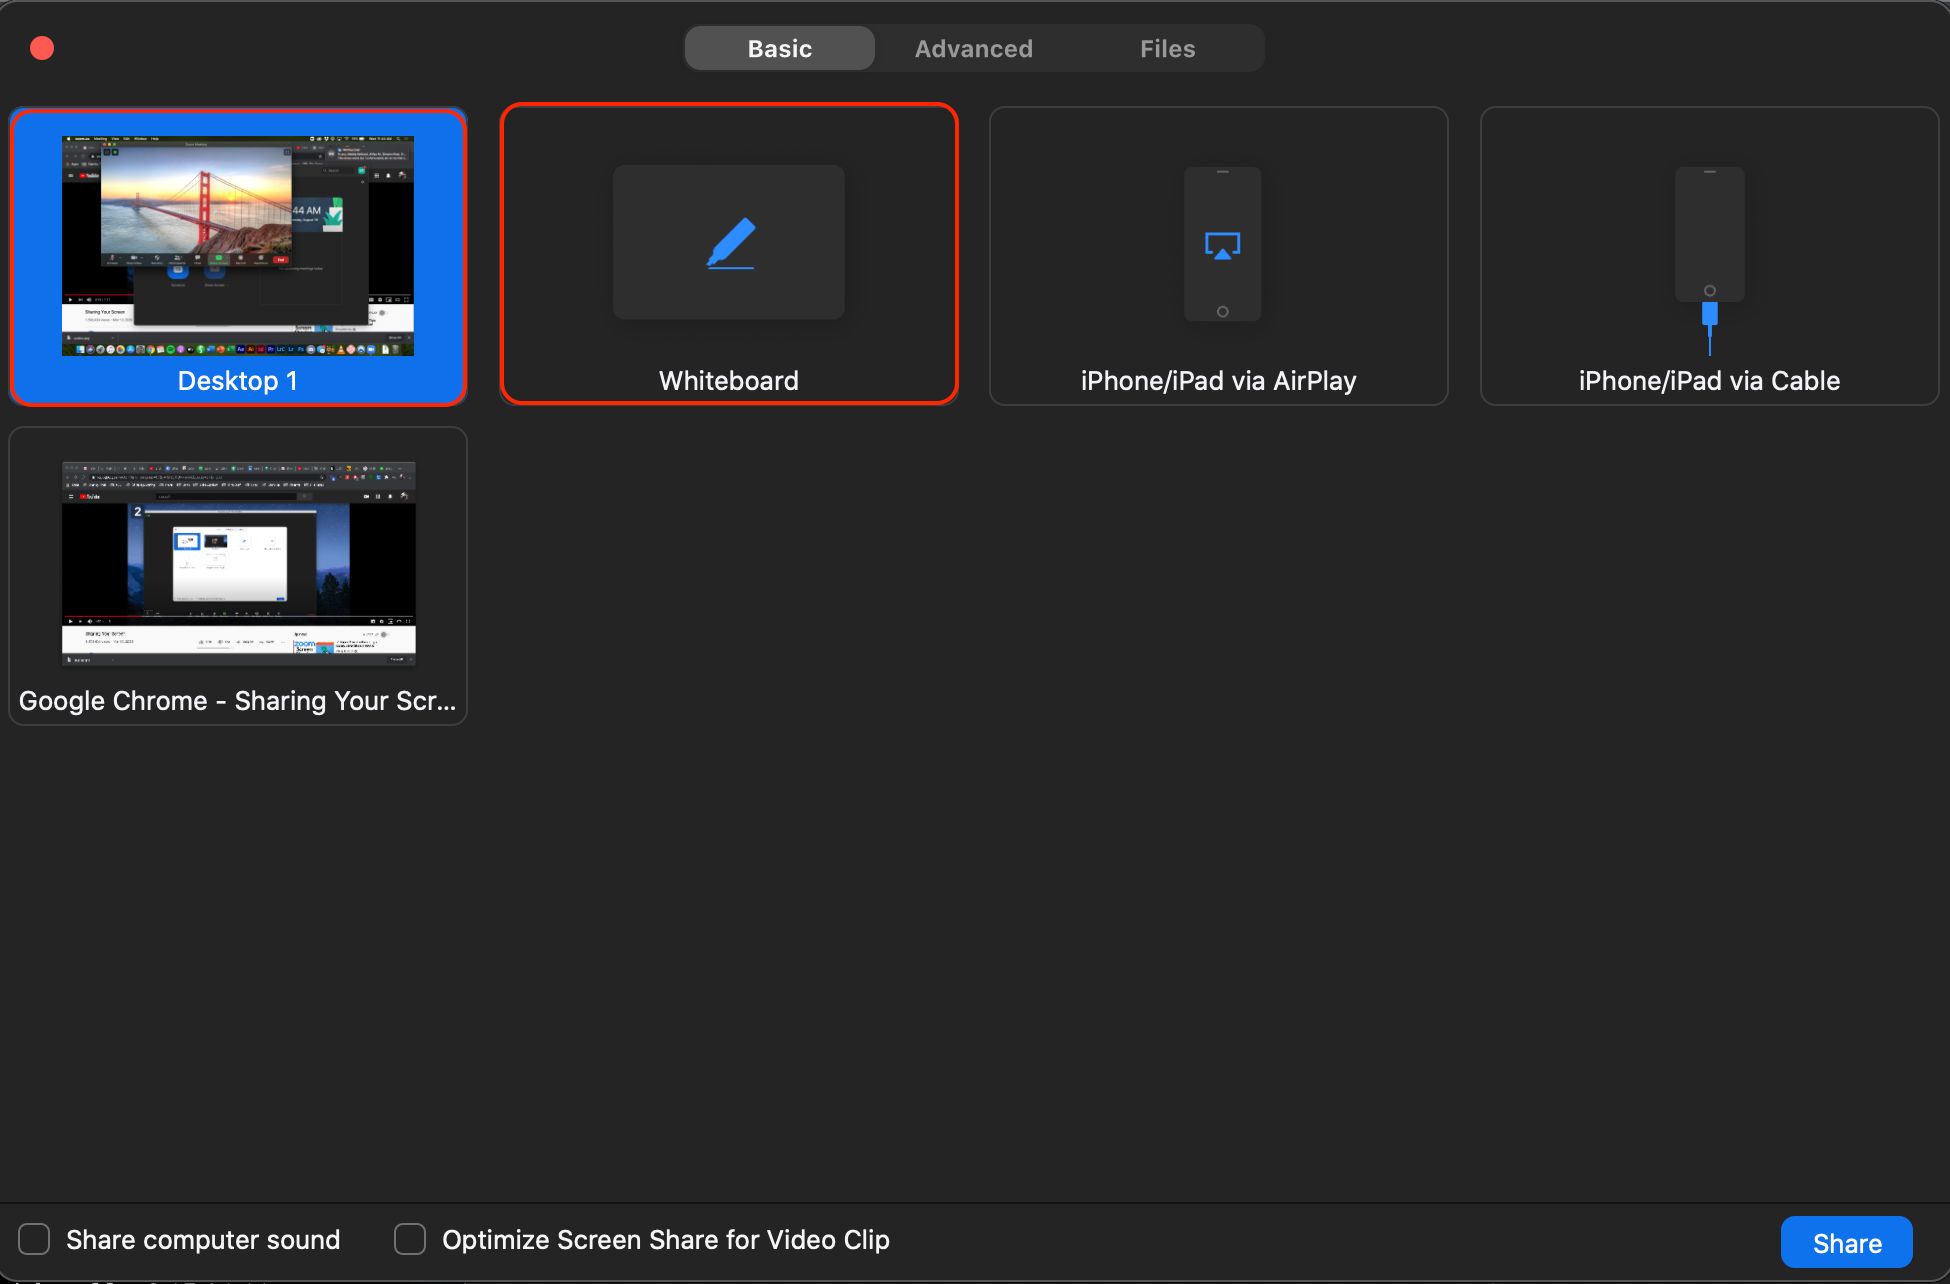
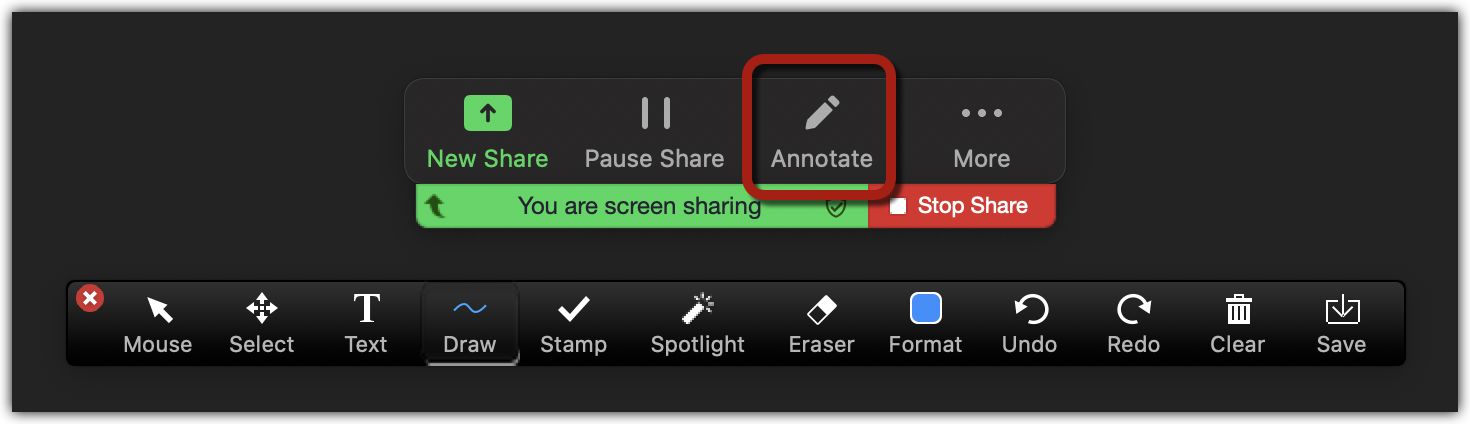
- During a Zoom meeting or when viewing shared content, locate the annotation toolbar at the top of the Zoom window. It will contain various annotation tools, including the text tool.
- Click on the “Text” icon in the annotation toolbar to activate the text tool.
- Position your cursor on the screen where you want to add the text. Click once to create a text box.
- Type your desired text directly into the text box. You can add multiple lines of text as needed.
- Customize the text by selecting it and using the options available in the toolbar. You can change the text color, size, font style, and alignment to suit your preference.
- If you want to move the text box, click and drag it to the desired location on the screen.
- To delete the text box, select it and press the delete key on your keyboard.
- Continue using the text tool to add comments or notes as necessary during the Zoom session.
With the text tool, you can quickly provide additional information, ask questions, or emphasize key points in real-time. It enhances the clarity of your message and allows participants to easily follow along with your annotations.
Remember, effective use of the text tool involves being concise and using clear language. Keep your annotations brief but informative to capture the attention of your audience and ensure that your messages are easily understood.
Now that you know how to use the text tool, let’s move on to exploring the drawing tool in Zoom.
How to Use the Drawing Tool
The drawing tool in Zoom allows you to draw freehand or create structured annotations on the shared content. It offers a range of options, including a pen, highlighter, and shapes, giving you flexibility in expressing your ideas and highlighting important information. Here’s a step-by-step guide on how to use the drawing tool:
- When in a Zoom meeting or viewing shared content, locate the annotation toolbar at the top of the Zoom window. It will contain various annotation tools, including the drawing tool.
- Click on the “Drawing” icon in the annotation toolbar to activate the drawing tool.
- Choose your preferred drawing tool from the options available, such as a pen or highlighter. You can also select a specific color and line thickness.
- Click and hold the mouse button to start drawing on the screen. If using a touch device, you can use your finger or a stylus.
- If you want to draw a straight line or specific shapes, hold the shift key while drawing.
- To switch between the pen and highlighter, click on the respective icons in the drawing tool options.
- To erase any annotations or modifications made, select the eraser tool within the drawing tool options and click on the area you want to erase. You can also use the undo button in the annotation toolbar to remove the last annotation made.
- Continue using the drawing tool to create annotations, mark important areas, or emphasize information throughout the Zoom session.
The drawing tool provides you with a creative outlet to visually represent your thoughts and ideas. Whether you’re sketching diagrams, underlining text, or circling important elements, it can help make your annotations more engaging and memorable for participants.
Remember to use different colors and line thicknesses to differentiate between annotations and emphasize specific points effectively. This will allow your audience to easily interpret and understand the purpose behind your annotations.
Now that you know how to use the drawing tool, let’s move on to exploring the spotlight tool in Zoom.
How to Use the Spotlight Tool
The spotlight tool in Zoom allows you to highlight a specific area on the shared content, making it more prominent for all participants. It is especially useful during presentations or when you want to draw attention to a particular element. Here’s a step-by-step guide on how to use the spotlight tool:
- During a Zoom meeting or when viewing shared content, locate the annotation toolbar at the top of the Zoom window. It will contain various annotation tools, including the spotlight tool.
- Click on the “Spotlight” icon in the annotation toolbar to activate the spotlight tool.
- Position your cursor on the screen where you want to apply the spotlight effect. Click and hold the mouse button to create a spotlight circle.
- Adjust the size of the spotlight circle by dragging the mouse or using the zoom in/out feature available in the annotation toolbar.
- The area within the spotlight circle will be highlighted and appear brighter, while the surrounding area will be slightly dimmed.
- If you want to move the spotlight circle, click and drag it to the desired location on the screen.
- To remove the spotlight effect, simply click outside the spotlight circle or use the eraser tool in the annotation toolbar to erase it.
- Continue using the spotlight tool as needed to draw attention to specific areas or elements on the shared content.
The spotlight tool is an effective way to guide the attention of participants and ensure that important details are not overlooked. By applying the spotlight effect, you can make specific content or sections stand out, enabling a clear focus for everyone in the Zoom session.
When using the spotlight tool, it’s important to consider the size and placement of the spotlight circle. Ensure that it adequately covers the intended area without obstructing other important information on the screen.
Now that you know how to use the spotlight tool, let’s move on to exploring the arrow tool in Zoom.
How to Use the Arrow Tool
The arrow tool in Zoom allows you to point out specific details or draw attention to a particular spot on the screen. It can be a helpful tool for highlighting important information or guiding participants’ focus during presentations or collaborative sessions. Here’s a step-by-step guide on how to use the arrow tool:
- During a Zoom meeting or when viewing shared content, locate the annotation toolbar at the top of the Zoom window. It will contain various annotation tools, including the arrow tool.
- Click on the “Arrow” icon in the annotation toolbar to activate the arrow tool.
- Position your cursor on the screen where you want to add the arrow. Click to create the starting point of the arrow.
- While still holding the mouse button, drag the cursor to create the arrow shape. Release the mouse button to complete the arrow.
- To customize the appearance of the arrow, such as color or thickness, use the options available in the annotation toolbar.
- If you want to move the arrow, click and drag it to the desired location on the screen.
- To delete the arrow, select it and press the delete key on your keyboard.
- Continue using the arrow tool as needed to point out specific details or direct attention to important areas.
The arrow tool allows you to visually guide participants’ focus and highlight specific elements on the shared content. Whether you’re indicating important text, drawing attention to a graph, or highlighting a specific part of an image, the arrow tool can provide clarity and emphasis to your annotations.
When using the arrow tool, consider the size and placement of the arrow to ensure it is easily visible and doesn’t obstruct crucial information. Additionally, choose colors and line thicknesses that contrast well with the background to make the arrow stand out.
Now that you know how to use the arrow tool, let’s move on to exploring the eraser tool in Zoom.
How to Use the Eraser Tool
The eraser tool in Zoom allows you to selectively remove annotations or modifications made on the shared content. It gives you the flexibility to correct or erase specific parts of your annotations as needed. Here’s a step-by-step guide on how to use the eraser tool:
- During a Zoom meeting or when viewing shared content, locate the annotation toolbar at the top of the Zoom window. It will contain various annotation tools, including the eraser tool.
- Click on the “Eraser” icon in the annotation toolbar to activate the eraser tool.
- Select the size of the eraser by clicking on the brush icon in the annotation toolbar and choosing the desired thickness.
- Click and hold the mouse button or use your finger on a touch device to erase specific annotations on the screen.
- If you want to clear all annotations made, you can use the “Clear” option in the annotation toolbar. This will remove all annotations made by you, but it does not affect annotations made by others.
- Continue using the eraser tool to selectively remove any annotations or modifications on the shared content.
The eraser tool provides you with the ability to make corrections or undo specific annotations without affecting the rest of the shared content. It enables you to refine your annotations and ensure the accuracy and clarity of your message.
When using the eraser tool, take care to be precise in your erasing. Be mindful of accidentally removing important information or annotations made by others. The ability to selectively erase annotations gives you the control to refine and enhance your shared content during Zoom sessions.
Now that you know how to use the eraser tool, you can confidently make adjustments or corrections to your annotations as needed.
Tips for Effective Annotation on Zoom
Mastering the art of annotation on Zoom can greatly enhance collaboration, engagement, and communication during virtual meetings and online classes. Here are some tips to help you make the most out of the annotation tools available on Zoom:
- Plan Ahead: Before the Zoom session, familiarize yourself with the content you will be annotating. Consider the key points or areas you want to highlight to effectively convey your message.
- Be Clear and Concise: Keep your annotations brief and to the point. Use clear language and avoid cluttering the screen with excessive annotations, as this can distract participants from the main content.
- Use Color and Contrast: Choose colors for your annotations that provide good contrast with the background. This ensures that your annotations are easily visible and readily understood by participants.
- Utilize Different Annotation Tools: Experiment with different annotation tools, such as text, drawing, spotlight, and arrows, to convey information in various ways. This adds visual interest and helps keep participants engaged.
- Collaborate and Involve Participants: Encourage participants to use annotation tools during the session. Collaboration and interaction can be enhanced by allowing participants to share their annotations or respond to others’ annotations on Zoom.
- Practice Annotation Techniques: Spend time practicing your annotation skills to become more proficient. Familiarize yourself with the different tools, practice drawing shapes or diagrams, and experiment with highlighting and underlining text.
- Be Mindful of Screen Real Estate: Avoid excessive annotation on the screen, especially if the content is detailed or complex. Keep in mind that annotations should complement the content rather than overwhelm it.
- Provide Context and Explanations: Whenever possible, provide brief explanations or context for your annotations. This helps participants understand the purpose and significance of your annotations.
- Save and Share Annotations: If needed, take screenshots or save the annotated content after the Zoom session to share with participants or refer back to it in the future. This ensures continuity and preserves the collaborative annotations made.
- Practice Moderation: While annotations can be valuable, it’s important to strike a balance. Use annotations strategically and avoid overusing them, as this can cause visual clutter and reduce their impact.
By following these tips, you can harness the power of annotation tools on Zoom to effectively convey your message, engage participants, and foster collaboration in virtual environments.
Conclusion
Annotation on Zoom is a powerful feature that enhances collaboration, engagement, and communication during virtual meetings and online classes. With tools like text, drawing, spotlight, arrows, and eraser, participants can actively interact with shared content, emphasize key points, and convey ideas effectively.
We explored the basic annotation tools available on Zoom and provided step-by-step instructions on how to use them. From adding text to drawing freehand, highlighting specific areas, pointing out details with arrows, to selectively erasing annotations, these tools offer a range of options to accommodate diverse annotation needs.
By utilizing annotation effectively, you can improve communication, foster engagement, and enhance the learning and problem-solving experiences. Annotations facilitate active participation, encourage collaboration, and enable real-time feedback, regardless of participants’ physical locations.
Remember to plan ahead, be clear and concise, use color and contrast appropriately, and involve participants in the annotation process. Practice annotation techniques and be mindful of screen real estate to ensure the annotations complement the content rather than overwhelm it. Additionally, provide context and explanations, save and share annotations when necessary, and practice moderation in using annotations to maintain a visually clean and impactful presentation.
As virtual collaboration becomes increasingly prevalent, mastering the art of annotation on Zoom is a valuable skill. So, take these tips and techniques, and leverage the annotation tools provided by Zoom to make your virtual interactions more engaging, productive, and memorable.
Now that you have a comprehensive understanding of annotation on Zoom, it’s time to put your knowledge into practice and make your virtual meetings and online classes more interactive and effective!