Introduction
Welcome to the world of whiteboarding on Zoom! Whether you’re a student, a teacher, a business professional, or just someone looking to collaborate visually with others, the whiteboard feature on Zoom is a powerful tool for communication and creativity. In this guide, we will explore how to make the most of this feature and unlock its full potential.
Whiteboarding has become an essential part of virtual meetings, presentations, and brainstorming sessions. It allows participants to visualize ideas, sketch diagrams, write notes, and collaborate in real-time. With Zoom’s whiteboard feature, you can create an interactive and dynamic space where everyone can contribute and engage.
Setting up and accessing the whiteboard feature on Zoom is simple and straightforward. Whether you’re using Zoom on your computer or mobile device, you’ll be able to utilize the whiteboard tools to their fullest extent. Once you’re familiar with the feature, you’ll be able to draw, write, use shapes and text boxes, insert images and documents, and collaborate with ease.
In this guide, we’ll take you through the process of accessing and utilizing the whiteboard feature. We’ll explore the various tools available, as well as tips and tricks for maximizing your whiteboarding experience. We’ll also cover common troubleshooting issues you may encounter along the way.
So, whether you’re a seasoned Zoom user or just getting started, buckle up and get ready to dive into the world of whiteboarding on Zoom. By the end of this guide, you’ll be equipped with the knowledge and skills to create captivating and interactive whiteboard sessions that will take your virtual meetings to the next level.
Setting up Zoom
Before you can start using the whiteboard feature on Zoom, you’ll need to make sure you have Zoom installed and set up on your computer or mobile device. Here’s how you can get started:
1. Download and install Zoom: Visit the Zoom website (zoom.us) and download the Zoom client for your computer or the Zoom app for your mobile device. Follow the on-screen instructions to install the software.
2. Create a Zoom account: Once the installation is complete, you’ll need to create a Zoom account. Open the Zoom client or app and click on the “Sign Up” or “Join a Meeting” button. You’ll be prompted to enter your email address and set a password. Follow the steps to complete the registration process.
3. Sign in to Zoom: After creating your account, open the Zoom client or app and sign in using your email and password. You’ll now have access to your Zoom dashboard, where you can schedule and join meetings.
4. Test your audio and video: Before using the whiteboard feature, it’s a good idea to test your audio and video settings. Click on the “Settings” button in the Zoom client or app and navigate to the “Audio” and “Video” tabs. Make sure your microphone and camera are working properly.
5. Update Zoom: It’s important to keep your Zoom client or app up to date to ensure you have the latest features and security enhancements. Check for updates regularly and install them when prompted.
Once you have set up Zoom successfully, you’re ready to start using the whiteboard feature. Whether you’re hosting a meeting or joining one, the whiteboard tools will be available for you to utilize during the session. In the next section, we’ll explore how to access and use the whiteboard feature on Zoom.
Accessing the Whiteboard Feature
Once you’ve set up Zoom, accessing the whiteboard feature is a breeze. Whether you’re hosting a meeting or joining one, here’s how you can access the whiteboard:
1. Start or join a meeting: Open the Zoom client or app and start or join a Zoom meeting as you normally would. You can start a new meeting or enter the meeting ID provided by the host.
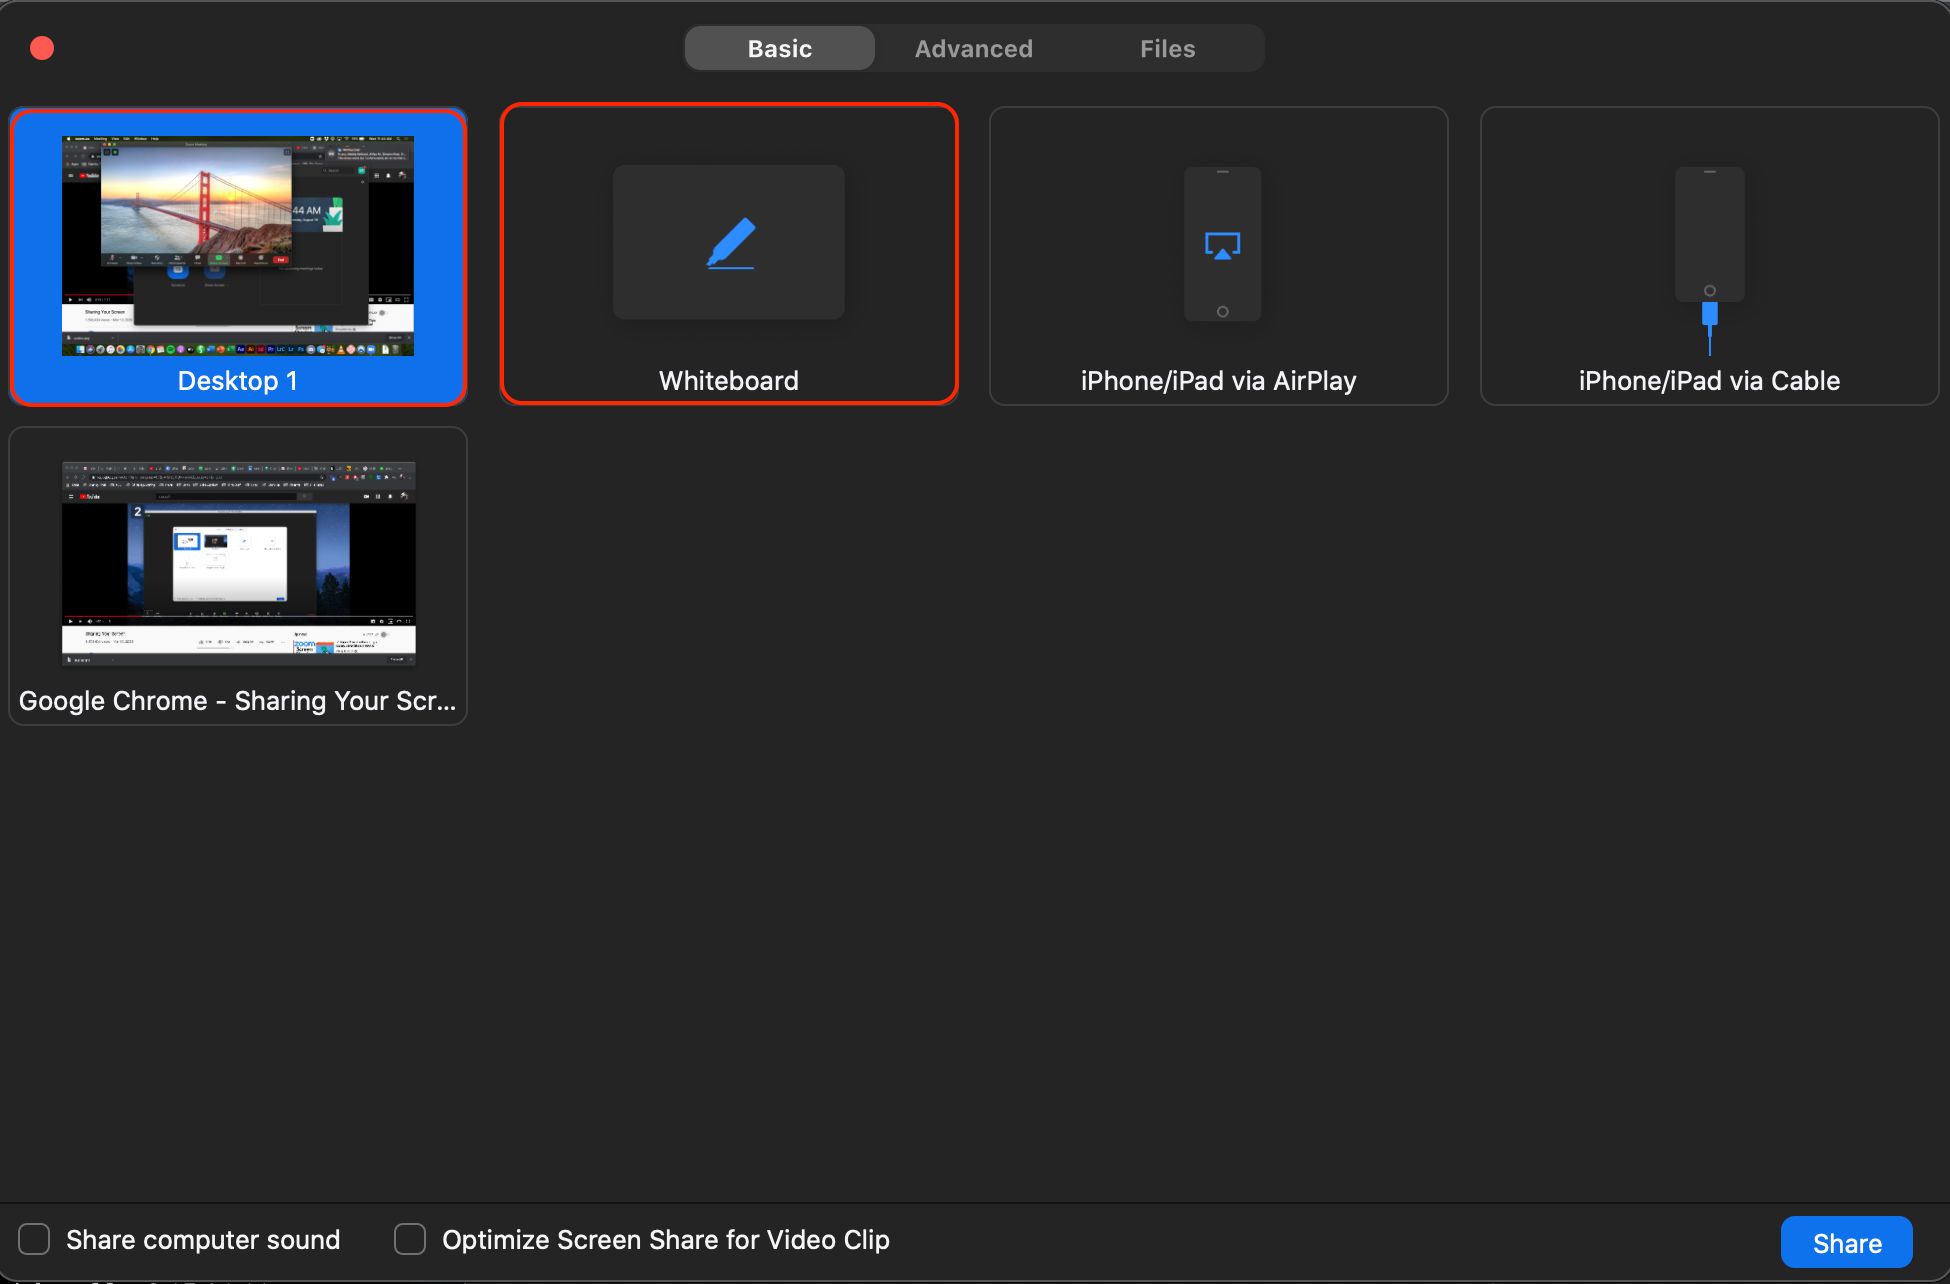
2. Enable the whiteboard: Once you’re in the meeting, you’ll find the meeting controls at the bottom of the screen. Locate the “Share Screen” button and click on it. A pop-up window will appear with various sharing options.
3. Select the whiteboard: In the sharing options window, you’ll see a list of available screens or applications to share. Look for the “Whiteboard” option and click on it to select it.
4. Start sharing: After selecting the whiteboard, click on the “Share” button. The meeting participants will now be able to see the whiteboard on their screens.
5. Access whiteboard tools: Once the whiteboard is shared, you’ll see a toolbar at the top of the screen with various tools and options. These tools allow you to draw, write, insert shapes, text boxes, images, and more.
That’s it! You’ve successfully accessed the whiteboard feature on Zoom. Now, let’s explore the different tools available on the whiteboard and how you can use them to collaborate and create engaging content.
Understanding the Whiteboard Tools
When using the whiteboard feature on Zoom, it’s important to familiarize yourself with the various tools and options available. These tools will allow you to express your ideas creatively and collaborate effectively. Here’s a breakdown of the key whiteboard tools:
1. Pen and highlighter: The pen tool allows you to draw freehand lines of various thicknesses and colors. The highlighter tool is perfect for emphasizing specific points or sections of your drawings.
2. Eraser: The eraser tool helps you remove any mistakes or unwanted elements from your whiteboard. Simply select it and erase the content you wish to delete.
3. Shapes: With the shape tool, you can easily add basic shapes such as squares, circles, triangles, and arrows to your whiteboard. This tool is great for illustrating diagrams or visualizing concepts.
4. Text box: The text box tool allows you to add written information to your whiteboard. You can type in text, choose the font, size, and color, and position the text box anywhere on the whiteboard.
5. Undo and redo: Made a mistake? No worries! The undo and redo buttons are there to help. If you need to revert back to a previous action, simply click the undo button. And if you change your mind, click the redo button to reinstate a discarded change.
6. Clear all: If you want to start with a blank canvas, the clear all button will erase everything on the whiteboard and provide you with a fresh space to work.
7. Zoom and pan: Zooming allows you to focus on a specific area of the whiteboard in more detail. Use the zoom feature to zoom in or out as needed. The pan tool enables you to move around the whiteboard and explore different sections.
8. Insert images and documents: The whiteboard feature also allows you to insert images and documents directly onto the canvas. This is useful for referencing external materials or incorporating visuals into your presentation.
By understanding and utilizing these whiteboard tools effectively, you’ll be able to create engaging and informative content during your Zoom meetings. In the next section, we’ll explore how you can draw and write on the whiteboard to convey your ideas clearly.
Drawing and Writing on the Whiteboard
One of the primary functions of the whiteboard feature on Zoom is to allow users to draw and write freely. Whether you’re explaining concepts, sketching diagrams, or taking notes, the ability to draw and write on the whiteboard can greatly enhance your communication. Here are some tips for effectively utilizing these features:
1. Select the pen or highlighter tool: Choose the desired thickness and color for your pen or highlighter from the toolbar at the top of the screen. Use the pen tool for drawing precise lines, and the highlighter tool to emphasize important points.
2. Write legibly: When writing text on the whiteboard, make sure it’s clear and legible for all participants. Use a font size and color that is easy to read. Consider adjusting the zoom level if needed to ensure proper visibility.
3. Utilize different colors: Use different colors for various elements on the whiteboard to help differentiate information or highlight key points. For example, you can use a specific color for headings, another for important details, and so on.
4. Be concise: Keep your drawings and writings concise and to the point. Use simple and clear shapes, arrows, or diagrams to convey your message effectively. Avoid overcrowding the whiteboard with unnecessary details.
5. Engage with your audience: Encourage participants to engage with the whiteboard by asking them to contribute ideas, draw their own diagrams, or write notes. This collaborative approach fosters a sense of active participation and enhances communication.
6. Use the eraser tool selectively: The eraser tool allows you to remove or modify specific elements on the whiteboard. Use it carefully to fix mistakes or refine your drawings. Remember, the eraser affects only the content you choose, so be cautious not to accidentally erase important information.
7. Experiment with shapes: The shape tool on the whiteboard can be used to create visual representations of concepts or ideas. Experiment with creating diagrams, flowcharts, or graphs to make complex information more accessible and engaging.
Remember, practice makes perfect. The more you utilize the drawing and writing features of the Zoom whiteboard, the better you’ll become at expressing your ideas visually. In the next section, we’ll explore additional features such as using shapes and text boxes to enhance your whiteboard sessions.
Using Shapes and Text Boxes
Shapes and text boxes are powerful tools that can take your whiteboard sessions on Zoom to the next level. They allow you to organize information, create visual hierarchies, and add clarity to your presentations. Here’s how you can effectively use shapes and text boxes on the Zoom whiteboard:
1. Adding shapes: Click on the shape tool in the whiteboard toolbar to access a variety of basic shapes such as rectangles, circles, triangles, and arrows. Select the desired shape and click and drag on the whiteboard canvas to create it. Resize or reposition the shape as needed by clicking and dragging its corners or edges.
2. Utilizing shape customization options: Experiment with different fill colors, border thicknesses, and styles to customize your shapes. This can help you create visual emphasis or differentiate between different sections or concepts on the whiteboard.
3. Using shapes for organization: Arrange shapes strategically to create visual structures or organizational frameworks. For example, you can use rectangles to create content boxes and arrows to indicate relationships or flow between different ideas or steps.
4. Adding text boxes: Click on the text box tool in the whiteboard toolbar and then click on the whiteboard canvas to create a text box. Type in your desired text and customize the font, size, color, and alignment options to suit your needs. Move and resize the text box as necessary.
5. Using text boxes for labeling and explanations: Text boxes are perfect for providing additional context or explanations for your drawings or diagrams. Use them to label different elements, provide bullet-point lists, or offer detailed descriptions. Clear and concise text within text boxes can enhance understanding and engagement.
6. Grouping elements together: Once you’ve added shapes and text boxes, consider grouping related elements together. This allows you to move or resize them as a single unit, making it easier to organize and structure your content on the whiteboard.
7. Experiment with layering: The whiteboard on Zoom allows you to layer shapes, text boxes, and drawings. By strategically layering your elements, you can create depth and visual interest in your whiteboard presentations.
By utilizing shapes and text boxes effectively, you can create organized, visually appealing, and informative whiteboard sessions. In the next section, we’ll explore how you can add images and documents to further enhance your Zoom whiteboard experience.
Adding Images and Documents
Adding images and documents to your Zoom whiteboard can greatly enhance the visual impact and effectiveness of your presentations. Whether you’re referencing external materials, incorporating visual aids, or showcasing relevant documents, here’s how you can make the most of this feature:
1. Inserting images: To add an image to the whiteboard, click on the image icon in the toolbar. Choose the image file from your computer or device and click “Open” to insert it. The image will appear on the whiteboard, and you can resize or reposition it as needed.
2. Enhancing visuals: Images can help illustrate concepts, provide examples, or create visual interest. Consider using relevant images that align with your content to enhance understanding and engagement.
3. Document sharing: Zoom allows you to share documents directly on the whiteboard. To do this, click on the “Share Screen” button and select the document you wish to share. The document will appear on the whiteboard, and participants can view it. Note that anyone with editing permissions can interact with the shared document.
4. Annotating documents: While sharing a document, you can use the whiteboard tools to annotate it. Draw attention to specific sections, highlight key points, or add additional notes directly on the document. This allows for collaborative discussions and further explanation of the content.
5. Utilizing screenshots: Screenshots can be an effective way to quickly capture and share information during a Zoom whiteboard session. Use the screenshot feature on your device to capture relevant content from other sources, such as websites, and then insert the screenshot into the whiteboard for discussion and analysis.
6. Sharing URLs: If you want to reference online content, such as articles, videos, or websites, you can share the URLs on the whiteboard. This allows participants to easily access and explore the resources you’re discussing.
Make sure to use images and documents sparingly and purposefully. They should supplement your content and add value to the discussion. Remember to consider the visual impact and keep the focus on the main ideas you’re conveying.
With the ability to add images and documents, you can create engaging and informative presentations on Zoom. In the next section, we’ll explore how to save and export your whiteboard content for future reference.
Saving and Exporting Whiteboard Content
Saving and exporting your whiteboard content on Zoom is crucial for future reference and sharing with others. Being able to store your whiteboard sessions allows you to revisit and review the information discussed. Here’s how you can save and export your whiteboard content:
1. Save the whiteboard: To save the whiteboard content, click on the ellipsis (…) button on the top-right of the whiteboard screen. From the dropdown menu, select “Save” or “Save As”. Choose the desired location on your computer or device, and give the file a meaningful name. Click “Save” to store the whiteboard content as an image file.
2. Export whiteboard as PDF: If you prefer to have your whiteboard content in a PDF format, you can export it. Click on the ellipsis (…) button, select “Save As PDF”, choose the destination folder, and provide a name for the PDF file. Click “Save” to export the whiteboard as a PDF document.
3. Take screenshots: Alternatively, you can take screenshots of the whiteboard using the screenshot functionality of your computer or device. This allows you to capture specific sections or moments during the whiteboard session and save them as image files for later reference.
4. Record the session: If you want a more comprehensive way to save and review your whiteboard sessions, you can record the Zoom meeting. By recording the meeting, you capture both the whiteboard and audio/video content. After the meeting, you can access the recording, review the whiteboard, and share it with others if needed.
It’s important to note that saving and exporting the whiteboard content should be done before ending the Zoom meeting. Once the meeting ends, the whiteboard content cannot be retrieved or modified.
By regularly saving and exporting your whiteboard content, you can create a library of resources or reference materials that can be used for future presentations, training sessions, or collaborations. In the next section, we’ll explore how you can collaborate with others on the whiteboard during Zoom meetings.
Collaborating on the Whiteboard
The whiteboard feature on Zoom is not just for individual use. It’s also a powerful tool for collaborative discussions and brainstorming sessions. Here’s how you can effectively collaborate with others on the whiteboard during Zoom meetings:
1. Granting permissions: As the meeting host, you have the ability to grant permissions to participants to interact with the whiteboard. By default, participants have view-only access. To allow others to draw, write, or add content to the whiteboard, click on the ellipsis (…) button and select “Allow Participants to Annotate”. This enables participants to actively contribute to the collaborative process.
2. Encourage active participation: During the meeting, actively encourage participants to share their ideas, thoughts, and suggestions on the whiteboard. Create an inclusive and welcoming environment where everyone feels comfortable expressing their opinions and contributing to the discussion.
3. Collaborate in real-time: Participants can take turns adding their drawings, writing, or annotations to the whiteboard. This real-time collaboration allows for dynamic and engaging discussions. Participants can build upon each other’s ideas, illustrate concepts, or create visual representations together.
4. Use the chat feature: In addition to the whiteboard, the chat feature in Zoom can be utilized for collaboration. Participants can use the chat to share additional thoughts, provide feedback, or ask questions related to the whiteboard content. It’s a great way to have parallel conversations that support the ongoing whiteboard session.
5. Utilize breakout rooms: If you have a larger meeting with multiple participants, consider utilizing Zoom’s breakout room feature. This allows you to split participants into smaller groups where they can collaborate on their own whiteboard. Once the breakout rooms are completed, participants can rejoin the main meeting and share their findings or ideas with the entire group.
6. Save and share the collaborative work: After the meeting, make sure to save and export the whiteboard content, as mentioned in the previous section. Share the saved content or exported files with all meeting participants, allowing them to review and refer back to the collaborative work.
By fostering a collaborative mindset and providing the necessary tools and permissions, you can create an interactive and engaging environment for participants to collaborate effectively on the whiteboard. In the next section, we’ll discuss troubleshooting common issues that may arise during whiteboard sessions on Zoom.
Troubleshooting Common Issues
While using the whiteboard feature on Zoom is generally a smooth experience, some common issues may arise along the way. Here are some troubleshooting tips to help you tackle these issues:
1. Limited access: If you’re unable to access the whiteboard feature during a meeting, ensure that the host has enabled whiteboard sharing for participants. If you’re the host, check your meeting settings and make sure the whiteboard option is enabled.
2. Unresponsive whiteboard: Sometimes, the whiteboard may freeze or become unresponsive. Try closing and reopening the whiteboard tool. If the issue persists, exit the meeting and rejoin to reset the whiteboard.
3. Audio/video interference: In certain cases, using the whiteboard simultaneously with audio or video features may cause audio/video interference. Consider turning off your microphone or camera while actively using the whiteboard to reduce potential disruptions.
4. Connectivity issues: Poor internet connection can impact the performance of the whiteboard. If you experience lagging or delays while using the whiteboard, try switching to a more stable internet connection or joining the meeting from a different location with better connectivity.
5. Compatibility issues: Ensure that you’re using the latest version of the Zoom client or app. Older versions may have compatibility issues with certain features, including the whiteboard. Check for updates regularly and install them to avoid any compatibility problems.
6. Limited tools or features: Some Zoom plans may have limitations on the whiteboard tools and features available. Check your Zoom plan to ensure you have access to all the tools and features you need. Consider upgrading your plan if necessary.
7. Communication and collaboration: If participants are facing difficulties collaborating on the whiteboard, make sure clear instructions are provided and that participants understand how to use the tools. Encourage open communication and provide guidance where necessary.
8. File sharing limitations: Keep in mind that there may be file size limitations when adding images or documents to the whiteboard. If you encounter any issues while sharing files, check if the file size exceeds the allowed limit. Consider compressing or resizing the file before sharing if necessary.
If you’ve exhausted these troubleshooting methods and the issue persists, it’s recommended to reach out to Zoom’s customer support for further assistance. They can provide additional guidance specific to your situation.
By being aware of these common issues and following the troubleshooting tips provided, you can overcome any challenges that may arise during your whiteboard sessions on Zoom. In the next section, we’ll wrap up this guide with a summary of the key points covered.
Conclusion
Using the whiteboard feature on Zoom opens up a world of possibilities for communication, collaboration, and creativity. With the ability to draw, write, add shapes, insert images, and share documents, you can create engaging and interactive presentations, brainstorming sessions, and virtual meetings. By following the steps outlined in this guide, you can effectively set up Zoom, access the whiteboard feature, and understand the various tools at your disposal.
Whether you’re a student sharing ideas with classmates, a teacher explaining concepts, or a business professional collaborating with colleagues, the whiteboard feature on Zoom offers valuable functionality. Utilize the tools to their fullest extent, encourage active participation, and foster a collaborative environment for innovative discussions.
Remember to save and export your whiteboard content for future reference and sharing. By doing so, you can create a valuable resource library and ensure that your whiteboard sessions have a lasting impact beyond the live meeting.
If you encounter any issues along the way, refer to the troubleshooting tips provided to overcome common challenges. Additionally, don’t hesitate to reach out to Zoom’s customer support for further assistance if needed.
Now that you have a comprehensive understanding of how to make the most of the whiteboard feature on Zoom, take your virtual meetings and collaborations to new heights. Start exploring, experimenting, and discovering the limitless possibilities of the Zoom whiteboard and elevate your communication to the next level!