Introduction
Welcome to our guide on how to allocate RAM for Minecraft. If you’re an avid Minecraft player, you’ve probably encountered situations where the game starts to lag or suffer from performance issues. One of the main causes of this is inadequate RAM allocation.
Minecraft is a resource-intensive game that relies heavily on your computer’s memory. By default, Minecraft allocates a limited amount of RAM, which may not be sufficient for smooth gameplay, especially if you’re using mods or resource packs. Allocating more RAM to Minecraft can significantly improve performance, reduce lag, and enhance your overall gaming experience.
This guide will walk you through the process of allocating RAM for Minecraft on different operating systems, including Windows, macOS, and Linux. We’ll also provide tips on optimizing your RAM allocation for the best performance possible.
However, before we dive into the specifics of RAM allocation, let’s take a moment to understand why it’s important in the first place.
Why Allocate RAM for Minecraft?
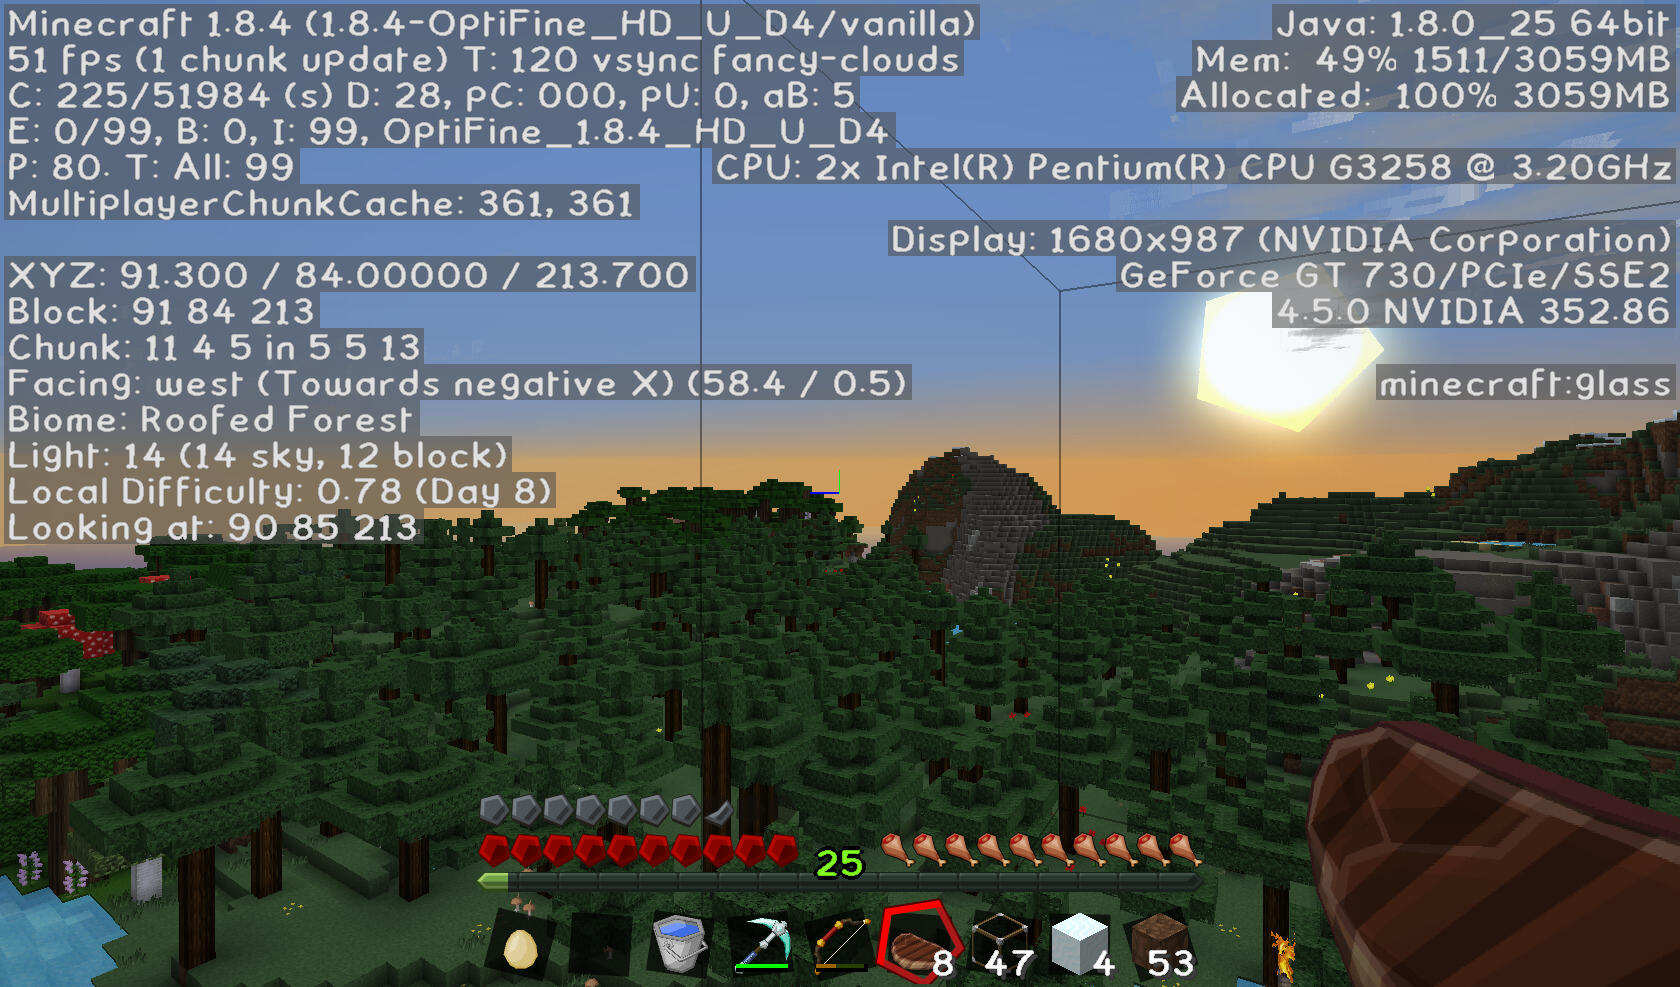
Allocating additional RAM for Minecraft is crucial for several reasons. Firstly, Minecraft is a game that relies heavily on memory usage. When you launch the game, it loads various assets, including textures, sounds, and world data. With insufficient RAM allocated, your computer may struggle to store and process these assets, leading to slower performance, lag, and even frequent crashes.
Secondly, if you’re using mods, resource packs, or any other customizations, these can further increase the demands on your system’s RAM. Mods enhance gameplay by adding new features, items, and functionalities, but they also require additional memory to handle the extra load. By allocating more RAM, you give your computer the necessary resources to handle these modifications smoothly.
Thirdly, Minecraft is a highly dynamic and interactive game. It generates vast landscapes, complex structures, and intricate redstone contraptions, all of which require significant computational power. Allocating more RAM for Minecraft allows your computer to process these elements quicker, resulting in faster rendering, smoother gameplay, and a more enjoyable experience overall.
Furthermore, if you’re running Minecraft servers, allocating more RAM becomes essential. Minecraft servers handle multiple player connections, world generation, and real-time interactions. Without sufficient RAM, the server can become overwhelmed, leading to lag, frequent disconnects, and an overall poor gaming experience for everyone involved. Allocating enough RAM to the server ensures stability, responsiveness, and the ability to accommodate a larger player base.
Lastly, by allocating more RAM to Minecraft, you give yourself room to grow. As you explore new mods, resource packs, or even engage in large-scale building projects, your RAM needs will increase. Allocating additional RAM now sets you up for future additions and ensures that Minecraft remains a smooth and enjoyable experience as you continue to explore its vast possibilities.
Requirements for Allocating RAM
Before you allocate more RAM for Minecraft, there are a few requirements you need to check off:
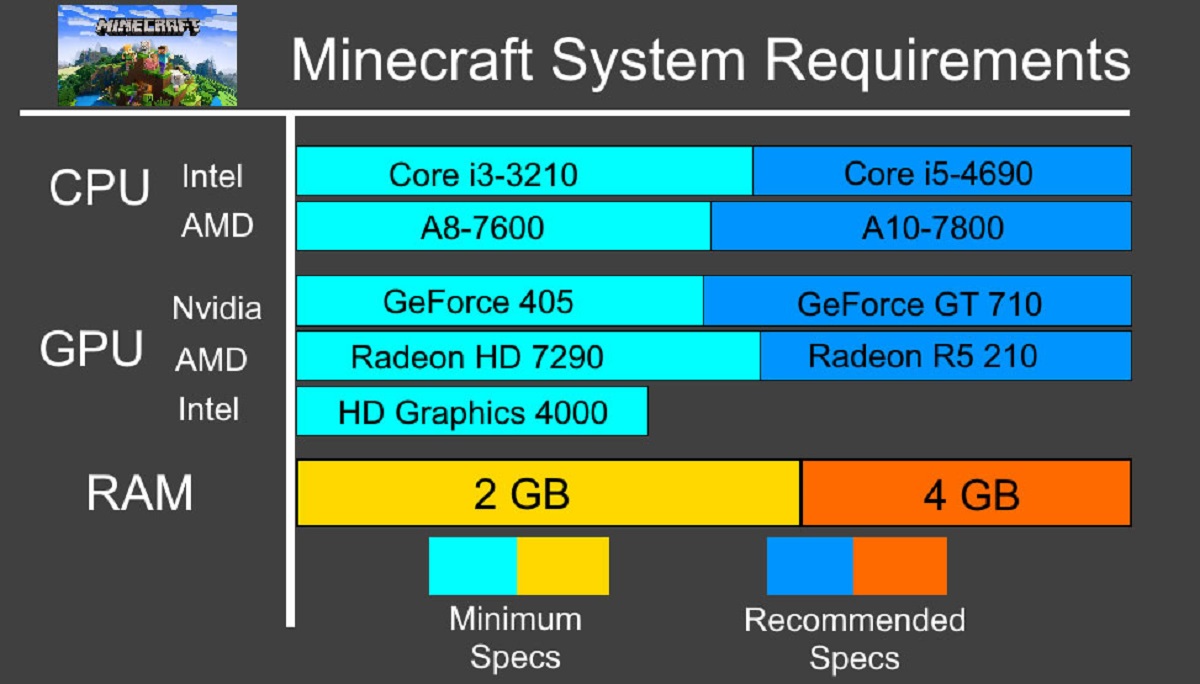
1. System Specifications: Ensure that your computer meets the recommended system specifications for running Minecraft. While allocating more RAM can improve performance, it won’t compensate for an outdated or underpowered system. Check the official Minecraft website for the recommended hardware specifications.
2. Available RAM: You need to have sufficient RAM available on your computer to allocate to Minecraft. Ideally, your system should have at least 8GB of RAM to ensure smooth gameplay. Allocating too much RAM may cause resource conflicts and impact overall performance, so it’s important to strike a balance.
3. 64-bit Java: Minecraft requires a 64-bit version of Java to utilize and allocate more than 4GB of RAM. Ensure that you have 64-bit Java installed on your system. You can check this by visiting the official Java website and downloading the appropriate version.
4. Administrative Access: To allocate more RAM, you’ll need administrative access to your computer. Make sure you have the necessary permissions to modify system settings and allocate resources.
5. Understanding Minecraft’s Memory Usage: It’s crucial to have a basic understanding of how Minecraft utilizes memory. By default, Minecraft allocates a certain amount of RAM, but it’s important to be aware of the resources required by mods, shaders, and other customizations. Educate yourself on the memory requirements of the features you plan to use to allocate an appropriate amount of RAM.
Once you’ve checked off these requirements, you’re ready to proceed with allocating RAM for Minecraft. The process may vary slightly depending on your operating system, so let’s explore the steps for Windows, macOS, and Linux in the following sections.
Checking Available RAM on Your Computer
Before allocating RAM for Minecraft, it’s essential to determine the amount of available RAM on your computer. This will help you allocate an appropriate amount without overloading your system. To check the available RAM, follow the steps below, depending on your operating system:
Windows:
- Press the Windows key + R to open the Run dialog box.
- Type “dxdiag” and press Enter.
- In the DirectX Diagnostic Tool window, navigate to the “System” tab.
- Look for the “Memory” section, which displays the total amount of RAM installed on your computer.
macOS:
- Open the “Apple” menu and select “About This Mac”.
- In the “Overview” tab, you’ll find the total amount of memory (RAM) displayed under “Memory”.
Linux:
- Open a terminal window.
- Type the command “free -h” and press Enter.
- You will see a table displaying information about your system’s memory. Look for the “Total” column to find the total amount of RAM.
Once you have determined the available RAM on your computer, you can proceed to allocate an appropriate amount for Minecraft. Remember to allocate a portion of RAM that allows for smooth gameplay while leaving enough space for other processes to run concurrently.
Now that you have checked your available RAM, let’s move on to the next sections, where we’ll discuss the steps to allocate RAM for Minecraft on different operating systems.
Allocating RAM for Minecraft on Windows
Allocating RAM for Minecraft on Windows involves adjusting the Java arguments in the Minecraft launcher. Follow these steps to allocate more RAM for Minecraft:
- Open the Minecraft launcher.
- Click on “Installations” at the top of the launcher.
- Select the installation profile you want to allocate more RAM to or create a new one.
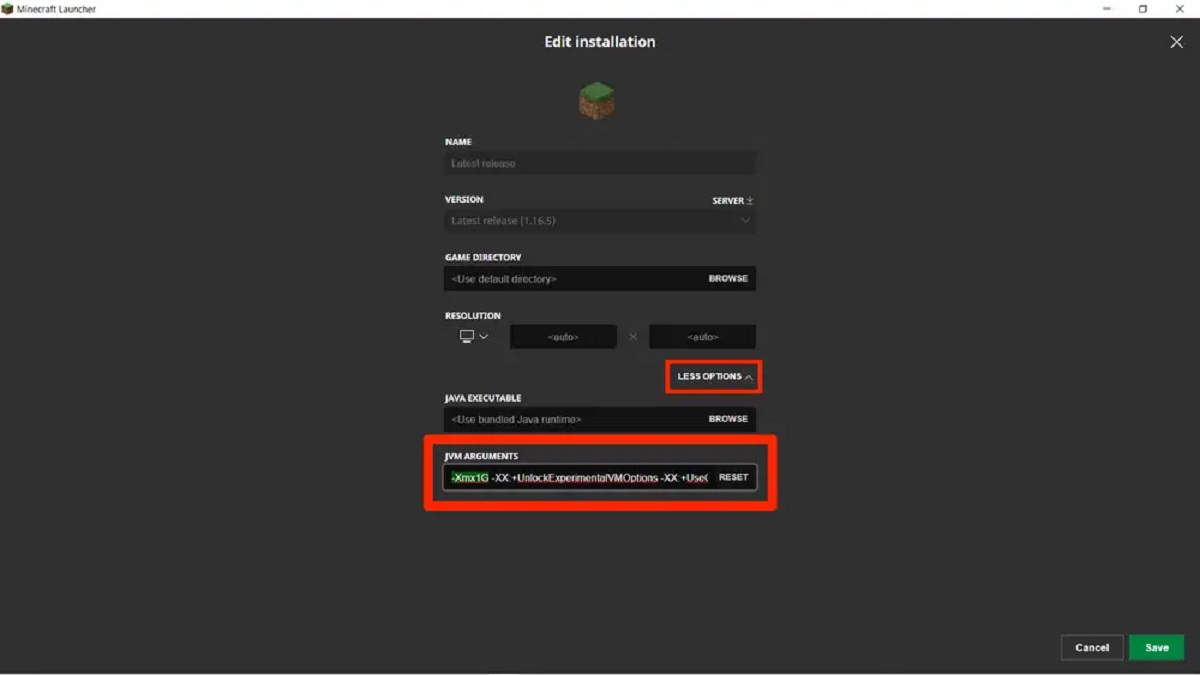
- Click on “More Options” next to the Play button.
- In the JVM Arguments box, look for the “-Xmx” flag.
- -Xmx specifies the maximum amount of RAM Minecraft can use. By default, it is typically set to 1GB. To increase it, replace the “1G” with the desired amount of RAM in gigabytes. For example, to allocate 4GB, change it to “-Xmx4G”.
- Click on “Save” to save the changes.
- Go back to the main launcher screen and select the installation profile you modified.
- Click on the Play button to launch Minecraft with the allocated amount of RAM.
It’s important to note that allocating too much RAM can negatively impact performance, so be cautious and find the right balance for your system. We recommend allocating between 4GB to 8GB of RAM for most Minecraft setups, while higher-end systems can handle even more.
Now that you’ve learned how to allocate RAM for Minecraft on Windows, let’s move on to the next section, where we’ll explore the process for macOS.
Allocating RAM for Minecraft on macOS
To allocate more RAM for Minecraft on macOS, you need to modify the Java settings in the Minecraft launcher. Follow these steps:
- Open the Minecraft launcher on your macOS.
- Click on “Installations” at the top of the launcher.
- Select the installation profile you want to allocate more RAM to or create a new one.
- Click on “More Options” next to the Play button.
- In the JVM Arguments box, look for the “-Xmx” flag.
- -Xmx specifies the maximum amount of RAM Minecraft can use. By default, it is typically set to 1GB. To increase it, replace the “1G” with the desired amount of RAM in gigabytes. For example, to allocate 4GB, change it to “-Xmx4G”.
- Click on “Save” to save the changes.
- Go back to the main launcher screen and select the installation profile you modified.
- Click on the Play button to launch Minecraft with the allocated amount of RAM.
Remember to allocate an amount of RAM that suits your specific setup. Allocating too much RAM can impact the performance of other applications running on your macOS. Generally, allocating between 4GB to 8GB of RAM should be sufficient for most Minecraft setups on macOS.
Now that you’ve learned how to allocate RAM for Minecraft on macOS, let’s move on to the next section, where we’ll explore the process for Linux.
Allocating RAM for Minecraft on Linux
Allocating more RAM for Minecraft on Linux involves modifying the Java arguments in the Minecraft launcher. Follow these steps to allocate more RAM:
- Open the Minecraft launcher on your Linux system.
- Click on “Installations” at the top of the launcher.
- Select the installation profile you want to allocate more RAM to or create a new one.
- Click on “More Options” next to the Play button.
- In the JVM Arguments box, look for the “-Xmx” flag.
- -Xmx specifies the maximum amount of RAM Minecraft can use. By default, it is typically set to 1GB. To increase it, replace the “1G” with the desired amount of RAM in gigabytes. For example, to allocate 4GB, change it to “-Xmx4G”.
- Click on “Save” to save the changes.
- Go back to the main launcher screen and select the installation profile you modified.
- Click on the Play button to launch Minecraft with the allocated amount of RAM.
When allocating RAM on Linux, it’s important to be mindful of the resources available on your system. Allocating too much RAM can strain your system and impact overall performance. For most Minecraft setups on Linux, allocating between 4GB to 8GB of RAM should be sufficient.
Now that you’ve learned how to allocate RAM for Minecraft on Linux, let’s move on to the next section where we’ll share some tips for optimizing your RAM allocation in Minecraft.
Tips for Optimized RAM Allocation
Allocating the right amount of RAM for Minecraft is crucial for optimal performance. Here are some tips to help you optimize your RAM allocation:
1. Start with a base amount: Begin by allocating a base amount of RAM that suits your system’s specifications and gameplay requirements. As a starting point, allocate between 4GB to 8GB of RAM, and make adjustments based on your specific needs.
2. Test and monitor: After allocating RAM, test Minecraft to ensure smooth gameplay. Monitor your system’s performance using tools like Task Manager (Windows) or Activity Monitor (macOS) to see how your system is handling the allocated RAM. Adjust the allocation accordingly if you experience performance issues.
3. Consider system resources: Take into account the other applications and processes running on your computer. Allocating too much RAM for Minecraft can impact the performance of other programs. Strike a balance by leaving enough RAM available for other essential processes.
4. Avoid excessive allocation: While allocating more RAM can enhance Minecraft’s performance, there is a limit. Allocating an excessive amount of RAM can lead to diminishing returns and may even cause instability. Find the sweet spot where performance is optimized without overburdening your system.
5. Optimize Minecraft settings: Alongside allocating RAM, optimize Minecraft’s in-game settings. Lowering render distance, turning off fancy graphics options, and reducing particles can lighten the load on your system’s resources, allowing for better overall performance.
6. Regularly update Java: Ensure that you have the latest version of Java installed on your system. Updating Java can bring performance improvements and bug fixes, which can positively impact Minecraft’s performance as well.
7. Consider modded environments: If you’re using mods or modpacks, keep in mind that they require additional resources. Allocating more RAM may be necessary to accommodate the increased demands of modded gameplay effectively.
8. Close unnecessary applications: Before launching Minecraft, close any unnecessary applications running in the background. This frees up system resources and allows Minecraft to utilize the allocated RAM more effectively.
By following these tips, you can optimize your RAM allocation for Minecraft and enjoy smoother gameplay, reduced lag, and an overall improved gaming experience.
Now that you’ve learned various tips for optimizing your RAM allocation, it’s time to wrap up this guide.
Conclusion
Allocating the right amount of RAM for Minecraft is crucial for optimal performance and a smooth gaming experience. By following the steps outlined in this guide, you can allocate more RAM to Minecraft on different operating systems, including Windows, macOS, and Linux.
Remember to check your system’s available RAM before making any allocations and ensure that your computer meets the recommended specifications for running Minecraft. Allocating too much RAM can strain your system, while allocating too little can result in lag and poor performance.
Additionally, optimizing your RAM allocation involves finding a balance between allocating enough resources for Minecraft and leaving sufficient RAM for other processes and applications on your system. Monitoring performance, adjusting allocation as needed, and considering system resources will help you achieve the best results.
Furthermore, optimizing Minecraft’s in-game settings, keeping Java updated, and considering the requirements of modded environments can also contribute to a smoother gameplay experience.
By following the tips and instructions in this guide, you can successfully allocate RAM for Minecraft and enjoy improved performance, reduced lag, and an overall enhanced gaming experience. Happy gaming!