How To Give More Ram To Minecraft: Boost Your Gaming Performance
Minecraft is a wildly popular game that has captivated millions of players around the world. Its unique block-based world, endless possibilities for creativity, and addictive gameplay make it a true gem in the gaming community. However, some players may encounter performance issues, such as lag or slow loading times. One possible solution to these problems is to give more RAM to Minecraft. In this article, we will explore how to do just that and boost your gaming performance.
Key Takeaways:
- Allocating more RAM to Minecraft can improve your gaming experience by reducing lag and speeding up loading times.
- Before increasing the RAM allocation, ensure that your computer meets the minimum system requirements and that you have enough available RAM.
Why should I allocate more RAM to Minecraft?
Minecraft is a Java-based game, and by default, it doesn’t utilize much RAM. However, as you start including resource packs, mods, or play on larger worlds, the game’s memory requirements can increase significantly. Allocating more RAM to Minecraft can help alleviate performance issues by allowing the game to access additional memory, leading to smoother gameplay and faster loading times.
How to allocate more RAM to Minecraft
Allocating more RAM to Minecraft is a straightforward process, and you can do it by following these simple steps:
- Check your system requirements: Before increasing the RAM allocation, ensure that your computer meets the minimum system requirements for Minecraft. You can find this information on the official Minecraft website.
- Determine available RAM: To allocate more RAM, you need to know how much RAM your computer has. On Windows, you can press “Ctrl + Shift + Esc” to open the Task Manager. Under the “Performance” tab, you will see the amount of available RAM.
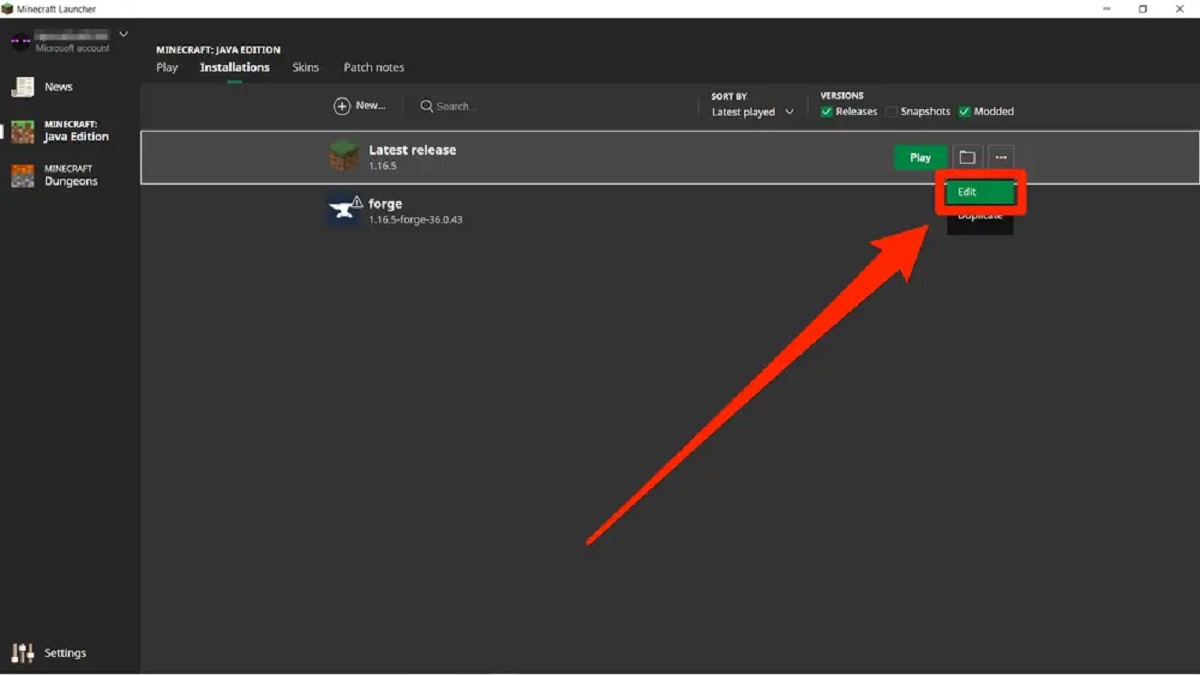
- Edit the Minecraft launcher profile: Start the Minecraft launcher and locate the installation you want to allocate more RAM to. Click on the “Installations” tab, find the installation, and click on the three dots (…) next to it. Then, select “Edit” from the dropdown menu.
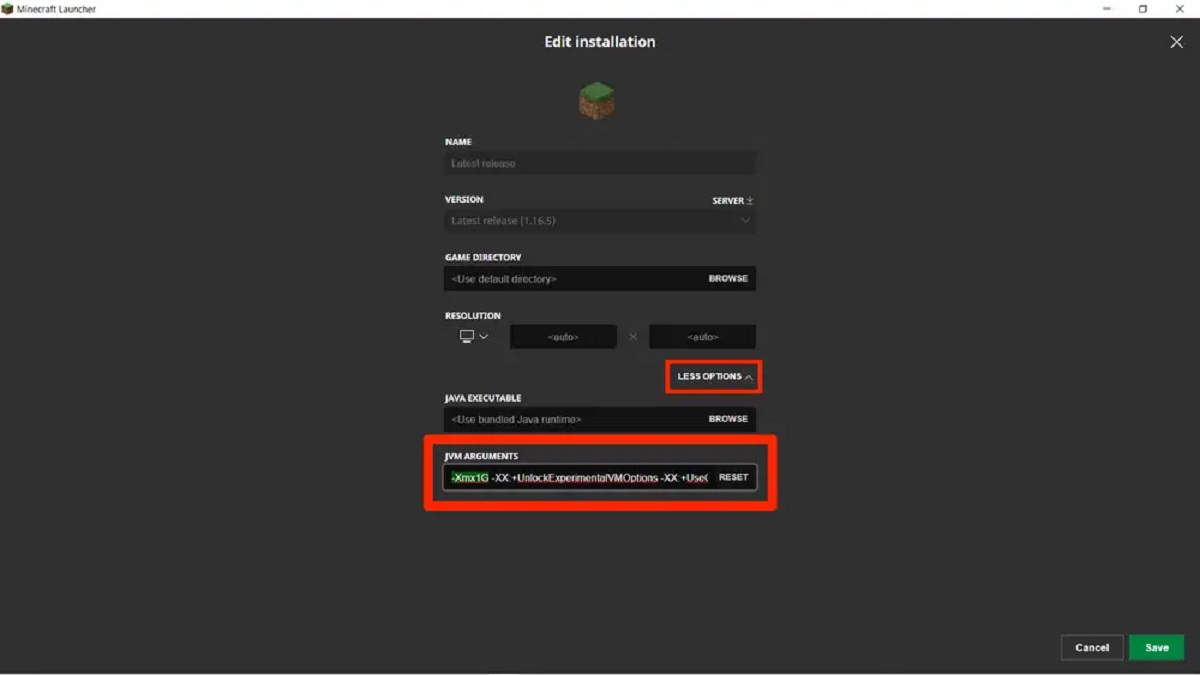
- Allocate more RAM: In the edit screen, locate the “JVM Arguments” section. You will see a line of code that starts with “-Xmx”. This line determines the maximum amount of RAM allocated to Minecraft. By default, it is usually set to 1GB. Increase this value to allocate more RAM. For example, if you want to allocate 4GB of RAM, change “-Xmx1G” to “-Xmx4G”.
- Save and play: After making the necessary changes, click on “Save” and then launch Minecraft. The game will now start with the increased RAM allocation, resulting in improved performance.
It’s important to note that allocating too much RAM to Minecraft can have adverse effects on your system’s performance, so make sure not to go overboard. Depending on your computer’s specifications, it is generally recommended to allocate around 4GB-8GB of RAM for Minecraft to achieve optimal results.
By following these steps and allocating more RAM to Minecraft, you can significantly enhance your gaming experience and enjoy the game without any performance issues. Give it a try, and see the difference it makes!
In Conclusion
Giving more RAM to Minecraft is a simple yet effective way to boost your gaming performance. By ensuring your computer meets the minimum system requirements and allocating a suitable amount of RAM, you can optimize Minecraft to run smoothly and enjoy a lag-free experience. Remember to follow the steps mentioned above and find the sweet spot for your system’s capabilities. Happy gaming!