Prerequisites
Before you can allocate more RAM to your Minecraft server, there are a few prerequisites you need to have in place. Ensuring that you meet these requirements will ensure a smooth and successful process. Here’s what you need:
- Minecraft Server Launcher: Make sure you have the Minecraft Server Launcher installed on your system. This launcher allows you to manage and customize your server settings. If you haven’t already, you can download it from the official Minecraft website.
- Minecraft Server Files: You should have the necessary Minecraft server files, including the server.jar file and any additional plugins or mods you want to include. These files are essential for running your Minecraft server.
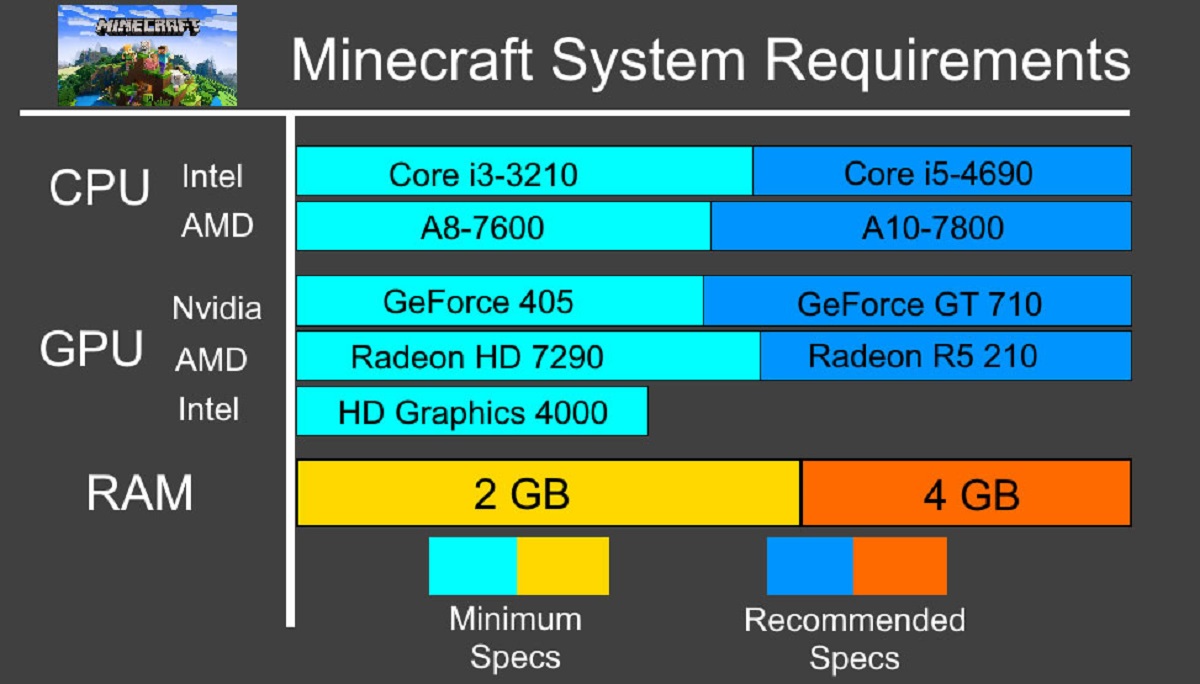
- Server Hardware: It’s important to have a computer or dedicated server with enough resources to handle the additional RAM allocation. Make sure your system meets the minimum hardware requirements specified by Mojang, the developers of Minecraft.
- Administrative Privileges: To make changes to your server configuration and allocate more RAM, you need administrative privileges on your system. This ensures that you have the necessary permissions to modify system settings and files.
Once you have these prerequisites in place, you’re ready to move on to the next steps and allocate more RAM to your Minecraft server. With the increased RAM, you’ll be able to enhance the performance and overall gameplay experience for you and your fellow players.
Step 1: Open the Minecraft Server Launcher
Before you can allocate more RAM to your Minecraft server, you need to open the Minecraft Server Launcher. The launcher is the tool that allows you to manage and customize your server settings. Here’s how to open it:
- Locate the Minecraft Server Launcher icon on your desktop or in your applications folder.
- Double-click on the icon to launch the Minecraft Server Launcher.
- The launcher will open, displaying a window with various options and tabs.
Once you have the Minecraft Server Launcher open, you’re ready to proceed to the next steps. This launcher provides you with a user-friendly interface to configure and manage your Minecraft server settings, including the allocation of RAM.
It’s important to note that the exact appearance and interface of the launcher may vary depending on the version you are using. However, the general steps to open the launcher should remain the same.
Now that you have the Minecraft Server Launcher open, you’re one step closer to allocating more RAM to your server. The next section will guide you through the process of accessing the server configuration options.
Step 2: Go to the ‘Launch options’ tab
Once you have the Minecraft Server Launcher open, you need to navigate to the ‘Launch options’ tab. This is where you can access and modify various configuration settings for your Minecraft server, including the allocation of RAM. Follow the steps below to reach the ‘Launch options’ tab:
- In the Minecraft Server Launcher window, locate and click on the ‘Launch options’ tab at the top of the window. It is usually next to tabs labeled ‘News’, ‘Installed’, and ‘Browse’.
- Clicking on the ‘Launch options’ tab will open a new window with a list of launch configurations.
- Select the launch configuration that corresponds to your Minecraft server.
- Click on the ‘Add new’ button if you don’t see the desired launch configuration listed.
By going to the ‘Launch options’ tab, you gain access to the necessary settings required to allocate more RAM to your Minecraft server. This is an essential step in enhancing the performance and optimizing the gameplay experience for you and your players.
Remember, the appearance and layout of the ‘Launch options’ tab might vary slightly depending on the version of the Minecraft Server Launcher you are using. However, the general steps to reach this tab should remain the same.
Now that you have successfully reached the ‘Launch options’ tab, you’re ready to move on to the next step and edit the server configuration to allocate more RAM. The upcoming section will guide you through the process.
Step 3: Edit the server configuration
After navigating to the ‘Launch options’ tab in the Minecraft Server Launcher, it’s time to edit the server configuration settings. This step allows you to make the necessary changes to allocate more RAM to your Minecraft server. Follow the steps below to edit the server configuration:
- In the ‘Launch options’ tab, locate and click on the launch configuration corresponding to your Minecraft server.
- A new window will appear, displaying various settings related to the selected launch configuration.
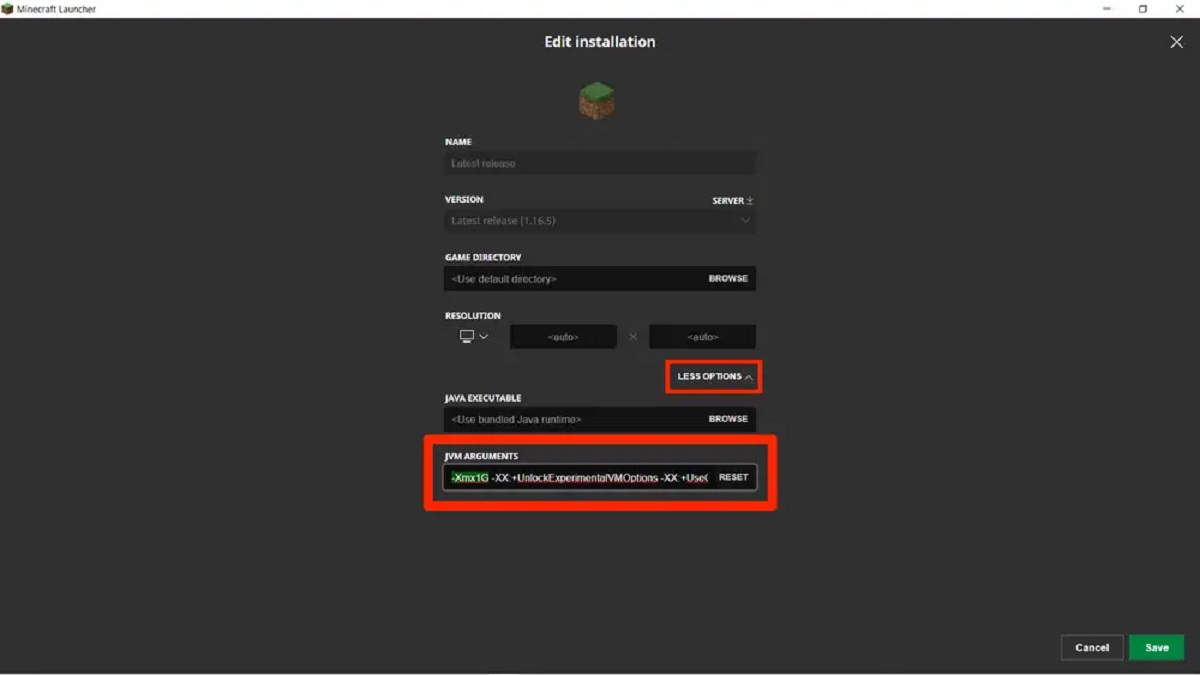
- Scroll down until you find the ‘JVM Arguments’ section.
- In the ‘JVM Arguments’ section, you will see a text box containing a string of text.
- This text represents the Java Virtual Machine (JVM) arguments, which include the allocation of RAM for your Minecraft server.
- To allocate more RAM, you need to modify the value in the ‘-Xmx’ argument.
- The value after ‘-Xmx’ represents the current allocation of RAM for the server.
- Change the value to the desired amount of RAM you want to allocate.
- Ensure you include the unit of measurement, such as ‘G’ for gigabytes or ‘M’ for megabytes.
Editing the server configuration allows you to allocate more RAM, which helps improve the performance and stability of your Minecraft server. Remember to consider your system’s capabilities and the amount of RAM available before making any changes.
Once you have made the necessary modifications to the server configuration, you’re ready to move on to the next step and save the changes. The subsequent section will guide you through the process of saving the configuration and launching the Minecraft server with the allocated RAM.
Step 4: Allocate more RAM to the server
After editing the server configuration in the Minecraft Server Launcher, you are now ready to allocate more RAM to your Minecraft server. This step is crucial in improving the server’s performance and ensuring a smooth gameplay experience. Follow the steps below to allocate more RAM:
- In the ‘JVM Arguments’ section of the server configuration, locate the ‘-Xmx’ argument, which represents the current allocation of RAM.
- Change the value after ‘-Xmx’ to the desired amount of RAM you want to allocate.
- Make sure to include the appropriate unit of measurement, such as ‘G’ for gigabytes or ‘M’ for megabytes.
- Examples of valid RAM allocation values include ‘-Xmx4G’ for 4 gigabytes of RAM or ‘-Xmx2048M’ for 2048 megabytes of RAM.
- You can allocate as much RAM as your system can handle, but ensure that you have sufficient resources available.
- Remember that allocating too much RAM can negatively impact the performance of your system.
- Once you have set the desired RAM allocation, save the server configuration.
Allocating more RAM to your Minecraft server allows it to efficiently handle the demands of gameplay, reducing lag and increasing responsiveness. It provides your server with the necessary resources to handle more players and mods.
However, it is important to find the right balance between allocating enough RAM for a smooth gameplay experience and ensuring your system has enough resources for other tasks. Consider the capabilities of your system and the available RAM before making any changes.
With the server configuration saved and the RAM allocation adjusted, you’re now ready to proceed to the final step of launching your Minecraft server with the allocated RAM.
Step 5: Save and launch the Minecraft server
After allocating more RAM to your Minecraft server, the next step is to save the server configuration and launch the server with the newly allocated RAM. Follow the steps below to complete this final step:
- Make sure you have made the necessary adjustments to the server configuration, including the allocation of RAM.
- Double-check that you have saved the server configuration by clicking on the ‘Save’ or ‘Apply’ button in the Minecraft Server Launcher.
- Once the configuration is saved, navigate back to the ‘News’ or ‘Installed’ tab in the Minecraft Server Launcher. These tabs should display the list of available server configurations.
- Select the server configuration you modified to allocate more RAM.
- Click on the ‘Play’ or ‘Start’ button to launch your Minecraft server with the new RAM allocation.
- Depending on your system and the size of your server, it may take a few moments for the server to start and load all the necessary components.
- Once the server is successfully launched, you will be able to connect to it and enjoy a smoother and more optimized gameplay experience.
Launching the Minecraft server after saving the configuration ensures that the server utilizes the newly allocated RAM. This enhanced memory allocation allows for better performance, reduced lag, and increased stability while playing Minecraft.
If you encounter any issues during the server launch or gameplay, you may need to revisit the server configuration and double-check the RAM allocation values. Adjusting the values and relaunching the server can help resolve any potential problems.
Now that you have successfully saved and launched your Minecraft server with the allocated RAM, you can start enjoying an improved gaming experience with better performance and responsiveness.
Conclusion
Allocating more RAM to your Minecraft server can greatly improve its performance and provide a smoother gameplay experience for you and your fellow players. By following the steps outlined in this guide, you have learned how to allocate more RAM to your Minecraft server and enhance its capabilities.
Starting with the prerequisites, you ensured that you had the necessary tools, server files, hardware, and administrative privileges to make the required changes. Opening the Minecraft Server Launcher gave you access to the server settings, and navigating to the ‘Launch options’ tab allowed you to edit the server configuration.
By modifying the ‘JVM Arguments’ and adjusting the value after ‘-Xmx’, you successfully allocated more RAM to the server. This step is crucial in optimizing the server’s performance and ensuring it can handle the demands of gameplay.
After saving the server configuration, you launched the Minecraft server with the newly allocated RAM, providing a smoother gaming experience with reduced lag and improved responsiveness.
Remember to consider your system’s capabilities and the available resources when allocating RAM, as allocating too much can negatively impact your system’s performance. Finding the right balance is key to maximizing the server’s potential without compromising the overall functionality of your computer.
Now that you have successfully allocated more RAM to your Minecraft server, you can enjoy a more enjoyable and immersive gaming experience. Explore vast landscapes, build epic structures, and play with friends on a server that can handle your adventures without skipping a beat.