Introduction
Welcome to the beginner’s guide on how to change the RAM in Minecraft! If you’re an avid Minecraft player, you may have encountered lag, low FPS, or even crashes when running the game. These issues can often be resolved by allocating more RAM to Minecraft, allowing it to run smoother and more efficiently.
Minecraft is a resource-intensive game that relies heavily on system memory to render the world, handle game mechanics, and run mods or resource packs. By default, Minecraft is allocated a certain amount of RAM from your computer’s resources, but sometimes this may not be enough, especially if you’re running a heavily modded version of the game or playing on a large multiplayer server.
Fortunately, changing the RAM allocation for Minecraft is a straightforward process, and in this guide, we’ll walk you through the step-by-step instructions. Whether you’re a seasoned player or just starting your Minecraft adventure, this guide will help you optimize your game settings and enhance your overall gaming experience.
Before we dive into the step-by-step instructions, it’s important to note that altering your computer’s RAM allocation requires a basic understanding of computer hardware and software. If you’re not comfortable with these technical aspects, it’s always a good idea to seek assistance or guidance from someone with experience or consult your computer’s user manual.
In the next sections, we’ll cover the necessary steps to change the RAM in Minecraft. We’ll start by checking the system requirements and ensuring that your computer meets the minimum specifications for running Minecraft smoothly. Then, we’ll guide you through installing Java, finding the Minecraft launcher, adjusting memory settings, and finally allocating more RAM to Minecraft.
So, grab your pickaxe, put on your favorite Minecraft skin, and let’s get started on optimizing your Minecraft gaming experience by changing the RAM allocation!
Step 1: Check System Requirements
Before diving into changing the RAM allocation in Minecraft, it’s essential to ensure that your computer meets the minimum system requirements. Minecraft requires a certain level of hardware capabilities to run smoothly and without any performance issues. Here’s how you can check if your system meets the requirements:
- Operating System: Make sure your computer is running a compatible operating system. Minecraft is compatible with Windows, macOS, and Linux systems.
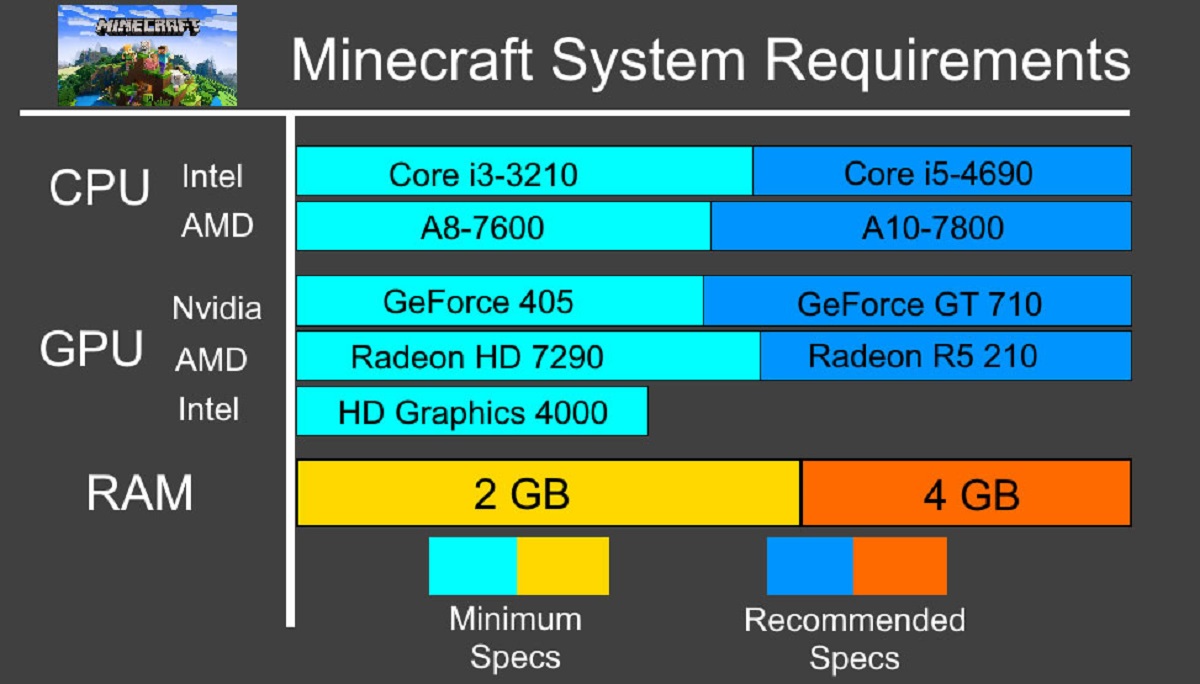
- Processor (CPU): Minecraft recommends at least an Intel Core i5-4690 or AMD A10-7800 or equivalent. This ensures the game runs smoothly, especially during intensive moments.
- Memory (RAM): Check the RAM capacity of your computer. The minimum requirement is 4GB, but for optimal performance, it’s recommended to have at least 8GB or more. Having more RAM allows Minecraft to allocate additional resources for better performance.
- Graphics Card (GPU): Minecraft can run on integrated graphics cards, but for a better experience, it’s recommended to have a dedicated graphics card such as NVIDIA GeForce 700 Series or AMD Radeon Rx 200 Series or higher.
- Java: Minecraft runs on Java, so make sure you have Java installed on your computer. We’ll cover the installation process in the next step.
Checking your system requirements ensures that your computer has the necessary specifications to run Minecraft smoothly. If your system falls short in any of these requirements, you may experience lag, low FPS, or even crashes while playing the game. Upgrading your hardware components might be necessary if your computer doesn’t meet the minimum requirements.
Once you’ve confirmed that your system meets or exceeds the minimum requirements, you’re ready to move on to the next step: downloading and installing Java, which is required to run Minecraft. Let’s proceed to the next section to learn how to get Java up and running on your computer!
Step 2: Download and Install Java
In order to run Minecraft, you’ll need to have Java installed on your computer. Java is a programming language that Minecraft utilizes for its game engine. Follow these steps to download and install Java:
- Visit the Java website: Open your preferred web browser and go to the official Java website at www.java.com.
- Download Java: On the Java website, click on the “Java Download” button. This will take you to the download page.
- Select the appropriate version: Depending on your operating system, you will need to choose the correct version of Java. Make sure to select the version that is compatible with your operating system.
- Start the download: Click on the download link to initiate the Java installation file download. The file size may vary based on your operating system.
- Run the installer: Once the download is complete, locate the installation file and run it. Follow the on-screen instructions to install Java on your computer.
- Verify the installation: After the installation is complete, you can verify if Java is installed correctly by opening the command prompt (Windows) or terminal (macOS/Linux) and typing “java -version”. If Java is installed properly, it will display the installed version information.
Once you have successfully installed Java on your computer, you are one step closer to optimizing your Minecraft gaming experience. Java provides the necessary framework for Minecraft to run and ensures compatibility with various operating systems.
In the next step, we’ll guide you on how to find the Minecraft launcher, the platform where you launch and manage your Minecraft installation. So let’s move on to the next section!
Step 3: Find the Minecraft Launcher
Now that you have Java installed on your computer, it’s time to locate the Minecraft Launcher. The Minecraft Launcher is the platform where you can launch and manage your Minecraft installation. Follow these steps to find the Minecraft Launcher:
- Open your preferred web browser: Launch your web browser and go to the official Minecraft website at www.minecraft.net.
- Click on “Get Minecraft”: On the Minecraft website, click on the “Get Minecraft” button located in the upper right corner of the page.
- Choose the edition: On the “Get Minecraft” page, you will see different editions of Minecraft available. Select the edition that you have purchased or want to play (Java Edition or Bedrock Edition).
- Log in or create a Mojang account: If you already have a Mojang account, log in with your credentials. Otherwise, create a new account by following the registration process.
- Access your account: After logging in, you will be redirected to your account page. Click on the “Download” button to access the Minecraft Launcher download page.
- Download the Minecraft Launcher: On the download page, click on the appropriate download link for your operating system to start downloading the Minecraft Launcher.
- Run the Minecraft Launcher: Once the download is complete, locate the downloaded file and run the Minecraft Launcher installation file. Follow the on-screen instructions to install the Minecraft Launcher on your computer.
- Open the Minecraft Launcher: After the installation is complete, locate the Minecraft Launcher icon on your desktop or in your application folder and open it.
By following these steps, you should now have successfully located and installed the Minecraft Launcher on your computer. The Minecraft Launcher is the central hub where you can access Minecraft, select game versions, and manage various settings for your Minecraft installation.
In the next step, we’ll guide you on how to adjust the memory settings in the Minecraft Launcher to optimize RAM allocation. So let’s move on to the next section!
Step 4: Adjust Memory Settings
Now that you have the Minecraft Launcher installed, it’s time to adjust the memory settings to optimize the RAM allocation for Minecraft. By default, Minecraft is allocated a certain amount of RAM from your computer’s resources. However, depending on your system’s capabilities and the demands of the game, you may need to adjust these settings to ensure smooth gameplay. Here’s how to adjust the memory settings:
- Open the Minecraft Launcher: Launch the Minecraft Launcher by double-clicking on the desktop icon or locating it in your application folder and opening it.
- Login and access the “Installations” tab: Log in to your Minecraft account if prompted, and then click on the “Installations” tab at the top of the launcher.
- Select the Minecraft version: On the “Installations” page, select the Minecraft version you want to allocate more RAM to from the list. If you don’t see the version you want, click on the “+ New” button to create a new installation and choose the desired version.
- Click on “More Options”: Once you’ve selected the version, click on the “More Options” link below it. This will expand the settings for that particular installation.
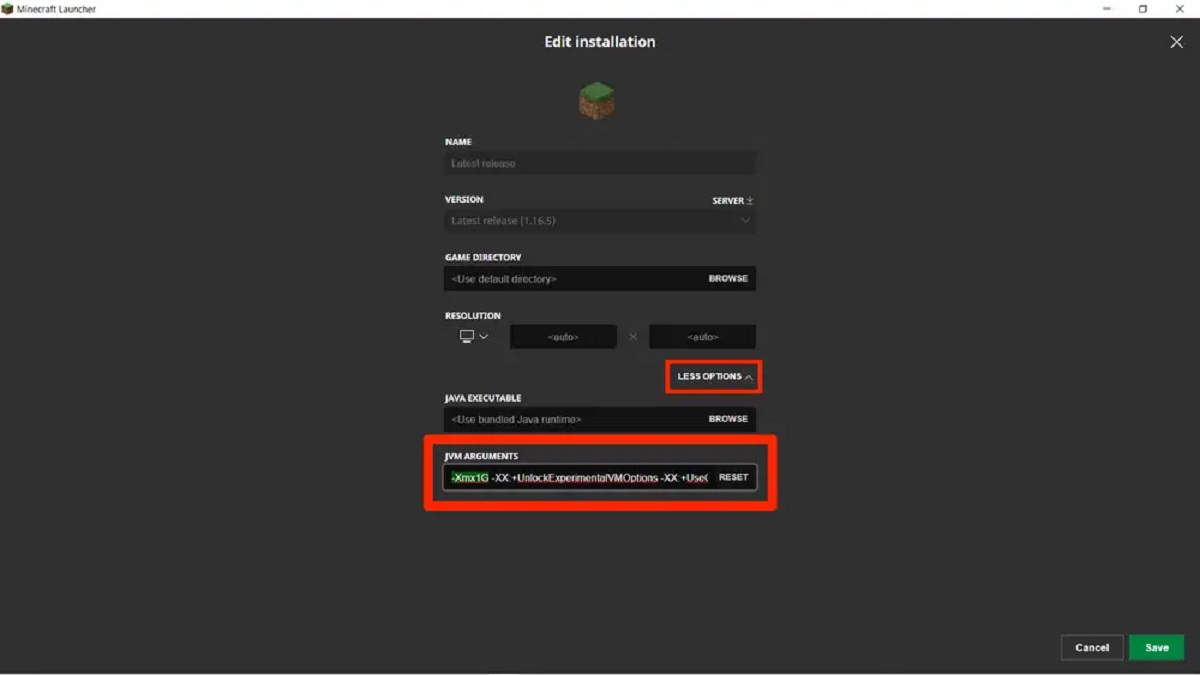
- Find the “JVM Arguments” box: Scroll down the page until you see the “JVM Arguments” box. This is where you can change the memory allocation settings.
- Allocate more RAM: In the “JVM Arguments” box, you will see a line of text that starts with “-Xmx”. This represents the maximum amount of RAM allocated to Minecraft. By default, it is set to a specific value, such as “2G” for 2 gigabytes of RAM. To allocate more RAM, modify this value by increasing the number. For example, you can change it to “4G” for 4 gigabytes of RAM.
- Save the changes: After adjusting the memory allocation, click on the “Save” button to save the changes for the selected Minecraft version.
By following these steps, you have successfully adjusted the memory settings in the Minecraft Launcher. Allocating more RAM to Minecraft allows it to have more resources available, resulting in smoother gameplay, reduced lag, and improved overall performance.
In the next step, we’ll guide you on how to allocate more RAM specifically for Minecraft. This requires modifying a system environment variable, so make sure you follow the instructions carefully. Let’s move on to the next section!
Step 5: Allocate More RAM to Minecraft
If you still experience performance issues with Minecraft after adjusting the memory settings in the Minecraft Launcher, you may need to allocate more RAM to the game. Allocating more RAM ensures that Minecraft has sufficient resources to handle complex worlds, mods, or resource packs. Here’s how to allocate more RAM to Minecraft:
- Open the Minecraft Launcher: Launch the Minecraft Launcher by double-clicking on the desktop icon or locating it in your application folder and opening it.
- Login and access the “Installations” tab: Log in to your Minecraft account if prompted, and then click on the “Installations” tab at the top of the launcher.
- Select the Minecraft version: On the “Installations” page, select the Minecraft version you want to allocate more RAM to from the list. If you don’t see the version you want, click on the “+ New” button to create a new installation and choose the desired version.
- Click on “More Options”: Once you’ve selected the version, click on the “More Options” link below it to expand the settings.
- Find the “JVM Arguments” box: Scroll down the page until you see the “JVM Arguments” box.
- Allocate more RAM: In the “JVM Arguments” box, add the following line of text before any existing arguments:
-Xmx[amount of RAM]G. For example, if you want to allocate 4 gigabytes of RAM, the line should look like-Xmx4G. - Save the changes: After adding the new JVM argument, click on the “Save” button to save the changes for the selected Minecraft version.
It’s important to note that allocating too much RAM to Minecraft can negatively impact the performance of your computer. It’s recommended to allocate a reasonable amount based on your computer’s available resources. Allocating too much RAM can result in memory conflicts and cause the game to lag or crash.
Once you have successfully allocated more RAM to Minecraft, launch the game and see if the performance has improved. If you still experience issues, you can try adjusting the memory allocation again or consider other optimization techniques, such as reducing the render distance or removing resource-intensive mods or resource packs.
Congratulations! You have successfully learned how to allocate more RAM to Minecraft, allowing for smoother gameplay and enhanced performance. With optimized RAM allocation, you can fully immerse yourself in the expansive world of Minecraft without any performance-related hindrances.
Conclusion
Congratulations! You have successfully learned how to change the RAM allocation in Minecraft to optimize your gaming experience. By following the step-by-step instructions in this guide, you can now ensure that Minecraft runs smoothly, with reduced lag and improved performance.
First, you checked the system requirements to ensure that your computer meets the minimum specifications for running Minecraft. Next, you downloaded and installed Java, the programming language that Minecraft relies on. Then, you found the Minecraft Launcher, the platform where you can launch and manage your Minecraft installation. After that, you adjusted the memory settings in the Minecraft Launcher, allowing for better RAM allocation.
If you still encountered performance issues, you then learned how to allocate more RAM to Minecraft by modifying the JVM arguments. By allocating more RAM, Minecraft can access additional resources, resulting in smoother gameplay and better overall performance.
Remember, when allocating more RAM, it’s important to strike a balance and not allocate an excessive amount that could strain your computer’s resources. Carefully consider your computer’s capabilities and available memory before making any adjustments.
With these optimizations in place, you can now dive back into the vast and immersive world of Minecraft without any worries about lag or performance issues. Enjoy building, exploring, and crafting to your heart’s content!
Thank you for following this guide, and happy Minecrafting!