Introduction
Adding subtitles to a video can greatly enhance its accessibility and viewer engagement. Whether you are creating a video tutorial, a promotional video, or a documentary, subtitles allow viewers to follow along with the content even if they cannot hear the audio. iMovie, the popular video editing software for Mac users, offers a simple and user-friendly solution for adding subtitles to your videos.
In this article, we will walk you through the step-by-step process of adding subtitles to a video in iMovie. You don’t need to be a professional video editor to accomplish this task. iMovie provides easy-to-use tools and features that make it accessible to beginners as well.
By adding subtitles to your videos, you not only make them accessible to a wider audience, including those who are hearing impaired or non-native English speakers, but you also improve the overall viewing experience for your audience. Subtitles can also be useful for creating foreign language versions of your videos or improving SEO by making your content more discoverable in search engines.
So let’s dive into the step-by-step process of adding subtitles to your videos using iMovie. We will guide you through importing the video clip, creating a new subtitle track, adding and formatting the subtitles, adjusting the timing, customizing the appearance, and finally exporting the video with subtitles.
Whether you are a beginner or an experienced video editor, this guide will provide you with the necessary instructions to add professional-looking subtitles to your videos using iMovie. Let’s get started!
Step 1: Importing the video clip
The first step in adding subtitles to your video in iMovie is to import the video clip into your project. Follow these simple steps:
- Launch iMovie on your Mac and create a new project by clicking on “+ Create New” and selecting “Movie”.
- Locate the video clip that you want to add subtitles to and drag it into the iMovie timeline. Alternatively, you can click on the “Import Media” button in iMovie and select the video clip from your computer.
- Once the video clip is imported, it will appear in the iMovie timeline where you can edit and add various elements to it, including subtitles.
It’s important to ensure that the video clip you import into iMovie is in a compatible format. iMovie supports a wide range of video formats, including MP4, MOV, and AVI. If your video is not in a compatible format, you may need to convert it using a video converter tool before importing it into iMovie.
Your video clip is now ready to have subtitles added to it. Proceed to the next step to create a new subtitle track in iMovie.
Step 2: Creating a new subtitle track
After importing the video clip into iMovie, the next step is to create a new subtitle track where you will add the subtitles. Follow these steps:
- Select the video clip in the iMovie timeline by clicking on it.
- Go to the top menu and click on “Window”. From the drop-down menu, select “Show Subtitles”. A separate panel will appear, displaying the subtitles options.
- Click on the “+” button at the bottom left corner of the subtitles panel to create a new subtitle track.
- A new subtitle track will be created below the video clip in the iMovie timeline. You can rename the subtitle track by double-clicking on its name.
The subtitle track allows you to add and manage subtitles for your video. Each subtitle you add will be a separate subtitle clip within the subtitle track.
It’s important to note that iMovie supports two types of subtitles: “Open” and “Closed” captions. Open captions are permanently burned into the video and cannot be turned off, while closed captions can be toggled on or off by the viewer. You can choose the type of subtitles you want to create based on your specific requirements.
With the new subtitle track in place, you are now ready to add subtitles to your video. Proceed to the next step to discover how to add subtitles using iMovie’s easy-to-use tools and features.
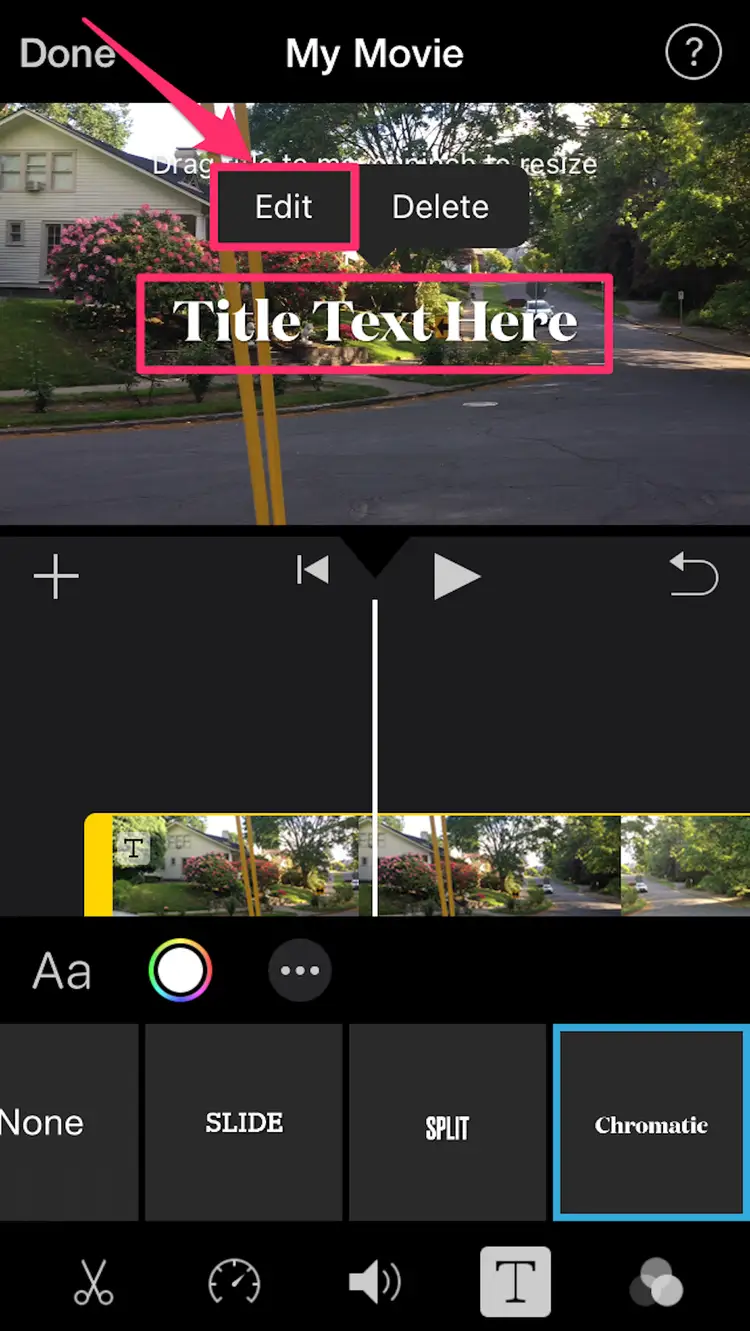
Step 3: Adding subtitles to the video
Now that you have created a subtitle track in iMovie, it’s time to start adding subtitles to your video. Follow these steps to add subtitles:
- Click on the subtitle track in the iMovie timeline to select it.
- Position the playhead in the timeline where you want to add the first subtitle.
- Click on the “+” button in the subtitles panel to create a new subtitle.
- A text box will appear on the video preview window where you can enter the subtitle text.
- Type the desired subtitle text and press Enter to add it to the timeline.
- Continue positioning the playhead and adding subtitles for each section of the video where you want text to appear.
You can also make adjustments to the duration of each subtitle clip by dragging its edges in the timeline. This allows you to control how long each subtitle remains visible on the screen.
iMovie provides various editing options for your subtitles, allowing you to enhance their appearance and readability. You can change the font, size, color, and position of the subtitles by selecting the subtitle clip in the timeline and using the formatting options in the subtitles panel.
It’s important to note that iMovie automatically adjusts the timing of subtitles based on the playhead’s position in the timeline. This ensures that your subtitles are synchronized with the corresponding parts of the video.
Once you have added all the necessary subtitles to your video, proceed to the next step to learn how to format them for improved readability and visual appeal.
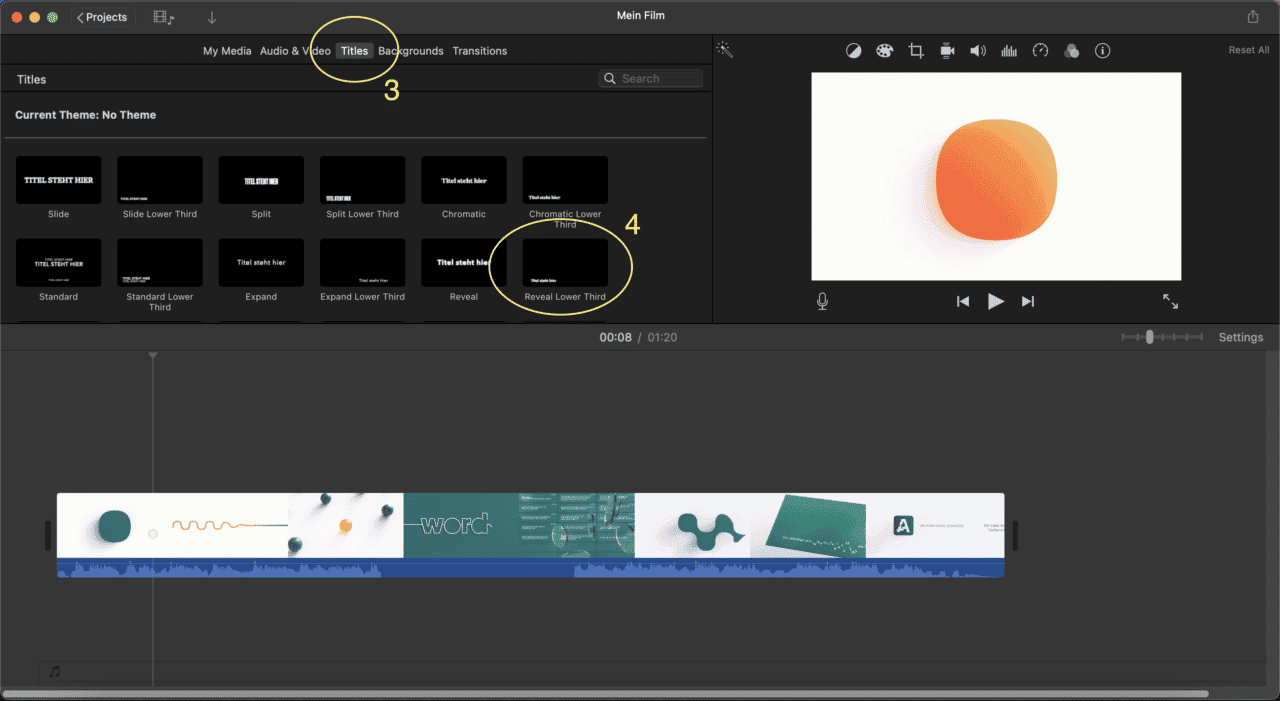
Step 4: Formatting the subtitles
After adding subtitles to your video in iMovie, you have the option to format them to enhance readability and visual appeal. Follow these steps to format your subtitles:
- Select the subtitle clip in the iMovie timeline.
- In the subtitles panel, you will find various formatting options.
- Use the font options to select a font type and size for your subtitles. Choose a font that is clear and easy to read.
- Experiment with different colors to make your subtitles stand out. Ensure that the color you choose provides sufficient contrast with the video for easy readability.
- Adjust the position of the subtitles using the alignment options. You can position the subtitles at the top, bottom, or center of the screen based on your preference.
- Additionally, you can add background and outline effects to your subtitles to make them more prominent.
Formatting your subtitles is crucial to ensure that they are easily understandable and visually appealing. It’s important to strike a balance between legibility and aesthetic appeal. Ensuring proper contrast, font size, and placement will help make your subtitles accessible to a wide range of viewers.
Remember to consider the overall design and style of your video when formatting the subtitles. Keeping the visual consistency throughout your video will create a professional and polished look.
Now that you have formatted your subtitles, you can move on to the next step to learn how to adjust the timing of the subtitles to match the video.
Step 5: Adjusting the timing of the subtitles
Once you have added subtitles to your video in iMovie, it’s important to ensure that the timing of the subtitles matches the corresponding parts of the video. Follow these steps to adjust the timing of your subtitles:
- Select the subtitle clip in the iMovie timeline.
- Drag the subtitle clip left or right in the timeline to adjust its starting point. This will determine when the subtitle appears in the video.
- To change the duration of the subtitle, drag its edges in the timeline. This allows you to control how long the subtitle remains visible on the screen.
- Use the playhead in the timeline to preview how the subtitles align with the video. Make adjustments as necessary to ensure accuracy.
- If you need to make fine-tuned adjustments to the timing, you can use the precision editor. Right-click on the subtitle clip and select “Show Precision Editor” to access this feature. Here, you can fine-tune the in and out points of the subtitle for precise synchronization.
By carefully adjusting the timing of your subtitles, you can ensure that they appear at the right moments and remain visible for an appropriate duration. This enhances the overall viewing experience and helps viewers follow along with the video content.
Continue previewing and making adjustments to the timing of your subtitles until you are satisfied with their placement and duration. Once you have fine-tuned the timing, you can proceed to the next step to customize the appearance of your subtitles.
Step 6: Customizing the appearance of the subtitles
Now that you have added and adjusted the timing of your subtitles in iMovie, you can further enhance their appearance to match the style and theme of your video. Follow these steps to customize the appearance of your subtitles:
- Select the desired subtitle clip in the iMovie timeline.
- In the subtitles panel, you will find various customization options.
- Experiment with different font styles, sizes, and colors to find the best fit for your video. Choose fonts that are clear, legible, and align with your video’s overall aesthetic.
- Adjust the opacity of the subtitles if you want them to be more transparent. This can be useful if you don’t want the subtitles to distract from the video content.
- To enhance readability, consider adding a background color or outline to your subtitles. This can make them stand out against the video background and improve visibility.
- Furthermore, you can apply transitions to your subtitles to add subtle animation or fading effects.
Customizing the appearance of your subtitles allows you to align them with your video’s visual style and create a cohesive viewing experience for your audience. It’s important to strike a balance between readability and visual appeal so that your subtitles are easily understandable without overpowering the video content.
Take the time to explore different customization options in iMovie and experiment with various combinations until you achieve the desired look for your subtitles. Once you are satisfied with the appearance, you can move on to the final step of exporting the video with subtitles.
Step 7: Exporting the video with subtitles
After adding, formatting, and customizing your subtitles in iMovie, the final step is to export your video with the subtitles included. Follow these steps to export your video:
- Click on the “File” tab in the top menu of iMovie.
- Select “Share” from the dropdown menu and then choose “File” as the export option.
- In the export settings window, you can customize the video format, resolution, and quality according to your requirements.
- Make sure that the “Include subtitles” option is selected before proceeding.
- Choose the destination folder where you want to save the exported video and subtitles.
- Click on the “Next” button and wait for iMovie to export the video with the subtitles.
- Once the export process is complete, you will have a standalone video file that includes the subtitles.
After exporting the video with subtitles, you can share it on various platforms such as social media, video hosting websites, or even burn it onto a DVD for distribution. The subtitles will be embedded in the video, ensuring that viewers can enable or disable them based on their preference.
Before finalizing the export, take the time to preview the video with subtitles to ensure that everything appears as intended. Check for any potential issues or inconsistencies and make adjustments if necessary.
Congratulations! You have successfully added subtitles to your video in iMovie and exported it with the subtitles included. Your video is now ready to be shared and enjoyed by a wider audience.
It’s important to note that iMovie offers additional options for sharing videos directly to platforms like YouTube, Vimeo, and more. You can explore these options in the “Share” dropdown menu for a more streamlined sharing process.
With the ability to add subtitles to your videos using iMovie, you can now create more accessible and engaging content that reaches a larger audience. Subtitles improve the viewing experience, especially for those who are hearing impaired or non-native speakers. Take advantage of this feature to make your videos more inclusive and impactful.
Conclusion
Adding subtitles to your videos using iMovie is a simple and effective way to enhance accessibility and engage your audience. With the step-by-step process outlined in this guide, you can easily import your video, create a subtitle track, and add, format, and customize subtitles to your liking.
Subtitles not only make your videos accessible to a wider audience, including those with hearing impairments or non-native language speakers, but they also improve the overall viewing experience. By providing subtitles, you ensure that viewers can follow along with your content, even in situations where the audio might be difficult to hear or understand.
iMovie offers a range of features and tools to make the subtitle process seamless, allowing you to adjust the timing, format the appearance, and export the video with embedded subtitles. Whether you are a beginner or an experienced video editor, iMovie provides a user-friendly interface that simplifies the process of adding professional-looking subtitles to your videos.
Remember to experiment with different formatting and customization options to ensure that your subtitles blend cohesively with the overall video aesthetic. Striking the right balance between readability and visual appeal is key to delivering a polished and engaging viewing experience.
By utilizing subtitles in your videos, you not only improve accessibility and widen your audience but also enhance search engine optimization. Subtitling your content can make it more discoverable in search engine results, reaching a broader audience and increasing the chances of your video being watched and shared.
Now that you have the knowledge and the tools to add subtitles to your videos using iMovie, go ahead and start enhancing your video content. Open up iMovie, import your video, and follow the step-by-step process outlined in this guide. With subtitles incorporated into your videos, you can communicate your message effectively, connect with your audience on a deeper level, and make a lasting impact.