Introduction
Are you tired of making grammatical errors while writing in Safari on your Mac? Do you want to enhance your writing skills and make your content more polished and professional? Look no further – Grammarly for Safari is here to help!
Grammarly is an incredible tool that provides real-time grammar and spelling suggestions, as well as highlighting punctuation, clarity, engagement, and delivery issues. It’s like having a personal writing assistant right in your browser!
In this guide, we will walk you through the simple steps to add Grammarly to Safari on your Mac. Whether you use Safari for work, school, or personal writing, by following these steps, you can elevate your writing to the next level and ensure that your content is error-free and impactful.
No more embarrassing grammar mistakes or typos – Grammarly for Safari can help you catch them all before your content is published or shared. Let’s dive into the steps to get Grammarly up and running in Safari on your Mac!
Step 1: Download and Install Grammarly for Safari
The first step in adding Grammarly to Safari on your Mac is to download and install the Grammarly extension from the Mac App Store. Here’s how you can do it:
- Open the Mac App Store on your Mac and search for “Grammarly” in the search bar.
- Select the Grammarly app from the search results and click on the “Get” or “Download” button to initiate the installation.
- Wait for the app to download and install on your Mac. Once it’s completed, you’ll find the Grammarly app in your Applications folder.
That’s it! You’ve successfully downloaded and installed Grammarly for Safari on your Mac. Now, let’s move on to the next step and enable Grammarly in Safari preferences so that it can start assisting you in your writing endeavors.
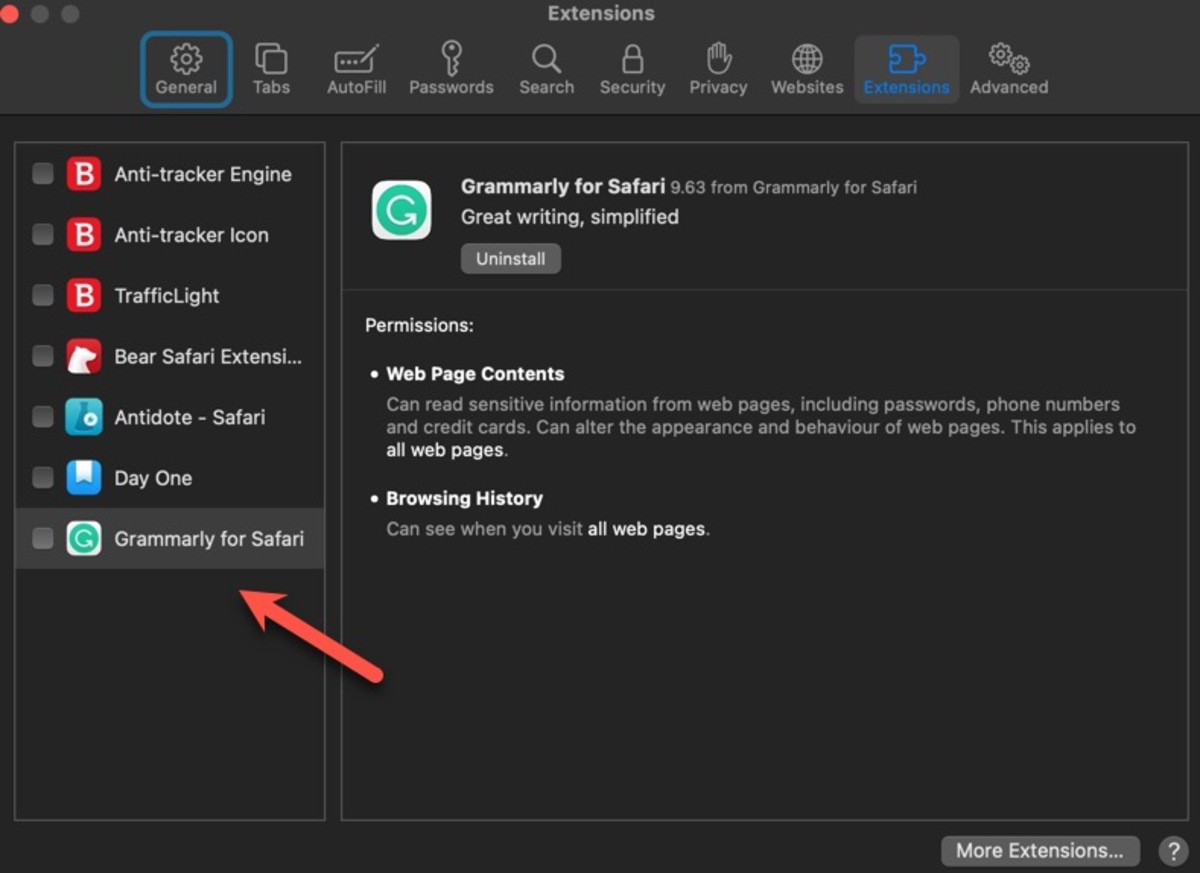
Step 2: Enable Grammarly in Safari Preferences
Once you have installed Grammarly on your Mac, the next step is to enable it in Safari preferences. Follow these simple steps to activate Grammarly in Safari:
- Open Safari on your Mac and click on the “Safari” menu in the top left corner of the screen.
- From the drop-down menu, select “Preferences” to open the Safari preferences window.
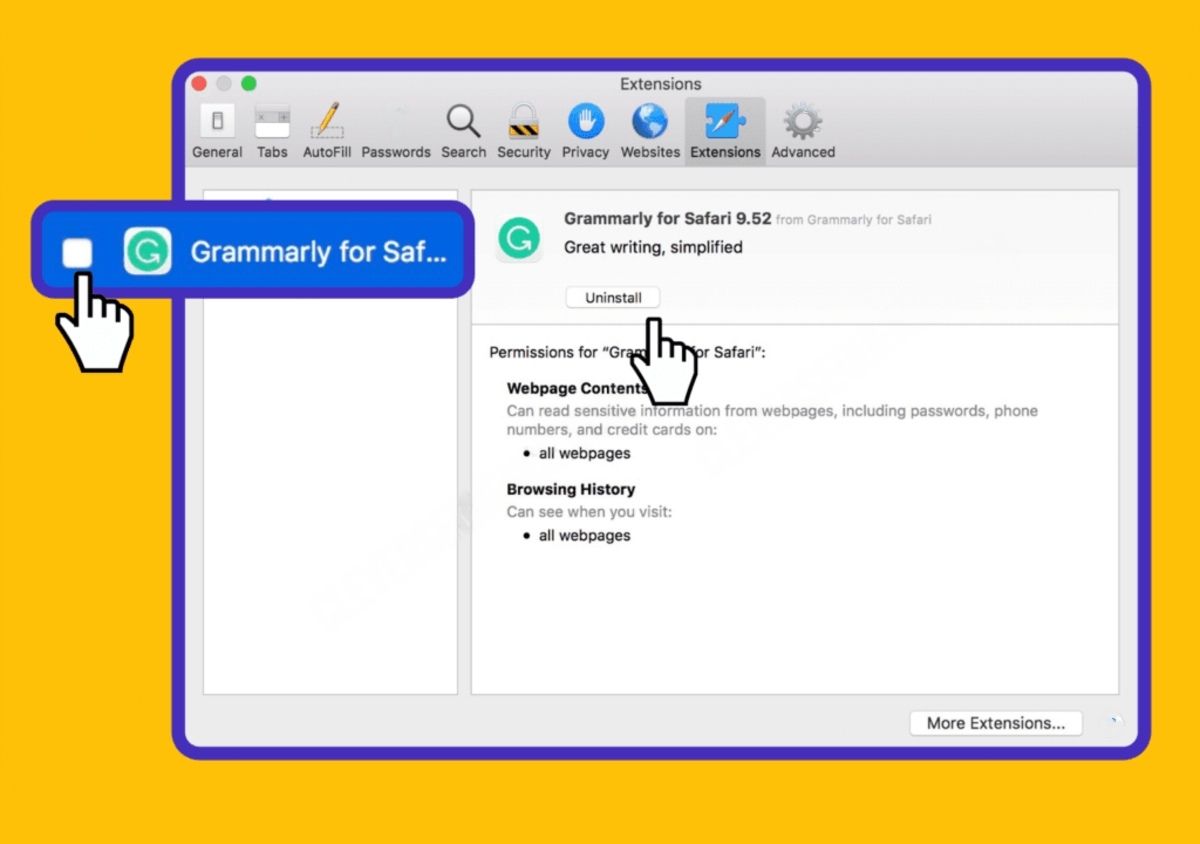
- In the preferences window, navigate to the “Extensions” tab.
- Look for the Grammarly extension in the list of installed extensions and ensure that the checkbox next to it is checked.
- Once the checkbox is selected, Grammarly will be enabled in Safari, and you can start using it to enhance your writing.
Enabling Grammarly in Safari preferences ensures that the extension is active and ready to assist you while typing in various online text fields, such as emails, social media posts, blog comments, and more. With Grammarly’s advanced grammar and spelling checks, you can feel confident that your writing is error-free, clear, and impactful.
Now that you have enabled Grammarly in Safari, let’s move on to the next step, which involves logging in and activating Grammarly on your Mac.
Step 3: Login and Activate Grammarly
After enabling Grammarly in Safari preferences, the next step is to log in to your Grammarly account and activate it on your Mac. Here’s how you can do it:
- Click on the Grammarly icon in your Safari toolbar. It should be located in the upper-right corner of the browser window.
- If you already have a Grammarly account, click on the “Log in” button and enter your login credentials (email and password).
- If you don’t have a Grammarly account, click on the “Sign up” button to create a new account. Follow the on-screen instructions to complete the registration process.
- Once you are logged in, Grammarly will be activated and ready to assist you with your writing in Safari.
By logging in and activating Grammarly, you can access advanced features such as writing style suggestions, vocabulary enhancements, and plagiarism detection. Whether you’re writing an important email, a research paper, or a blog post, Grammarly can help you refine your writing and make it more engaging and professional.
Now that you have successfully logged in and activated Grammarly, let’s move on to the next step to customize the Grammarly settings according to your preferences.
Step 4: Customize Grammarly Settings
Once you have logged in and activated Grammarly in Safari on your Mac, it’s time to customize the settings to align with your writing style and preferences. Here’s how you can do it:
- Click on the Grammarly icon in your Safari toolbar to open the Grammarly menu.
- From the menu, select “Go to Grammarly” to access the Grammarly dashboard.
- In the dashboard, click on the “Profile” tab to customize your writing goals and preferences.
- Here, you can choose your preferred writing genre, tone, and audience to receive personalized suggestions and recommendations.
- Additionally, you can enable or disable specific writing checks, such as grammar, punctuation, spelling, clarity, inconsistency, and more, based on your writing needs.
- Take some time to explore the settings and make adjustments according to your preferences.
Customizing Grammarly settings allows you to personalize the feedback and suggestions you receive while using the tool. By aligning Grammarly with your specific writing goals, you can optimize the writing experience and ensure that your content meets the highest standards of excellence.
With Grammarly’s customizable settings, you can take full control of your writing and tailor the tool to suit your unique style, audience, and writing projects. Now that you have customized the settings, let’s move on to the final step, where you will learn how to effectively use Grammarly to check your writing in Safari.
Step 5: Use Grammarly to Check Your Writing
Now that you have customized Grammarly’s settings to your liking, it’s time to start using it to check your writing in Safari. Here’s how you can effectively utilize Grammarly to enhance your writing:
- Open Safari and navigate to any webpage or text field where you want to write or edit your content.
- As you type, Grammarly will automatically analyze your text and provide real-time suggestions, underlining potential errors or improvements.
- Pay attention to the highlighted words or phrases. Grammarly will offer suggestions and explanations to help you improve grammar, spelling, punctuation, clarity, and more.
- Click on the underlined word or phrase to see Grammarly’s suggestions. You can choose to accept the suggestion, ignore it, or modify your text accordingly.
- Experiment with Grammarly’s additional features, such as the document outline, vocabulary suggestions, and readability score, to enhance your overall writing quality.
- Continue writing and revising your content, taking Grammarly’s suggestions into account to refine your writing further.
Grammarly not only helps you correct grammar and spelling errors, but it also elevates your writing by offering style, tone, and clarity enhancements. By utilizing Grammarly’s insights, your writing will become more polished, engaging, and persuasive.
Remember to review your writing in context and make conscious decisions based on Grammarly’s recommendations. Grammarly is a valuable tool, but it’s important to maintain your unique writing style and voice while utilizing its suggestions.
Congratulations! By following these five simple steps, you have successfully added Grammarly to Safari on your Mac and learned how to utilize it effectively to improve your writing. Enjoy the benefits of error-free writing, enhanced clarity, and overall writing excellence with Grammarly by your side.
Conclusion
Adding Grammarly to Safari on your Mac is a game-changer when it comes to improving your writing skills. With its real-time grammar and spelling suggestions, as well as advanced writing enhancements, Grammarly helps you create error-free and impactful content.
In this guide, we covered the simple steps to download and install Grammarly for Safari, enable it in Safari preferences, log in, and customize the settings according to your writing style. We also explored how to effectively use Grammarly to check your writing in Safari, taking advantage of its suggestions and insights.
By incorporating Grammarly into your writing routine, you can elevate your content to a whole new level. Whether you’re a student, professional, or casual writer, Grammarly ensures that your writing is clear, concise, and professional, helping you make a lasting impression on your readers.
So, what are you waiting for? Take the plunge and add Grammarly to Safari on your Mac today. Enhance your writing, boost your confidence, and produce error-free content that leaves a lasting impact. Happy writing!