Introduction
Adding a domain to Google Workspace is essential for businesses and organizations looking to utilize professional email addresses, collaborative tools, and other features. Google Workspace, formerly known as G Suite, offers a comprehensive suite of cloud-based productivity and communication tools designed to streamline workflows and enhance productivity.
By adding your domain to Google Workspace, you can access a range of services such as Gmail, Google Drive, Google Calendar, Google Meet, and more. This not only allows you to create a professional email address using your domain name but also provides you with a centralized platform for efficient collaboration and communication within your team.
In this article, we will guide you through the step-by-step process of adding a domain to Google Workspace. Please note that you must be the administrator of your Google Workspace account to perform these actions. Additionally, you should have access to the domain settings of your website in order to complete the necessary verification steps.
Before we dive into the details, it’s important to note that adding a domain to Google Workspace requires technical knowledge, specifically in managing domain settings and DNS records. If you are not familiar with these concepts, it may be beneficial to consult with your IT department or a web professional to ensure a smooth transition.
Now, let’s get started with adding your domain to Google Workspace and unlock the full potential of this powerful suite of productivity tools.
Step 1: Log in to Google Workspace Admin Console
The first step towards adding your domain to Google Workspace is to log in to the Google Workspace Admin Console. This console is where you manage and configure all the settings for your Google Workspace account.
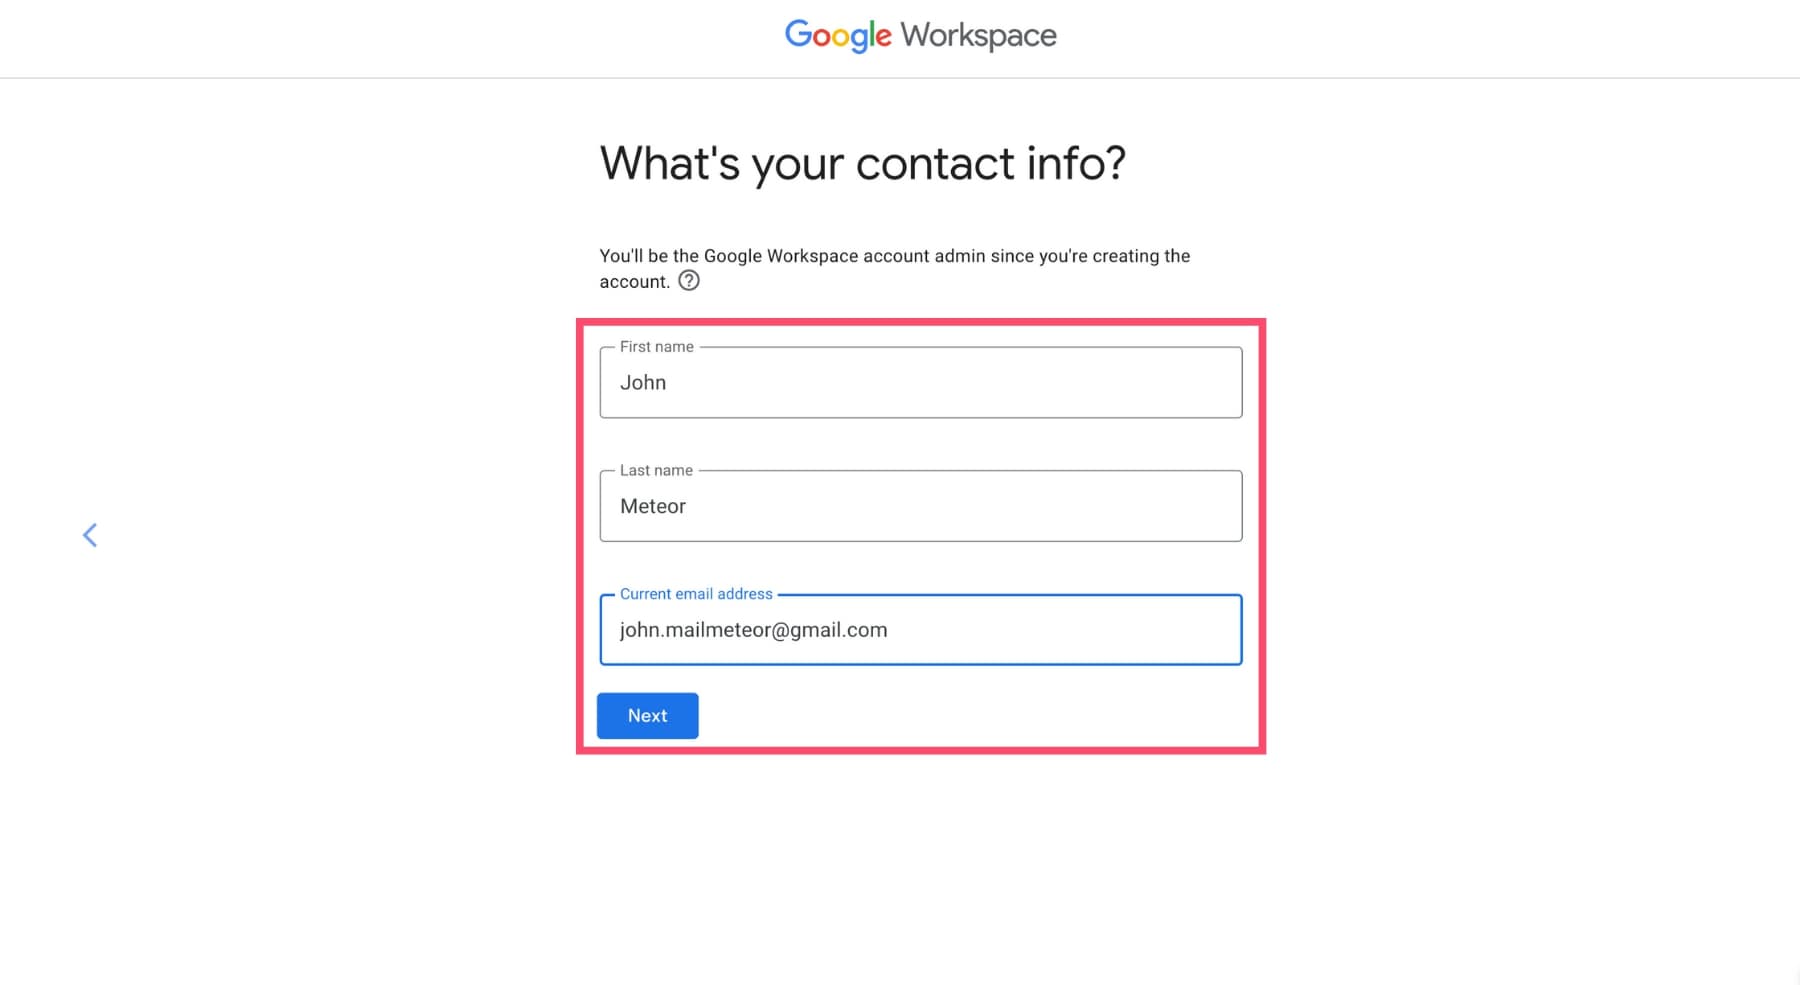
To access the Admin Console, open your preferred web browser and visit the Google Workspace admin login page. Enter the email address associated with your Google Workspace account, which should be the administrator email address, and then enter the corresponding password.
If you encounter any issues logging in, ensure that you are using the correct email address and password. If you have forgotten your password, you can initiate a password reset process by following the instructions on the login page.
Once you have successfully logged in, you will be greeted with the Google Workspace Admin Console, which provides you with access to various settings and administrative controls.
It’s worth noting that if you are managing multiple domains within your Google Workspace account, you will need to select the relevant domain from the console’s navigation menu before proceeding with the next steps.
The Admin Console is equipped with a user-friendly interface that allows you to navigate through different sections and settings easily. Take some time to familiarize yourself with the layout and organization of the console, as you will be using it to perform a range of administrative tasks throughout the setup process.
Now that you have logged in to the Google Workspace Admin Console, you are ready to move on to the next step: adding your domain.
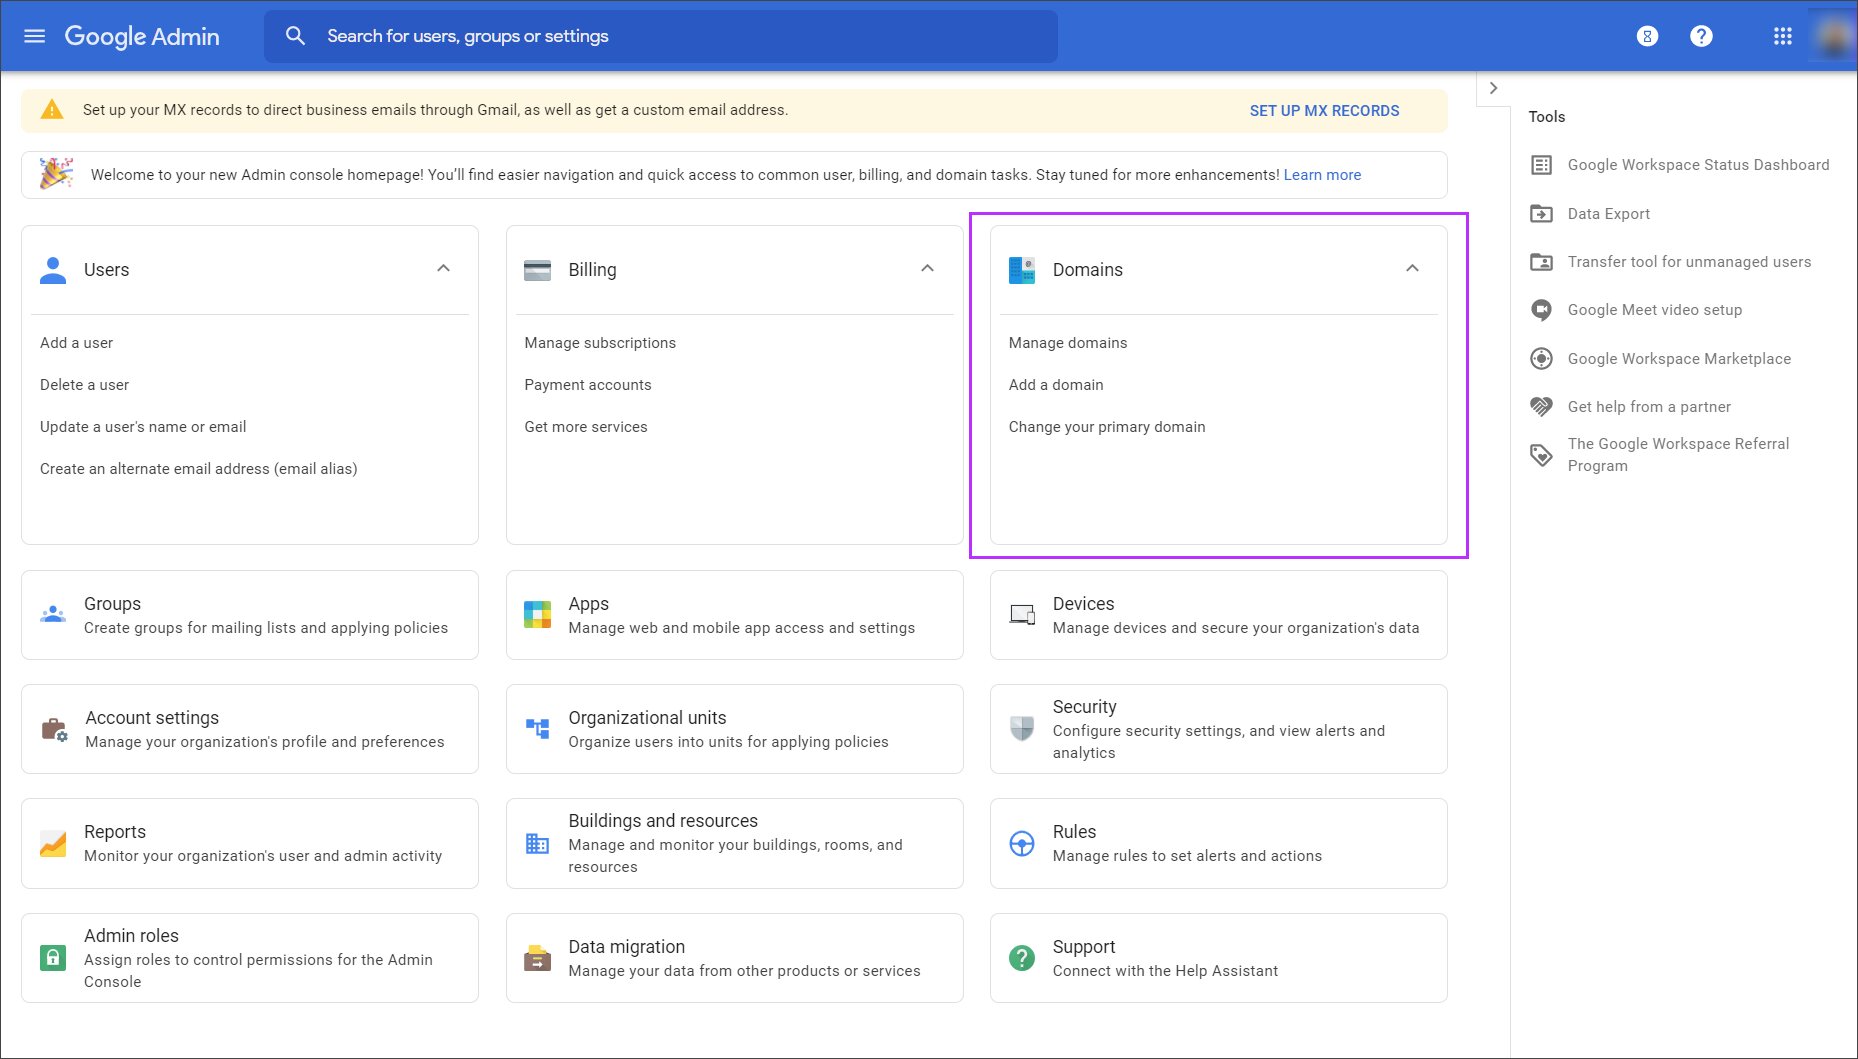
Step 2: Go to Domains
After logging in to the Google Workspace Admin Console, the next step is to navigate to the “Domains” section. This is where you can manage and add domains to your Google Workspace account.
To go to the “Domains” section, look for the menu on the left-hand side of the Admin Console. Scroll down until you find the “Domains” tab, and click on it.
Upon clicking on the “Domains” tab, you will be redirected to the “Domains” page, which displays a list of all the domains associated with your Google Workspace account.
If you haven’t added any domains to your account yet, the list will be empty. However, if you have already added domains, you will see them listed here along with relevant information such as the domain name, verification status, and other important details.
In the “Domains” section, you have the ability to manage various aspects of your domain, including adding new domains, verifying ownership, configuring DNS settings, and more. This makes it a crucial step in the process of adding a domain to Google Workspace.
Once you have reached the “Domains” page, you are now ready to proceed with adding your domain and moving forward with the setup process.
Now that you have successfully reached the “Domains” section in the Google Workspace Admin Console, it’s time to move on to the next step: adding your domain.
Step 3: Add Domain
Now that you are in the “Domains” section of the Google Workspace Admin Console, it’s time to add your domain to your account.
To add a new domain, locate the “+ Add Domain” button on the “Domains” page and click on it.
A pop-up window will appear, prompting you to enter the domain name that you want to add. Make sure to enter the domain name correctly, as this will be the primary domain associated with your Google Workspace account.
After entering the domain name, click on the “Continue” button to proceed.
Next, you will be asked to select how you want to verify your domain ownership. Google Workspace offers multiple verification methods, including domain host verification, HTML file upload, HTML tag verification, and DNS record verification.
Choose the verification method that is most convenient and suitable for you. If you have access to your domain’s DNS records, DNS record verification is often the recommended method as it provides a more seamless and automated verification process.
Once you have chosen the verification method, click on the “Verify” button to proceed with verifying your domain ownership.
At this point, Google Workspace will provide you with the necessary instructions or verification records specific to the chosen verification method. Follow these instructions carefully to complete the domain verification process.
Note that the domain verification process may take some time, depending on the method chosen and the DNS propagation time. Be patient and ensure that you have completed all the necessary steps to verify your domain ownership.
Congratulations! You have successfully added your domain to your Google Workspace account. The domain will now appear in the list of domains on the “Domains” page in the Admin Console.
Now, it’s time to move on to the next step: setting up the domain verification.
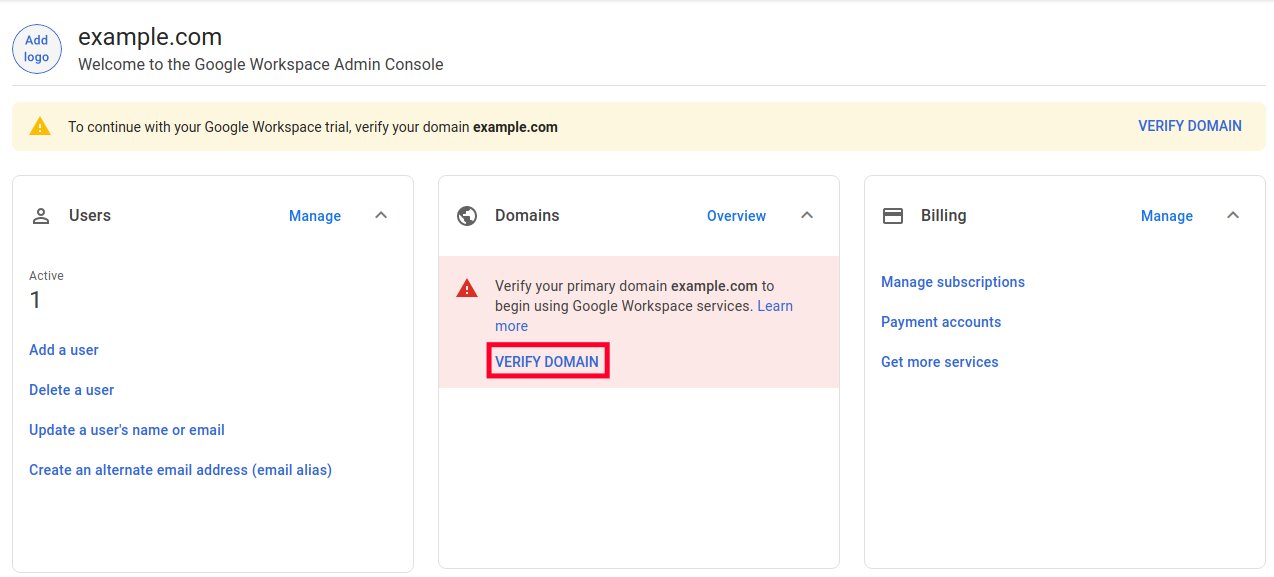
Step 4: Verify Domain Ownership
After adding your domain to Google Workspace, the next crucial step is to verify your domain ownership. Verification is required to ensure that you have the necessary authority to manage and utilize the domain within your Google Workspace account.
To verify your domain ownership, you will need to follow the specific instructions provided by Google Workspace based on your chosen verification method.
If you opted for DNS record verification during the domain adding process, you will be provided with a unique TXT record or CNAME record that you need to add to your domain’s DNS settings. This record acts as a verification token and confirms your domain ownership.
Access your domain’s DNS records through your domain registrar or DNS hosting provider. Look for the DNS management section or a similar option that allows you to edit your DNS records.
Add the provided TXT record or CNAME record to your domain’s DNS settings. Depending on your domain registrar or DNS hosting provider, the process for adding DNS records may vary. Make sure to follow their instructions and guidelines precisely.
Once you have added the TXT record or CNAME record, it may take some time for the changes to propagate across the internet. This process, known as DNS propagation, typically takes a few hours, but it can take up to 48 hours in some cases.
To check the status of your domain verification, you can return to the “Domains” section in the Google Workspace Admin Console. Look for your domain in the list and check the verification status column. If the status changes to “Verified” or “Complete,” then your domain ownership has been successfully verified.
If you encounter any issues during the verification process, double-check that you correctly added the DNS record and allow enough time for DNS propagation. If the issue persists, consult with your domain registrar’s support or refer to Google Workspace documentation for further assistance.
Once the domain ownership verification is complete, you are one step closer to fully utilizing the benefits of Google Workspace.
In the next step, we will guide you through setting up the domain verification to ensure a seamless integration between your domain and Google Workspace services.
Step 5: Set Up Domain Verification
Now that you have successfully verified your domain ownership, it’s time to set up the domain verification in Google Workspace. This step ensures a seamless integration between your domain and the various services offered by Google Workspace.
To set up the domain verification, follow these steps:
- Go to the “Domains” section in the Google Workspace Admin Console, where you added your domain.
- Locate your domain in the list and click on it to access the domain settings.
- In the domain settings page, navigate to the “Domain verification” section.
- Click on the “Set up” or “Verify” button, depending on the available options.
- Google Workspace will provide you with the necessary instructions and verification methods to complete the setup.
- Follow the instructions carefully and choose the verification method that is most convenient for you. This may include uploading an HTML file, adding an HTML tag to your website, or other methods available.
- Proceed with the selected verification method and make sure to complete all the required steps.
- Once you have completed the domain verification setup, click on the “Verify” or “Finish” button to initiate the verification process.
During the domain verification setup, Google Workspace will check if the verification token is present or the chosen method is implemented correctly. This process typically happens instantaneously or within a few minutes.
After the domain verification setup is complete, Google Workspace will confirm the status of your domain verification. If the verification is successful, you will see a “Verified” status next to your domain in the Admin Console’s “Domains” section.
It’s important to note that domain verification is crucial for accessing and utilizing Google Workspace services seamlessly. Verifying your domain ownership not only establishes a secure connection between your domain and Google Workspace but also provides access to additional features and capabilities.
Now that you have set up the domain verification, you can move on to the next step: updating your DNS records to configure your domain for use with Google Workspace services.
Step 6: Update DNS Records
After successfully verifying your domain ownership and setting up domain verification in Google Workspace, the next step is to update your DNS records. DNS records are essential for directing traffic and configuring your domain to work seamlessly with Google Workspace services.
To update your DNS records, follow these steps:
- Access the DNS management section of your domain registrar or DNS hosting provider.
- Locate the DNS settings or DNS zone section, where you can manage your domain’s DNS records.
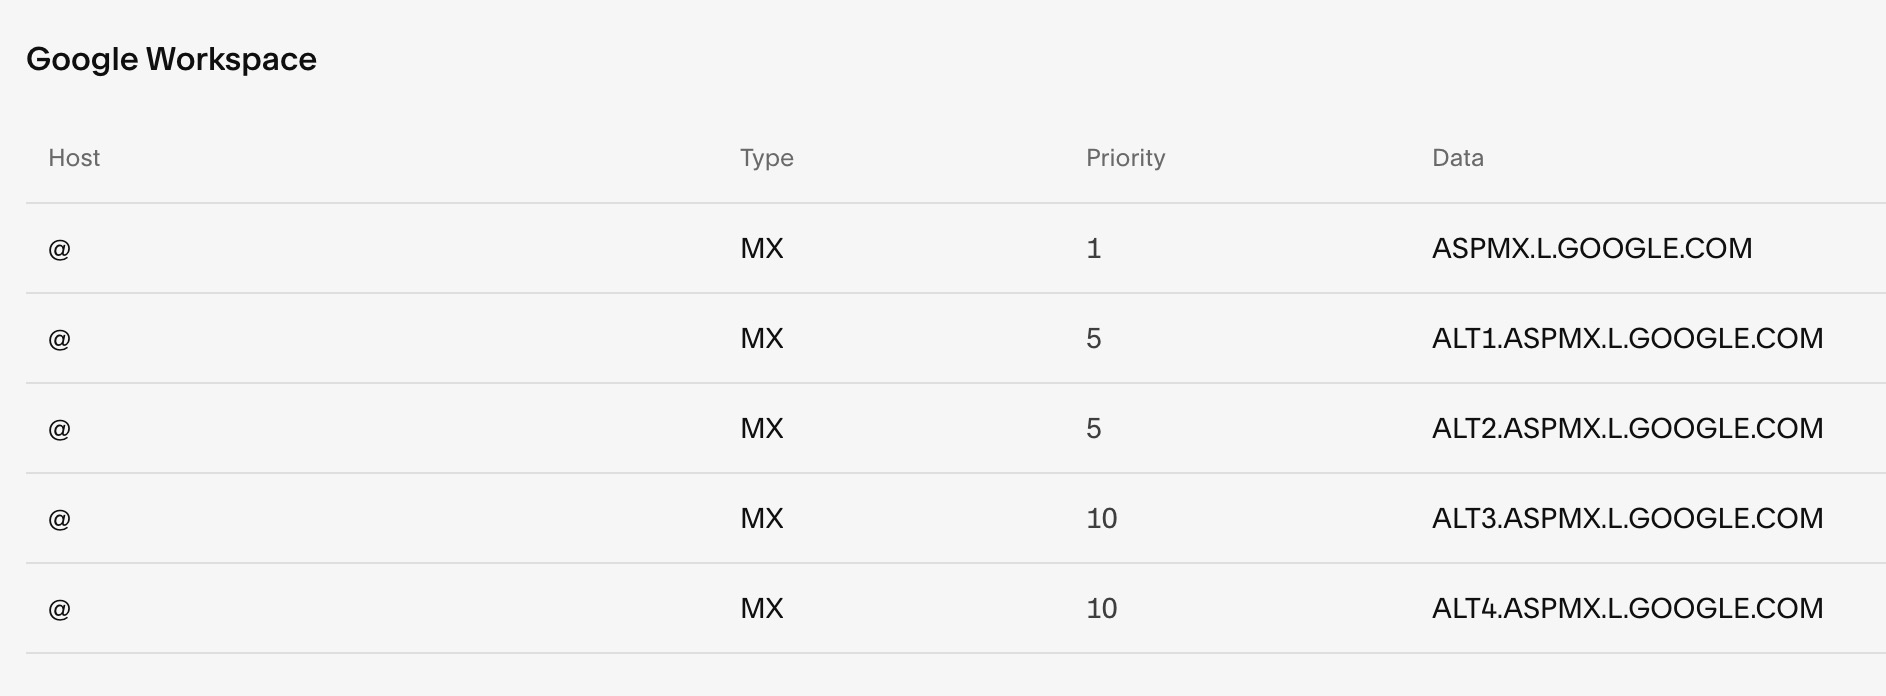
- Look for the specific DNS records that need to be updated, as provided by Google Workspace. This typically includes records for email delivery, calendar settings, and other services.
- Update the existing DNS records or add new records based on the instructions provided by Google Workspace.
- Ensure the DNS records are accurately entered, including the correct values, names, and types.
- Save the changes to update the DNS records for your domain.
It’s important to note that DNS record management may vary depending on your domain registrar or DNS hosting provider. If you are unsure about making these changes, it’s recommended to seek guidance from your IT department or a web professional to ensure the accuracy and functionality of your DNS records.
After updating the DNS records, it may take some time for the changes to propagate across the internet. This process, known as DNS propagation, typically takes a few hours but can take up to 48 hours in some cases.
During this time, it’s advisable to avoid making further changes to your DNS records, as it can disrupt the propagation process and lead to inconsistencies in the accessibility of your domain.
Once the DNS propagation is complete, Google Workspace will be able to recognize and utilize your domain’s DNS settings for various services, including email delivery, calendar integration, and more.
Congratulations! You have successfully updated your DNS records to configure your domain for use with Google Workspace services.
Now, let’s move on to the next step: completing the domain verification process.
Step 7: Complete Verification
After updating your DNS records, the next step is to complete the domain verification process in Google Workspace. This final step ensures that all the changes and configurations you made are recognized and fully integrated into your Google Workspace account.
To complete the domain verification, follow these steps:
- Go back to the “Domains” section in the Google Workspace Admin Console.
- Locate your domain in the list and check the verification status. It should be listed as “Pending,” indicating that the verification process is not yet completed.
- Click on your domain to access the domain settings.
- In the domain settings, look for the “Verify” or “Complete verification” button. Click on it to initiate the verification process.
- Google Workspace will perform a final check to confirm that your domain’s DNS records are properly configured and that the necessary changes are propagated.
- Wait for the verification process to complete. This typically happens within a few minutes or hours.
- Refresh the page periodically to check the verification status. Once the verification is successfully completed, the status will change to “Verified” or “Complete.”
If the verification process encounters any issues or errors, double-check your DNS records and ensure they are accurately configured. Make sure that enough time has passed for the DNS changes to propagate across the internet.
If you encounter persistent issues during the verification process, it’s recommended to consult with your domain registrar’s support or refer to the Google Workspace documentation for further assistance.
Once the verification status of your domain changes to “Verified” or “Complete,” congratulations! You have successfully completed the domain verification process.
Your domain is now fully integrated with Google Workspace services, and you can begin to explore and utilize the various features and tools available to enhance collaboration, productivity, and communication within your organization.
Now, let’s move on to the final step: configuring email and other services for your domain.
Step 8: Configure Email and Other Services
With your domain successfully verified and set up in Google Workspace, it’s time to configure email and other services to fully utilize the power of this productivity suite. Google Workspace offers a range of services, including Gmail, Google Drive, Google Calendar, Google Meet, and more.
To configure email and other services for your domain, follow these steps:
- Go to the Google Workspace Admin Console and navigate to the “Apps” section. This is where you can manage and configure various services.
- Locate the Gmail app and click on it to access the Gmail settings.
- In the Gmail settings, you can customize the email experience for your organization. Set up email aliases, create mailing lists, and configure email routing and filtering options according to your requirements.
- Next, explore other apps such as Google Drive, Google Calendar, and Google Meet. Configure settings and permissions to ensure smooth collaboration and communication within your organization.
- Take advantage of the additional services offered by Google Workspace, such as Google Docs, Google Sheets, Google Slides, and more. These tools are designed to enhance productivity and facilitate seamless collaboration.
- Consider integrating other third-party applications and services into your Google Workspace account to further expand your productivity capabilities. Explore the Google Workspace Marketplace for available integrations.
Each service within Google Workspace provides a wealth of features and customization options. Take your time to familiarize yourself with the settings and functionalities of each service to fully optimize your organization’s workflows.
Furthermore, it’s important to educate your team members on best practices and efficient usage of the Google Workspace services. Provide training and resources to ensure a smooth transition and maximize the benefits of collaboration and productivity tools.
Congratulations! You have successfully configured email and other services for your domain in Google Workspace. Your organization is now equipped with the necessary tools and features to enhance productivity and streamline communication.
Remember to regularly review and update your settings as your organization’s needs evolve. Google Workspace offers a flexible and customizable environment to adapt and grow with your business.
Now that you have completed all the necessary steps, you are ready to fully leverage the power of Google Workspace and enjoy its numerous benefits for your organization.
Conclusion
Adding your domain to Google Workspace opens up a world of possibilities for your business or organization. By following the step-by-step process outlined in this guide, you can successfully configure your domain and leverage the powerful suite of productivity and collaboration tools offered by Google Workspace.
Throughout this journey, you have learned how to log in to the Google Workspace Admin Console, navigate to the Domains section, add your domain, verify domain ownership, set up domain verification, update DNS records, complete the verification process, and configure email and other services.
Remember that the process of adding a domain to Google Workspace requires technical knowledge and familiarity with managing DNS settings. If you encounter any difficulties or uncertainties, it is recommended to seek guidance from your IT department or consult with a web professional.
Once your domain is successfully added and configured in Google Workspace, you gain access to a wide array of tools and services that can streamline communication, enhance collaboration, and boost productivity within your organization.
Make sure to regularly review and update your settings to ensure they align with your evolving needs and take advantage of any new features or updates released by Google Workspace.
Now that you have completed all the necessary steps, you are ready to unleash the full potential of Google Workspace and witness improved efficiency and collaboration within your organization.
Embrace the power of Google Workspace, embrace the possibilities it offers, and watch your business or organization thrive in the digital landscape.