Introduction
Welcome to a comprehensive guide on how to set up DMARC in Google Workspace. In today’s digital landscape, email security is of paramount importance. Organizations around the world are constantly facing the threat of email phishing, spoofing, and other malicious activities that can compromise their data and reputation. DMARC (Domain-based Message Authentication, Reporting, and Conformance) is an industry-standard email authentication protocol that helps protect against these threats.
DMARC provides a way for email senders to verify their identity and specify how email servers should handle messages that fail authentication. It works by aligning SPF (Sender Policy Framework) and DKIM (DomainKeys Identified Mail) authentication mechanisms and providing reporting and conformance capabilities. By implementing DMARC, you can significantly reduce the risk of impersonation attacks and ensure the delivery of legitimate emails to your recipients.
In this guide, we will walk you through the process of setting up DMARC in Google Workspace, formerly known as G Suite. Google Workspace is a cloud-based productivity suite that includes email hosting, collaborative tools, and various other services for businesses of all sizes. By leveraging the built-in DMARC capabilities within Google Workspace, you can enhance the security and credibility of your organization’s email communications.
Before we dive into the steps of setting up DMARC in Google Workspace, let’s first understand why DMARC is so important in today’s email landscape.
What is DMARC?
DMARC, which stands for Domain-based Message Authentication, Reporting, and Conformance, is an email authentication protocol that helps prevent email spoofing and phishing attacks. It is a powerful tool in the fight against fraudulent and malicious emails.
DMARC works by allowing domain owners to specify how email receivers should handle messages that claim to be from their domain. It aligns two existing email authentication mechanisms: SPF (Sender Policy Framework) and DKIM (DomainKeys Identified Mail), providing a comprehensive framework for email authentication.
SPF allows domain owners to define which IP addresses and mail servers are authorized to send emails on behalf of their domain. When an email is received, the recipient’s server checks the SPF record associated with the sender’s domain to ensure that the email originated from an authorized source. If the SPF check fails, the email may be marked as suspicious or rejected.
DKIM adds an additional layer of security by digitally signing outgoing emails using cryptographic keys. The recipient’s server can then verify the signature by using the public key published in the sender’s DNS records. If the signature is valid, it ensures the authenticity and integrity of the email.
While SPF and DKIM are effective on their own, they have limitations. SPF only validates the “envelope sender” (the return path), while DKIM only verifies the contents of the email. This means that if an email passes SPF but fails DKIM, or vice versa, it may still be considered legitimate by the recipient’s server.
This is where DMARC comes into play. It combines SPF and DKIM by allowing domain owners to define a policy for how receivers should handle emails that don’t pass authentication. With DMARC, domain owners can specify whether the email should be quarantined, rejected outright, or delivered with a warning.
Additionally, DMARC provides important reporting capabilities. It allows domain owners to receive detailed reports from email receivers, providing insight into how their domain is being used and whether any unauthorized activity is taking place. These reports can help identify and mitigate potential email-related security issues.
Overall, DMARC plays a crucial role in email authentication and can greatly enhance the security and trustworthiness of your organization’s email communications. By implementing DMARC, you can effectively combat email spoofing, protect your brand reputation, and ensure that your legitimate emails reach the intended recipients.
Why is DMARC important?
DMARC is an essential tool for organizations to enhance email security and protect their brand reputation. Here are several key reasons why DMARC is important:
- Prevents email spoofing and phishing attacks: Email spoofing is a technique used by cybercriminals to deceive recipients into believing that an email is from a legitimate source. These spoofed emails can be used to distribute malware, steal sensitive information, or trick recipients into disclosing personal data. DMARC helps prevent email spoofing by allowing domain owners to specify how emails that fail authentication should be handled. By implementing DMARC, organizations can significantly reduce the risk of their domain being used for fraudulent activities.
- Enhances email deliverability: When your domain has a strong DMARC policy in place, it signals to email receivers that your emails are authentic and trustworthy. This can help improve your email deliverability rates, ensuring that your legitimate emails reach the intended recipients’ inboxes rather than being marked as spam or rejected altogether. By increasing deliverability, DMARC allows organizations to effectively communicate with their stakeholders and customers.
- Safeguards brand reputation: A successful email spoofing or phishing attack can not only compromise data and harm recipients but also damage your organization’s brand reputation. DMARC helps protect your brand by ensuring that only legitimate emails from your domain are delivered to recipients. By taking control of your email authentication process, you can prevent unauthorized entities from tarnishing your brand’s image through fraudulent email activities.
- Provides valuable reporting capabilities: DMARC enables domain owners to receive detailed reports from participating email receivers on how their domain is being utilized. These reports include valuable information such as the volume of emails sent on your domain’s behalf, the sources of these emails, and any authentication failures. By analyzing these reports, organizations can identify any unauthorized activity, potential security vulnerabilities, or misconfiguration issues and take corrective measures.
- Strengthens overall email security: Implementing DMARC is part of a layered approach to email security. By combining SPF, DKIM, and DMARC, organizations can significantly reduce the risk of email-based attacks. Each layer contributes to the overall security framework, providing additional layers of verification and protection against different types of email threats. DMARC strengthens the security posture of your organization’s email infrastructure, making it harder for cybercriminals to exploit vulnerabilities and compromise sensitive information.
Overall, DMARC is a crucial component of any organization’s email security strategy. It helps prevent email spoofing, enhances deliverability, safeguards brand reputation, provides valuable reporting, and strengthens overall email security. By implementing DMARC, organizations can protect their stakeholders, preserve brand integrity, and ensure secure and trustworthy email communications.
Prerequisites for Setting up DMARC in Google Workspace
Before you can begin setting up DMARC in Google Workspace, there are a few prerequisites that you need to ensure:
- Verified domain in Google Workspace: To set up DMARC, you need to have a verified domain in Google Workspace. This means that you have already completed the domain verification process and have administrative access to manage your domain’s settings.
- Access to Google Workspace Admin Console: You will need access to the Google Workspace Admin Console to make the necessary configurations for DMARC. Make sure you have administrative credentials or have been granted appropriate access by the domain administrator.
- Understanding of DNS records: DMARC requires modifications to your domain’s DNS (Domain Name System) records. It’s important to have a basic understanding of DNS and be able to make changes to your domain’s DNS records. If you are not familiar with DNS management, consult with your IT department or domain registrar for assistance.
- Existing SPF and DKIM setup: Before setting up DMARC, ensure that you have already set up SPF (Sender Policy Framework) and DKIM (DomainKeys Identified Mail) for your domain. DMARC works by aligning these existing authentication mechanisms, so they need to be properly configured and in place.
- Knowledge of DMARC policies: Familiarize yourself with the different DMARC policies and their implications. Understand the differences between “none,” “quarantine,” and “reject” policies, as they determine how email receivers handle messages that fail DMARC authentication. Choose the appropriate policy based on your organization’s security requirements and risk tolerance.
Having these prerequisites in place will ensure a smooth setup process for DMARC in Google Workspace. It’s important to have administrative access to Google Workspace, a verified domain, understanding of DNS records, existing SPF and DKIM setup, and knowledge of DMARC policies.
Now that you’re aware of the prerequisites, let’s move on to the steps required to set up DMARC in Google Workspace.
Step 1: Accessing Google Workspace Admin Console
The first step in setting up DMARC in Google Workspace is accessing the Google Workspace Admin Console. The Admin Console is where you can manage various settings and configurations for your Google Workspace account, including email authentication settings.
Here’s how you can access the Google Workspace Admin Console:
- Open your preferred web browser and go to the Google Workspace Admin Console login page.
- Enter your Google Workspace email address and password associated with your domain.
- Click on the “Sign in” button to log in to your Google Workspace Admin Console.
Once you have successfully logged in, you will have access to the Admin Console’s dashboard, where you can manage different aspects of your Google Workspace account.
It’s important to note that accessing the Google Workspace Admin Console requires administrative credentials or appropriate access granted by the domain administrator. If you do not have access, reach out to the designated administrator for your organization to obtain the necessary permissions.
By accessing the Google Workspace Admin Console, you are now ready to proceed with the next steps for setting up DMARC and strengthening the email authentication of your domain.
Step 2: Enabling DMARC
Once you have accessed the Google Workspace Admin Console, the next step is to enable DMARC for your domain. Enabling DMARC allows you to establish policies and rules for how email servers should handle messages that fail DMARC authentication.
Here’s how you can enable DMARC in Google Workspace:
- From the Google Workspace Admin Console dashboard, navigate to the “Apps” section.
- Click on “Google Workspace” to access the settings for your domain.
- In the Google Workspace settings, click on “Gmail” to manage Gmail-related configurations.
- Scroll down to the “Advanced settings” section and click on “Advanced settings” to access the advanced email settings.
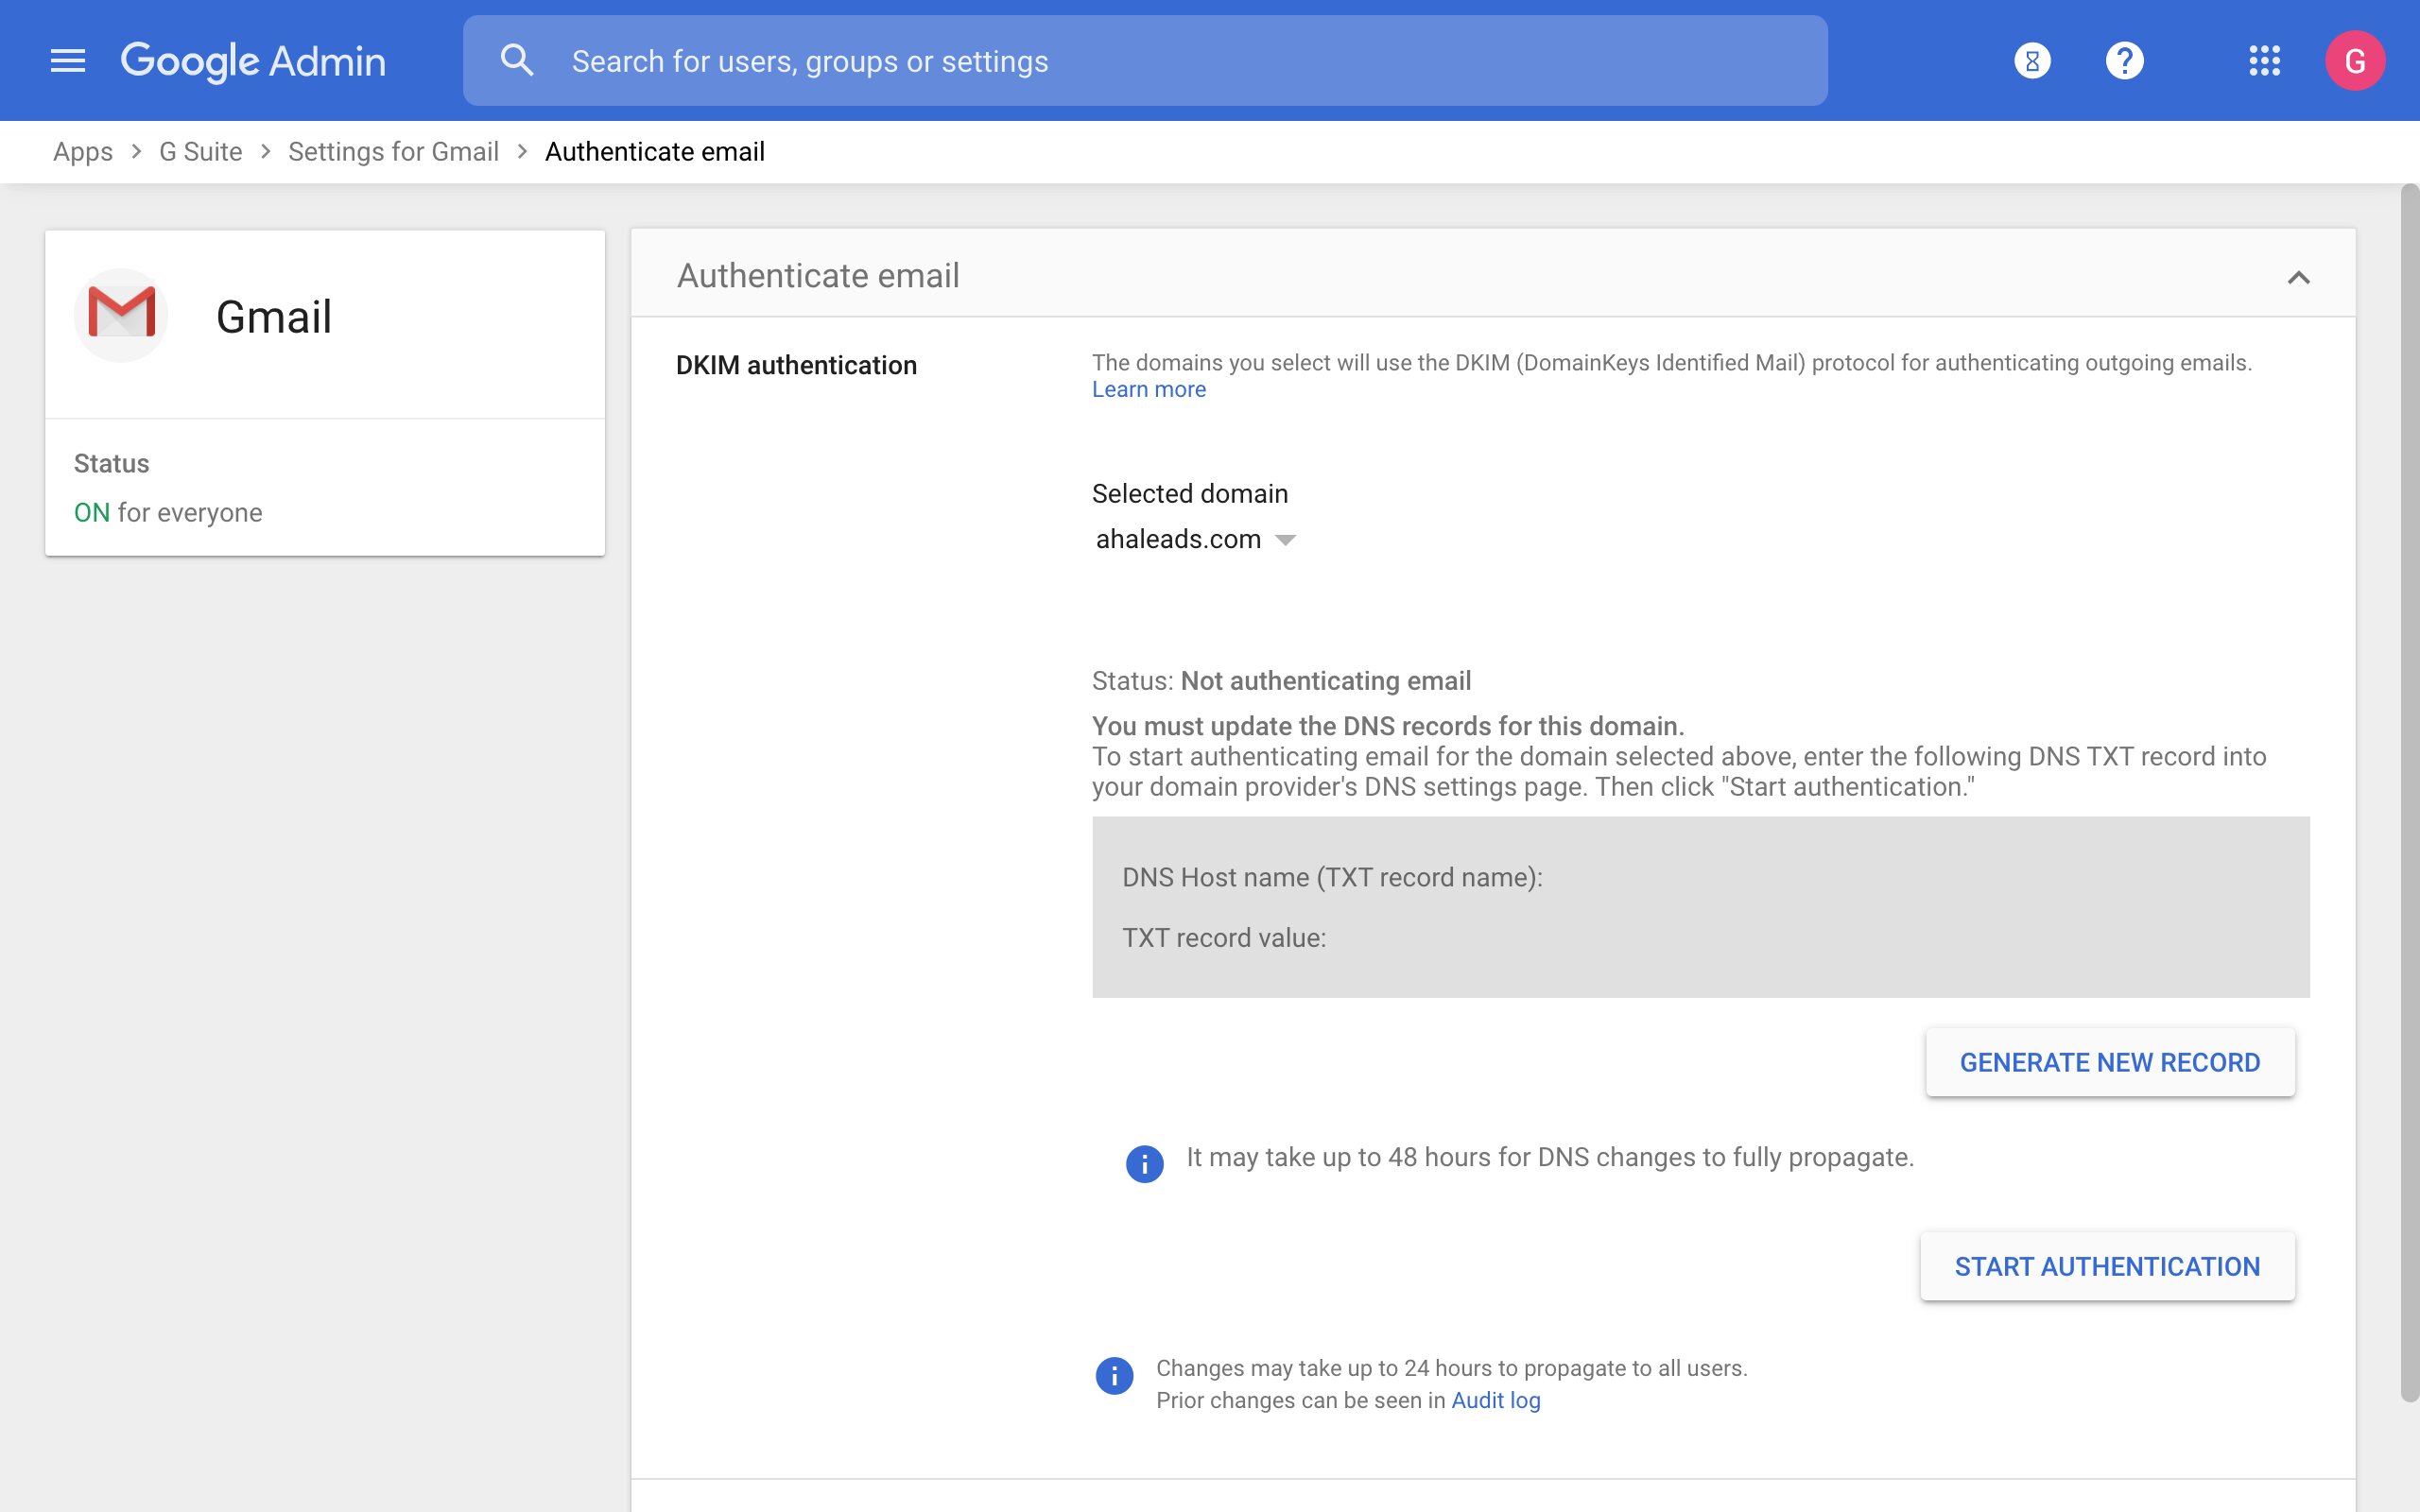
- In the “Advanced settings” page, click on the “Authenticate email” tab.
- Under the “DMARC” section, select the option to “Enable” DMARC for your domain.
Enabling DMARC is a crucial step in the setup process, as it allows you to establish the foundation for email authentication and specify how email servers should handle messages that fail DMARC authentication.
After enabling DMARC, you will be able to move on to the next step of configuring the specific DMARC policies for your domain. The policies you choose will determine the actions taken by email receivers when an email fails DMARC authentication. It is important to carefully consider and set the appropriate policies based on your organization’s security requirements and risk tolerance.
Now that DMARC is enabled for your domain, you are one step closer to strengthening your email authentication and protecting your organization against email spoofing and phishing attacks.
Step 3: Configuring DMARC Policies
After enabling DMARC for your domain in Google Workspace, the next step is to configure the DMARC policies. DMARC policies determine how email receivers should handle messages that fail DMARC authentication. These policies provide instructions for filtering or quarantining suspicious emails and help protect your domain from email spoofing and phishing attacks.
Here’s how you can configure DMARC policies in Google Workspace:
- From the Google Workspace Admin Console, navigate to the “Apps” section.
- Click on “Google Workspace” to access the settings for your domain.
- In the Google Workspace settings, click on “Gmail” to manage Gmail-related configurations.
- Scroll down to the “Advanced settings” section and click on “Advanced settings” to access the advanced email settings.
- In the “Advanced settings” page, click on the “Authenticate email” tab.
- Under the “DMARC” section, click on “Configure DMARC” to set up your DMARC policies.
- In the DMARC configuration page, enter your desired DMARC policy in the provided text field. The policy can be set to “none,” “quarantine,” or “reject.”
- Choose how frequently you want to receive DMARC reports by specifying an email address in the “Email report aggregate data to” field.
- Click on “Save” to apply the DMARC policies to your domain.
When configuring DMARC policies, it’s important to understand the implications of each policy option. The “none” policy allows email receivers to collect and send DMARC reports without taking any action on failing messages. “Quarantine” directs email receivers to place failing messages in the spam or quarantine folder, while “reject” instructs email receivers to reject failing messages outright.
Choosing the appropriate DMARC policy depends on your organization’s security requirements and risk tolerance. While a “none” policy allows you to collect data and monitor DMARC activity, a more stringent policy like “quarantine” or “reject” provides stronger protection against email spoofing and phishing attacks.
After configuring DMARC policies, the email receivers will follow the specified policies when authenticating the emails from your domain. This helps protect your organization’s domain reputation and ensures the delivery of legitimate emails to recipients while filtering out potentially harmful or fraudulent messages.
Now that you have configured your DMARC policies, the next step is to verify the DMARC records and ensure they are properly set up for your domain, which we will cover in the next step.
Step 4: Verifying DMARC Records
After configuring DMARC policies in Google Workspace, the next step is to verify the DMARC records for your domain. Verifying DMARC records ensures that the DNS records for your domain are correctly set up and aligned with the DMARC configuration.
Here’s how you can verify DMARC records in Google Workspace:
- Go to your DNS management console or contact your domain registrar to access your domain’s DNS records.
- Locate the DNS TXT record for your domain.
- Add a new TXT record for your domain using the following values:
- Name: _dmarc.yourdomain.com (replace “yourdomain.com” with your actual domain)
- TTL: Set the time-to-live value based on your DNS provider’s recommendations.
- Value: v=DMARC1; p=your DMARC policy; rua=your reporting email address;
Replace “your DMARC policy” with the DMARC policy you have configured (e.g., “none,” “quarantine,” or “reject”). Replace “your reporting email address” with the email address where you want to receive DMARC reports.
Save or publish the changes to your DNS records.
Once you have added the DMARC record, it may take some time for the changes to propagate across DNS servers. DNS propagation can take up to 48 hours, but typically, it happens much faster.
To verify the DMARC records, you can use online tools like the “DMARC Record Checker” or check the DNS records using the “nslookup” command in the command prompt:
- For Windows: Open the Command Prompt and type: nslookup -type=txt _dmarc.yourdomain.com
- For macOS and Linux: Open the Terminal and type: dig TXT _dmarc.yourdomain.com
If the DMARC records are correctly set up, you should see the configured DMARC policy and reporting email address in the output.
Verifying DMARC records ensures that your domain’s DNS records are aligned with the DMARC configuration and properly set up to authenticate incoming emails. It is an important step to ensure that DMARC is functioning correctly for your domain in Google Workspace.
Now that you have verified the DMARC records, it’s time to move on to the next step of monitoring and analyzing the DMARC reports to gain valuable insights into your email authentication.
Step 5: Monitoring and Analyzing DMARC Reports
Once you have set up and verified DMARC records for your domain in Google Workspace, the final step is to monitor and analyze the DMARC reports. DMARC reports provide valuable insights into your email authentication, allowing you to identify authentication failures, potential threats, and unauthorized usage of your domain.
Here’s how you can monitor and analyze DMARC reports in Google Workspace:
- Ensure that you have specified an email address to receive DMARC reports during the configuration of your DMARC policies.
- Regularly check the email address where DMARC reports are sent. These reports provide aggregated data about the authentication results of emails sent from your domain.
- Analyze the DMARC reports to gain insights into the authentication status of your domain’s emails. Look for patterns, trends, and potential issues that need attention.
- Pay attention to authentication failures to identify potential spoofing attempts or unauthorized usage of your domain.
- Monitor the reports to ensure that legitimate emails are being authenticated successfully and are not getting blocked or flagged as suspicious by recipient servers.
- Use the information from the reports to make necessary adjustments to your email authentication setup, such as identifying and fixing misconfigurations, ensuring the alignment of SPF and DKIM records, and tightening your DMARC policies as needed.
It’s important to note that DMARC reports can provide detailed information about the recipients, sending sources, and authentication results of emails from your domain. This information can help you take proactive measures to protect your domain’s reputation and prevent email-based attacks.
While it’s crucial to regularly monitor and analyze DMARC reports, keep in mind that it may take some time to gather enough data and establish patterns. It’s recommended to monitor the reports over a period of time to gain a comprehensive understanding of your domain’s email authentication landscape.
By monitoring and analyzing DMARC reports, you can ensure that your email authentication setup is effective, mitigate risks associated with email spoofing, and proactively protect your domain and brand reputation.
Congratulations! You have now successfully set up DMARC in Google Workspace and have taken the necessary steps to enhance the security and integrity of your domain’s email communications.
Conclusion
Setting up DMARC in Google Workspace is a crucial step in strengthening the security and authentication of your organization’s email communications. By implementing DMARC, you can mitigate the risk of email spoofing, prevent phishing attacks, and protect your domain’s reputation.
In this comprehensive guide, we have covered the essential steps to set up DMARC in Google Workspace. We began by understanding the importance of DMARC in today’s email landscape, its role in preventing spoofing and phishing attacks, and its ability to enhance email deliverability and safeguard brand reputation.
We then discussed the prerequisites for setting up DMARC, including having a verified domain in Google Workspace, access to the Google Workspace Admin Console, understanding of DNS records, and existing SPF and DKIM setup.
Following that, we provided a step-by-step walkthrough of enabling DMARC in Google Workspace, configuring DMARC policies, verifying DMARC records, and monitoring and analyzing DMARC reports.
By following these steps, you have successfully strengthened your email authentication framework and established policies to protect against email-based threats. The monitoring and analysis of DMARC reports will provide valuable insights into the authentication status of your domain’s emails and allow you to take proactive measures to maintain a secure email environment.
Remember to regularly review and update your DMARC policies as necessary, ensuring that they align with your organization’s security requirements and risk tolerance.
With DMARC in place, you have taken a significant step towards safeguarding your organization’s email communications, protecting your brand reputation, and ensuring the delivery of legitimate emails to your recipients’ inboxes.
Implementing DMARC is an ongoing effort, and it’s important to stay informed about best practices and emerging trends in email security. Continuously evaluate and enhance your email authentication measures to proactively address any evolving threats.
Thank you for following this guide, and we hope that it has provided you with the knowledge and guidance needed to successfully set up DMARC in Google Workspace. By implementing DMARC, you are taking a proactive approach to email security and protecting your organization from potential threats.