Introduction
In today’s digital world, videos have become a popular medium for communicating information and storytelling. Whether you are creating videos for social media, websites, or professional projects, adding subtitles can greatly enhance the accessibility and user experience of your content. Subtitles not only make your videos accessible to individuals with hearing impairments, but they also ensure that your message is understood by a wider audience, including those who may be watching in a noisy environment or in a different language.
Adobe Premiere Pro, one of the leading video editing software used by professionals, offers a seamless way to add auto-generated subtitles to your videos. With its powerful features and intuitive user interface, Premiere Pro makes it easy to import and customize subtitles, ensuring they align perfectly with your video.
In this article, we will guide you through the process of adding auto-generated subtitles in Premiere Pro. Whether you have a recorded dialogue or need to transcribe spoken words, Premiere Pro’s built-in captioning tools will save you time and effort. By the end of this tutorial, you’ll be equipped with the knowledge to effortlessly add subtitles to your videos and provide an inclusive viewing experience for your audience.
So, without further ado, let’s dive into the step-by-step process of adding auto-generated subtitles in Adobe Premiere Pro.
Step 1: Import your footage into Premiere Pro
The first step in adding auto-generated subtitles to your video is to import your footage into Adobe Premiere Pro. Premiere Pro supports a wide range of video formats, allowing you to work with various types of footage.
To import your footage, simply launch Premiere Pro and create a new project or open an existing one. Once you’re in the project panel, select “File” from the menu bar and click on “Import”. This will open a dialog box where you can navigate to the location of your video file.
Once you’ve located your video file, select it, and click on the “Import” button. Premiere Pro will then import your footage into the project panel, and you’ll be able to see it listed alongside other assets in your project.
It’s important to note that you can import multiple video files at once, making it easier to work with projects that require different footage sources. To select multiple files, you can use the Control (or Command on Mac) key and click on the desired files.
Alternatively, you can also drag and drop your video files directly from your file explorer or Finder into the project panel. Premiere Pro will automatically import the files into your project.
By importing your footage into Premiere Pro, you’re now ready to move on to the next step and create a new sequence to start editing your video.
Step 2: Create a new sequence for your project
After importing your footage into Adobe Premiere Pro, the next step is to create a new sequence. A sequence is where you will arrange and edit your video clips, add effects, and incorporate subtitles.
To create a new sequence, go to the project panel and right-click on your imported video file. From the context menu that appears, select “New Sequence from Clip”. Premiere Pro will automatically create a new sequence based on the settings of your video file.
If you prefer to customize the sequence settings, you can manually create a new sequence. To do this, go to the menu bar and click on “File”, then select “New” and choose “Sequence”. You can then adjust the settings such as the sequence name, video dimensions, and frame rate to match your project requirements.
It’s important to choose the right sequence settings to ensure that your video and subtitles align perfectly without any issues. Make sure to match the settings of your footage, such as resolution and frame rate, to avoid any potential quality loss or synchronization problems.
After creating the new sequence, you will find it in the timeline panel. This is where you will be able to edit your video and add the auto-generated subtitles in the later steps. The timeline panel provides a visual representation of your video’s duration and allows you to arrange and manipulate your clips.
Now that you have created a new sequence, you’re ready to move on and enable the Captions panel to start working with subtitles in Premiere Pro.
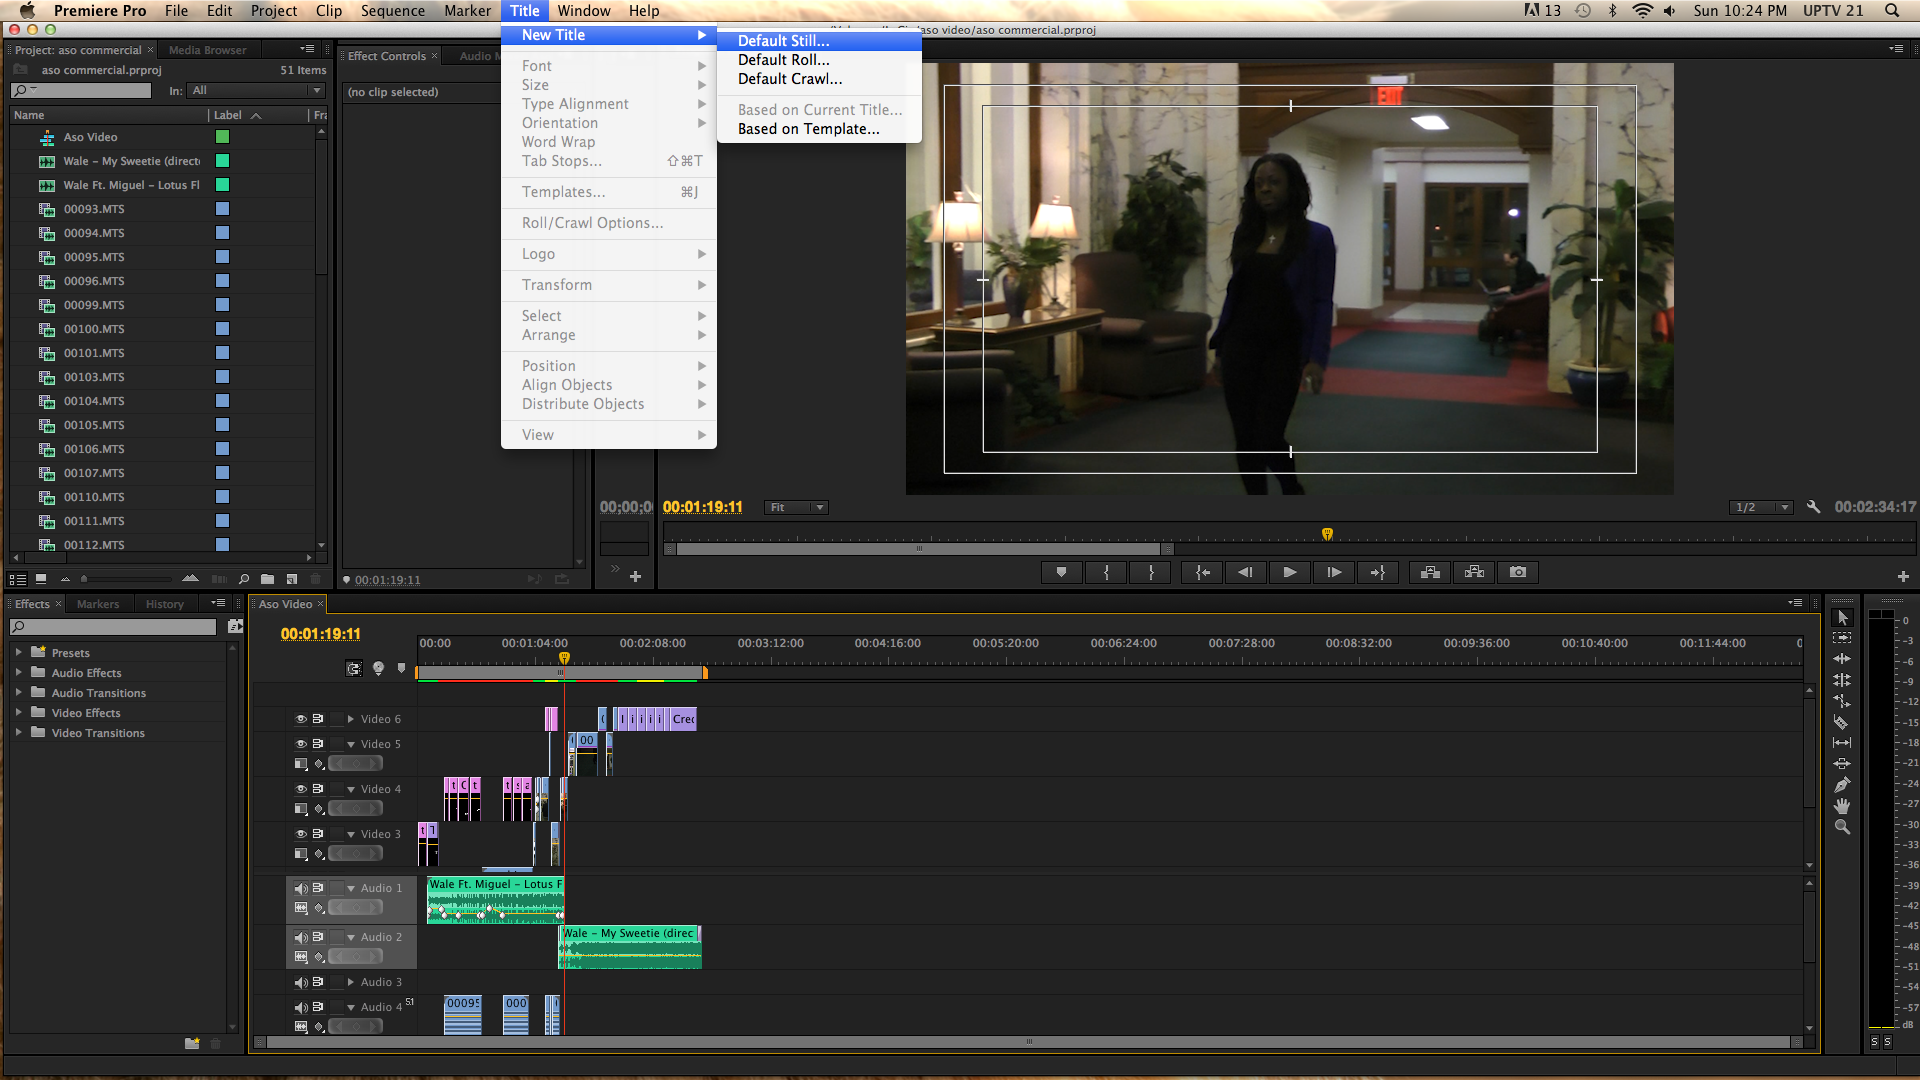
Step 3: Enable the Captions panel
In order to work with subtitles in Adobe Premiere Pro, you need to enable the Captions panel. The Captions panel provides you with the necessary tools to create, edit, and manage your subtitles in a seamless manner.
To enable the Captions panel, navigate to the top menu bar and click on “Window”. From the dropdown menu, select “Captions”. This will open the Captions panel and display it alongside the other panels in your workspace.
If you don’t see the Captions option in the Window menu, you can also enable the panel by going to the “Essential Graphics” workspace. To do this, simply click on the “Workspace” dropdown menu in the top right corner of the interface, and select “Essential Graphics”. The Captions panel should now be visible in the workspace.
Once the Captions panel is enabled, you’ll have access to various subtitle-related features and settings. This includes the ability to add new caption tracks, import subtitle files, adjust the timing of captions, customize the appearance, and more.
The Captions panel is crucial for managing and organizing your subtitles effectively. It allows you to work with multiple caption tracks, making it easier to handle different languages or subtitles for different purposes.
With the Captions panel now enabled, you’re ready to move on and learn how to add a new caption track to start incorporating subtitles into your video.
Step 4: Add a new caption track
After enabling the Captions panel in Adobe Premiere Pro, the next step is to add a new caption track. Caption tracks allow you to organize and manage different sets of subtitles within your project.
To add a new caption track, first, make sure the timeline panel is active. Then, click on the “Add Caption Track” button located at the bottom of the Captions panel. This will create a new empty caption track in your timeline.
By default, Premiere Pro creates a single caption track, but you can add more tracks if needed. To add additional tracks, simply click on the “Add Caption Track” button again. This can be useful when working with multiple languages or when you want to separate subtitles for different sections of your video.
When you add a new caption track, it will appear as a new row in the timeline panel, just above the video track. Each caption track can hold multiple captions that align with specific sections of your video.
Please note that each caption track has its own settings, such as the language and format. You can customize these settings by clicking on the “Settings” icon on the desired caption track’s header in the timeline panel. This allows you to specify the language of the subtitles and adjust other parameters like font, size, color, and positioning.
By adding a new caption track, you are ready to proceed with the next step: importing the subtitle file into your Premiere Pro project.
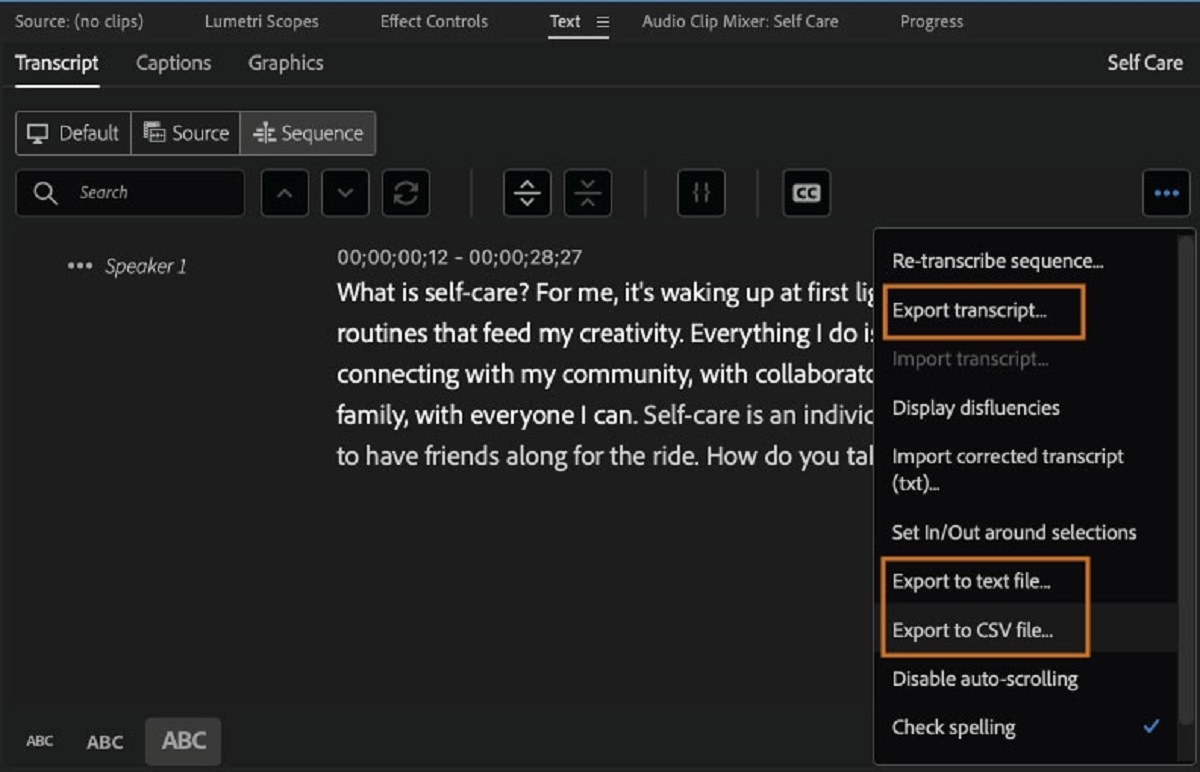
Step 5: Import the subtitle file
Now that you have added a new caption track in Adobe Premiere Pro, it’s time to import the subtitle file into your project. The subtitle file contains the text that will be displayed as subtitles in your video, and it can be in various formats such as SRT, VTT, or SCC.
To import the subtitle file, first, make sure the Captions panel is active. Then, click on the “Import Captions” button located at the bottom of the panel. This will open a file explorer or Finder window, allowing you to navigate to the location of your subtitle file.
Once you have found the subtitle file on your computer, select it, and click on the “Import” button. Premiere Pro will then import the subtitle file and display it in the Captions panel.
After importing the subtitle file, Premiere Pro will automatically assign the captions to the active caption track in the timeline panel. If you have multiple caption tracks, you can select a different track by clicking on its header in the timeline panel before importing the subtitles.
It’s important to ensure that the subtitle file is correctly formatted and synchronized with the video. Double-check that the timing and content of the subtitles align properly with the corresponding sections of your video.
In case you need to make adjustments to the timing or content of the subtitles, you can do so by selecting the caption in the Captions panel and modifying the text or the In and Out points in the timeline panel.
By importing the subtitle file, you have now successfully added the subtitles to your project. You can proceed to the next step to adjust the timing of the subtitles to match your video’s pacing and dialogue.
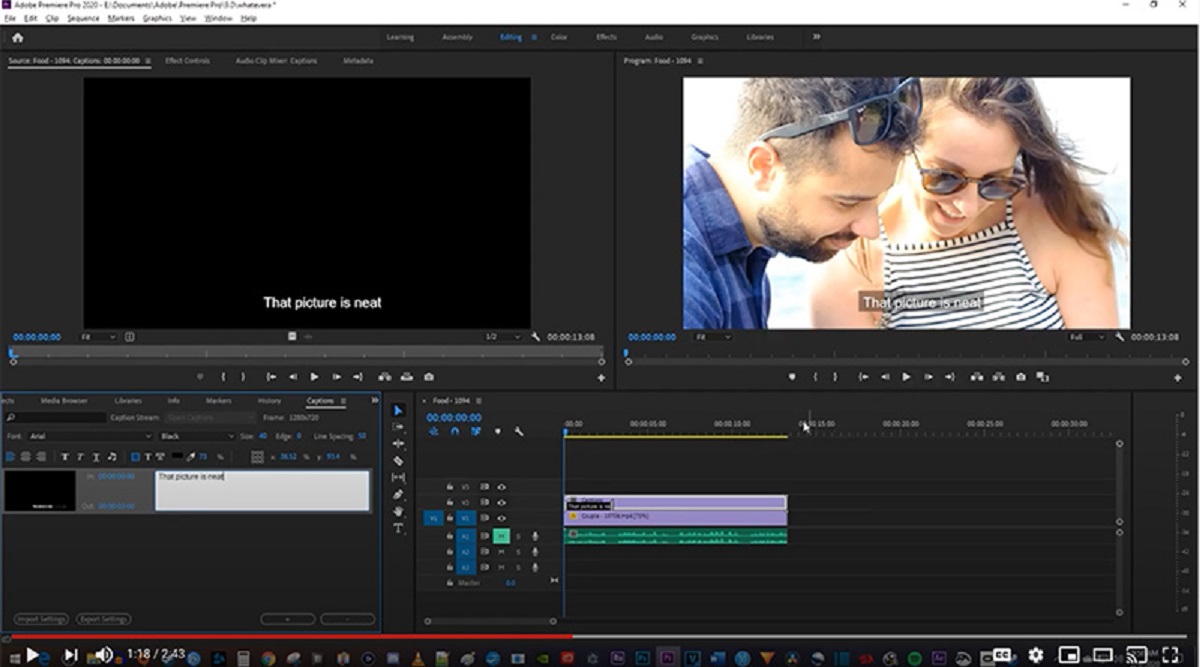
Step 6: Adjust the timing of the subtitles
Once you have imported the subtitle file into Adobe Premiere Pro, the next step is to adjust the timing of the subtitles to ensure they synchronize perfectly with your video. This is especially important if the subtitles were auto-generated or if you need to make manual adjustments for better accuracy.
To adjust the timing of the subtitles, first, make sure the Captions panel is active. Then, select the caption you want to modify in the Captions panel. You will see the corresponding caption marker in the timeline panel.
To change the timing of the caption, you can either drag the caption marker left or right in the timeline panel or adjust the In and Out points of the caption in the Captions panel. This allows you to precisely control when the subtitle appears and disappears on the screen.
By aligning the subtitles with the dialogue and visual cues of your video, you can ensure that the message is conveyed accurately and that the subtitles do not appear too early or too late.
If you need to make more precise adjustments to the timing of the subtitles, you can use the “Roll/Crawl Options” in the Captions panel. This feature allows you to fine-tune the timing of individual subtitles by specifying the start and end times in milliseconds.
As you adjust the timing of the subtitles, make sure to preview your video to ensure that the subtitles flow smoothly and align with the audio and visuals. You can use the playback controls in Premiere Pro to review your video and make any necessary adjustments.
Remember to pay attention to the pacing and synchronization of the subtitles with the dialogue, as well as any on-screen actions or important visual cues. By taking the time to adjust the timing, you can create a more professional and polished subtitle experience for your audience.
With the timing of your subtitles properly adjusted, you’re ready to move on to the next step and customize their appearance to match the aesthetics of your video.
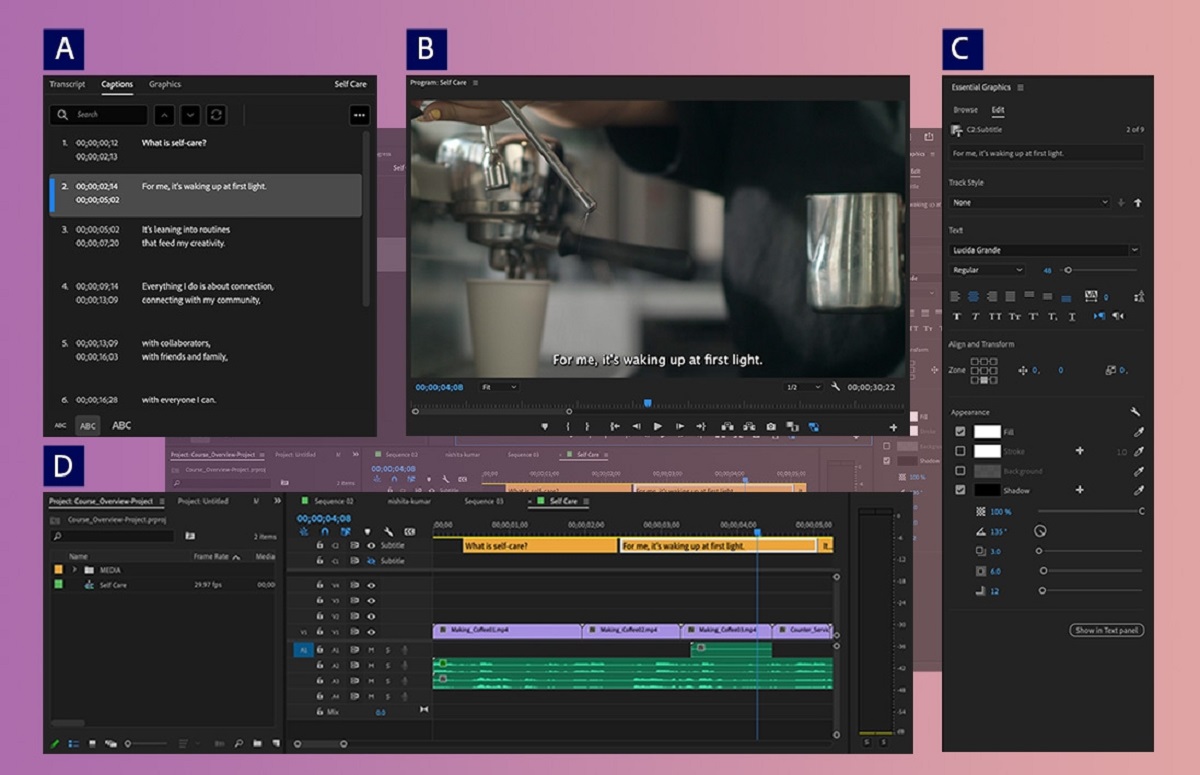
Step 7: Customize the appearance of the subtitles
After adjusting the timing of the subtitles in Adobe Premiere Pro, you have the option to customize their appearance to align with the overall aesthetics of your video. Customizing the appearance of subtitles can help enhance the visual appeal and ensure they are easily readable by your audience.
To customize the appearance of subtitles, make sure the Captions panel is active. Then, select the caption track or individual captions that you want to modify.
In the Captions panel, you will find various options to customize the appearance of the subtitles. You can change the font, size, color, and style of the text to suit your video’s design. Experiment with different combinations to find the look that best matches your project’s visual theme.
Premiere Pro also allows you to customize the background of the subtitles. You can add a solid color background or adjust the opacity to make the subtitles stand out against the video content. Additionally, you can apply effects like drop shadows or outlines to enhance the visibility and legibility of the subtitles.
If you want to create a specific style for your subtitles that you can easily apply throughout your video, you can save your custom settings as a preset. This will allow you to quickly apply the same appearance to other captions in your project with just a few clicks.
Remember to keep the readability of the subtitles in mind while customizing their appearance. Ensure that the font size is large enough for viewers to read comfortably, especially on smaller screens or mobile devices.
It’s also recommended to preview your video with the customized subtitles to ensure that they blend well with the content and don’t distract from the overall viewing experience. Make any necessary adjustments until you are satisfied with the appearance and readability of the subtitles.
By customizing the appearance of the subtitles, you can add a stylistic touch to your video and make the subtitles more visually appealing to your audience.
With the subtitles now customized to your liking, you’re almost done. The final step is to export your project with the auto-generated subtitles!
Step 8: Export your project with the auto-generated subtitles
After adding and customizing the auto-generated subtitles in Adobe Premiere Pro, the final step is to export your project, ensuring that the subtitles are included and properly displayed in the final video.
To export your project with the auto-generated subtitles, go to the menu bar and click on “File”. From the dropdown menu, select “Export” and choose “Media”. This will open the Export Settings window.
In the Export Settings window, you can adjust various settings such as the format, resolution, and bitrate for your exported video. Make sure to select the settings that best match your intended use or platform.
Under the Captions tab in the Export Settings window, ensure that the “Embed captions” option is checked. This will ensure that the auto-generated subtitles are embedded within the video file, allowing them to be displayed when the video is played on compatible devices or platforms.
You also have the option to choose the subtitle format in which the captions will be exported. Premiere Pro supports popular subtitle formats such as SRT and VTT, which can be useful if you plan to distribute your video to platforms that require specific subtitle file formats.
Once you have set the export settings and confirmed that the captions are embedded, click on the “Export” button to begin exporting your project with the auto-generated subtitles.
The export process may take some time, depending on the length and complexity of your video. You can monitor the progress in the Export window, and Premiere Pro will notify you once the export is completed.
After the export is finished, you will have a video file with the auto-generated subtitles embedded within it. You can now share or distribute this video file on various platforms, knowing that the subtitles will be displayed to your viewers.
Remember to test the exported video on different devices and platforms to ensure that the subtitles are visible and properly synchronized with the video. Take the time to review the final product and make any necessary adjustments if needed.
By exporting your project with the auto-generated subtitles, you have successfully completed the process of adding accessible and inclusive subtitles to your video using Adobe Premiere Pro.
Congratulations! Your video is now ready to be enjoyed by a wider audience, ensuring that your message reaches viewers regardless of their hearing abilities or language barriers.
Conclusion
Adding auto-generated subtitles to your videos in Adobe Premiere Pro can greatly enhance their accessibility, reach, and overall user experience. By following the step-by-step process outlined in this article, you can effortlessly incorporate subtitles into your projects, ensuring that your message is understood by a wider audience.
We started by importing the footage into Premiere Pro and creating a new sequence to organize and edit our video. Then, we enabled the Captions panel, allowing us to manage and customize the subtitles effectively. Importing the subtitle file into our project allowed us to seamlessly integrate the text with our video.
After importing the subtitles, we adjusted their timing to ensure perfect synchronization with our video’s dialogue and visual cues. Then, we proceeded to customize the appearance of the subtitles to match the aesthetics of our project, enhancing their visual appeal and readability.
Finally, we exported our project with the auto-generated subtitles, ensuring that they are embedded within the video file and displayed when viewed on compatible devices or platforms.
By following these steps, you have learned how to make your videos more accessible and inclusive by incorporating auto-generated subtitles in Adobe Premiere Pro. Whether you’re creating videos for social media, websites, or professional projects, subtitles can significantly improve the viewing experience for a wider audience.
Remember to test your exported video on different devices and platforms to ensure that the subtitles are displayed correctly. Take the time to review and make any necessary adjustments to deliver the best possible subtitle experience for your viewers.
So, go ahead and start adding auto-generated subtitles to your videos using Adobe Premiere Pro. Unlock the power of accessibility and expand your reach to a broader audience!