Introduction
With the rise of social media platforms and the popularity of animated gifs, they have become an effective medium for communication and entertainment. However, sometimes a gif alone may not convey the complete message or context. This is where subtitles come in.
Subtitles are text elements that appear on the screen, providing additional information, translating dialogue, or conveying emotions. Adding subtitles to gifs can enhance the viewer’s experience, make the content more accessible, and allow creators to express their thoughts more effectively.
In this article, we will explore the benefits of adding subtitles to gifs and guide you through the steps of how to do it. Whether you are a social media enthusiast, a content creator, or simply someone who enjoys sharing animated gifs, this article will help you level up your gif game.
By incorporating subtitles, you have the opportunity to provide context, clarify messages, add humor, or even engage users in a dialogue. Subtitles can turn a gif from a visual snippet into a fully immersive experience.
Stick around as we delve into the process of adding subtitles to gifs. We will cover everything from preparing the gif, choosing a subtitle format, writing the subtitles, creating the subtitle file, and adding the subtitles using online tools or video editing software. By the end, you’ll have the knowledge and skills to give your gifs that extra oomph!
What are subtitles?
Subtitles are textual representations of the spoken dialogue or narration in videos, movies, or other multimedia content. They appear on the screen simultaneously with the audio, providing a written version of the spoken words.
The primary purpose of subtitles is to make the content accessible to people with hearing impairments or those who prefer to read along while watching. Subtitles also play a crucial role in language translation, allowing viewers to enjoy content in different languages.
Subtitles can be displayed in various formats, such as open captions, closed captions, or subtitles embedded within the video. Open captions are always visible and cannot be turned off, while closed captions can be toggled on or off by the viewer. Embedded subtitles are typically added during the video editing process and are not separate files.
Aside from accessibility and translation purposes, subtitles can have other uses as well. They can provide additional information, such as the names of characters or locations, explanations of complex concepts, or textual representations of sounds and music. Subtitles can also be used creatively to add humor, convey emotions, or emphasize certain parts of the dialogue.
In the case of gifs, subtitles serve a similar purpose of providing context, enhancing comprehension, and adding an extra layer of meaning. Since gifs are short and often lack audio, subtitles become even more important in conveying the message or punchline effectively.
Adding subtitles to gifs can transform them from mere visual snippets into engaging and interactive content. Subtitles allow creators to tell a story, evoke a certain emotion, or inject humor into their gifs. They give viewers a broader understanding of the message and enable those who cannot hear the audio to fully enjoy the gif.
Now that we have a clear understanding of what subtitles are, let’s explore the reasons why adding subtitles to gifs can be beneficial.
Why add subtitles to gifs?
Adding subtitles to gifs offers several benefits that can enhance the viewing experience and make the content more engaging and accessible. Here, we will explore some of the key reasons why adding subtitles to gifs is worth considering.
Accessibility: Subtitles provide a means for individuals with hearing impairments to fully enjoy and understand the content. By adding subtitles to gifs, you make your content accessible to a wider audience, inclusive of those who rely on text to comprehend the dialogue or message.
Clarify messages: Gifs are limited in duration, making it challenging to convey complete ideas or context. By adding subtitles, you can provide additional information, explanations, or translations that clarify the message you want to convey. This ensures that viewers fully understand the intended meaning behind your gif.
Language adaptation: Gifs are shared globally, and not everyone speaks the same language. Adding subtitles allows you to translate the dialogue or text in the gif, enabling viewers from different regions to understand and appreciate your content. It gives you the opportunity to connect with a broader audience and expand your reach.
Engagement and interaction: Subtitles can create a more interactive and engaging experience for viewers. Well-crafted subtitles can add humor, emphasize certain parts of the dialogue, or convey emotions more effectively. By adding subtitles to your gifs, you can elicit stronger reactions and encourage viewers to share or comment on your content.
Improved comprehension: Gifs often rely on visual cues and brief actions to convey meaning. However, some viewers may find it challenging to grasp the full context without additional textual information. Subtitles provide the necessary context, allowing viewers to fully comprehend the message you are trying to communicate.
Enhanced storytelling: Gifs can tell a story or capture a moment, but sometimes the story may be incomplete without spoken words or additional information. By adding subtitles, you can fill in the gaps, add depth to the narrative, and guide viewers through the intended storyline.
From accessibility to improved comprehension and enhanced engagement, the benefits of adding subtitles to gifs are clear. In the following sections, we will guide you through the step-by-step process of how to add subtitles to your gifs, so you can start taking advantage of these benefits and create compelling and accessible content.
Step 1: Prepare the gif
Before you begin adding subtitles to your gif, it’s essential to prepare the gif file and ensure it’s ready for the subtitle integration process. Follow these steps to properly prepare your gif:
Select the right gif: Choose a gif that effectively conveys your message or tells a story. Keep in mind the purpose of adding subtitles and select a gif that will benefit from the additional textual information.
Ensure the gif is clear and high-quality: Verify that the gif is visually clear and of good quality. Subtitles can be easier to read when the gif has a high resolution and is not overly compressed.
Trim or edit the gif if necessary: If your gif is longer than it needs to be, consider trimming it to the desired duration. You can use various online gif editing tools or video editing software to ensure the gif is concise and focused on the key elements.
Save a copy of the original gif: Make sure to save a backup copy of the original gif before making any modifications. This way, you can revert to the original file if needed, or make additional edits without losing the initial version.
Consider the gif size limitations: Keep in mind that some platforms or messaging apps may have size limitations for sharing gifs. Ensure that your gif file size is within the allowed limit to prevent any issues during the sharing process.
By properly preparing your gif, you set a solid foundation for the subtitle integration process. Take the time to choose the right gif, ensure its quality, and make any necessary edits to optimize the viewer’s experience. With a well-prepared gif, you’re ready to move on to the next step: choosing a subtitle format.
Step 2: Choose a subtitle format
When it comes to adding subtitles to gifs, you have several options for the subtitle format. The choice of format depends on the platform or software you’ll be using to add the subtitles and the level of control you require over the timing and appearance of the subtitles. Here are some common subtitle formats to consider:
SRT (SubRip Subtitle): SRT is one of the most widely used subtitle formats. It consists of time-stamped text lines with a specific format. SRT files are compatible with many video players and can be easily created and edited using text editors or dedicated subtitle editing software.
ASS/SSA (Advanced SubStation Alpha): ASS and SSA are more advanced subtitle formats that allow for greater customization options. They support various text styles, font types, colors, and even animations. These formats are often used in video editing software or media players with advanced subtitle rendering capabilities.
VTT (WebVTT): VTT is a subtitle format specifically designed for online videos and web content. It supports basic formatting such as bold, italic, and positioning of the subtitles on the screen. VTT files are easy to create and can be used directly in HTML5 video players.
Once you’ve chosen a subtitle format, it’s essential to consider the compatibility with the platform or software you’ll be using to add the subtitles. Some online subtitle generators or video editing software may have specific requirements or support for certain subtitle formats.
Additionally, it’s crucial to understand the capabilities of the platform or software in terms of subtitle styling and timing adjustments. Some platforms or software may have limitations on text styling or the ability to synchronize the subtitles precisely with the gif.
By choosing the appropriate subtitle format, you ensure compatibility and flexibility in adding subtitles to your gif. Take into account the platform or software you’ll be using, the level of control you require, and the desired appearance of the subtitles. Once you’ve selected a format, you’re ready to move on to the next step: writing the subtitles.
Step 3: Write the subtitles
Now that you have chosen the subtitle format, it’s time to write the subtitles for your gif. The subtitles should accurately reflect the dialogue, provide additional information, or convey the intended message. Here are some tips to consider when writing the subtitles:
Be concise: Gifs are short, so it’s important to keep the subtitles concise and to the point. Aim for brief and straightforward sentences that effectively convey the essence of the dialogue or message.
Maintain readability: Ensure that the subtitles are easily readable. Use a legible font type and size, and consider the color and contrast against the background to ensure optimal visibility. Avoid using long sentences or excessive line breaks that may make it difficult for viewers to follow the subtitles.
Avoid excessive text: Be mindful of the limited space available for the subtitles. Avoid overcrowding the gif with too much text, as it may distract from the visual elements or make the subtitles cluttered and hard to read. Focus on capturing the key points or essential information.
Adapt to the gif duration: Take into account the duration of the gif when timing the subtitles. Ensure that the subtitles are displayed for an adequate amount of time, allowing viewers enough time to read and comprehend the text. Avoid displaying the subtitles for too long, as it can feel visually overwhelming.
Capture the tone and style: Consider the mood, tone, and style of the gif when writing the subtitles. Adapt the language and wording to match the content and evoke the desired emotions. Subtitles can be serious, funny, or even poetic, depending on the nature of the gif.
Proofread and edit: After writing the subtitles, it’s crucial to proofread and edit them for accuracy, grammar, and clarity. Ensure that there are no spelling mistakes or grammatical errors that could detract from the quality of the gif and the overall viewing experience.
By following these tips, you can create subtitles that enhance the viewer’s understanding and engagement with your gif. Well-written and properly timed subtitles will effectively convey the intended message and contribute to the overall impact of the gif. Once you have written the subtitles, you can proceed to the next step: creating the subtitle file.
Step 4: Create the subtitle file
Once you have written the subtitles for your gif, the next step is to create the subtitle file. The subtitle file will contain the timing information and the actual subtitle text, allowing you to synchronize the subtitles with your gif. Here’s how to create the subtitle file:
Use dedicated subtitle editing software: Various subtitle editing software tools are available that allow you to create and format subtitle files. These tools provide a user-friendly interface and often support different subtitle formats. You can manually input the timing and text for each subtitle line and then save the file in the desired subtitle format.
Use online subtitle generators: There are also online subtitle generators available that can assist in creating subtitle files. These generators typically provide a text editor interface where you can input the timing and text for each subtitle line. Once complete, the generator will generate the subtitle file in the specified format.
Follow the specific format guidelines: When creating the subtitle file, ensure that you follow the specific format guidelines for the chosen subtitle format. Pay attention to things like time codes, line breaks, and text formatting to ensure the compatibility of the subtitle file with the platform or software you’ll be using to add the subtitles.
Name the subtitle file appropriately: When saving the subtitle file, give it a clear and descriptive name that references the corresponding gif. This will make it easier to keep track of multiple subtitle files and ensure you can easily identify the correct subtitle file for each gif.
Save a backup copy: Once you have created the subtitle file, make sure to save a backup copy in case you need to make any modifications or adjustments later on. This will provide a safety net and prevent any potential loss of work.
Creating the subtitle file is an essential step in the subtitle integration process. It allows you to translate the subtitles you have written into a file format that can be easily integrated with your gif. Once you have created the subtitle file, you are ready to move on to the next step: adding subtitles using online tools or video editing software.
Step 5: Add subtitles using online tools
If you prefer a quick and convenient way to add subtitles to your gif, online tools can be a great option. These tools allow you to upload your gif and subtitle file, and they will automatically synchronize the subtitles with your gif. Here’s how to add subtitles using online tools:
- Select a reliable online tool: There are numerous online tools available for adding subtitles to gifs. Choose a reputable and user-friendly tool that supports the subtitle format you have created.
- Upload your gif: Begin by uploading your gif file to the online tool. Ensure that the file is within the acceptable size limits defined by the tool.
- Upload your subtitle file: After uploading the gif, proceed to upload your subtitle file. The online tool will recognize the subtitle format and import the subtitle text and timing.
- Adjust the subtitle settings: Most online tools allow you to adjust the appearance and position of the subtitles. Customize the font, size, color, and positioning to ensure that the subtitles are visually appealing and easily readable.
- Preview and make adjustments: Before finalizing the subtitles, preview the gif with the integrated subtitles. Check for any timing issues or formatting errors and make adjustments as necessary.
- Download the subtitled gif: Once you are satisfied with the synchronization and appearance of the subtitles, proceed to download the subtitled gif. The online tool will generate a new file that includes the subtitles.
- Save a backup: It’s always a good practice to save a backup copy of the subtitled gif to avoid any potential loss of work or the need for future modifications.
Adding subtitles using online tools is a quick and efficient method that doesn’t require any additional software installation. It’s ideal for those who are new to subtitle integration or prefer a streamlined process. However, keep in mind that online tools may have limitations in terms of customization and advanced subtitle features.
Once you have successfully added subtitles to your gif using an online tool, you can proceed to share your newly subtitled gif with the world or move on to the next step if you require more advanced customization options: adding subtitles using video editing software.
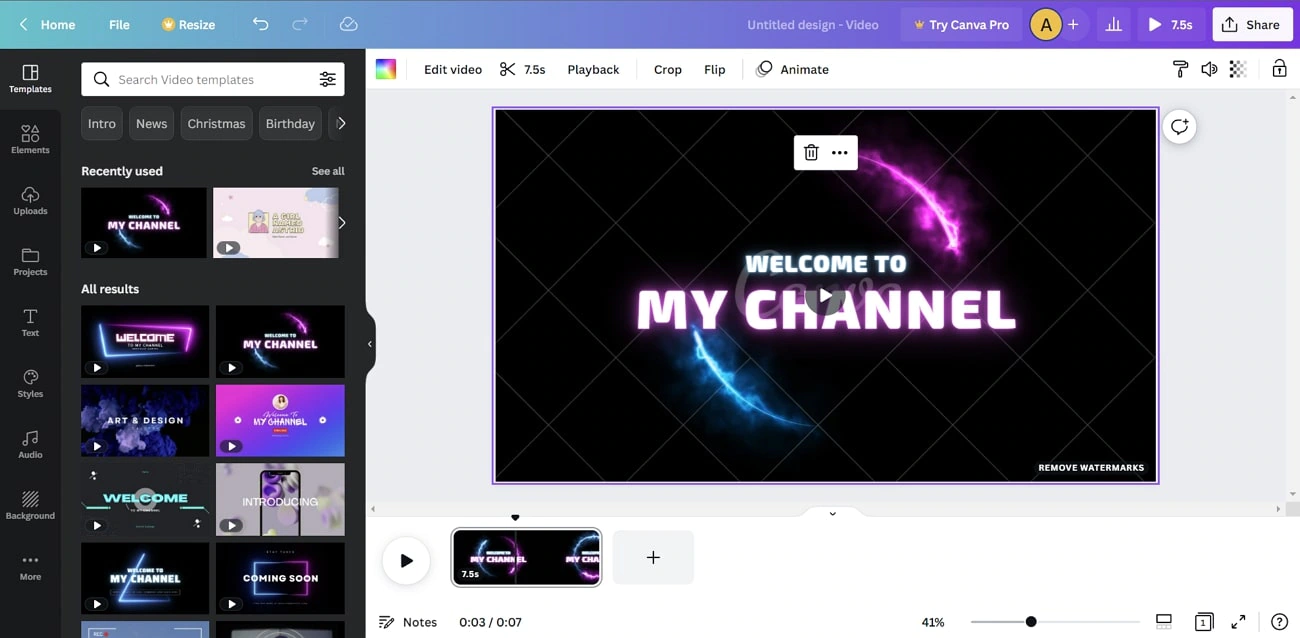
Step 6: Add subtitles using video editing software
If you desire more control over the appearance and customization of your subtitles, using video editing software is a great option. Video editing software provides advanced features and flexibility to finesse your subtitles and integrate them seamlessly with your gif. Follow these steps to add subtitles using video editing software:
- Select a video editing software: Choose a reliable and user-friendly video editing software that supports subtitle integration. Popular options include Adobe Premiere Pro, Final Cut Pro, and Sony Vegas Pro.
- Import your gif: Start by importing your gif file into the video editing software. Most software allows you to drag and drop the gif file into the project timeline or import it through the file menu.
- Import the subtitle file: After importing the gif, import the subtitle file into the video editing software. Ensure that the software supports the subtitle format you have created.
- Arrange the subtitle track: Once the subtitle file is imported, arrange it on a separate track in the timeline. This allows you to synchronize the subtitles precisely with the gif without altering the original gif file.
- Adjust the timing and appearance: Using the video editing software’s tools and features, fine-tune the timing and appearance of the subtitles. Adjust the timing to ensure that the subtitles appear and disappear smoothly with the gif’s content. Customize the font, size, color, and positioning to match the desired style.
- Preview and make adjustments: Before finalizing the subtitles, preview the subtitled gif and make any necessary adjustments. Check for synchronization issues, readability, and overall aesthetic appeal.
- Export the subtitled gif: Once you are satisfied with the subtitled gif, proceed to export the file. Select the appropriate export settings, such as video format and compression settings, to optimize the gif’s quality and file size.
Adding subtitles using video editing software gives you full control over the appearance and timing of the subtitles. You can customize the subtitles to match your gif’s style and ensure that they seamlessly integrate with the visual content. However, it may require a bit more time and familiarity with the software to master these finer controls.
After successfully adding subtitles using video editing software, you can proudly share your professionally subtitled gif or further explore the creative possibilities offered by video editing software.
Conclusion
Adding subtitles to gifs can greatly enhance the viewer’s experience, make the content more accessible, and allow for clearer communication of messages. Whether you want to provide context, translate dialogue, or add a touch of humor, subtitles can elevate your gifs to a new level.
In this article, we discussed the benefits of adding subtitles to gifs and provided a step-by-step guide to help you through the process. We covered preparing the gif, choosing a subtitle format, writing the subtitles, creating the subtitle file, and adding subtitles using online tools or video editing software.
By following these steps, you can ensure that your subtitles are accurately synced with your gifs, visually appealing, and easy to read. Whether you prefer the convenience of online tools or the advanced customization options offered by video editing software, you now have the knowledge to add subtitles to your gifs with confidence.
Remember to keep the subtitles concise, maintain readability, and adapt them to the desired tone and style. Proofread and edit your subtitles to ensure accuracy, and choose a subtitle format and integration method that suits your needs.
With subtitles, your gifs can convey a more comprehensive message, engage a wider audience, and facilitate cross-cultural communication. So, go ahead and add that extra dimension to your gifs – let the subtitles make them more impactful, accessible, and enjoyable for everyone.