Introduction
Subtitles play a crucial role in enabling everyone to understand and enjoy videos, regardless of their language or hearing abilities. Whether you have a video clip in a foreign language or need assistance in following the dialogue, adding subtitles can greatly enhance the viewing experience. Google Drive, the popular cloud storage service, provides a convenient platform for storing and sharing videos. Fortunately, you can also add subtitles to videos in Google Drive, making it easier for you and your audience to comprehend the content.
In this article, we will guide you through the process of enabling subtitles in Google Drive. We will show you step-by-step how to upload the video, install the necessary app, and generate translated subtitles for your video content. By the end of this article, you will have the knowledge and tools to easily add subtitles to your videos in Google Drive.
Whether you are a content creator, educator, or simply someone who enjoys watching videos, this tutorial will help you make your videos more accessible and inclusive. So let’s dive into the steps required to enable subtitles in Google Drive and make your videos more enjoyable for everyone.
How to Enable Subtitles in Google Drive
Enabling subtitles in Google Drive is a simple process that can be done by following a few easy steps. Once you have uploaded your video to Google Drive, you can utilize a useful third-party app called “Subtitle Translator” to generate and add subtitles to your video. Let’s get started:
Step 1: Open Google Drive
To begin, open your web browser and navigate to Google Drive by visiting drive.google.com. Sign in to your Google account if prompted.
Step 2: Upload the Video File
Click on the “+ New” button located in the top left corner of the screen and select “File upload” from the dropdown menu. Choose the video file from your computer and wait for the upload to complete.
Step 3: Right-click on the Video File and Select “Open with”
Locate the uploaded video file in your Google Drive. Right-click on the file and select “Open with” from the options menu.
Step 4: Choose “Connect more apps”
In the “Open with” submenu, scroll down and select “Connect more apps”. This will open the Google Workspace Marketplace.
Step 5: Search for and Install the “Subtitle Translator” App
In the Google Workspace Marketplace, search for “Subtitle Translator”. Once you find the app, click on it to view the details and click on the “+ Install” button to install the app.
Step 6: Open the Video File Again and Select “Open with”
Once the “Subtitle Translator” app is installed, go back to your Google Drive and locate the video file again. Right-click on the file and select “Open with” from the options menu.
Step 7: Choose the “Subtitle Translator” App
In the “Open with” submenu, scroll down until you see the “Subtitle Translator” app. Click on it to open the video file with the app.
Step 8: Click on “Translate” and Select the Desired Language for the Subtitles
Within the “Subtitle Translator” app, you will see various settings and options. Click on the “Translate” button and select the desired language for the subtitles from the dropdown menu.
Step 9: Wait for the Subtitles to be Generated
After selecting the language, the app will start generating the subtitles for your video. This may take some time, depending on the length of the video and the complexity of the language.
Step 10: Save the Translated Subtitles
Once the subtitles have been generated, you can make any necessary adjustments or edits. Then, click on the “Save” button to save the translated subtitles as a separate file in your Google Drive.
That’s it! You have successfully enabled subtitles for your video in Google Drive. Now, whenever you play the video, you can turn on the subtitles to make it more accessible and understandable.
Adding subtitles to your videos not only improves accessibility but also makes your content more inclusive and reaches a wider audience. So don’t hesitate to follow these simple steps and enhance your videos with subtitles in Google Drive.
Step 1: Open Google Drive
Before you can add subtitles to your videos in Google Drive, you need to navigate to the Google Drive website. Follow these simple steps to open Google Drive:
1. Launch your preferred web browser.
2. In the address bar, type “drive.google.com” and press Enter.
3. If you are not already signed in to your Google account, you will be prompted to do so. Enter your credentials and click on the “Next” button.
Once you have successfully signed in, you will be redirected to the Google Drive homepage. Here, you can access your saved files, folders, and other features provided by Google Drive. Take a moment to familiarize yourself with the interface, including the main menu, search bar, and file display area.
Google Drive offers a user-friendly and intuitive interface, making it easy to navigate and manage your files. You can easily upload, organize, and share files with others through this cloud storage service. With the ability to add subtitles to your videos, Google Drive becomes an even more powerful tool for content creators, educators, and anyone who wants to make their videos accessible and inclusive.
Now that you have successfully opened Google Drive, you can proceed to the next step of uploading your video file.
Step 2: Upload the Video File
Once you have accessed Google Drive, the next step is to upload the video file that you want to add subtitles to. Follow these instructions to upload your video:
- Click on the “+ New” button located in the top left corner of the Google Drive interface. A dropdown menu will appear.
- From the dropdown menu, select “File upload”. This will open a file explorer dialog box.
- Navigate to the location on your computer where the video file is stored.
- Select the video file and click on the “Open” button.
Google Drive will now begin uploading the video file to your account. The upload progress will be displayed on the screen, and you may need to wait for a few moments, depending on the file size and your internet connection speed.
During the upload process, make sure not to close the browser tab or navigate away from the page. If the upload is interrupted for any reason, you can resume the process by selecting the file again and clicking on the “Resume” button.
Once the upload is complete, the video file will appear in your Google Drive, and you can access it at any time by navigating to the appropriate folder. Google Drive provides a generous amount of storage space, so you can upload multiple videos without worrying about running out of space.
Uploading your video file to Google Drive is an essential step as it allows you to access and manage your videos easily. Now that the video is uploaded, you can move on to the next step and open the file to add subtitles using a third-party app.
Step 3: Right-click on the Video File and Select “Open with”
Once you have successfully uploaded your video file to Google Drive, the next step is to open the file and prepare it for adding subtitles. Follow these instructions to proceed:
- Locate the video file in your Google Drive. This can be done by navigating to the appropriate folder or using the search bar at the top of the Google Drive interface.
- Once you have located the video file, right-click on it. A contextual menu will appear with several options.
- In the contextual menu, hover your cursor over the “Open with” option. This will display a submenu with various apps and options.
- Select the desired option from the “Open with” submenu. Choose a program or app that is compatible with video playback and editing.
By selecting “Open with” and choosing an appropriate program, you ensure that the video file will be opened in a way that allows you to add subtitles. This step is crucial for accessing the necessary tools and functions required for adding and editing subtitles within Google Drive.
Some popular options for opening video files include Google’s own video player, VLC media player, or video editing software like Adobe Premiere Pro or iMovie. The specific program or app you choose will depend on your personal preferences and needs.
Once you have selected the program or app to open the video file, it will launch, and the video will be loaded for playback or editing. You are now ready to proceed with the next steps to add subtitles to your video in Google Drive.
Note that the availability of app options in the “Open with” submenu may vary depending on the apps you have installed or connected to your Google Drive account. If you don’t see the desired app listed, you may need to explore the Google Workspace Marketplace or connect more apps to Google Drive to find compatible subtitle editing tools.
Now that you have opened the video file with the appropriate program or app, you can move on to the next steps to install and use a reliable subtitle translator to add subtitles to your video in Google Drive.
Step 4: Choose “Connect more apps”
After right-clicking on the video file and selecting “Open with” in Google Drive, the next step is to choose the option to “Connect more apps”. This will allow you to explore and connect additional applications that can assist you in adding subtitles to your video. Follow these instructions to proceed:
- With the video file open in your chosen program or app, navigate to the appropriate menu or settings area.
- Look for an option labeled “Connect more apps” or something similar. This option is typically available within the program’s menu bar, toolbar, or settings panel.
- Click on the “Connect more apps” option. This will redirect you to the Google Workspace Marketplace.
The Google Workspace Marketplace is a platform where you can explore and connect various third-party applications that integrate with Google Drive and offer additional functionalities. These applications cover a wide range of purposes, including subtitle translation, editing, and synchronization.
By choosing to “Connect more apps”, you open up a world of possibilities for enhancing your video with subtitles. The Google Workspace Marketplace offers a diverse selection of subtitle-related apps that can streamline and simplify the process of adding subtitles to your videos in Google Drive.
When searching for apps in the Google Workspace Marketplace, consider factors such as user ratings, reviews, and compatibility with your chosen video editing program or app. Look for apps that have a good reputation and positive feedback from users, as this indicates their reliability and effectiveness for adding subtitles to your videos.
Connecting more apps to your Google Drive account expands your toolkit for working with videos and enables you to customize your editing experience according to your specific requirements. This step adds flexibility and convenience to the process of adding subtitles to your video, ensuring that you can find and utilize the tools that best suit your needs.
Now that you have chosen to “Connect more apps”, you can explore the Google Workspace Marketplace and install the necessary app for adding subtitles to your video.
Step 5: Search for and Install the “Subtitle Translator” App
Once you have chosen to “Connect more apps” in Google Drive, you can search for and install the “Subtitle Translator” app. This app will provide you with the necessary tools to translate and add subtitles to your video. Follow these instructions to proceed:
- Within the Google Workspace Marketplace, locate the search bar at the top of the page.
- Type “Subtitle Translator” or a related keyword into the search bar and press Enter.
- A list of apps related to subtitle translation will appear. Look for the app named “Subtitle Translator” and click on it to view the app details.
- Review the app details, including the description, user ratings, reviews, and any other relevant information.
- If you are satisfied with the app and believe it will meet your requirements, click on the “+ Install” button to install the “Subtitle Translator” app.
By installing the “Subtitle Translator” app, you gain access to a powerful tool specifically designed for translating and adding subtitles to videos. This app will streamline the subtitle creation process, saving you time and effort.
When evaluating the “Subtitle Translator” app in the Google Workspace Marketplace, pay attention to user ratings and reviews. These can provide valuable insights into the app’s performance, ease of use, and overall effectiveness. Consider choosing an app that has positive feedback and a high rating to ensure a smooth experience when translating and adding subtitles to your videos.
Furthermore, take the time to read the app’s description and features carefully. This will give you a better understanding of the functionalities and capabilities it offers. Look for features such as automatic translation, subtitle synchronization, and support for various subtitle formats, as these can greatly enhance the subtitle creation process.
Installing the “Subtitle Translator” app demonstrates a commitment to quality and efficiency in adding subtitles to your videos. With this app in place, you are well-equipped to move on to the next steps and begin working on translating and adding subtitles to your video in Google Drive.
Step 6: Open the Video File Again and Select “Open with”
After installing the “Subtitle Translator” app in Google Drive, the next step is to open the video file once again and select the app to work with. This step allows you to access the subtitle translation features provided by the app. Follow these instructions to proceed:
- Return to your Google Drive homepage by navigating to drive.google.com in your web browser.
- Locate the video file for which you want to add subtitles. You can find it by browsing through your folders or using the search bar at the top of the Google Drive interface.
- Right-click on the video file to open a contextual menu with various options.
- In the contextual menu, hover your cursor over the “Open with” option to reveal a submenu.
- Scroll down the submenu until you find the “Subtitle Translator” app. Click on it to select the app.
By opening the video file with the “Subtitle Translator” app, you ensure that you can access the necessary tools and features to translate and add subtitles to your video within Google Drive. It also enables seamless integration with the app, allowing for a smooth subtitle creation experience.
When selecting the “Subtitle Translator” app, make sure to let the video file fully load within the app. Depending on the size and duration of the video, it may take a few moments for the video file to be processed and ready for subtitle translation.
The “Subtitle Translator” app interface will provide you with options to set the desired language for the subtitles, adjust timing and synchronization, and make additional edits if required. It may also offer automatic translation features, simplifying the process of translating subtitles for videos in different languages.
Now that you have successfully opened the video file with the “Subtitle Translator” app, you are ready to proceed to the next steps to translate and generate the subtitles for your video in Google Drive.
Step 7: Choose the “Subtitle Translator” App
After opening the video file in Google Drive with the “Subtitle Translator” app, the next step is to choose the app to work with. This will allow you to access the translation and subtitle creation features provided by the app. Follow these instructions to proceed:
- In the “Open with” submenu, scroll through the list of available apps until you find the “Subtitle Translator” app.
- Click on the “Subtitle Translator” app to select it as the program to work with for translating and adding subtitles to your video.
By choosing the “Subtitle Translator” app, you are setting it as the primary tool to assist you in creating and editing subtitles for your video within Google Drive. This app is specifically designed to streamline the subtitle creation process and offers features such as automatic translation, subtitle synchronization, and more.
Once you have selected the “Subtitle Translator” app, it will fully load within Google Drive, providing you with its user-friendly interface and a range of subtitle editing options. The app may display a playback window where you can preview your video while working on the subtitles, making it easier to synchronize and align the text with the visual content.
Make sure to familiarize yourself with the “Subtitle Translator” app’s functionality and interface. Take a look at the various options and settings it offers, as they will be instrumental in ensuring accurate and high-quality subtitles for your video.
With the “Subtitle Translator” app chosen, you are now ready to move forward with the translation process and add subtitles to your video. The app will guide you through the necessary steps to customize and generate the subtitles for your video, providing you with a seamless experience within Google Drive.
Now that you have selected the “Subtitle Translator” app as your subtitle creation tool, you can proceed to the next step and begin translating the subtitles for your video.
Step 8: Click on “Translate” and Select the Desired Language for the Subtitles
Once you have chosen the “Subtitle Translator” app in Google Drive, the next step is to click on the “Translate” button and select the desired language for your subtitles. This will initiate the translation process and allow you to customize the subtitles according to your preferences. Follow these instructions to proceed:
- Within the “Subtitle Translator” app interface, locate the “Translate” button. It is typically prominently displayed or found within the main menu or toolbar of the app.
- Click on the “Translate” button to initiate the translation process for your video’s subtitles.
- A language selection menu will appear, displaying a list of available languages for translation. Choose the desired language for your subtitles from the menu.
By clicking on the “Translate” button and selecting the desired language, you are instructing the “Subtitle Translator” app to convert the audio content of your video into text in the specified language. The app employs sophisticated algorithms and translation technologies to create accurate and coherent subtitles.
Take your time to browse through the available languages and choose the one that best suits your needs. Consider the target audience and the primary language spoken or understood by your viewers. It is crucial to select the correct language to ensure that the subtitles are meaningful and beneficial to your audience.
Note that some translation options may include automatic detection of the original language. This feature can be useful when working with videos containing multiple languages or if you are unsure of the original language and need the app to determine it automatically.
With the language selected, the “Subtitle Translator” app will proceed with the translation process. Depending on the length of your video and the complexity of the language, this step may take some time. However, the app will typically provide a progress bar or indication to show you the translation status.
Now that you have clicked on “Translate” and selected the desired language, you are one step closer to generating the subtitles for your video. The “Subtitle Translator” app will work its magic, converting the audio into textual subtitles for your chosen language.
Next, proceed to the subsequent steps to finalize and save the translated subtitles for your video in Google Drive.
Step 9: Wait for the Subtitles to be Generated
After initiating the translation process in the “Subtitle Translator” app, the next step is to wait for the subtitles to be generated. The app will carefully analyze the audio content of your video and convert it into textual subtitles in the desired language. Follow these instructions to proceed:
- Once you have selected the desired language for your subtitles and clicked on the “Translate” button, the “Subtitle Translator” app will start analyzing the audio content of your video.
- Depending on the length of your video and the processing power of the app, it may take some time for the subtitles to be generated. The app will typically display a progress indicator or loading bar to keep you informed.
- Be patient and allow the app to complete the subtitle generation process. The time required will vary depending on the duration and complexity of your video, as well as the processing capabilities of the app.
During the subtitle generation process, it is important to refrain from closing the “Subtitle Translator” app or navigating away from the page. Interrupting the process may result in incomplete or inaccurate subtitles. Therefore, it is best to dedicate the necessary time and resources to ensure a successful subtitle generation experience.
The “Subtitle Translator” app utilizes advanced algorithms and machine learning techniques to analyze the audio and convert it into coherent subtitles. The accuracy and quality of the generated subtitles will depend on the clarity of the audio and the complexity of the language being translated.
While waiting for the subtitles to be generated, take this opportunity to review the settings and options provided by the app. Familiarize yourself with the various features and tools that allow you to customize the subtitle display, adjust timings, and make any necessary edits or improvements.
Upon completion of the subtitle generation process, the app will provide you with the generated subtitles for your video. These subtitles will be aligned with the audio content, making it easier for viewers to follow along and understand the video even if they do not understand the original language.
Now that you have initiated the subtitle generation process, patiently wait for the subtitles to be generated. The “Subtitle Translator” app is working diligently to provide you with accurate and synchronized subtitles that will greatly enhance the accessibility and comprehensibility of your video.
Once the subtitles have been generated, you can proceed to the final step of saving the translated subtitles for your video in Google Drive.
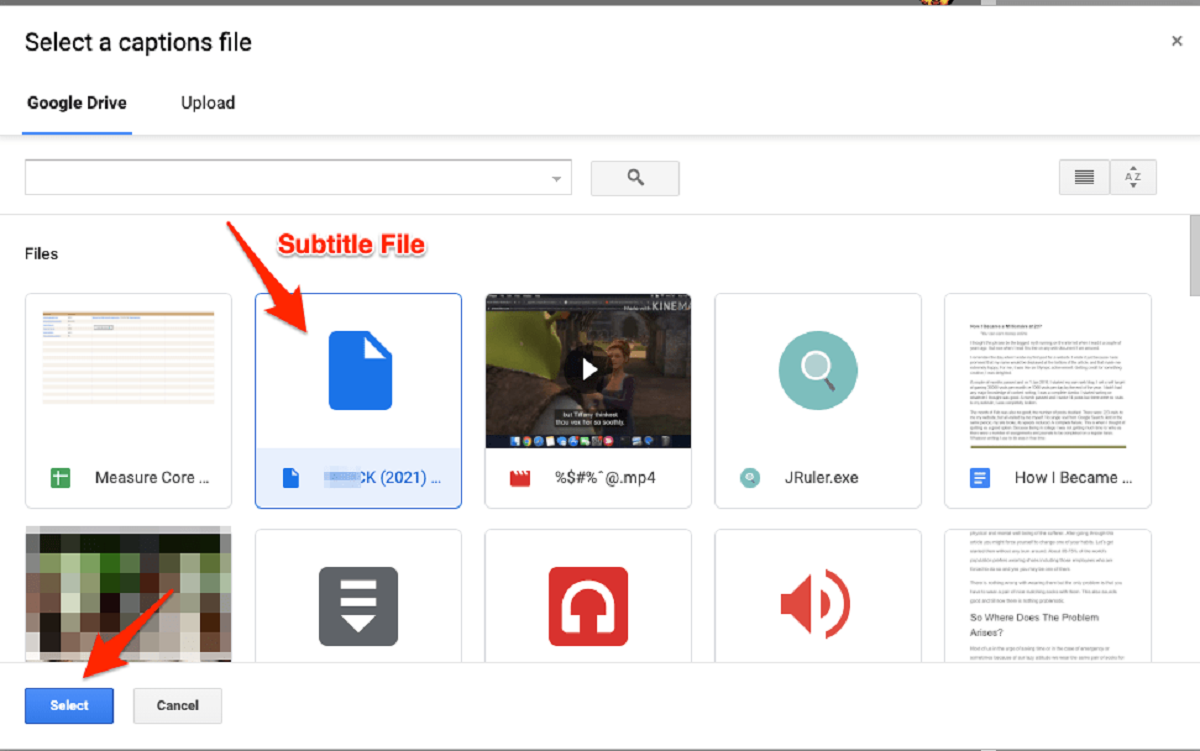
Step 10: Save the Translated Subtitles
After the subtitles have been generated for your video in the “Subtitle Translator” app, the final step is to save the translated subtitles. This will ensure that the subtitles are applied to your video and can be accessed and displayed when needed. Follow these instructions to proceed:
- Once the subtitles have been generated, review them carefully to ensure accuracy and coherence. Make any necessary adjustments or edits to the subtitles to align them perfectly with the audio content.
- Within the “Subtitle Translator” app, look for an option or button labeled “Save” or “Export”. Click on it to access the saving options.
- Choose the desired format for your subtitles, such as SRT (SubRip), VTT (WebVTT), or SSA (SubStation Alpha). The format you choose will depend on the specific requirements and compatibility of your video playback platform.
- Select the destination folder in your Google Drive where you want to save the translated subtitles.
- Click on the “Save” or “Export” button to confirm the saving process.
By saving the translated subtitles, you are preserving the edits, translations, and synchronization made within the “Subtitle Translator” app. This ensures that the subtitles remain associated with your video file within Google Drive.
When choosing the format for your subtitles, consider the video playback platform or software you will be using. Different platforms support different subtitle formats, so it is important to select a format that is compatible with your intended playback environment.
Additionally, make sure to choose an appropriate folder in your Google Drive to save the translated subtitles. Organizing your files efficiently will make it easier to locate and manage your subtitles in the future.
After clicking on the “Save” or “Export” button, the “Subtitle Translator” app will proceed to save the translated subtitles in the specified format and destination folder in your Google Drive. A confirmation message may be displayed to indicate the success of the saving process.
Now, your translated subtitles are saved, and they are ready to be associated with your video. You can test the subtitles by playing the video and enabling the subtitle display. Verify that the subtitles are properly synchronized and accurately reflect the audio content of your video.
Congratulations! You have successfully completed the process of saving the translated subtitles for your video in Google Drive. The subtitles will greatly enhance the accessibility and inclusivity of your video by allowing a wider audience to understand and enjoy the content.
Conclusion
Adding subtitles to your videos in Google Drive is a valuable technique that improves accessibility, reach, and inclusivity. By following the step-by-step process outlined in this guide, you can easily enable subtitles and make your videos more comprehensible to a wider audience.
Throughout this tutorial, we have covered the essential steps to add subtitles in Google Drive:
- Open Google Drive and navigate to the video file.
- Upload the video file to your Google Drive.
- Right-click on the video file and select “Open with”.
- Choose the option to “Connect more apps”.
- Search for and install the “Subtitle Translator” app.
- Open the video file again and select the “Subtitle Translator” app.
- Click on “Translate” and select the desired language for the subtitles.
- Wait for the subtitles to be generated.
- Save the translated subtitles to your Google Drive.
By following these steps, you can easily translate and add subtitles to your videos, making them accessible to viewers who may have hearing impairments or those who prefer to watch videos in different languages.
Remember to choose the appropriate language for your subtitles and review the accuracy and coherence of the generated subtitles before saving them. Additionally, consider the compatibility of the subtitle format with your video playback platform.
Google Drive, with its user-friendly interface and robust storage capabilities, provides a convenient platform for storing, organizing, and sharing your videos. With the “Subtitle Translator” app, you can now enhance your videos’ accessibility and make them more inclusive for a broader audience.
So why wait? Start adding subtitles to your videos in Google Drive today and open up a world of opportunities for increased viewership, engagement, and impact.