Introduction
Welcome to this step-by-step guide on how to change the battery in a Samsung tablet. Over time, the battery life of electronic devices starts to diminish, and replacing the battery can help restore the tablet’s functionality. Whether you have noticed a significant decrease in the battery’s capacity or simply want to upgrade to a higher-capacity battery, this guide will walk you through the process.
Changing the battery in a Samsung tablet may seem like a daunting task, but with the right tools and instructions, it can be a straightforward process. By following these steps, you can successfully replace the battery and enjoy extended usage time on your tablet.
Before we dive into the process, it is important to note that attempting to change the battery yourself may void your warranty. If your tablet is still under warranty, consider reaching out to Samsung or an authorized service center for assistance.
In this guide, we will cover the essential steps, from gathering the necessary tools to closing the tablet case after replacing the battery. We will also provide some tips and precautions to ensure a smooth and successful battery replacement.
Now, let’s begin the journey of rejuvenating your Samsung tablet by replacing its battery.
Step 1: Gathering the necessary tools
Before you start the battery replacement process, it is important to gather all the tools you will need. Having the right tools at hand will make the process easier and help you avoid any potential damage to your tablet. Here are the tools you will need:
- Replacement Battery: Ensure you have a compatible replacement battery specifically designed for your Samsung tablet model. You can purchase a genuine battery from authorized retailers or online.
- Screwdriver: Most Samsung tablets use small Phillips-head screws, so a precision or small screwdriver should be sufficient for removing the screws.
- Plastic Opening Tools: These tools help in prying open the tablet case without causing any damage to the delicate internal components. You can use plastic pry tools or guitar picks as alternatives.
- Tweezers: Tweezers come in handy when disconnecting and reconnecting small connectors inside the tablet. They provide better precision and control.
- Static-Free Work Surface: Find a clean, static-free workspace with enough space to lay out the tablet and the tools. This will prevent any stray static electricity from damaging the tablet’s internal components.
- Anti-Static Wrist Strap: An optional but recommended tool, an anti-static wrist strap grounds you and prevents static discharge that could damage sensitive electronic components.
- Clean Cloth or Anti-Static Mat: You may also want to have a clean cloth or an anti-static mat to place the tablet on while you work. This will prevent scratches or damage to the tablet’s screen or back cover.
- Labeling or Organizing Tools: It can be helpful to use small containers or labels to keep track of the screws and small parts you remove during the disassembly process.
With these tools gathered, you will be well-prepared to start the process of changing the battery in your Samsung tablet. Make sure you have everything within reach before proceeding to the next step.
Step 2: Powering off the tablet
Before you begin opening up your Samsung tablet, it is crucial to power it off to avoid any potential damage or electrical hazards. Follow these steps to safely power off the tablet:
- Press and hold the power button located on the side or top of your tablet.
- A power options menu will appear on the screen. Select the “Power Off” option.
- Wait for a few moments as the tablet shuts down completely.
Make sure the tablet is powered off completely before proceeding to the next step. This will help prevent any accidental power-on actions while you are working on the internals of the device.
It is important to note that some Samsung tablets have a built-in battery that cannot be easily removed. In such cases, you may only be able to perform a soft reset by pressing and holding the power button to force a restart. If you are unsure whether your tablet’s battery is removable, consult the manufacturer’s documentation or support resources.
By powering off the tablet, you ensure that it is in a safe and powered-down state required for the battery replacement process. With the tablet powered off, you are now ready to open the tablet case and access the internal components.
Step 3: Opening the tablet case
Now that your Samsung tablet is powered off, it’s time to open the tablet case to access the battery. Here are the steps to open the tablet case:
- Take your plastic opening tool or guitar pick and locate the seam where the front and back of the tablet meet.
- Gently insert the plastic opening tool into the seam and carefully pry the back cover away from the front of the tablet.
- As you work your way around the edges, you will encounter plastic clips that hold the two pieces together. Apply gentle pressure to release the clips without forcing or breaking them.
- Continue prying the back cover until it is completely separated from the rest of the tablet. Be patient and take your time to avoid damaging any internal components.
- Set the back cover aside in a safe place. You now have access to the internal components of your tablet.
It’s worth noting that different Samsung tablet models may have different opening mechanisms or additional screws to remove before the back cover can be completely detached. If you encounter any resistance or difficulty during the process, consult your tablet’s user manual or look for online resources specific to your tablet model.
Remember to handle the tablet and its components with care, as they can be delicate and easily damaged. Avoid applying excessive force or using sharp tools that could scratch or crack the tablet’s surface.
With the tablet case open, you are ready to proceed to the next step and disconnect the battery.
Step 4: Disconnecting the battery
With the tablet case open, it’s time to disconnect the battery to ensure your safety and prevent any accidental power supply while working. Follow these steps to disconnect the battery:
- Locate the battery connector, which is usually a thin cable connecting the battery to the tablet’s motherboard.
- Using your tweezers, carefully grip the plastic connector housing at the end of the cable.
- Gently and firmly pull the connector straight out from the motherboard. Be cautious not to pull on the cable itself as it may damage the connection.
- Once the connector is detached, set it aside. Ensure that it is not touching any metal components to avoid any potential short-circuiting.
It’s important to exercise caution while disconnecting the battery. Do not use excessive force or yank the connector forcefully, as this can damage the cable or the motherboard. Take your time and handle the connector with care to safely detach it from the tablet.
If your tablet has additional connectors securing the battery, such as adhesive tape or clips, take note of their positions and carefully remove them before attempting to disconnect the battery.
By disconnecting the battery, you eliminate any power source to the tablet and reduce the risk of electrical shock or accidental damage. With the battery disconnected, you can confidently proceed to the next step of removing the old battery from your Samsung tablet.
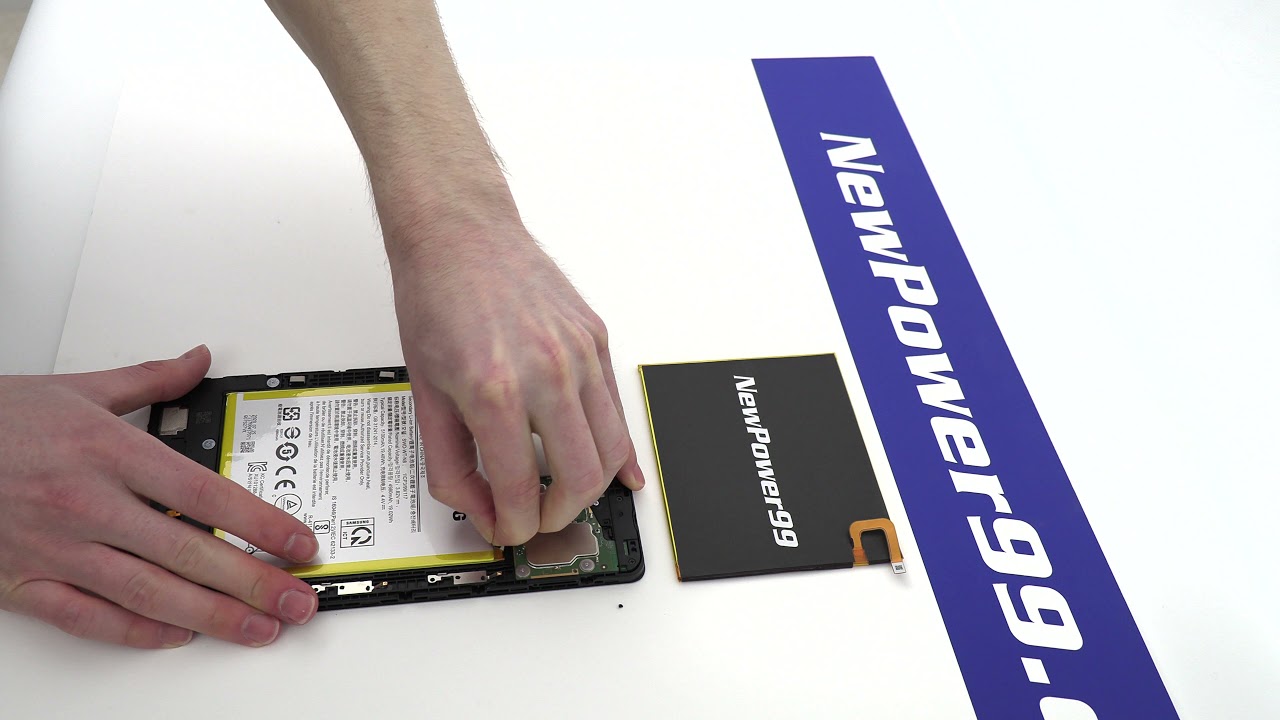
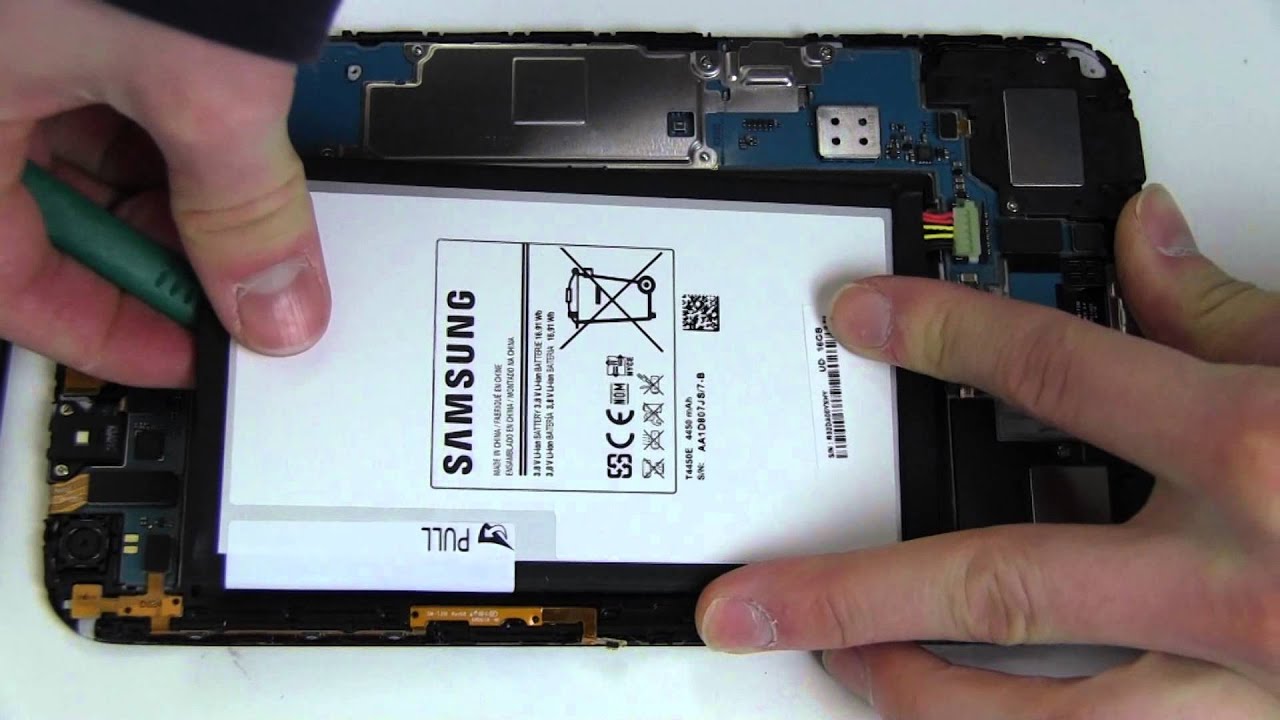
Step 5: Removing the old battery
Now that the battery is disconnected, you can safely remove the old battery from your Samsung tablet. Follow these steps to remove the old battery:
- Inspect the battery and identify any holding adhesive or strips that may be securing it to the tablet’s frame.
- If there are adhesive strips, carefully peel them off from the battery’s edges. Take care not to damage the battery or any of the surrounding components.
- Once the adhesive is removed, you can gently lift the battery from the tablet’s frame. Use your fingers or a plastic opening tool to pry it away if necessary.
- Be mindful of any cables or connectors that may still be attached to the battery. Disconnect them carefully, if applicable, using tweezers or a gentle pulling motion.
- Set aside the old battery in a safe place away from any heat or moisture sources. Properly dispose of the old battery following your local recycling guidelines.
It’s essential to handle the old battery with care, as it may contain hazardous materials. Be mindful not to puncture or bend the battery, as this can lead to damage and potential safety risks.
During this step, take the opportunity to inspect the battery compartment and surrounding area for any debris, dust, or damage. Clean the area if necessary, ensuring there is no obstruction for the new battery installation.
By removing the old battery, you are making way for the installation of the new battery, which will restore power and extend your tablet’s usage time. Once the old battery is safely removed, you can move on to the next step of installing the new battery in your Samsung tablet.
Step 6: Installing the new battery
Now that the old battery has been removed, it’s time to install the new battery in your Samsung tablet. Follow these steps to properly install the new battery:
- Take the new replacement battery designed for your Samsung tablet model.
- Position the new battery correctly in the battery compartment, aligning it with the connectors and screw holes, if applicable.
- If there are any cables or connectors that need to be attached to the battery, carefully connect them using tweezers or a gentle snapping motion. Ensure a secure and proper connection.
- If there were adhesive strips or pads on the old battery, you can use new adhesive strips provided with the replacement battery, or use adhesive tape cut to size. Apply the adhesive to the edges of the battery to secure it to the tablet’s frame.
- Ensure the battery is flat and properly seated in the compartment without any gaps or unevenness. This will help maintain a stable connection and prevent any shifting or movement.
During the installation, be mindful of any cables, connectors, or fragile components near the battery compartment. Take care not to accidentally damage or disconnect any internal parts while positioning the new battery.
If your replacement battery came with additional instructions or precautions, be sure to follow them for the specific installation process of your tablet model.
By installing the new battery, you are taking a significant step towards rejuvenating your Samsung tablet’s power source. With the new battery in place, you are now ready to proceed to the next step, which is reconnecting the battery.
Step 7: Reconnecting the battery
Now that the new battery is installed in your Samsung tablet, it’s time to reconnect it to ensure proper power supply. Follow these steps to reconnect the battery:
- Locate the battery connector on the tablet’s motherboard.
- Gently align the connector of the battery cable with the port on the motherboard.
- Hold the connector firmly and insert it straight into the port until it is securely seated. Be careful not to force it or bend any pins.
- Double-check the connection to make sure it is properly aligned and seated. The connector should be fully inserted and flush with the motherboard.
Take care while reconnecting the battery to avoid misalignment or damaging the connector or the motherboard. Ensure the connection is secure, as a loose connection may result in power issues or an unstable battery connection.
If your tablet had other connectors or clips securing the battery in place, make sure to reattach them according to their original positions. Refer to your tablet’s user manual or online resources for guidance if needed.
By reconnecting the battery, you reestablish the power supply to your Samsung tablet. This step sets the stage for closing the tablet case and completing the battery replacement process.
With the battery reconnected, you are now ready to move on to the next step of closing the tablet case and securing the components in place.
Step 8: Closing the tablet case
Now that the new battery is properly connected, it’s time to close the tablet case and secure all the components in place. Follow these steps to close the tablet case:
- Take the back cover of the tablet and align it carefully with the front of the tablet.
- Starting from one edge, gently press the back cover onto the tablet, ensuring that all the plastic clips snap securely into place.
- Work your way around the edges of the tablet, applying even pressure to ensure a snug fit between the front and back covers.
- Listen for audible clicks or feel for a secure connection as the clips lock the back cover in place.
While closing the tablet case, be cautious not to pinch any cables or connectors that may be near the edges. Take your time to align the back cover properly and avoid using excessive force, as this could potentially damage the clips or the tablet’s casing.
Once the back cover is securely in place, gently press on various areas of the tablet to ensure that it is tightly sealed and there are no gaps between the front and back covers.
With the tablet case closed, the internal components and new battery are protected, and the tablet’s aesthetics are restored. Now, you are almost ready to power on your Samsung tablet and enjoy its improved battery life.
Before proceeding to the final step, take a moment to clean the tablet’s exterior using a soft, lint-free cloth to remove any smudges or fingerprints from the screen and casing.
With the tablet case closed and the tablet looking clean and tidy, it’s time to move on to the last step of the process: powering on and testing the tablet.
Step 9: Powering on and testing the tablet
After successfully closing the tablet case, it’s time to power on your Samsung tablet and ensure that the battery replacement was a success. Follow these steps to power on and test the tablet:
- Locate the power button on the side or top of your tablet.
- Press and hold the power button for a few seconds until you see the device powering on. You may see the manufacturer’s logo or a loading screen.
- Once the tablet has booted up, check the battery icon or indicator to ensure that it is charging or showing an appropriate level of charge.
- Allow the tablet to fully power on and go through the startup process.
- Use the tablet as you normally would to test its functions and performance. Pay attention to the battery life and see if it has improved compared to the old battery.
During the testing phase, make sure to monitor the battery’s performance and observe if it holds a charge, charges properly, and provides sufficient usage time. If you notice any issues, such as rapid battery drain or the tablet not turning on, consult the troubleshooting guide in your tablet’s user manual or reach out to the manufacturer for further assistance.
It’s always a good idea to fully charge the new battery before extended usage. Follow the manufacturer’s instructions for optimal charging practices, which may include charging the tablet to 100% and allowing it to complete a full charge cycle.
Congratulations! By successfully powering on your Samsung tablet and testing its functionality, you have completed the battery replacement process. You can now enjoy extended battery life and continue using your tablet with confidence.
Conclusion
Changing the battery in a Samsung tablet can be a worthwhile endeavor to restore its power and extend its usage time. We have covered the step-by-step process, from gathering the necessary tools to successfully replacing the battery.
By following the instructions carefully, you can safely power off the tablet, open the tablet case, disconnect the old battery, and remove it from the compartment. Installing the new battery and reconnecting it allows you to close the tablet case and secure all the components. Finally, powering on and testing the tablet helps ensure a successful battery replacement.
Remember to exercise caution throughout the process, handling both the tablet and the battery with care. Take your time, follow the manufacturer’s guidelines, and refer to your tablet’s user manual or online resources for specific instructions related to your tablet model.
It’s essential to note that battery replacement may void your warranty. If your tablet is still under warranty, consider seeking assistance from Samsung or an authorized service center to avoid any potential issues.
With a new battery in place, your Samsung tablet can regain its functionality and provide you with extended usage time. Enjoy the convenience of a longer-lasting battery and continue using your tablet for work, entertainment, and staying connected.
We hope this guide has been valuable in helping you change the battery in your Samsung tablet. Now, go ahead and enjoy your tablet’s enhanced performance and extended battery life!