Introduction
Welcome to our guide on how to change a tablet battery. As we rely more and more on our tablets for work, entertainment, and communication, ensuring that our devices have a properly functioning battery becomes increasingly important. Over time, tablet batteries can lose their efficiency and may need to be replaced. In this article, we will provide you with a step-by-step guide on how to change the battery in your tablet, as well as some valuable tips to extend its battery life.
Whether your tablet is experiencing a significant decrease in battery life, or you simply want to have a spare battery on hand, knowing how to change your tablet battery can save you time and money. It is important to note that the process of changing a tablet battery can vary depending on the make and model of your device. Therefore, it is always a good idea to consult the manufacturer’s instructions or seek professional assistance if you are unsure. With that said, let’s dive into the world of tablet batteries and discover how to make the necessary switch.
Before we proceed, it is essential to emphasize the importance of handling the tablet battery with care. Batteries contain potentially harmful chemicals, and mishandling them can result in damage to the device or personal injury. We highly recommend following safety guidelines and taking precautions such as working in a well-ventilated area and wearing protective gloves when handling the battery.
In the following sections, we will provide you with a comprehensive guide on how to change a tablet battery, including the different types of batteries, the tools you will need, and a step-by-step procedure to ensure a successful battery replacement. So let’s get started on breathing new life into your tablet!
Why would you need to change the tablet battery?
There are several reasons why you may need to change the battery in your tablet. Over time, the battery’s capacity can degrade, leading to shorter battery life and the need for more frequent charging. If you find that your tablet is not holding a charge as long as it used to, or if it suddenly shuts off even when the battery level appears to be sufficient, it may be time to replace the battery.
Physical damage to the battery can also necessitate a replacement. If you drop your tablet or expose it to extreme temperatures, the battery may become damaged, affecting its performance and potentially posing a safety risk. Swelling or bulging of the battery is a clear indication of damage and should be addressed immediately by replacing the battery.
Furthermore, as technology advances, new tablets are released with improved battery life and efficiency. If you have an older model and are struggling with inadequate battery performance, replacing the battery with a newer and more efficient one can significantly enhance your tablet experience.
Another reason to consider replacing your tablet battery is to have a spare on hand. This is especially useful for frequent travelers or individuals who heavily rely on their tablets throughout the day. Having an extra battery can provide peace of mind, ensuring that you have a backup power source when needed.
It’s important to note that not all tablets have user-replaceable batteries. Some devices are built with non-removable batteries, which require professional assistance for replacement. If you find yourself in this situation, it is advisable to contact the manufacturer or an authorized service center to safely replace the battery.
In the next section, we will explore the different types of batteries found in tablets and provide guidelines on choosing the right battery for your device.
What type of battery does your tablet have?
Tablets typically use one of three types of batteries: lithium-ion (Li-ion), lithium-polymer (Li-Po), or nickel-metal hydride (NiMH). Each type has its own characteristics, advantages, and limitations. Understanding the type of battery your tablet uses is important when it comes to replacing it.
Lithium-ion (Li-ion) batteries are the most common type found in modern tablets. They are known for their high energy density, which means they can store a larger amount of energy in a smaller size compared to other battery types. Li-ion batteries are also lightweight, have a relatively low self-discharge rate, and do not suffer from the “memory effect” issue that used to plague older battery technologies. This makes them an excellent choice for portable devices like tablets.
Lithium-polymer (Li-Po) batteries are similar to Li-ion batteries but have a slightly different construction. They are often found in thinner and sleeker tablets, as they can be molded into various shapes to fit the device’s design. Li-Po batteries offer improved flexibility, stability, and safety compared to Li-ion batteries. They are also lighter and have a higher energy density than traditional Li-ion batteries.
Nickel-metal hydride (NiMH) batteries are less common in tablets nowadays, as they are bulkier and have a lower energy density compared to Li-ion and Li-Po batteries. NiMH batteries are known for their longer lifespan and affordability. However, they are more prone to self-discharge and suffer from the memory effect, which can reduce their overall capacity over time.
It’s crucial to identify the type of battery your tablet uses before purchasing a replacement. This information can usually be found in the device’s user manual or on the manufacturer’s website. Additionally, you can usually find the battery information by removing the tablet’s back cover and examining the existing battery. Make sure to note the battery’s model number, voltage, and capacity to ensure compatibility when shopping for a replacement.
Now that you know more about the different types of tablet batteries, let’s move on to the tools and equipment you’ll need to change the battery.
Tools and equipment needed to change the tablet battery
Before you begin the process of changing the battery in your tablet, it’s important to gather the necessary tools and equipment. Having the right tools will ensure a smooth and successful battery replacement. Here are the essential items you will need:
1. Replacement battery: Ensure that you purchase a compatible battery for your specific tablet model. Refer to the battery’s model number, voltage, and capacity to make sure it matches the original battery.
2. Screwdriver set: Most tablets require a small Phillips or Torx screwdriver to remove the back cover and access the battery compartment. Check the type and size of screws used in your tablet and acquire the appropriate screwdriver.
3. Plastic opening tools: These non-conductive tools are useful for prying open the tablet’s casing without causing damage. They come in various shapes and sizes, allowing you to gently separate the components without scratching or breaking them.
4. Tweezers: A pair of fine-tipped tweezers can be handy for gripping small screws or connectors during the battery replacement process. They allow for precise handling and positioning of delicate components.
5. Anti-static wrist strap: While not a mandatory requirement, wearing an anti-static wrist strap can help discharge static electricity from your body, preventing it from damaging sensitive electronic components during the repair process.
6. Cleaning materials: It’s a good idea to have some lint-free cloths or microfiber wipes on hand to clean any dust or fingerprints from the tablet’s components. This will help ensure a clean and clear workspace as you work on the battery replacement.
7. Adhesive strips or adhesive tape: Depending on the tablet model, you might need adhesive strips or adhesive tape to secure the new battery in place. These adhesives ensure that the battery stays firmly attached to the device’s housing.
Always follow safety guidelines and work in a well-lit and clean area. Make sure to power off your tablet before attempting to replace the battery and handle the components with care. If you’re unsure about any aspect of the process, it’s advisable to consult the manufacturer’s instructions or seek professional assistance.
Now that you have gathered the necessary tools and equipment, we can proceed to the step-by-step guide on how to change the battery in your tablet.
Step-by-step guide to changing the tablet battery
Changing the battery in your tablet may seem like a daunting task, but with the right tools and careful execution, you can successfully replace the battery and enjoy extended battery life. Here is a step-by-step guide to help you through the process:
Step 1: Preparation
Power off your tablet and gather all the necessary tools and equipment. Ensure you are working in a well-lit and clean area to avoid any accidental damage or loss of small components.
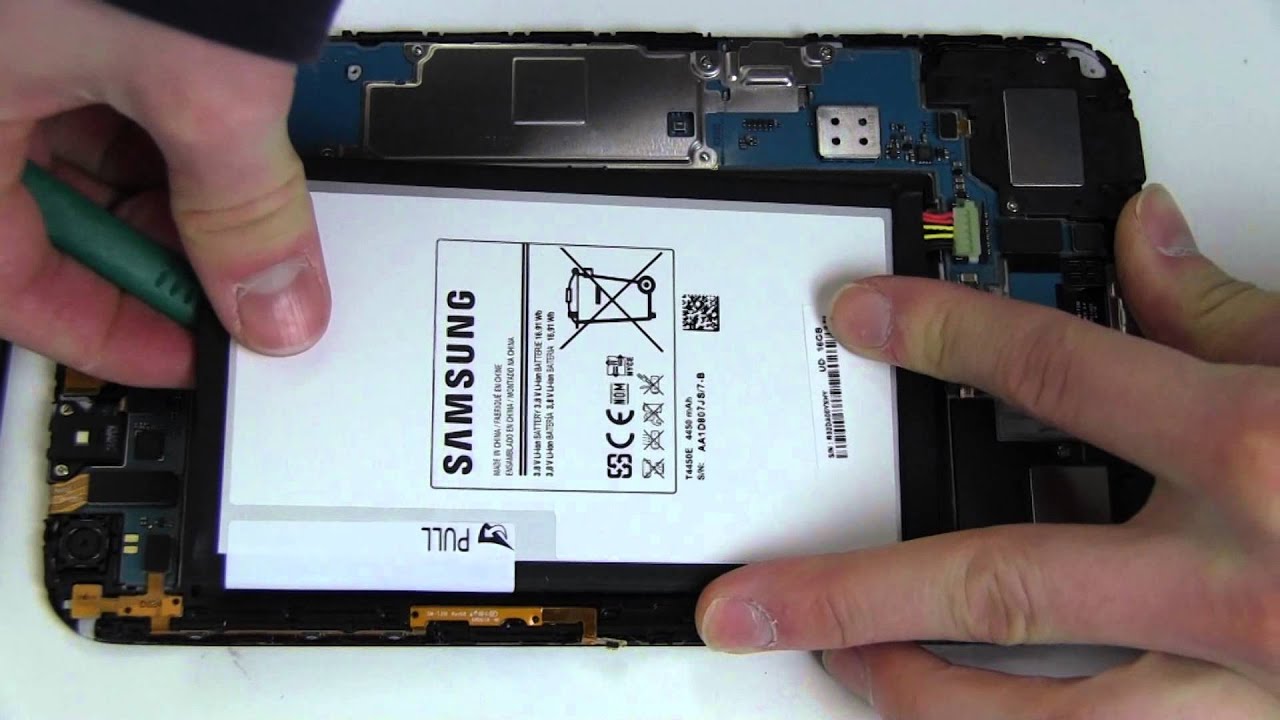
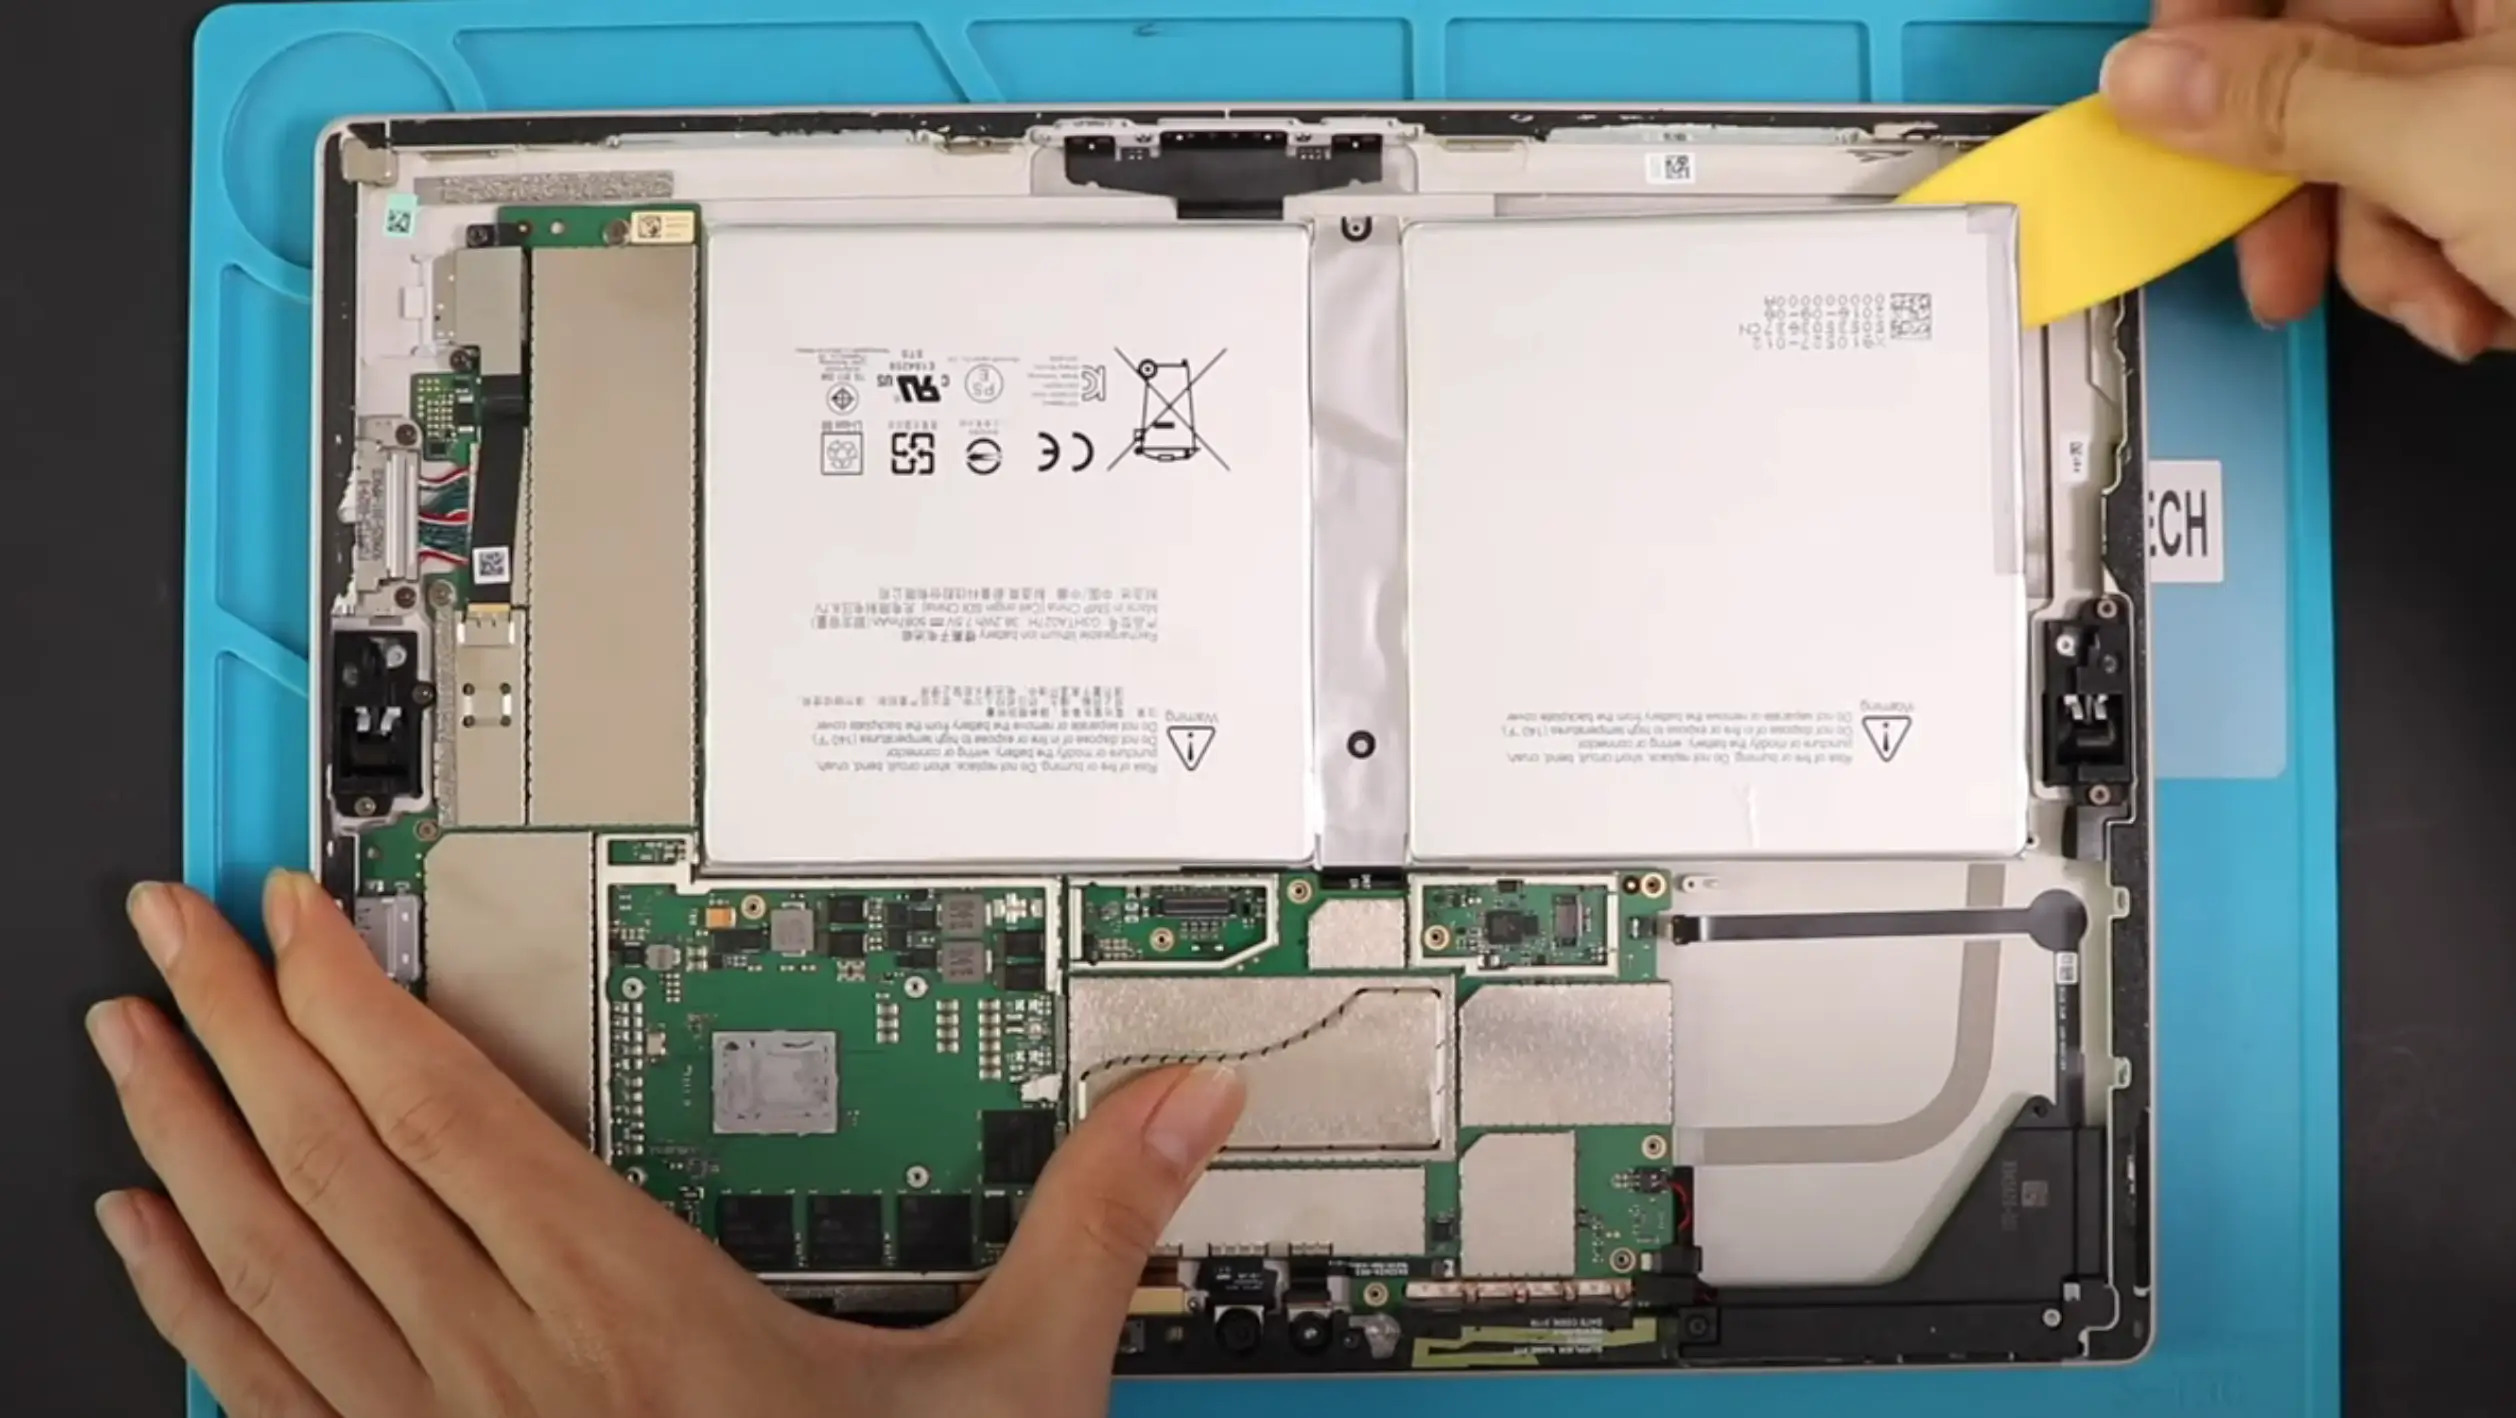
Step 2: Remove the back cover
Use a small screwdriver to remove the screws holding the back cover of your tablet in place. Set the screws aside in a safe place and carefully lift off the back cover. Some tablets may have clips or adhesive holding the cover, so gently pry it open with a plastic opening tool if necessary.
Step 3: Disconnect the old battery
Locate the battery and identify the connectors. Carefully disconnect any wires or ribbon connectors attached to the battery. Take note of the connection points and how they are positioned for later reassembly.
Step 4: Remove the old battery
If the battery is secured with adhesive strips or adhesive tape, carefully detach it from the tablet’s housing. Use a plastic opening tool or tweezers to gently lift the battery from its position, taking care not to damage any surrounding components.
Step 5: Prepare the new battery
Take out the new replacement battery and ensure it matches the specifications of your original battery. If needed, transfer any adhesive strips or adhesive tape from the old battery to the new one to secure it in place.
Step 6: Connect the new battery
Align the new battery in the designated slot, making sure it is properly positioned. Reconnect any wires or ribbon connectors following the same configuration as noted during the disconnection process. Ensure that the connections are secure but not overly tight to avoid damaging the connectors.
Step 7: Replace the back cover
Carefully reattach the back cover, aligning it with the tablet’s housing. Replace and tighten the screws using the appropriate screwdriver. If there are any clips or adhesive, ensure they are properly secured to keep the back cover in place.
Step 8: Power on and test
Once the back cover is securely in place, power on your tablet and check if the battery is functioning correctly. Monitor the battery level and observe if there are any improvements in battery life compared to before the replacement.
By following these step-by-step instructions, you can successfully change the battery in your tablet. However, it’s important to note that the process can vary depending on your tablet’s make and model. Always refer to the manufacturer’s instructions or seek professional assistance if you are unsure or encounter any difficulties during the battery replacement process.
In the next section, we will go over some common mistakes to avoid when changing the tablet battery.
Common mistakes to avoid when changing the tablet battery
Changing the battery in your tablet requires precision and attention to detail. To ensure a successful battery replacement and avoid potential damage, it’s important to be aware of common mistakes that should be avoided. Here are some key mistakes to keep in mind:
Mistake 1: Skipping safety precautions
One of the most significant mistakes you can make when changing a tablet battery is disregarding safety precautions. Always power off your tablet before starting the process and handle the battery and components with care. Wear protective gloves if necessary and work in a well-ventilated area to minimize any risks associated with the battery’s chemical components.
Mistake 2: Not researching the right battery
Using an incompatible battery can lead to performance issues or even damage to your tablet. Avoid this mistake by carefully researching and purchasing the correct replacement battery for your specific tablet model. Refer to the battery’s model number, voltage, and capacity to ensure compatibility.
Mistake 3: Neglecting to backup your data
Before starting the battery replacement process, it’s crucial to create a backup of all your important data. Accidents can happen during the repair, and you don’t want to risk losing valuable files or information. Take the time to back up your tablet’s data to a computer or external storage device to avoid any potential data loss.
Mistake 4: Rushing the disassembly process
Take your time when removing the back cover and disconnecting the old battery. Rushing this process can potentially damage delicate components or connectors. Carefully unscrew and lift off the back cover, and gently disconnect any wires or ribbon connectors, following the proper steps. If you encounter resistance, double-check for any additional screws or clips holding the components together.
Mistake 5: Improperly connecting the new battery
When installing the new battery, make sure to connect it properly, following the same configuration as when you disconnected the old battery. Ensure that the connectors are securely attached but avoid over-tightening them, as this can damage the connectors or wires. Double-check the connections before reassembling the tablet.
Mistake 6: mishandling the battery
Batteries are delicate components, and mishandling them can cause damage or even pose a safety hazard. Avoid bending or puncturing the battery, as this can lead to leaks or other malfunctions. Always handle the battery with care, using tweezers or non-conductive tools if necessary, and avoid exposing it to extreme temperatures or physical impacts.
Mistake 7: Not testing the new battery
Once you have completed the battery replacement process, power on your tablet and test the new battery. Monitor the battery life and observe for any improvements compared to the old battery. If you notice any abnormalities or issues, such as overheating or rapid discharge, disconnect the battery and seek professional assistance.
By being aware of these common mistakes and taking the necessary precautions, you can avoid potential pitfalls during the tablet battery replacement process. Now let’s move on to some helpful tips for extending the battery life of your tablet.
Tips for extending the tablet battery life
While replacing your tablet’s battery can significantly improve its performance, it’s also essential to take proactive steps to extend its battery life. Here are some effective tips to help you maximize the battery life of your tablet:
1. Adjust screen brightness:
Lowering the screen brightness can have a significant impact on battery life. Reduce the brightness level to a comfortable but energy-efficient setting. Consider enabling auto-brightness to automatically adjust the screen brightness based on ambient lighting conditions.
2. Manage app notifications:
Limit the number of app notifications to prevent unnecessary battery drain. Review your app settings and disable notifications for non-essential apps or customize them to receive only important alerts.
3. Use Wi-Fi instead of cellular data:
When possible, connect your tablet to a Wi-Fi network rather than using cellular data. Wi-Fi consumes less power than cellular data, extending battery life while browsing the internet or streaming content.
4. Close unused apps:
Apps running in the background can continue to consume battery power. Close apps that you are not actively using to conserve energy. On some tablets, you can use the multitasking view or task manager to easily close unused apps.
5. Enable battery-saving mode:
Most tablets have a built-in battery-saving mode that helps optimize power consumption. Enable this mode to automatically adjust settings for maximum battery efficiency, such as reducing CPU performance or limiting background processes.
6. Limit widgets and live wallpapers:
Widgets and live wallpapers can be visually appealing but can also drain the battery. Keep the number of widgets on your tablet’s home screen to a minimum, and opt for static wallpapers rather than dynamic or animated ones.
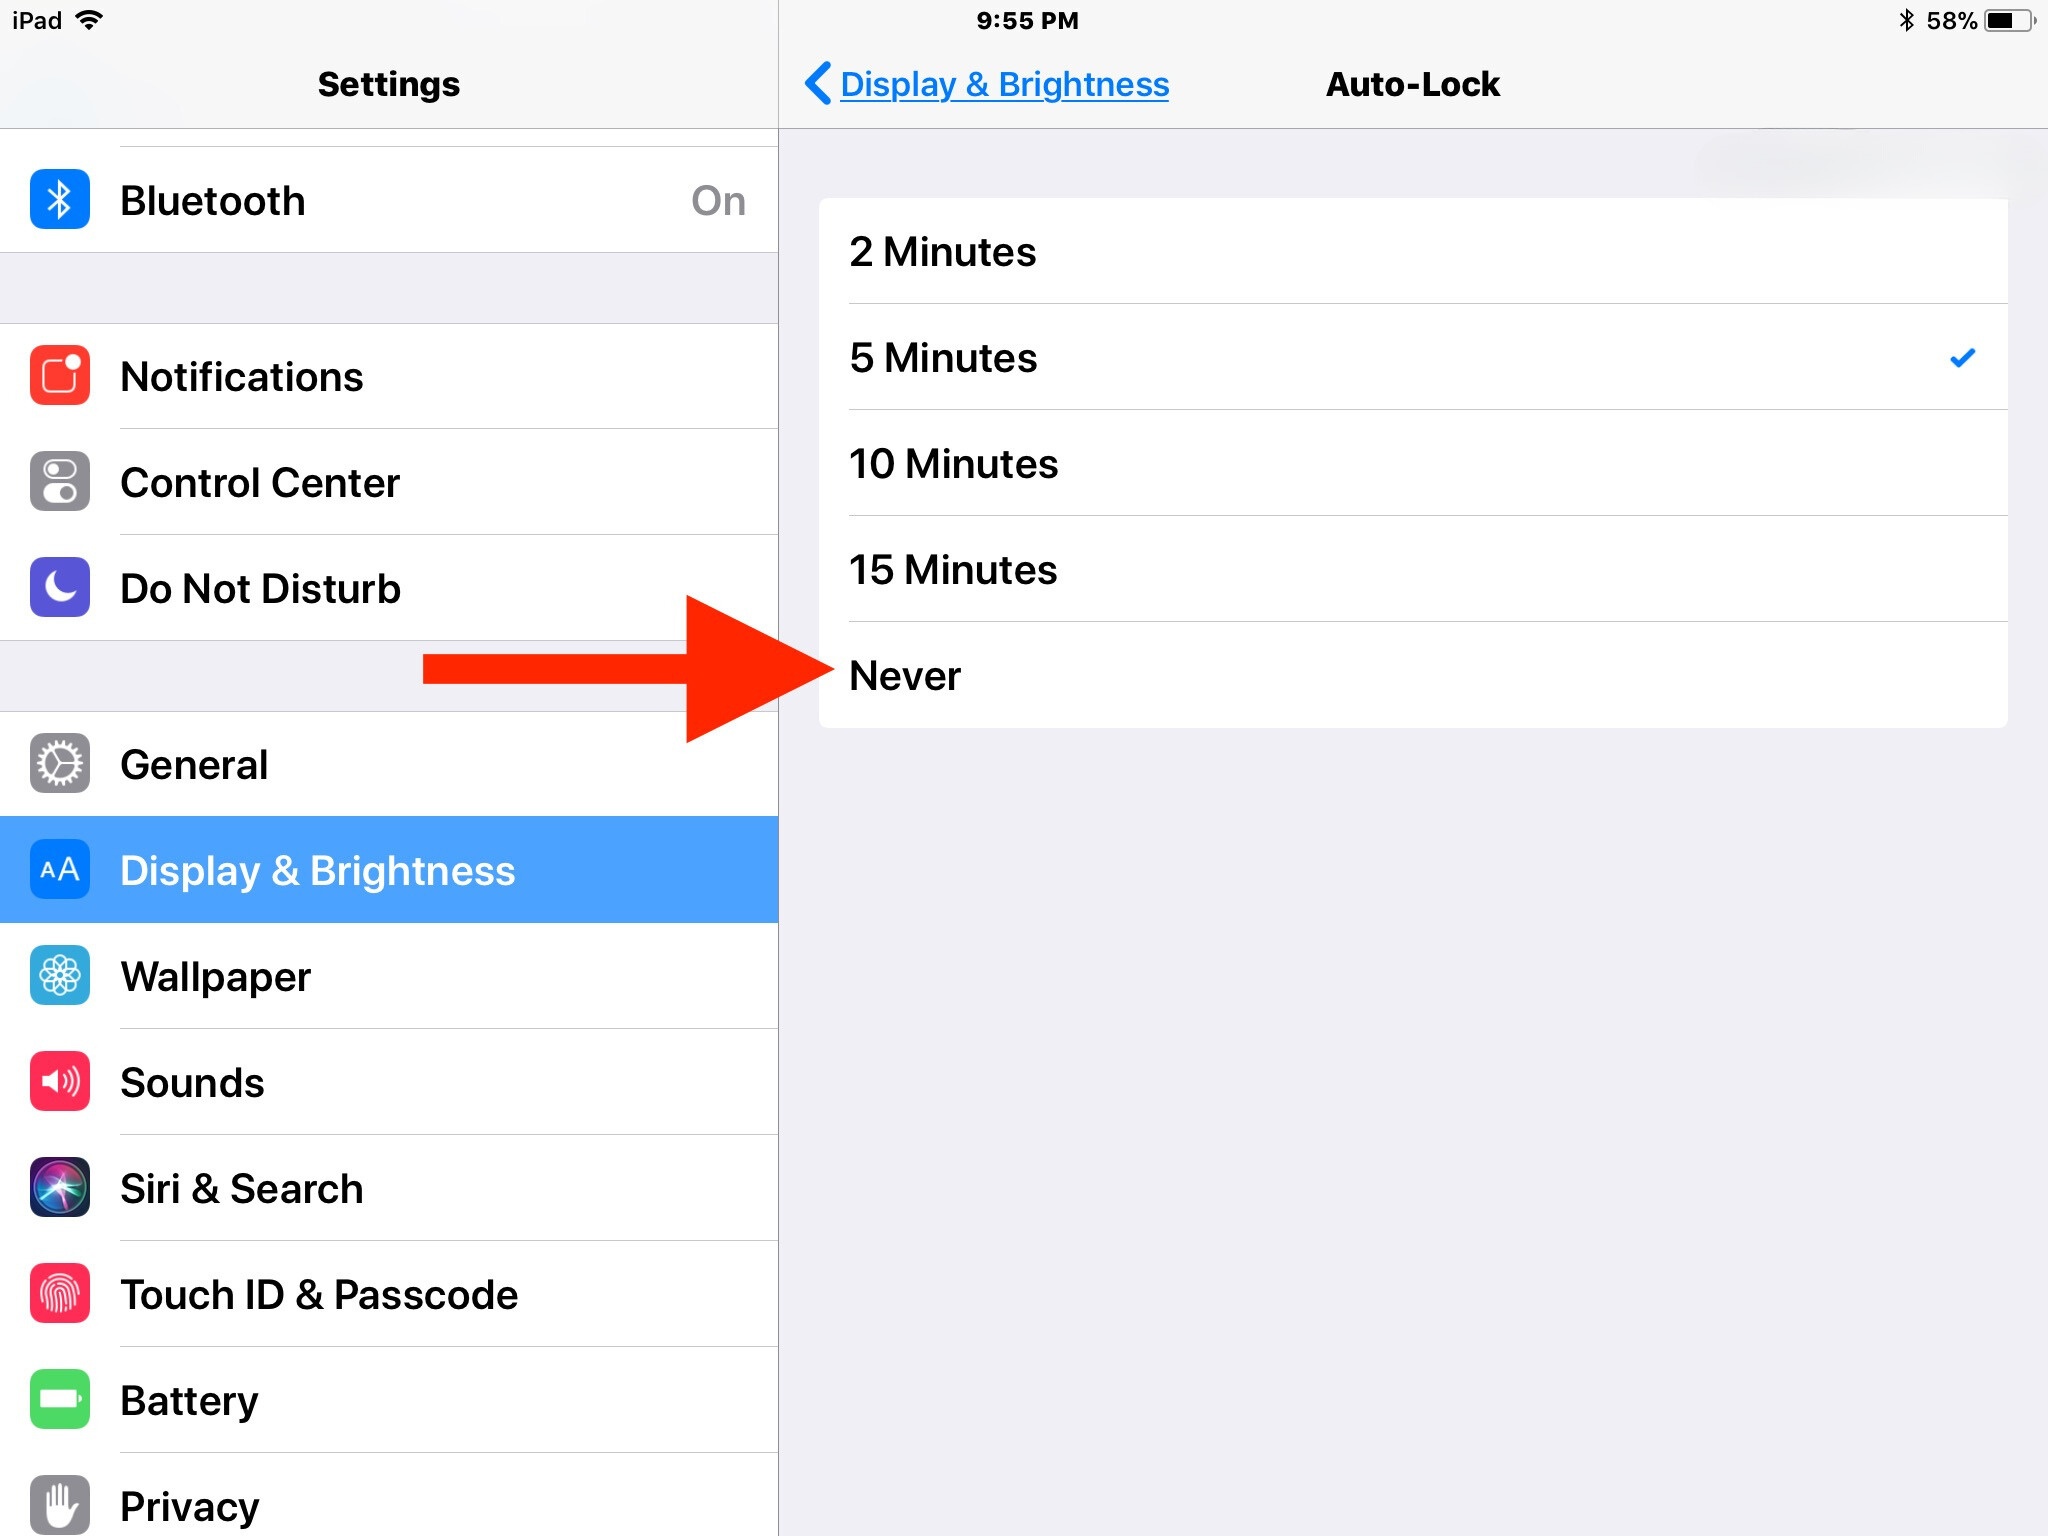
7. Reduce screen timeout:
Set your tablet’s screen timeout to a short duration to minimize battery usage when the device is not in use. This ensures that the screen turns off promptly when idle, conserving battery power.
8. Update apps and software:
Keep your tablet’s apps and operating system up to date. Developers often release updates that optimize battery usage and performance. Check for app updates regularly and install the latest firmware updates provided by the tablet manufacturer.
9. Use battery-saving apps:
Consider installing battery-saving apps or utility apps that can help extend your tablet’s battery life. These apps often provide additional features like managing app usage, monitoring power consumption, and optimizing settings for optimal battery performance.
10. Avoid extreme temperatures:
Extreme temperatures, both hot and cold, can affect battery life and performance. Avoid exposing your tablet to direct sunlight, and refrain from using or charging your tablet in very hot or cold environments.
By implementing these tips, you can significantly prolong the battery life of your tablet, allowing for longer usage without frequent recharging. Now, let’s address some commonly asked questions about tablet battery replacement.
Frequently Asked Questions (FAQs) about tablet battery replacement
Here are some commonly asked questions regarding tablet battery replacement:
Q: Can I replace the battery in any tablet?
A: Not all tablets have user-replaceable batteries. Some tablets are built with non-removable batteries, which require professional assistance for replacement. It’s best to check the manufacturer’s instructions or contact their customer support to determine if your tablet’s battery can be replaced by the user.
Q: How long does a tablet battery last?
A: The lifespan of a tablet battery depends on various factors, including usage patterns, battery quality, and tablet model. On average, tablet batteries can last between 2 to 4 years before their performance starts to decline.
Q: Can I use a third-party battery for my tablet?
A: While it is possible to use a third-party battery for a tablet, it is recommended to use a battery from the tablet’s manufacturer or a reputable supplier. Third-party batteries may not have undergone the same quality control measures, which could potentially lead to compatibility or safety issues.
Q: How do I know if my tablet’s battery needs to be replaced?
A: If your tablet experiences significantly reduced battery life, sudden shutdowns even at higher battery levels, or if the battery swells or bulges, it may be an indication that the battery needs to be replaced.
Q: Can I use my tablet while it’s charging?
A: Yes, in most cases, you can use your tablet while it’s charging. However, keep in mind that using resource-intensive apps or performing tasks that require a high amount of processing power may slow down the charging process.
Q: Do I need to calibrate my tablet battery after replacing it?
A: Some tablets may benefit from battery calibration after a battery replacement. Check the manufacturer’s guidelines to see if they recommend calibration. Calibration involves fully charging the tablet and then completely discharging it to recalibrate the battery level readings.
Q: Is it possible to extend the battery life of my tablet?
A: Yes, there are several steps you can take to extend the battery life of your tablet, such as adjusting screen brightness, closing unused apps, using Wi-Fi instead of cellular data, and enabling battery-saving modes. Refer to the “Tips for extending the tablet battery life” section in this article for more detailed tips.
It’s important to consult the tablet’s manufacturer guidelines or seek professional assistance if you have specific questions or concerns about your tablet’s battery replacement process.
Now that you have a better understanding of tablet battery replacement, let’s wrap up this article.
Conclusion
In this comprehensive guide, we have explored the process of changing a tablet battery, as well as provided valuable tips for extending its battery life. Replacing the battery in your tablet can breathe new life into the device and ensure optimal performance. Remember to follow safety precautions, gather the necessary tools, and consult the manufacturer’s instructions or seek professional assistance if needed.
Understanding the type of battery your tablet uses is crucial before purchasing a replacement. Whether it’s a lithium-ion, lithium-polymer, or nickel-metal hydride battery, ensure compatibility to guarantee a successful battery replacement.
We’ve also discussed common mistakes to avoid during the battery replacement process, such as skipping safety precautions, not researching the right battery, and mishandling the battery. By being aware of these mistakes, you can minimize risks and increase the chances of a smooth battery replacement.
Additionally, we provided tips for extending the tablet battery life, including adjusting screen brightness, managing app notifications, and using Wi-Fi whenever possible. By implementing these strategies, you can optimize power usage and enjoy longer battery life on your tablet.
Lastly, we addressed frequently asked questions about tablet battery replacement, clarifying concerns about compatibility, battery lifespan, and using third-party batteries. It’s crucial to refer to manufacturer guidelines and seek professional advice when in doubt.
Remember, changing the battery in your tablet can effectively address battery-related issues and improve overall performance. Stay mindful of safety precautions, conduct thorough research, and follow the step-by-step guide provided in this article for a successful battery replacement.
Now it’s time to put your newfound knowledge into action and enjoy extended battery life on your tablet!