Introduction
Are you tired of the default screen resolution on your Samsung tablet? Do you want to change it to better suit your preferences or enhance your viewing experience? Fortunately, Samsung tablets offer a simple and straightforward process to adjust the screen resolution to your liking.
Screen resolution refers to the number of pixels displayed on your screen, which directly impacts the clarity, sharpness, and overall quality of the visuals. By adjusting the screen resolution, you can optimize your tablet for various activities like gaming, watching movies, or reading ebooks.
In this article, we will guide you through the step-by-step process of changing the screen resolution on your Samsung tablet. Whether you have the latest Samsung Galaxy Tab or an older model, the steps are generally the same. So, grab your tablet and let’s get started on customizing your screen resolution!
Before diving into the process, it’s worth noting that changing the screen resolution may affect the performance and battery life of your tablet. Higher resolutions require more processing power, which can result in decreased performance or reduced battery life. So, it’s essential to find the right balance between visual quality and device capabilities.
Now that we’ve covered the basics let’s move on to the first step of accessing the settings menu on your Samsung tablet.
Step 1: Accessing the Settings Menu
The first step to changing the screen resolution on your Samsung tablet is accessing the Settings menu. The Settings menu allows you to customize various aspects of your tablet, including the display settings.
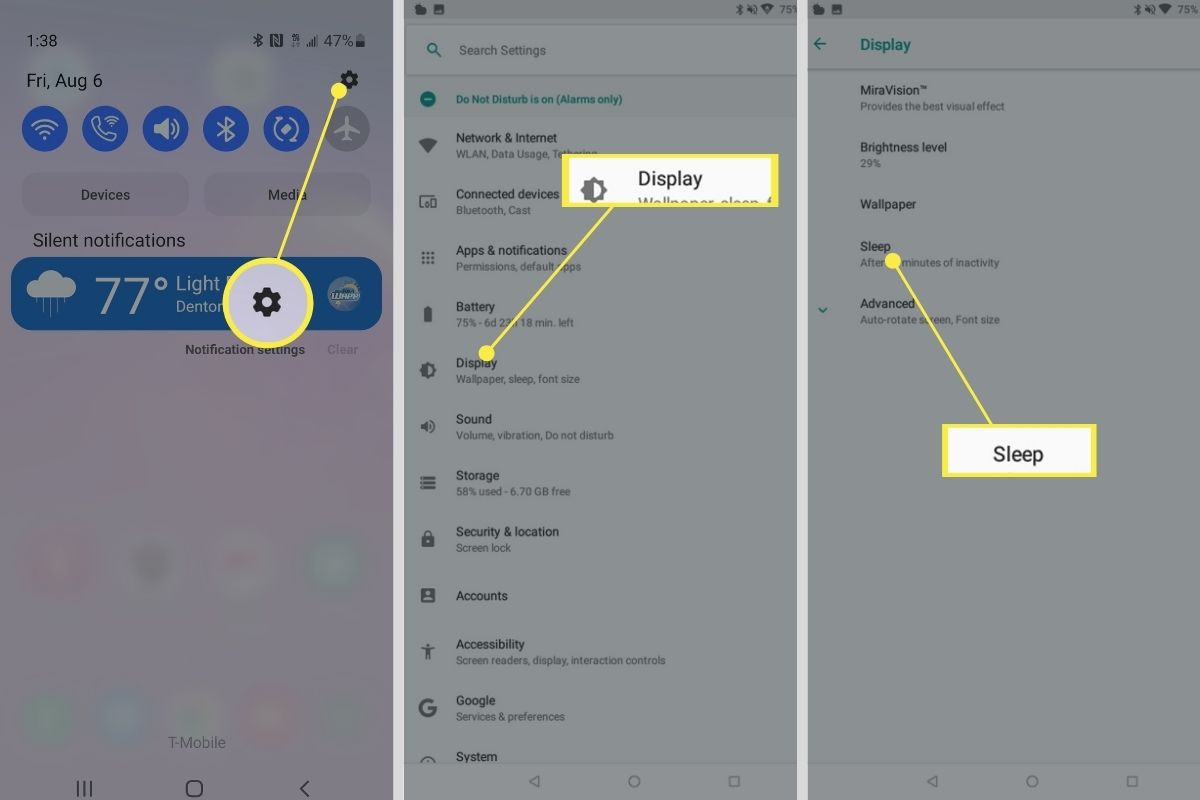
To access the Settings menu, start by unlocking your tablet and navigating to the home screen. Look for the “Settings” app icon, which is usually represented by a gear or a cogwheel. Once you locate it, tap on the icon to open the Settings menu.
Alternatively, you can swipe down from the top of the screen to reveal the notification panel and tap the gear icon to access the Settings menu directly.
On some Samsung tablets, you may need to swipe up from the bottom of the screen or across from the side to access the app drawer, where the Settings app is usually located. Once you find the app, tap on it to open the Settings menu.
Once you’ve successfully opened the Settings menu, you’re ready to move on to the next step: navigating to the display settings.
Note that the exact location and appearance of the Settings app may vary slightly depending on the model and Android version of your Samsung tablet. However, you can typically find it on the home screen or in the app drawer.
Now that you know how to access the Settings menu, let’s proceed to the next step and learn how to navigate to the display settings.
Step 2: Navigating to the Display Settings
After accessing the Settings menu on your Samsung tablet, the next step is to navigate to the display settings. The display settings contain various options to customize and adjust the visual aspects of your tablet, including the screen resolution.
To find the display settings, scroll through the Settings menu until you see the “Display” or “Display & Brightness” option. Tap on it to enter the display settings.
In the display settings, you’ll find a range of options related to the appearance and functionality of your tablet’s display. These may include brightness, font size, screen timeout, and of course, screen resolution.
Depending on the Samsung tablet model and Android version, the display settings may be organized slightly differently. You may need to explore different sections or tabs to locate the screen resolution option.
If you are having trouble finding the screen resolution option, you can use the search function within the Settings menu. Look for a magnifying glass icon or a search bar, usually located at the top or bottom of the screen. Type in “screen resolution” or just “resolution” and the settings related to the display should appear.
Once you have found the screen resolution option in the display settings, you’re ready to move on to the next step: adjusting the screen resolution to your desired settings.
Now that you know how to navigate to the display settings, let’s continue to the next step and learn how to adjust the screen resolution on your Samsung tablet.
Step 3: Adjusting the Screen Resolution
Now that you have successfully navigated to the display settings on your Samsung tablet, it’s time to adjust the screen resolution to your desired settings. Changing the screen resolution allows you to optimize the visual clarity and quality according to your preferences and needs.
Within the display settings, look for the option that specifically mentions screen resolution. It may be labeled as “Screen Resolution,” “Resolution,” or something similar.
Tapping on the screen resolution option will present you with a list of available resolution options. Samsung tablets typically provide a range of preset resolution options for you to choose from.
It’s important to note that higher resolutions offer crisper and more detailed visuals, but they may also consume more battery power. On the other hand, lower resolutions may sacrifice some visual quality but can help conserve battery life. Consider your priorities and needs when selecting a screen resolution.
Now that you’re ready to adjust the screen resolution, let’s move on to the next step: selecting the desired screen resolution from the available options.
Remember, different Samsung tablet models may have different resolution options available, so select the one that suits your needs and preferences.
In the next step, we will guide you through the process of confirming the changes and ensuring that your new screen resolution settings take effect.
Step 4: Selecting the Desired Screen Resolution
With the list of available screen resolution options in front of you, it’s time to select the desired resolution for your Samsung tablet. Choosing the right screen resolution can greatly impact your viewing experience, so take some time to consider your preferences and needs.
Browse through the available resolution options and tap on the one that best suits your requirements. The options may be displayed as pixel dimensions, such as 1920×1080 or 2560×1600, or refer to standard resolutions like HD, FHD, or QHD.
Keep in mind that selecting a higher resolution will result in crisper and more detailed visuals, while a lower resolution might offer better performance and battery life.
As you select a new resolution, take note that the changes might be instantly applied or require confirmation. In some cases, a pop-up message may appear asking if you want to keep the new resolution settings. Make sure to confirm and save the changes for them to take effect.
Once you have selected your desired screen resolution and confirmed the changes, you’re almost done. However, it’s essential to perform the final step of confirming the changes to ensure they are applied successfully.
In the next step, we will guide you through the process of confirming the changes and making sure your new screen resolution settings are in effect.
Step 5: Confirming the Changes
After selecting your desired screen resolution on your Samsung tablet, it’s crucial to confirm the changes you made to ensure they are successfully applied. This step ensures that your tablet’s display will reflect the new screen resolution you have chosen.
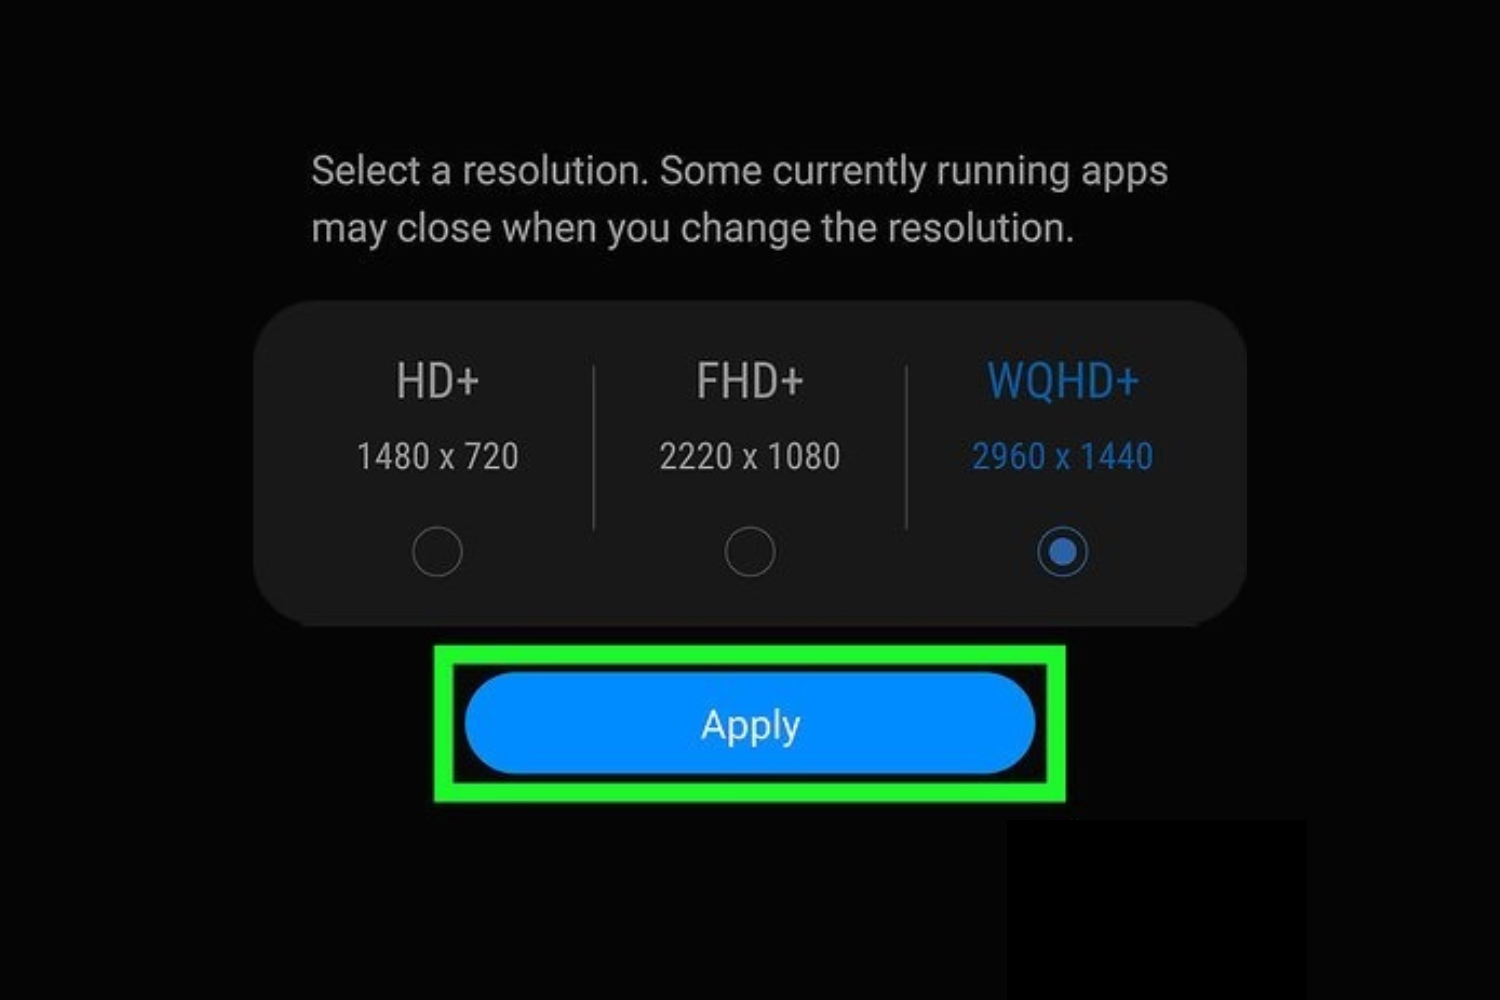
Once you have selected the desired screen resolution, you may see a confirmation message or dialog box asking if you want to apply the changes. This message typically gives you a few seconds to review the new resolution settings before applying them.
Read the confirmation message carefully to ensure you are happy with the selected resolution and its potential impact on battery life and performance. If you are satisfied with the changes, tap on the “Apply” or “Confirm” button to proceed.
After confirming the changes, your Samsung tablet will immediately adjust the screen resolution to the new setting you selected. It may take a few moments for the adjustments to take effect, but once they do, you should notice the difference in the visual quality and clarity of your tablet’s display.
To double-check if the changes have been applied successfully, you can open a high-resolution image or video to examine the level of detail and clarity. If the visuals appear sharper and more vibrant, it indicates that the new screen resolution is active on your tablet.
Congratulations! You have successfully confirmed and applied the changes to the screen resolution on your Samsung tablet. Now, it’s time to enjoy the benefits of your personalized display settings.
In the final step, we will wrap up the process and conclude the guide on how to change the screen resolution on your Samsung tablet.
Step 6: Enjoying the New Screen Resolution
With the changes to the screen resolution applied, it’s time to sit back, relax, and enjoy the enhanced visuals on your Samsung tablet. The new screen resolution allows you to experience sharper details, improved clarity, and overall better viewing quality.
Take advantage of the optimal screen resolution for different activities like gaming, streaming videos, reading, or simply browsing the web. The improved visual quality will enhance your overall digital experience and make everything on your tablet look more vibrant and captivating.
When watching videos or movies, you’ll notice a heightened level of detail in the visuals, making your favorite content even more enjoyable. Gaming will become more immersive as the graphics become clearer, allowing you to fully appreciate the game’s intricacies.
Reading ebooks or articles on your tablet will be a more pleasant experience with crisper text and sharper images. The improved visual clarity reduces eye strain and makes it easier to read for more extended periods.
It’s important to note that while a higher screen resolution provides better quality visuals, it may consume slightly more battery power. Keep this in mind and adjust your tablet’s settings accordingly to balance visual quality and battery life.
If, for any reason, you decide that the new screen resolution is not to your liking, don’t worry. You can always repeat the steps mentioned earlier to navigate to the display settings and select a different resolution that better suits your preferences.
Now that you have successfully changed the screen resolution on your Samsung tablet and are enjoying the improved visuals, take some time to explore other customization options and settings within the display settings. Maximize your tablet’s potential by adjusting brightness, font size, or other related settings to further enhance your viewing experience.
By understanding and utilizing the various display options available on your Samsung tablet, you can tailor the settings to your liking and make the most out of your device’s capabilities.
Congratulations! You have completed the process of changing the screen resolution on your Samsung tablet. Enjoy the new visual experience and make the most out of your tablet’s display!
Conclusion
Changing the screen resolution on your Samsung tablet is a simple yet powerful way to customize your viewing experience and optimize the visual quality of your device. Through a few easy steps, you can enhance the sharpness, clarity, and overall appeal of the visuals on your tablet’s display.
In this guide, we walked you through the process of changing the screen resolution on your Samsung tablet. We started by accessing the Settings menu, then navigating to the display settings, adjusting the screen resolution, and confirming the changes. Finally, we discussed the importance of enjoying the new screen resolution and maximizing the benefits of the enhanced visuals.
Remember, selecting the right screen resolution involves finding the balance between visual quality and device performance. Higher resolutions offer crisper visuals but may impact battery life, while lower resolutions prioritize efficiency but sacrifice some visual quality. It’s essential to assess your preferences and needs to find the resolution that suits you best.
By changing the screen resolution on your Samsung tablet, you can optimize the display for various activities such as gaming, watching movies, reading, or browsing the web. The improved visual experience will make everything on your tablet more enjoyable and engaging.
Now armed with the knowledge of how to change the screen resolution on your Samsung tablet, you can take full control of your viewing experience and tailor it to your preferences. Explore the different resolution options available, experiment with settings, and discover the perfect combination that suits your needs.
We hope this guide has been helpful in guiding you through the process of changing the screen resolution on your Samsung tablet. Enjoy your newfound visual clarity and make the most out of your tablet’s display!