Introduction
Welcome to our guide on how to change the battery in a Samsung tablet. Over time, the battery in your tablet may start to lose its capacity and require replacement. This can be an intimidating task if you’ve never done it before, but with the right tools and a step-by-step approach, it’s completely doable.
Before we begin, it’s important to note that this guide is specific to Samsung tablets. The process may vary slightly for other brands, so make sure to consult the user manual or manufacturer’s guidelines for your particular device.
Now, if you notice that your tablet’s battery life has significantly decreased or your tablet is having trouble holding a charge, it may be time to replace the battery. This can be a cost-effective alternative to purchasing a brand new device, especially if the rest of your tablet is still functioning well.
In this guide, we will take you through the step-by-step process of changing the battery in your Samsung tablet. We will provide detailed instructions and visual aids to help you along the way. So, let’s get started!
Step 1: Gather the necessary tools
Before we begin the battery replacement process, it’s essential to gather all the necessary tools. Having the right tools at hand will make the process smoother and more efficient. Here are the tools you’ll need:
- Replacement battery: Make sure you have a compatible replacement battery for your Samsung tablet. You can purchase one from a reputable supplier or directly from the manufacturer.
- Small Phillips head screwdriver: Most Samsung tablets require a Phillips head screwdriver to remove the back cover and access the battery. Make sure you have a small-sized screwdriver to fit the screws on your specific tablet model.
- Plastic pry tools: These tools are helpful for safely removing the back cover of your tablet without causing any damage. They come in various shapes and sizes, resembling thin, flat spatulas or guitar picks.
- Tweezers: Tweezers can be handy for manipulating small components or connectors during the battery replacement process.
- Non-conductive spudger: A non-conductive spudger is a tool used to pry apart connectors and disconnect cables without the risk of electrical shock. It can be useful in safely detaching the battery cable.
- Clean cloth or microfiber cloth: Having a clean cloth on hand will help you wipe away any dust or debris that may accumulate during the process.
- Adhesive strips or adhesive glue: Depending on your tablet model, you may need adhesive strips or adhesive glue to secure the new battery in place.
Once you have gathered all the necessary tools, you’ll be well-prepared to start replacing the battery in your Samsung tablet. It’s important to have a clean and organized workspace to avoid losing any small components during the process. With everything in place, we can move on to Step 2: Powering off the tablet.
Step 2: Power off the tablet
Before you begin working on your Samsung tablet, it’s crucial to power it off completely. This ensures the safety of both the device and yourself during the battery replacement process. Here’s how to power off your tablet:
- Hold down the power button: Locate the power button on your tablet. It’s typically located on the side or top of the device. Press and hold the power button until a menu appears on the screen.
- Select “Power off”: On the menu, look for the option to “Power off” or “Turn off.” Use the touchscreen to select this option. You may need to swipe or tap the screen to navigate through the menu.
- Confirm the power off: After selecting “Power off,” the tablet will display a confirmation prompt. Tap on “OK” or a similar option to proceed with shutting down your tablet.
Once you’ve completed these steps, your Samsung tablet should power off completely. It’s important to wait a few moments to ensure that the device is completely turned off before proceeding with the battery replacement.
Note: If your tablet has a removable battery, you may skip this step as you can simply remove the battery without powering off the device. However, most newer Samsung tablets feature non-removable batteries, so it’s essential to power off the tablet before proceeding.
Now that your tablet is powered off, we can move on to the next step, which involves removing the back cover of the device. Take caution and follow the instructions carefully to avoid damaging any components during the process.
Step 3: Remove the back cover
Now that your Samsung tablet is powered off, it’s time to remove the back cover. The back cover is the protective casing that encloses the internal components of your tablet, including the battery. Here’s a step-by-step guide on how to remove the back cover:
- Inspect the tablet: Carefully examine the back of your tablet to locate any screws or clips that hold the back cover in place. Some tablets may have visible screws, while others may feature clips or a combination of both.
- Remove screws (if applicable): If your tablet has visible screws, use a small Phillips head screwdriver to loosen and remove them. Keep the screws in a safe place to avoid misplacing them during the battery replacement process.
- Identify clips (if applicable): If your tablet has clips securing the back cover, use a plastic pry tool or a non-conductive spudger to gently pry around the edges of the tablet. Apply gentle pressure to the areas where the clips are located to release them.
- Carefully remove the back cover: Once the screws are removed or the clips are released, you can carefully lift the back cover off the tablet. Start from one edge and work your way around, applying gentle pressure to detach the cover from the device.
During this process, make sure to exercise caution and go slow to avoid damaging the back cover or any internal components. If you encounter resistance, double-check for any remaining screws or clips that may be holding the back cover in place. Avoid using excessive force as this can lead to unintended damage.
Once the back cover is successfully removed, set it aside in a safe place. Take note of the location of any adhesive strips or connectors that may be attached to the back cover, as you may need to reattach them later during the reassembly process.
With the back cover removed, you now have access to the internal components of your Samsung tablet, including the battery. The next step is to disconnect the battery cable, which will allow you to safely remove the old battery and install a new one.
Step 4: Disconnect the battery cable
With the back cover of your Samsung tablet removed, it’s time to disconnect the battery cable. This step is crucial to ensure the safety of the device and prevent any electrical damage during the battery replacement process. Follow the steps below to disconnect the battery cable:
- Locate the battery connector: Look for the battery connector on the motherboard or circuit board of your tablet. It’s usually a small, rectangular-shaped connector with wires attached to it.
- Identify the connector type: Depending on your tablet model, the battery connector may have different types of attachment, such as a clip, latch, or adhesive tape. Take note of how the connector is secured before proceeding.
- Disconnect the battery cable: To disconnect the battery cable, carefully pull or lift the connector away from its port. Use your fingers or a non-conductive spudger to avoid damaging any delicate components during the process. Apply gentle and even pressure to detach the connector without bending or twisting the wires.
It’s important to handle the battery cable with care and avoid placing any unnecessary strain on the wires. Take note of the cable’s orientation and the position of any locking mechanism or adhesive tape that may need to be reattached when connecting the new battery later.
Once the battery cable is disconnected, ensure that it is clear from any other components to avoid accidental contact. This step ensures that you can safely proceed with removing the old battery and replacing it with a new one.
In the next step, we will guide you through the process of removing the old battery from your Samsung tablet. Stay focused and follow the instructions carefully to complete the battery replacement effectively.
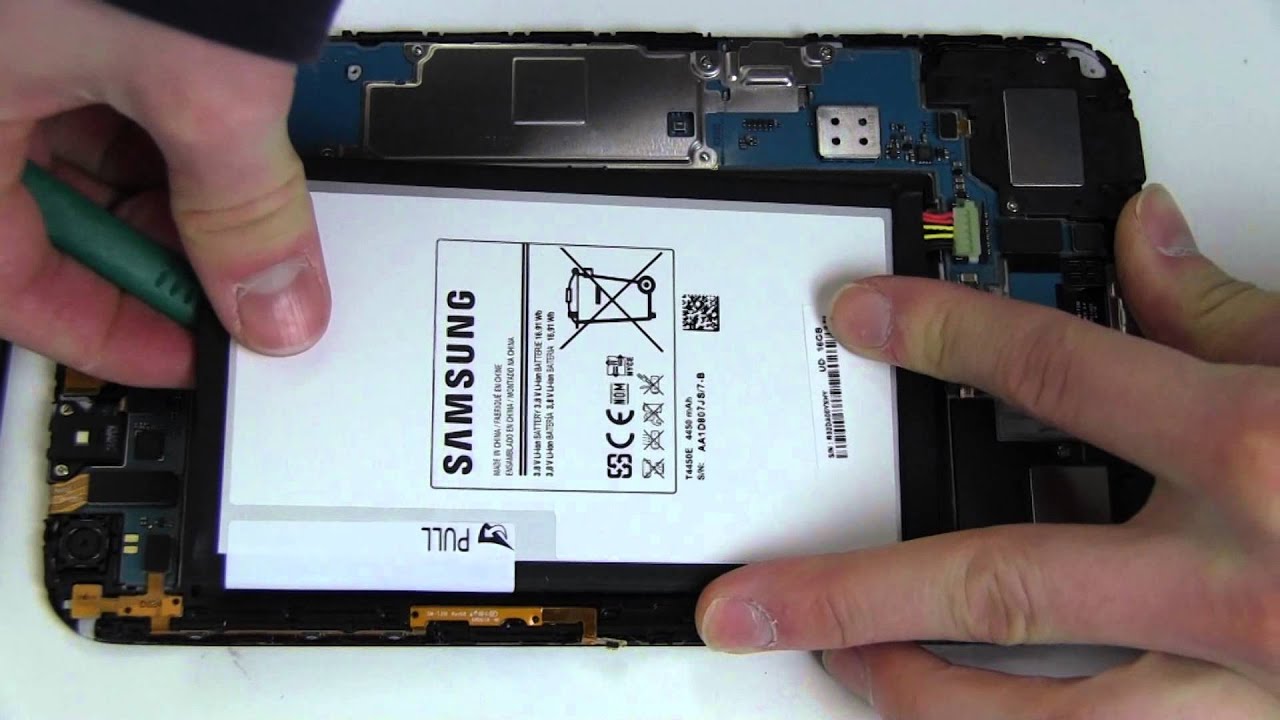
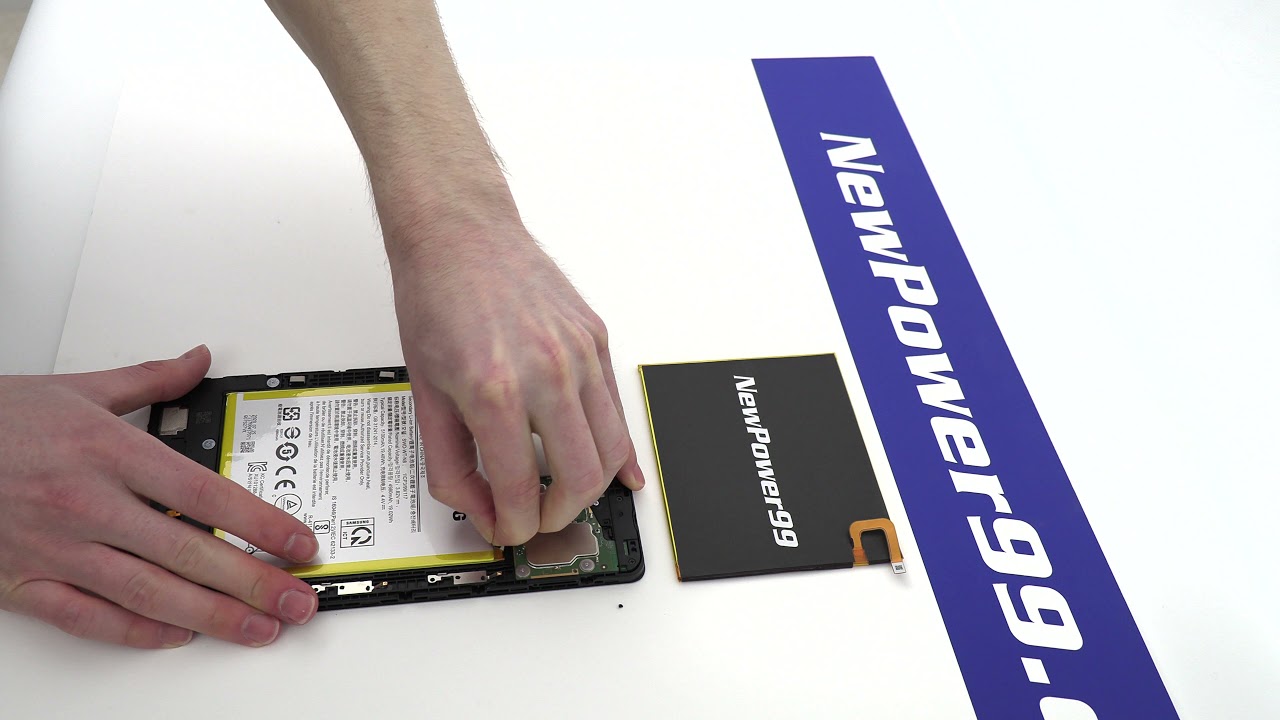
Step 5: Remove the old battery
Now that the battery cable is safely disconnected, it’s time to remove the old battery from your Samsung tablet. Follow the steps below to successfully remove the old battery:
- Inspect the battery: Take a moment to examine the battery and its positioning within the tablet. Observe any adhesive strips, connectors, or brackets that may be securing the battery in place.
- Detach any adhesive strips: If your tablet has adhesive strips securing the battery, carefully peel them away from the battery surface. Use a gentle, even motion to avoid tearing the strips. Keep in mind that some tablets may not have adhesive strips and instead rely on other means of attachment.
- Disconnect any additional connectors or brackets: Check for any other connectors or brackets that may be fastening the battery to the tablet. If present, gently detach them using your fingers or tweezers.
- Remove the battery: With the adhesive strips and connectors detached, you can now safely lift the old battery out of the tablet. Use your fingers or a non-conductive spudger to avoid damaging any internal components, as well as the battery itself. Apply even pressure and lift the battery straight out.
During this process, be mindful of any cables or connectors that may still be attached to the battery. Avoid pulling or tugging on them, as this can cause damage. Take note of the orientation of the old battery as it will guide you in properly installing the new one.
Once you have successfully removed the old battery, set it aside in a safe place. Properly dispose of the old battery in accordance with local regulations to avoid any environmental impact. Now, you are ready to proceed to the next step, which involves installing the new battery in your Samsung tablet.
Step 6: Install the new battery
Now that you have removed the old battery from your Samsung tablet, it’s time to install the new battery. Follow these steps carefully to ensure a successful installation:
- Position the new battery: Take the new battery and position it in the same orientation as the old battery. Make sure the battery is aligned properly with the connectors in the tablet.
- Attach any connectors or brackets: If there are any connectors or brackets that were detached from the old battery, reattach them to the new battery in the appropriate positions. Use your fingers or tweezers for a secure attachment.
- Secure with adhesive strips or adhesive glue: If your tablet requires adhesive strips or adhesive glue to secure the battery in place, apply them as instructed by the manufacturer. Ensure that the battery is firmly and evenly secured without any excess adhesive.
- Perform a visual inspection: Before proceeding further, visually inspect the new battery to ensure it is positioned correctly and securely. Check that all connectors are properly attached and any adhesive is in place.
It’s important to handle the new battery with care and avoid any unnecessary force or pressure that could damage it or the tablet. Take your time to ensure a proper and secure installation.
With the new battery installed, you are one step closer to completing the battery replacement process in your Samsung tablet. In the next step, we will guide you through reconnecting the battery cable and securing the back cover, bringing your tablet back to its fully functional state.
Step 7: Reconnect the battery cable
With the new battery securely installed in your Samsung tablet, it’s time to reconnect the battery cable. This step is crucial to ensure proper functionality and power supply to the device. Follow these steps to reconnect the battery cable:
- Locate the battery connector port: Identify the battery connector port on the motherboard or circuit board of your tablet. It should align with the battery cable that you previously disconnected.
- Align the connector: Take the battery cable connector and align it with the battery connector port. Ensure that the pins on the connector align with the corresponding slots in the port.
- Connect the cable: Carefully insert the battery cable connector into the battery connector port. Apply gentle pressure to push it in until it is fully seated. Ensure that the connector is flush against the port.
- Ensure a secure connection: Double-check that the battery cable connector is securely connected to the battery connector port. Gently tug on the connector to make sure it is firmly attached and there is no risk of it coming loose.
It’s essential to handle the battery cable and connector with care to avoid bending or damaging the pins. Take note of the orientation and position of the connector for proper alignment and connection.
Once the battery cable is securely reconnected, the power supply will be restored to your tablet’s new battery. This brings us to the next step, which involves replacing the back cover to protect the internal components and complete the battery replacement process.
Step 8: Replace the back cover
With the battery cable reconnected, it’s time to replace the back cover of your Samsung tablet. The back cover serves as protection for the internal components and ensures a secure and sleek appearance. Follow these steps to properly replace the back cover:
- Align the back cover: Take the back cover and align it with the edges of your tablet. Ensure that all the openings for the camera, buttons, and ports are properly aligned with their respective slots on the tablet.
- Press down gently: Starting from one edge, carefully press down on the back cover to secure it in place. Move your fingers or palm along the edges of the cover, applying even pressure to ensure a uniform fit.
- Listen and feel for clicking or snapping: As you press down on the back cover, listen and feel for any clicking or snapping sounds. These indicate that the clips or latches on the cover are engaging and securing it to the tablet.
- Inspect for gaps or misalignment: Once the back cover is in place, visually inspect the edges to make sure it is properly aligned with the tablet’s body. Check for any gaps or areas where the cover may not be fully seated.
- If screws were removed, reinsert them: If your tablet requires screws to secure the back cover, retrieve the screws you set aside earlier. Use a small Phillips head screwdriver to carefully reinsert and tighten the screws, following the original screw pattern.
Take your time during this step to ensure that the back cover is securely in place without any gaps or misalignment. Properly securing the back cover protects the internal components and completes the battery replacement process.
With the back cover replaced, you are now ready for the final step: powering on your tablet and enjoying the benefits of a new battery!
Step 9: Power on the tablet
Congratulations! You’re at the final step of the battery replacement process for your Samsung tablet. It’s time to power on your tablet and ensure that everything is working properly with the new battery. Follow these steps to power on your tablet:
- Locate the power button: On your tablet, locate the power button. It is typically found on the side or top of the device.
- Press and hold the power button: Press and hold the power button for a few seconds until the screen lights up or you see the manufacturer’s logo.
- Release the power button: Once you see signs of life on the tablet screen, release the power button. The device will begin to boot up.
- Wait for the tablet to fully start up: Allow your tablet a moment to complete the startup process. You should see the home screen or lock screen, indicating that your tablet is powered on and ready for use.
- Check the battery indicator: Take a look at the battery indicator on your tablet’s screen. Ensure that it shows a charging symbol or a fully charged battery to confirm that the new battery is functioning properly.
If your tablet powers on successfully and the battery indicator indicates a charge, then congratulations! You have successfully replaced the battery in your Samsung tablet.
However, if you encounter any issues, such as the tablet not powering on or the battery not charging, double-check the battery connection and ensure that it is firmly and securely attached. If the problem persists, you may need to seek assistance from a professional or contact the manufacturer for further troubleshooting.
Now that your tablet is up and running with a new battery, you can enjoy extended battery life and optimal performance. Take care of your tablet, and if needed in the future, refer back to this guide to change the battery again.
Conclusion
Congratulations on successfully completing the battery replacement process for your Samsung tablet! By following our step-by-step guide, you have learned how to gather the necessary tools, power off the tablet, remove the back cover, disconnect the battery cable, remove the old battery, install the new battery, reconnect the battery cable, replace the back cover, and power on the tablet. You can now enjoy a refreshed tablet with a new battery that will provide extended battery life and improved performance.
Remember, replacing the battery in your tablet can be a cost-effective alternative to purchasing a brand new device, especially if the rest of your tablet is still in good working condition. With the right tools and careful attention to detail, you can easily replace the battery and continue using your tablet for years to come.
It’s important to note that this guide is specific to Samsung tablets, and the process may vary for other brands. Always refer to the user manual or manufacturer’s guidelines for your specific device to ensure a safe and successful battery replacement.
We hope that this guide has been helpful to you, providing clear instructions and insights on how to change the battery in your Samsung tablet. If you have any further questions or need additional assistance, don’t hesitate to reach out to a professional or contact the manufacturer for support. Enjoy your newly replaced battery and the enhanced performance it brings to your Samsung tablet!