Introduction
Welcome to the step-by-step guide on how to remove a battery from a Samsung tablet. Whether you need to replace a faulty battery or simply want to have a spare one on hand, this tutorial will walk you through the process.
Before you begin, it’s important to note that removing the battery from your Samsung tablet requires some technical expertise and should be done with caution. If you’re not comfortable or confident with electronics, we recommend seeking professional assistance to avoid any damage to your device.
In this guide, we will provide clear instructions on how to safely remove the battery from your Samsung tablet. We will also highlight the essential tools you will need for the task, ensuring that you are fully prepared for the procedure. It’s crucial to follow the steps carefully to prevent any accidental damage to your tablet.
By removing the battery, you gain access to an essential component of your tablet. Understanding how to remove and replace the battery will allow you to troubleshoot and fix various issues, such as battery draining too quickly or not charging properly. So, without further ado, let’s dive into the step-by-step process of removing a battery from a Samsung tablet.
Step 1: Safety Precautions
Before you proceed with removing the battery from your Samsung tablet, it is crucial to prioritize safety. Follow these safety precautions to minimize the risk of injury or damage:
- Power off the tablet: Before you begin, make sure to turn off your tablet completely. This will help prevent any potential electrical shock.
- Work in a well-lit and clean area: Find a well-lit workspace with ample space to comfortably work on your tablet. A clean area will help prevent any dirt or debris from causing damage to the device.
- Remove any external power sources: Ensure that your tablet is not connected to any chargers or other external power sources. Detaching the battery while the device is still receiving power can be dangerous.
- Use anti-static protection: To safeguard your tablet from static electricity, wear an anti-static wristband or regularly touch a grounded metal object throughout the process.
- Be careful with tools: When using tools during the battery removal process, exercise caution. Only use tools specifically designed for electronics repair and apply gentle force to avoid damaging other components.
- Handle the battery with care: Treat the battery delicately and avoid puncturing or bending it. Mishandling the battery can lead to leakage or other hazards.
- Keep track of screws: As you dismantle your tablet, keep track of the screws in a well-organized manner. This will ease the reassembly process later.
By adhering to these safety precautions, you can ensure a smooth and secure battery removal process. Now that you are aware of the safety measures, let’s move on to gathering the necessary tools for the task.
Step 2: Gather the Necessary Tools
Before you begin removing the battery from your Samsung tablet, it’s essential to gather all the necessary tools. Having the right tools at hand will make the process smoother and reduce the risk of damaging your device. Here are the tools you will need:
- Small Phillips screwdriver: To remove the screws securing the back cover of your tablet, you’ll need a small Phillips screwdriver. Make sure it fits the screws snugly to avoid stripping them.
- Plastic prying tool or guitar pick: A plastic prying tool or a guitar pick can be used to carefully pry open the back cover of your tablet. These tools are gentle on the device and help avoid scratches or damage.
- Tweezers: Tweezers can aid in disconnecting small connectors or cables inside your tablet. They provide precision and make handling delicate parts easier.
- Anti-static wristband or mat: To protect your tablet from static electricity, using an anti-static wristband or working on an anti-static mat is highly recommended. This will prevent any potential electrical damage to the internal components.
- Clean cloth or microfiber cloth: It’s important to have a clean cloth or microfiber cloth on hand to wipe down the tablet and keep it free from dust or debris during the battery removal process.
- Container or organizer: A small container or organizer can be handy to store the screws and small parts you remove from the tablet. This will help prevent loss or confusion when reassembling the device.
By ensuring you have these tools readily available, you’ll be well-prepared to proceed with removing the battery from your Samsung tablet. With the safety precautions in mind and the necessary tools in hand, we can now move on to the next step: powering off the tablet.
Step 3: Power Off the Tablet
Before you start removing the battery from your Samsung tablet, it is important to power off the device completely. This step ensures your safety and prevents any potential damage to the tablet’s internal components. Follow these instructions to power off your tablet:
- Press and hold the power button: Locate the power button on your tablet. Press and hold it until a menu or power options appear on the screen.
- Select “Power off” or “Shut down”: Using your finger or stylus, navigate to the “Power off” or “Shut down” option on the screen. Tap on it to initiate the shutdown process.
- Confirm the shutdown: Depending on your tablet model, you may be prompted to confirm the shutdown. Follow the on-screen instructions and confirm that you want to power off the device.
- Wait for the tablet to turn off: Once the shutdown process is initiated, wait for the tablet to fully turn off. You can confirm this by ensuring that the screen is black and there is no sign of activity.
Ensuring that your tablet is powered off completely before proceeding with the battery removal is crucial to avoid electrical shock or damage. Take a moment to double-check that the tablet is completely powered off before moving on to the next step.
Now that you have successfully powered off your tablet, we can continue with the battery removal process by removing the back cover. Let’s proceed to the next step.
Step 4: Remove the Back Cover
With the tablet powered off, it’s time to remove the back cover. The back cover holds the battery in place, and removing it will grant you access to the battery itself. Follow these steps to remove the back cover:
- Position the tablet face down: Place your tablet on a soft and clean surface with the screen facing down. This will prevent any scratches or damage to the display.
- Identify the location of the screws: Look for the screws that secure the back cover. They are typically located along the edges or corners of the tablet. Some tablets may have visible screws, while others may have hidden screws under rubber covers or stickers.
- Use a small Phillips screwdriver: Pick up your small Phillips screwdriver and carefully unscrew each screw holding the back cover in place. Keep the screws in a safe container or organizer to avoid misplacement.
- Pry open the back cover: Once the screws are removed, it’s time to pry open the back cover. Take a plastic prying tool or a guitar pick and insert it into the seam between the back cover and the tablet. Gently apply pressure and move the tool along the edges to loosen the cover.
- Work your way around: Gradually work your way around the edges of the tablet, gently prying the back cover open. Take your time to ensure that you do not force or bend the cover. Apply steady and even pressure to avoid any damage to the tablet or the cover.
- Once the back cover is loose: As you continue to pry open the back cover, you will reach a point where it becomes loose. At this stage, you can carefully lift off the back cover and set it aside.
With the back cover removed, you now have access to the battery compartment. However, before proceeding to the next step, it is crucial to disconnect the battery connector to ensure safe removal. We will cover this step in the next section.
Step 5: Disconnect the Battery Connector
Now that you have successfully removed the back cover, the next step is to disconnect the battery connector. This step ensures that there is no electrical connection between the battery and the tablet, allowing for safe removal. Follow these instructions to disconnect the battery connector:
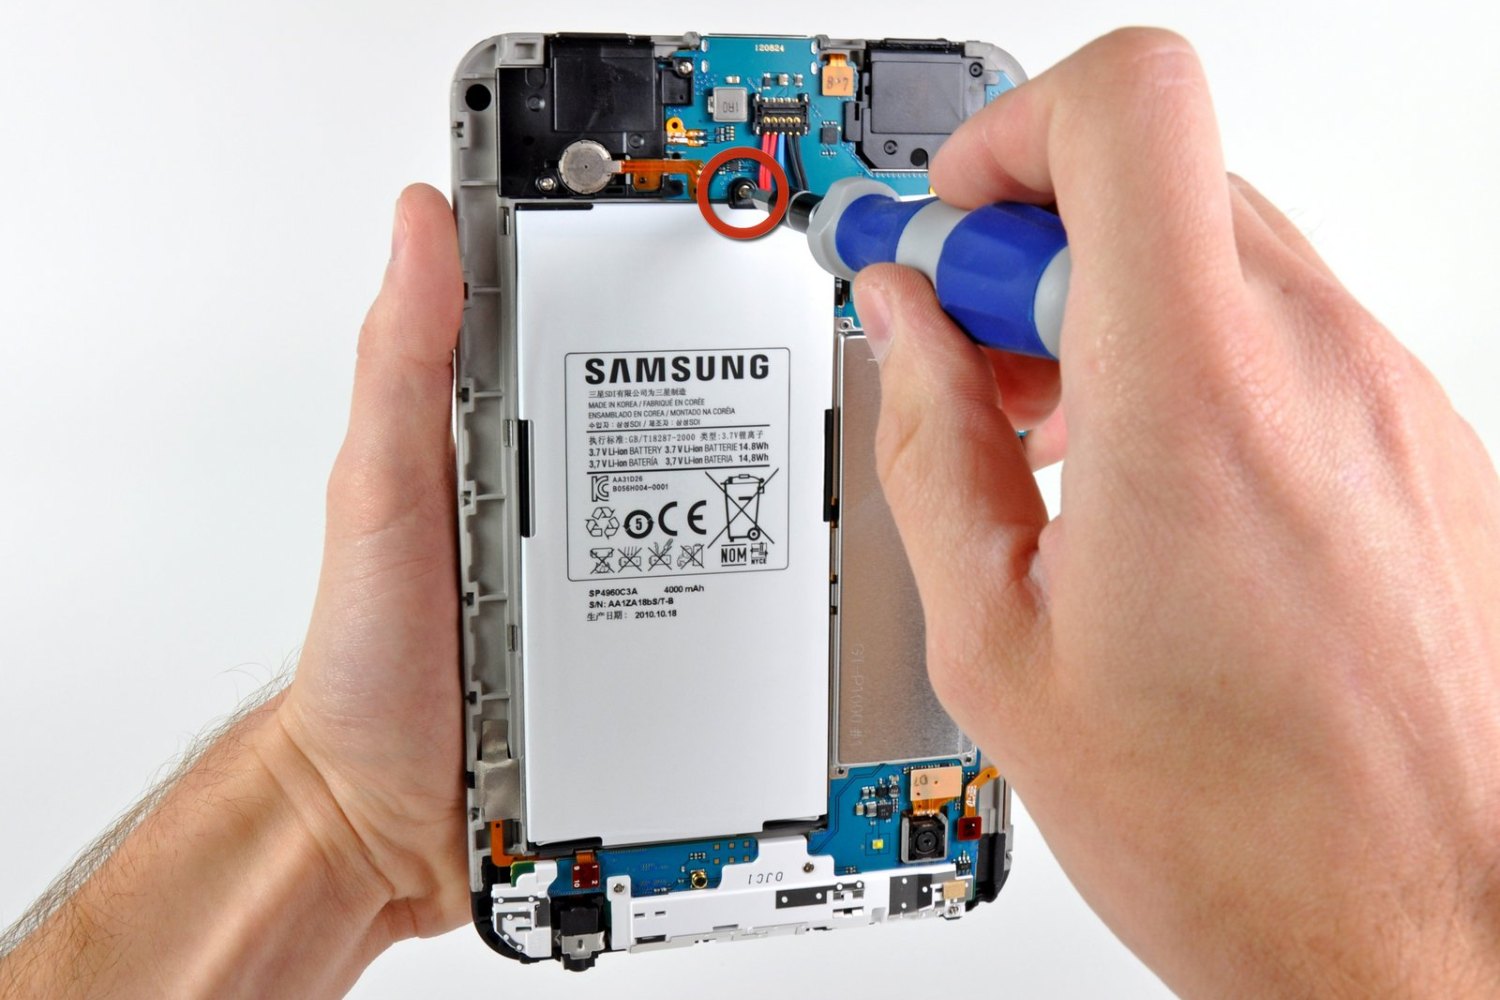
- Locate the battery connector: Look for a small connector attached to the motherboard. This connector is usually near the battery and can be identified by its size and shape.
- Use a plastic prying tool or tweezers: Gently lift the latch or tab securing the battery connector. Be careful not to apply excessive force to avoid damaging the connector or other components.
- Disconnect the battery connector: Once the latch or tab is lifted, gently pull the battery connector away from its socket. Make sure to grasp the connector itself and not the wires to avoid any strain.
- Ensure a secure disconnection: After disconnecting the battery connector, ensure that it is fully detached and there is no electrical connection. Double-check that there are no visible wires or any signs of connection.
Once you have disconnected the battery connector, you have successfully prepared the battery for removal. However, before proceeding to the next step, it’s essential to take precautions when handling the battery itself, which we will cover in the next section.
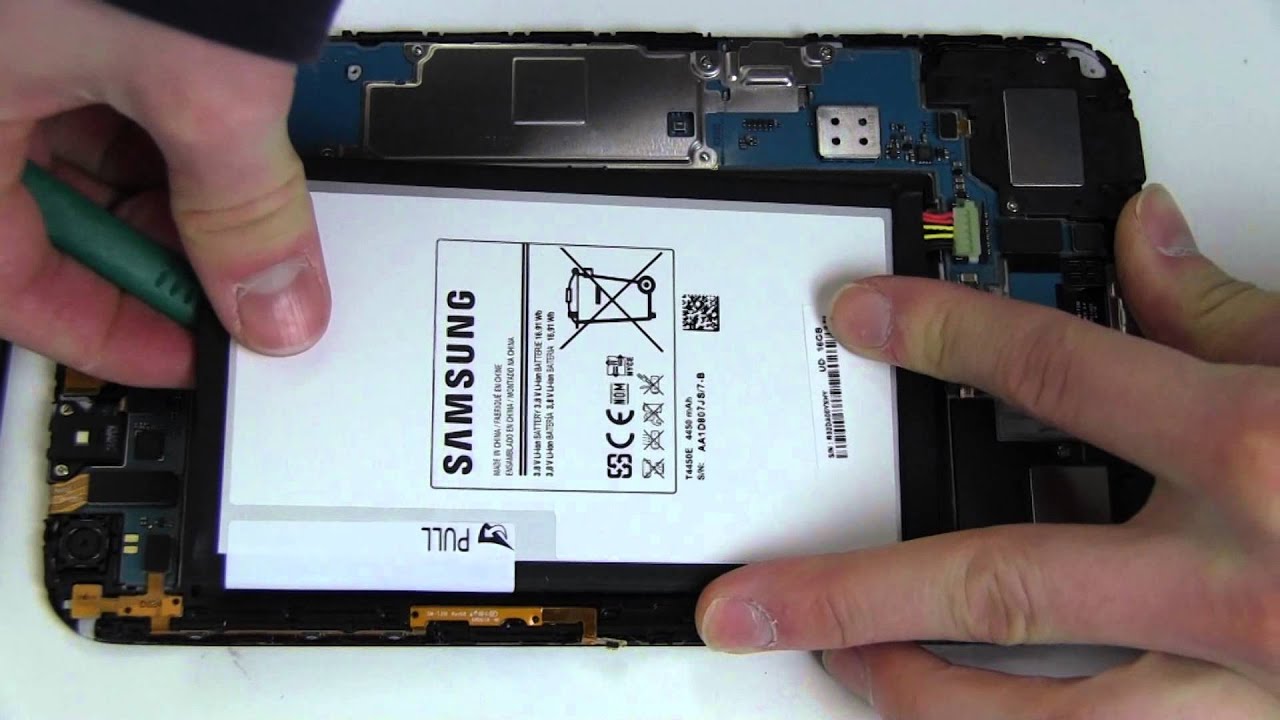
Step 6: Remove the Battery
Now that the battery connector is disconnected, you’re ready to remove the battery from your Samsung tablet. Handle the battery with care, as it is a delicate and essential component of your device. Follow these steps to safely remove the battery:
- Identify the battery: Locate the battery inside your tablet. It is usually a rectangular-shaped component that is securely placed in the battery compartment.
- Use your fingers or a tool: Depending on the tablet model, you may be able to remove the battery by gently pulling it out with your fingers. If it is tightly secured, use a plastic prying tool or a non-metallic tool, such as a guitar pick, to carefully lift the battery from its position.
- Apply even pressure: If you’re using a tool to remove the battery, apply even pressure and gently pry it away from the tablet. Avoid bending, twisting, or applying excessive force, as this can damage the battery or other internal components.
- Slowly lift the battery: Once the battery is detached from its position, slowly lift it out of the battery compartment. Take your time and be cautious not to damage any surrounding components as you remove the battery.
- Set the battery aside: Place the removed battery on a non-conductive and non-metallic surface, away from any liquids or potential sources of damage. This ensures the safety of the battery and prevents unwanted accidents.
With the battery successfully removed from your Samsung tablet, you can now proceed with any necessary battery replacement or troubleshooting. Remember to keep the battery in a safe location and follow proper disposal guidelines if needed.
Now that the battery has been removed, we’re ready to move on to the final step: reassembling your tablet and powering it on. We’ll cover this in the next section.
Step 7: Reassembly and Power On
Now that you have successfully removed the battery from your Samsung tablet, it’s time to reassemble the device and power it back on. Follow these steps to complete the process:
- Retrieve the back cover: Take the back cover that you set aside earlier and align it properly with the tablet’s body. Ensure that all the edges and corners line up correctly.
- Press the back cover into place: With the cover aligned, apply gentle pressure and press down on the back cover to secure it in position. You should hear a series of clicks or feel the cover lock into place.
- Screw in the screws: Retrieve the screws you removed earlier and use a small Phillips screwdriver to tighten them back into their respective positions. Be careful not to overtighten, as it can damage the threads.
- Power on the tablet: Once the back cover is securely in place, it’s time to power on your tablet. Press and hold the power button until you see the device booting up and the screen lighting up.
- Ensure proper functionality: After powering on the tablet, check if all the functions and features are working correctly. Verify that the battery is charging, the display is functioning, and the device is responding to touch commands.
- Confirm the battery level: Give your tablet some time to charge and verify that the battery level is increasing. Check the battery indicator to ensure that it is charging properly.
Once you have completed these steps and confirmed that your tablet is functioning as expected, congratulations! You have successfully reassembled your Samsung tablet after removing and replacing the battery.
Always remember to exercise caution when handling electronic devices and follow proper safety guidelines. If you encounter any issues during the reassembly process or experience any difficulties with your tablet, it is recommended to seek professional assistance.
With your tablet powered on and battery successfully replaced, you can now enjoy using your Samsung tablet without any battery-related concerns.
Conclusion
Removing a battery from a Samsung tablet may seem like a daunting task, but by following the step-by-step guide outlined in this article, you can safely and successfully complete the process. Remember to take necessary safety precautions, gather the appropriate tools, and handle the tablet and battery with care.
By removing the battery, you gain access to an essential component of your Samsung tablet. This knowledge allows you to troubleshoot and fix various battery-related issues, such as a battery draining too quickly or not charging properly. It also provides the opportunity to replace a faulty battery or have a spare one on hand.
Throughout the process, it is important to prioritize safety, work in a clean and well-lit area, and use the correct tools. Take your time and be patient during each step to avoid any damage to your tablet or its internal components.
Once you have successfully removed and replaced the battery, reassemble the tablet carefully, ensuring that all screws are tightened properly and the back cover is securely in place. Power on your tablet and confirm that everything is functioning correctly.
Remember, if you are not comfortable or confident in your ability to perform the battery removal, it is best to seek professional assistance to avoid any potential damage to your device.
With the knowledge and skills gained from this guide, you now have the ability to remove and replace the battery in your Samsung tablet. By empowering yourself with this understanding, you can prolong the life of your device and enjoy uninterrupted usage.
Thank you for following this guide, and we hope it has been helpful in assisting you with removing a battery from your Samsung tablet!