Introduction
Replacing the battery on a Samsung Galaxy tablet is a straightforward process that can help restore the device’s battery life and prevent potential issues caused by a worn-out battery. Over time, a tablet’s battery capacity may diminish, resulting in shorter battery life and reduced performance. Whether your tablet struggles to hold a charge or dies quickly, replacing the battery can be a cost-effective solution to keep your device running smoothly.
Before embarking on the battery replacement process, it is important to gather the necessary tools and ensure you have a compatible replacement battery. This will ensure a seamless and successful battery replacement without causing any damage to the tablet.
In this guide, we will walk you through the step-by-step process of replacing the battery on your Samsung Galaxy tablet. From powering off the device to disconnecting the battery cable and inserting the new battery, we will provide detailed instructions to help you accomplish this task with ease.
Note: The following instructions are specifically for Samsung Galaxy tablets. If you have a different model or brand of tablet, be sure to consult the device’s user manual or contact the manufacturer for the appropriate battery replacement instructions.
Tools Needed
Before you begin replacing the battery on your Samsung Galaxy tablet, gather the following tools:
- Small Phillips screwdriver: You will need this to remove any screws securing the back cover or battery.
- Plastic pry tool or guitar pick: This tool will help you safely remove the back cover without scratching or damaging the tablet.
- Replacement battery: Make sure to purchase a compatible battery for your specific Samsung Galaxy tablet model. It is recommended to buy from a reputable supplier or the tablet manufacturer to ensure quality and compatibility.
- Tweezers: These will come in handy for handling small components, cables, or connectors during the battery replacement process.
- Anti-static wrist strap (optional): While not necessary, using an anti-static wrist strap can help prevent electrostatic discharge and protect sensitive components of the tablet.
Having these tools readily available before starting the battery replacement will make the process smoother and more efficient. It is important to exercise caution and work in a well-lit and clean area to avoid any mishaps or damage to the tablet.
Step 1: Power off the tablet
The first step in replacing the battery on your Samsung Galaxy tablet is to power off the device. This is crucial to ensure your safety and prevent any potential damage to the tablet or yourself during the battery replacement process.
To power off the tablet, follow these simple steps:
- Press and hold the power button located on either the side or the top of the tablet, depending on the model.
- A menu will appear on the screen with various options.
- Select the “Power off” or “Shut down” option from the menu.
- Confirm the shutdown by tapping “OK” or a similar button when prompted.
- Wait for the tablet to completely power off before proceeding to the next step.
It is essential to ensure the tablet is completely powered off before removing the back cover and handling the internal components. Leaving the tablet powered on during the battery replacement process can pose a risk of electric shock or damage to the tablet’s hardware.
By following this first step and successfully powering off your Samsung Galaxy tablet, you are ready to move on to the next step of the battery replacement process.
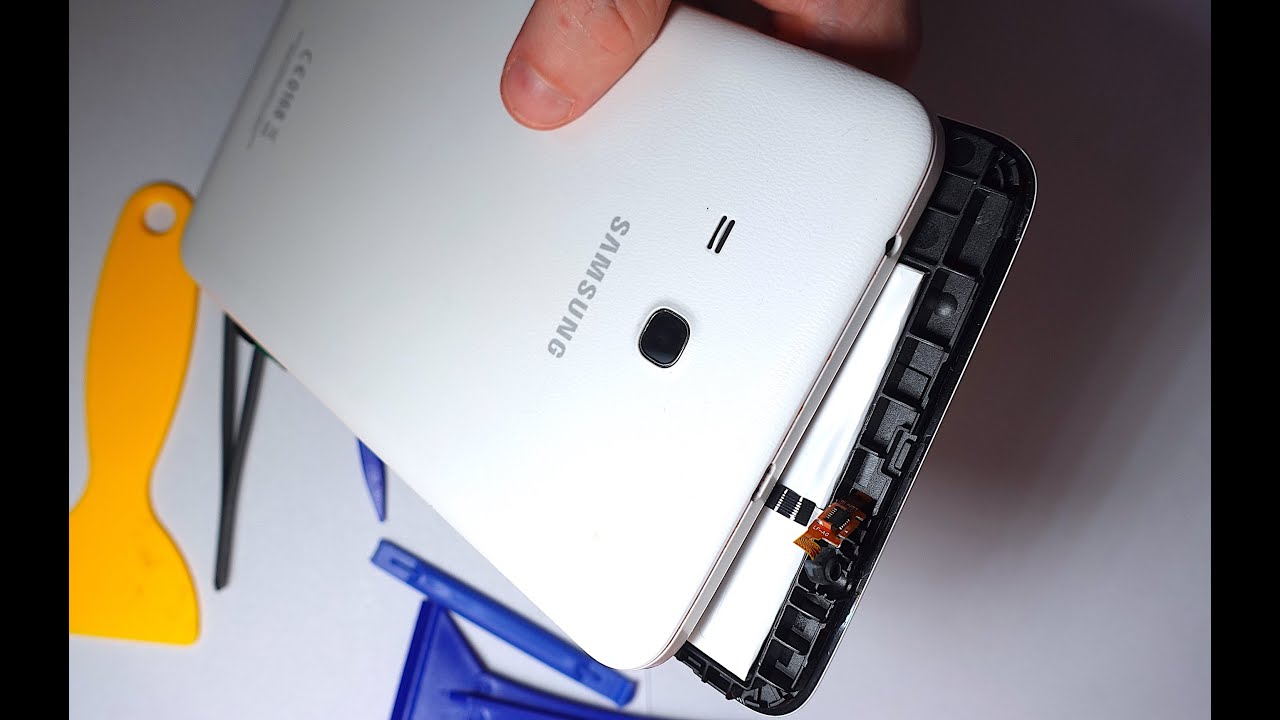
Step 2: Remove the back cover
Once you have powered off your Samsung Galaxy tablet, the next step in replacing the battery is to remove the back cover. The back cover houses the battery and provides access to its compartment.
To remove the back cover, follow these steps:
- Locate the small notch or groove on the side or bottom of the tablet.
- Insert a plastic pry tool or a guitar pick into the notch, gently prying it inwards.
- Gradually work the pry tool along the edges of the tablet, releasing the clips that secure the back cover.
- Be careful not to apply excessive force or use sharp objects that can damage the tablet or the back cover.
- Continue prying and lifting until you can easily remove the back cover.
Some tablet models may have screws securing the back cover in place. If you come across any screws, use a small Phillips screwdriver to remove them before attempting to pry off the back cover.
Once the back cover is removed, set it aside in a safe place. You may need it later to secure the new battery in place.
With the back cover successfully removed, you can now proceed to the next step of disconnecting the battery cable in order to remove the old battery.
Step 3: Disconnect the battery cable
After removing the back cover of your Samsung Galaxy tablet, the next step in replacing the battery is to disconnect the battery cable. This will ensure that there is no power supply to the old battery during the removal process.
Follow these steps to disconnect the battery cable:
- Locate the battery connector, which is a small plug where the battery cable connects to the tablet’s motherboard.
- Using a pair of tweezers, gently grip the battery connector plug.
- Slowly and carefully pull the plug straight out from its socket, disconnecting the battery cable.
- Ensure that you do not pull on the cable itself, as this may cause damage.
It is important to exercise caution when disconnecting the battery cable to avoid any accidental damage to the tablet’s internal components or the cable itself. Take your time and ensure a clean and firm grip on the battery connector plug before gently removing it from the socket.
Once the battery cable is disconnected, you have successfully prepared the tablet for the next step of removing the old battery from its compartment.
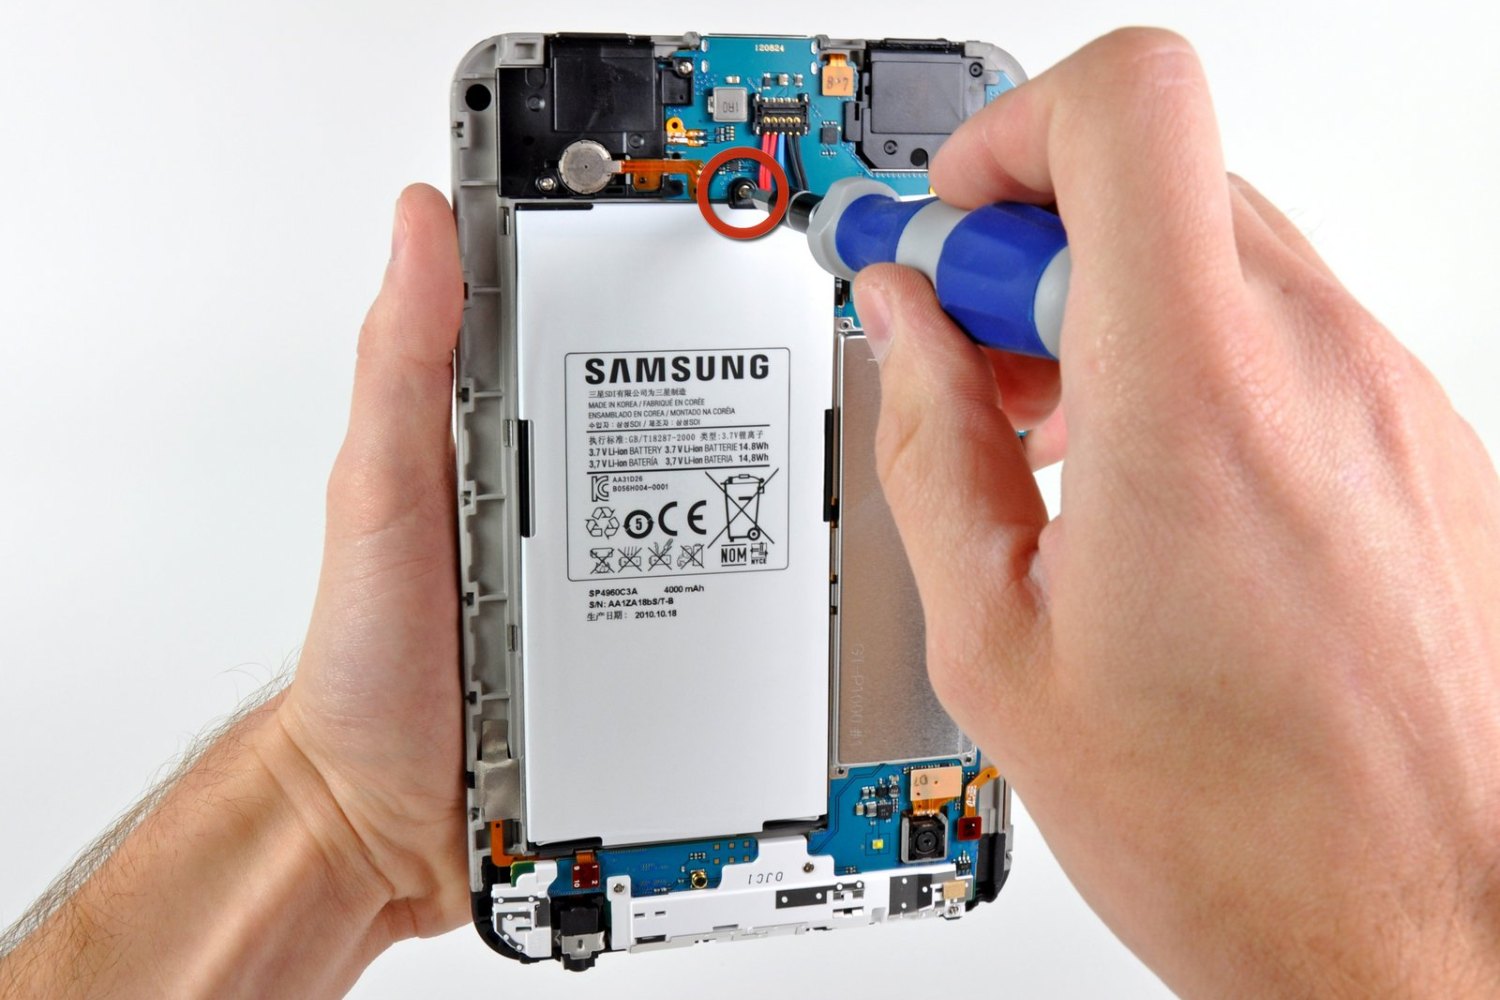
Step 4: Remove the old battery
Now that you have disconnected the battery cable, it is time to remove the old battery from its compartment in your Samsung Galaxy tablet. Removing the old battery will pave the way for the installation of the new one, helping to restore the tablet’s power and performance.
Follow these steps to remove the old battery:
- Locate the old battery within the battery compartment. It is usually square or rectangular in shape and may be secured with adhesive or screws.
- If your battery is secured with adhesive, carefully pry it away from the tablet’s frame using a pry tool or a guitar pick. Take caution not to bend or damage the battery.
- If your battery is secured with screws, use a small Phillips screwdriver to remove them. Set the screws aside in a safe place as you will need them to secure the new battery later.
- Once the adhesive or screws are removed, carefully lift the old battery out of its compartment. If the battery is stuck, ensure you are applying even pressure and avoid using excessive force.
- Handle the old battery with care, making sure not to puncture or bend it, as it may contain hazardous materials.
It is crucial to properly dispose of the old battery according to local regulations or take it to an authorized recycling center. Do not throw it in the trash or incinerate it.
With the old battery successfully removed, you are now ready to proceed to the next step of inserting the new battery into the tablet.
Step 5: Insert the new battery
After successfully removing the old battery from your Samsung Galaxy tablet, it’s time to insert the new battery. This step is crucial in restoring the tablet’s power and ensuring optimal performance. Before inserting the new battery, ensure it is compatible with your tablet model and that you have met all the necessary safety precautions.
Follow these steps to insert the new battery:
- Take the new battery and align it with the battery compartment. Make sure the connectors on the battery align with the corresponding connectors inside the compartment.
- Gently place the new battery into the compartment, ensuring it fits snugly and securely.
- If your battery was secured with screws, retrieve the screws set aside earlier and use a small Phillips screwdriver to carefully reattach them. Ensure they are tightened securely, but do not overtighten as this may damage the battery or the tablet.
- If your battery was secured with adhesive, simply press it down gently to ensure it adheres to the tablet’s frame.
Be sure to handle the new battery with caution, avoiding any unnecessary force or pressure. Aligning it properly and securing it in place will ensure a stable and reliable connection.
With the new battery successfully inserted and secured in the compartment, you have completed a major step in the battery replacement process. The next step is to reconnect the battery cable, allowing the tablet to draw power from the new battery.
Step 6: Reconnect the battery cable
After inserting the new battery into your Samsung Galaxy tablet, the next step is to reconnect the battery cable. By doing so, you will establish a connection between the tablet’s motherboard and the new battery, enabling the device to draw power and function properly.
Follow these steps to reconnect the battery cable:
- Locate the battery cable connector on the tablet’s motherboard. It is the socket where the battery cable was previously disconnected.
- Take the battery cable and align the plug with the battery connector on the motherboard.
- Gently insert the plug into the socket, ensuring it goes in straight and fully seats in the connector.
- Do not force the connection and double-check that the plug is properly aligned before gently pushing it in.
- Once the battery cable is securely connected, give it a gentle tug to ensure it is firmly in place.
It is essential to exercise caution when reconnecting the battery cable to avoid any damage to the connector or motherboard of your tablet. Taking your time and ensuring a secure and proper connection will help prevent any potential issues down the line.
With the battery cable successfully reconnected, you are now ready to move on to the next step of replacing the back cover of your Samsung Galaxy tablet.
Step 7: Replace the back cover
After reconnecting the battery cable of your Samsung Galaxy tablet, the next step is to replace the back cover. This will help protect the internal components and ensure a secure fit for the new battery.
Follow these steps to replace the back cover:
- Align the back cover with the tablet’s frame, ensuring that all the edges and corners match up.
- Gently press down on the back cover, starting from one corner and moving along the edges, until you hear or feel a click. This indicates that the clips securing the cover are engaging.
- If your tablet requires screws to secure the back cover, retrieve the screws set aside earlier.
- Using a small Phillips screwdriver, carefully tighten the screws in the designated screw holes. Be cautious not to overtighten them, as this may damage the back cover or the tablet.
Ensure that the back cover is securely in place before proceeding to the next step. A properly aligned and secured back cover will provide protection to the internals of your tablet and ensure a polished appearance.
With the back cover successfully replaced, you are almost done with the battery replacement process. The final step is to power on your Samsung Galaxy tablet and verify if the new battery is functioning correctly.
Step 8: Power on the tablet
The final step in replacing the battery on your Samsung Galaxy tablet is to power it on and ensure that everything is functioning properly. This step will allow you to verify that the new battery is providing the necessary power to the tablet and that the device is working as expected.
Follow these steps to power on the tablet:
- Ensure that the back cover is securely in place and all screws, if any, are tightened.
- Locate the power button on the side or top of the tablet.
- Press and hold the power button until you see the tablet’s logo or the screen lights up.
- Release the power button and wait for the tablet to boot up.
- Once the tablet is powered on, pay attention to the battery level indicator on the screen. It should reflect the new battery and show an appropriate charge level.
If the tablet powers on normally and the battery level appears accurate, congratulations! You have successfully replaced the battery on your Samsung Galaxy tablet. The new battery should provide improved battery life and overall performance.
However, if you encounter any issues during the power-on process or notice any abnormal behavior, it is recommended to double-check the battery connection and ensure that all steps were followed correctly. If the issues persist, it may be necessary to seek further assistance from a professional or contact the tablet’s manufacturer for support.
Enjoy your newly replaced battery and extended battery life on your Samsung Galaxy tablet!
Conclusion
Replacing the battery on your Samsung Galaxy tablet can greatly improve its overall functionality and battery life. By following the step-by-step guide outlined in this article, you can successfully replace the battery and enjoy a refreshed tablet experience.
Throughout the battery replacement process, it is crucial to exercise caution and follow the instructions carefully. Gathering the necessary tools, powering off the tablet, removing the back cover, disconnecting the battery cable, removing the old battery, inserting the new battery, reconnecting the battery cable, replacing the back cover, and finally powering on the tablet are the key steps involved in the process.
Remember to always use compatible replacement batteries and handle them with care. Observe proper disposal methods for the old battery to protect the environment.
After completing the battery replacement, power on your tablet and ensure that it powers up without any issues. Take note of the improved battery life and overall performance with the new battery.
If you encounter any difficulties during the battery replacement or have concerns about the process, consider seeking assistance from a professional or contacting the tablet manufacturer for support.
With a successfully replaced battery, you can now enjoy extended usage time and optimal performance on your Samsung Galaxy tablet for many more years to come.