Introduction
Are you looking to take your gaming experience to the next level? Or maybe you’re a graphic designer wanting to improve the performance of your applications? One of the most effective ways to achieve this is by upgrading your graphics card. A graphics card, also known as a video card or GPU (Graphics Processing Unit), is a crucial component in your computer that handles the rendering of images and videos.
Upgrading your graphics card can significantly enhance the visual quality, speed, and overall performance of your system. Whether you’re an avid gamer, a content creator, or a professional in need of powerful graphics capabilities, taking the leap and upgrading your graphics card can unlock a whole new world of possibilities.
However, before you rush into purchasing a new graphics card, it’s essential to understand your current setup and determine what you need from an upgrade. This article will guide you through the process of upgrading your graphics card, helping you make an informed decision and successfully installing the new hardware.
We’ll delve into the steps necessary to research and select the right graphics card for your needs, as well as checking compatibility with your system. We’ll also cover the preparation required before the upgrade, such as backing up your data and ensuring your computer is ready for the installation process.
Once you have selected and purchased the new graphics card, we’ll walk you through the physical installation process, including connecting power cables and securing the card in the correct slot. Afterward, we’ll discuss the necessary software configuration and driver installation to ensure optimal performance.
To ensure a smooth transition, we’ll also cover testing and troubleshooting steps to ensure everything is functioning correctly. Finally, we’ll wrap up with a few closing thoughts and recommendations to ensure you get the most out of your upgraded graphics card.
Let’s get started on this exciting journey of upgrading your graphics card and unleashing the true potential of your computer!
Understanding your current graphics card
Before embarking on the process of upgrading your graphics card, it’s important to have a clear understanding of your current GPU and its capabilities. Knowing what you currently have will help you determine what kind of upgrade is necessary and what improvements you can expect.
Start by identifying the make and model of your current graphics card. This information can typically be found by accessing your computer’s Device Manager or by using system information applications. Once you have this information, you can research the specifications and performance benchmarks of your current GPU.
Take note of the VRAM (Video Random Access Memory) capacity of your current graphics card, as this directly affects its ability to handle high-resolution textures and complex scenes. Additionally, look for details about the core clock speed and memory clock speed, which can indicate the overall processing power of your GPU.
Consider what games or applications you currently use and evaluate how well your current graphics card handles them. Are you experiencing lag or low frame rates? Are you unable to play games at the highest settings? Understanding the limitations of your current GPU will help you determine the level of upgrade required.
It’s also worth considering the age of your current graphics card. As technology rapidly advances, newer graphics cards offer significant improvements in performance and power efficiency. If your current card is several years old, upgrading to a newer model can provide a substantial boost in overall performance and compatibility with the latest games and applications.
Lastly, take note of the interface used by your current graphics card. The most common interfaces are PCI Express (PCIe) and AGP (Accelerated Graphics Port). Ensure that your motherboard has the appropriate slot to accommodate the new graphics card you plan to purchase.
By thoroughly understanding your current graphics card, including its specifications, performance capabilities, and limitations, you can make a well-informed decision when it comes to selecting a new graphics card and determining the improvements you can expect. With this knowledge in hand, you’re ready to move forward with the next step – researching and selecting your new graphics card.
Researching and selecting a new graphics card
Now that you have a clear understanding of your current graphics card, it’s time to embark on the process of researching and selecting a new one. Upgrading your graphics card is an investment, so it’s important to gather the necessary information to make an informed decision.
First, consider your budget. Graphics cards come in a wide range of price points, and determining how much you’re willing to spend will help narrow down your options. Remember that a higher price tag often indicates better performance and more advanced features.
Next, assess your needs and intended usage. Are you a hardcore gamer looking for maximum performance? Or are you a content creator in need of graphics horsepower for rendering and editing tasks? Understanding your specific requirements will help you focus on cards that align with your needs.
Pay attention to the recommended system requirements of the games or applications you frequently use. This will help you determine the minimum specifications your new graphics card should meet to ensure smooth and optimized performance.
Consider the VRAM capacity of the graphics card. More VRAM allows for smoother rendering of high-resolution textures and ensures compatibility with future games and applications that may demand more memory. However, keep in mind that excessive VRAM may not necessarily translate to better performance if your system doesn’t fully utilize it.
Research the latest graphics card models from different manufacturers. Look for reviews and benchmarks to gauge their performance and reliability. Websites like Tom’s Hardware and TechRadar can provide valuable insights and comparisons to aid in your decision-making process.
Take note of the power requirements of the graphics card you’re considering. Ensure that your power supply unit (PSU) can adequately support the graphics card’s power consumption. GPUs with higher performance often require additional power connectors, so check for compatibility with your PSU and available power connectors.
Compatibility with your existing system is crucial. Check if your motherboard has the appropriate interface slot (usually PCIe) for the new graphics card. Additionally, verify that there is enough physical space inside your computer case to accommodate the graphics card’s dimensions.
Consider the warranty and customer support provided by the manufacturer. A reputable manufacturer with excellent customer service can make a significant difference in case of any issues or defects.
By conducting thorough research and considering your budget, needs, system requirements, performance benchmarks, power requirements, compatibility, and manufacturer reputation, you can confidently select a new graphics card that meets your requirements for improved performance and visual quality.
Checking compatibility with your system
After selecting a potential graphics card, it is vital to verify its compatibility with your system before making a purchase. Ensuring compatibility will help avoid any issues or frustrations down the line and ensure that your new graphics card can be seamlessly integrated into your computer.
The first step is to confirm that your motherboard has the appropriate interface slot for the graphics card you plan to install. Most modern graphics cards use the PCI Express (PCIe) slot, but older systems may still utilize the now outdated AGP (Accelerated Graphics Port) interface.
Consult your computer’s documentation or the manufacturer’s website to identify the type and number of available slots. Ensure that the selected graphics card matches the interface requirement of your motherboard to guarantee compatibility.
It’s also crucial to verify that your power supply unit (PSU) can handle the power requirements of the new graphics card. Higher-performing GPUs often demand more power, so double-check your PSU’s wattage rating and the available PCIe power connectors. Ensure that your PSU can provide enough power to accommodate the new card without straining the system.
Take note of the physical dimensions of the graphics card as well. Some high-end graphics cards can be quite large, and you need to ensure that your computer case has enough space to accommodate it. Measure the available space inside your case and compare it with the dimensions of the graphics card, considering factors such as length, height, and width.
Additionally, consider the cooling requirements of the new graphics card. Higher-performance GPUs often generate more heat, requiring efficient cooling solutions. Ensure that your computer case has adequate fan placements and airflow to keep the graphics card and the overall system temperature within safe limits.
Check the operating system (OS) requirements and driver compatibility of the selected graphics card. Verify that the drivers are available for your specific OS version to prevent any installation or compatibility issues. Most manufacturers provide driver downloads on their websites, so check their official documentation for the supported operating systems.
Lastly, consider any additional hardware or peripherals that may be affected by the new graphics card. For example, if you use a multiple-monitor setup, verify that the graphics card supports the desired number of displays and the necessary ports, such as HDMI, DisplayPort, or DVI.
By thoroughly checking compatibility with your system in terms of interface slot, power supply, physical dimensions, cooling requirements, OS compatibility, driver availability, and additional peripherals, you can ensure a smooth and successful upgrade process without encountering any compatibility issues.
Preparing your computer for the upgrade
Before diving into the physical installation of your new graphics card, it’s crucial to properly prepare your computer to ensure a smooth and successful upgrade process. Taking the time to prepare your system will help minimize the risk of encountering any unexpected issues during the installation.
The first step is to back up your important data. While it’s unlikely that a graphics card upgrade will result in data loss, it’s always better to be safe than sorry. Create a backup of your important files, documents, and any other data that you cannot afford to lose. This can be done by copying your files to an external hard drive, using cloud storage services, or utilizing backup software.
Next, gather all the necessary tools and equipment. You will typically need a screwdriver (usually Phillips head) to remove the side panel of your computer case and secure the new graphics card. Check the documentation of your graphics card and computer case to determine if any specific tools are required for installation.
Ensure that your computer is powered off and unplugged before proceeding. This will eliminate the risk of electrical damage to your hardware and reduce any potential harm to yourself during the upgrade process.
Before physically installing the new graphics card, it’s a good practice to uninstall the drivers of your old graphics card. This can be done through the Device Manager or through the software provided by the graphics card manufacturer. Removing the old drivers helps prevent conflicts and ensures a clean installation process for the new drivers.
Some users may also find it beneficial to update their system’s BIOS (Basic Input/Output System) before the upgrade. Check the manufacturer’s website for any available BIOS updates for your motherboard. Updating the BIOS can address compatibility issues and improves the overall stability of your system.
Inspect the PCI Express slot on your motherboard to ensure that it is free from dust or debris. Use compressed air or an anti-static brush to gently clean the slot, ensuring a good connection for the new graphics card.
Take note of the power supply requirements for the new graphics card. Verify that your power supply unit (PSU) can provide the necessary power connectors and wattage. If necessary, consider upgrading your power supply to accommodate the new card and prevent any power-related issues.
Lastly, familiarize yourself with the installation process by reading the instructions provided by the graphics card manufacturer. These instructions will guide you through the physical installation steps specific to your graphics card model and ensure that you handle the hardware correctly.
By backing up your data, gathering the necessary tools, powering off and unplugging your computer, uninstalling old drivers, updating your BIOS if needed, cleaning the PCI Express slot, checking power supply requirements, and reading the manufacturer’s instructions, you will be well-prepared to proceed with the physical installation of your new graphics card.
Installing the new graphics card
Now that you have prepared your computer for the upgrade, it’s time to proceed with installing the new graphics card. This process involves physically integrating the card into your system and ensuring a secure and stable connection.
Start by locating the PCIe slot on your motherboard. Remove the side panel of your computer case, usually secured by screws, to gain access to the internal components. Locate the appropriate PCIe slot that matches the interface of your new graphics card.
Before handling the new graphics card, discharge any static electricity by touching a grounded object, such as a metal part of your computer case. This step helps prevent electrostatic discharge (ESD) from damaging the sensitive components of the graphics card.
Carefully insert the graphics card into the appropriate PCIe slot. Align the connectors on the card with the slot and gently but firmly insert the card, ensuring that it is fully seated in the slot. Apply gentle pressure until the card is securely in place.
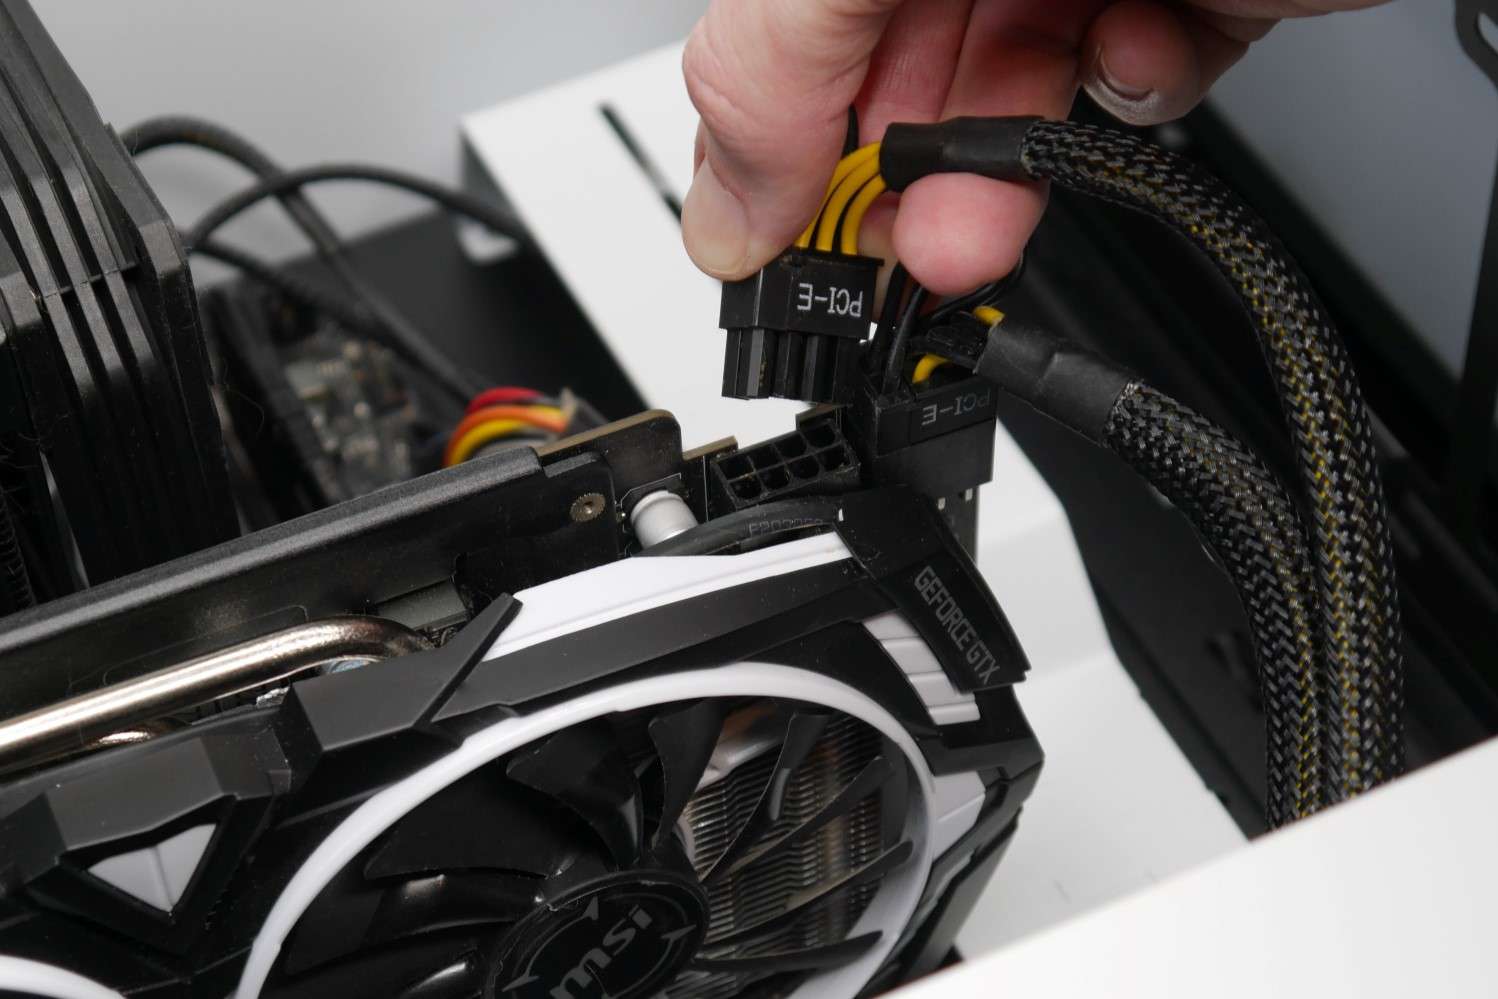
If your graphics card requires additional power connectors, ensure that the necessary cables are connected securely from the power supply unit (PSU) to the card. The connectors are usually located on the side or the top of the graphics card. Verify that each connection is properly aligned and fully inserted.
Once the graphics card is correctly installed, secure it in place. Most graphics cards have a retention mechanism, such as a latch or screw, to hold them in position. Ensure that the card is firmly secured to prevent any movement or disconnection during use.
Replace the side panel of your computer case and secure it with the screws, ensuring a tight fit. This step helps maintain proper airflow and prevents dust from entering your system.
Connect your monitor to the graphics card using the appropriate video cable, such as HDMI, DisplayPort, or DVI. Locate the corresponding video output ports on the back of the graphics card and connect the cable securely.
With the physical installation complete, connect the power cable to your computer and turn it on. Your system should recognize the new graphics card and automatically install the necessary drivers. If prompted, follow the on-screen instructions to complete the driver installation process.
Once the drivers are installed, restart your computer to ensure that the changes take effect. You can then access the graphics card’s control panel or software to adjust settings, such as display resolution, refresh rate, and other specific configurations based on your preferences and requirements.
Congratulations! You have successfully installed the new graphics card into your system. Enjoy the enhanced performance, improved visuals, and the ability to tackle more demanding games and applications on your upgraded setup.
Configuring the settings and drivers
After installing your new graphics card, it’s important to configure the settings and drivers to ensure optimal performance and compatibility with your system and applications. Proper configuration will help you take full advantage of the capabilities of your upgraded graphics card.
Start by installing the latest drivers for your graphics card. Visit the manufacturer’s website and search for the drivers specific to your graphics card model and operating system. Download the appropriate drivers and follow the installation instructions provided by the manufacturer.
Once the drivers are installed, restart your computer to ensure that the changes take effect. This step is crucial for the system to recognize and properly utilize the new graphics card.
Access the control panel or software provided by the graphics card manufacturer. This software allows you to adjust various settings and optimize the performance of your graphics card. Options might include adjusting the display resolution, refresh rate, color settings, and enabling features such as anti-aliasing or vertical sync.
If you’re a gamer, explore the settings available in the games you play. Some games offer specific options to maximize performance or to take advantage of your new graphics card’s features, such as higher quality textures or advanced visual effects. Make sure to adjust these settings to suit your preferences and system’s capabilities.
Consider enabling automatic updates for your graphics drivers. Manufacturers release regular updates to address performance issues, fix bugs, and add support for new games and applications. Enabling automatic updates ensures that you stay up to date with the latest driver optimizations and enhancements.
While configuring the settings, keep an eye on the temperature and fan speed of your graphics card. Some software provided by manufacturers allows you to monitor these metrics. Ensuring that your graphics card stays within acceptable temperature limits helps maintain its performance and longevity.
Experiment with different settings to find the balance between performance and visual quality that suits your preferences. Some users prioritize maximum performance, while others may prefer higher quality visuals. Finding the settings that work best for you will enhance your overall experience.
Periodically check for driver updates and software upgrades from the graphics card manufacturer. As new drivers and software releases become available, they may provide performance improvements, bug fixes, and new features that can further enhance your graphics card’s capabilities.
By configuring the settings and drivers, you can ensure that your new graphics card is properly optimized to deliver the best possible performance and visuals. Take the time to explore the available options, experiment with different settings, and stay up to date with driver updates to make the most of your upgraded hardware.
Testing and troubleshooting
After configuring the settings and drivers, it’s crucial to test your system with the new graphics card to ensure that everything is functioning as expected. Testing allows you to verify the performance, stability, and compatibility of your upgraded hardware. If any issues arise, troubleshooting steps can help identify and resolve them.
Start by running benchmark tests or stress tests to assess the performance of your new graphics card. Benchmarking software, such as 3DMark or FurMark, can measure various aspects of graphics card performance, including frame rates, rendering capabilities, and temperature. Compare your results with online benchmarks for your specific graphics card model to ensure that it is performing up to standard.
Test your system with demanding applications or games that you frequently use. Monitor the performance and stability during gameplay or resource-intensive tasks. Pay attention to any unusual artifacts, crashes, or performance issues that may indicate compatibility or configuration problems.
If you encounter any issues, consider checking for updates to your graphics card drivers. Manufacturers often release driver updates to address compatibility issues, bug fixes, and performance improvements. Ensure that you are using the latest drivers available for your specific graphics card model.
Ensure that your system is adequately cooled. Overheating can cause performance issues or even damage to your hardware. Monitor the temperatures of your graphics card using software provided by the manufacturer or third-party applications. If temperatures are high, consider improving system airflow, installing additional case fans, or adjusting fan curves to ensure efficient cooling.
If you experience stability issues or crashes, consider resetting your graphics card settings to the default values. Sometimes, incompatible configurations or overclocking settings can lead to instability. Use the control panel or software provided by the manufacturer to restore settings to their default values and test the system again.
Inspect all cable connections, including power cables, to ensure they are securely attached. Loose or improperly connected cables can cause intermittent issues or performance problems. Firmly reattach any loose cables and ensure they are properly seated.
Consider checking for firmware updates for your graphics card. Manufacturers occasionally release firmware updates that address specific issues or provide improvements in performance or compatibility. Check the manufacturer’s website for any available firmware updates and follow the instructions provided to update your graphics card’s firmware.
If you are unable to resolve any issues you encounter, consider seeking assistance from the manufacturer’s technical support. They can provide guidance specific to your graphics card model and help troubleshoot any persistent issues that may be affecting your system.
By thoroughly testing and troubleshooting your system with the new graphics card, you can identify and address any performance or compatibility issues. Regular testing ensures that you are getting the most out of your upgraded hardware and enables you to enjoy a seamless and enhanced computing experience.
Conclusion
Congratulations on successfully upgrading your graphics card! By taking the time to understand your current graphics card, researching and selecting a new one, checking compatibility, preparing your computer, installing the new graphics card, configuring the settings and drivers, and testing and troubleshooting, you have unlocked a world of improved performance, visual quality, and enhanced gaming or graphic design experiences.
An upgraded graphics card can breathe new life into your computer, allowing you to play the latest games at higher settings, render complex designs more efficiently, and enjoy smoother and more immersive visuals. The process of upgrading may seem daunting at first, but with proper research, preparation, and careful installation, you can achieve a seamless transition to your new hardware.
Remember to keep your drivers up to date, as manufacturers often release updates to improve performance, address compatibility issues, and add support for new games and applications. Regularly testing your system and monitoring temperatures can help ensure optimal performance and prevent any potential issues from arising.
If you encounter any difficulties or have concerns during the process, don’t hesitate to reach out to the manufacturer’s customer support. They are there to assist you and provide expert guidance specific to your graphics card model.
Now, with the power and capabilities of your new graphics card at your fingertips, it’s time to embark on your gaming adventures or creative endeavors with confidence. Enjoy the enhanced visuals, improved performance, and the exciting possibilities that come with your upgraded graphics card!