Introduction
Setting up autofill in Chrome can significantly streamline your browsing experience by automatically populating forms with your personal information, such as your name, address, and payment details. This feature not only saves time but also reduces the hassle of repeatedly entering the same information across different websites.
By configuring autofill settings in Chrome, you can expedite the checkout process when shopping online, simplify the completion of online forms, and ensure that your frequently used information is readily available whenever needed. Whether you're a frequent online shopper, a busy professional managing various accounts, or simply looking to optimize your browsing efficiency, mastering the art of autofill can be a game-changer.
In this guide, we will walk you through the step-by-step process of setting up autofill in Chrome, empowering you to harness the full potential of this convenient feature. Whether you're a seasoned Chrome user or just getting started with this popular web browser, you'll find that configuring autofill is a simple yet impactful way to enhance your browsing experience. So, let's dive in and unlock the power of autofill in Chrome!
Step 1: Open Chrome Settings
To begin the process of setting up autofill in Chrome, the first step is to access the browser's settings. This is where you can customize various aspects of Chrome to suit your preferences, including enabling autofill and managing the information it stores.
-
Launch Chrome: Open the Chrome web browser on your computer or mobile device. Once the browser is open, you will need to navigate to the settings menu.
-
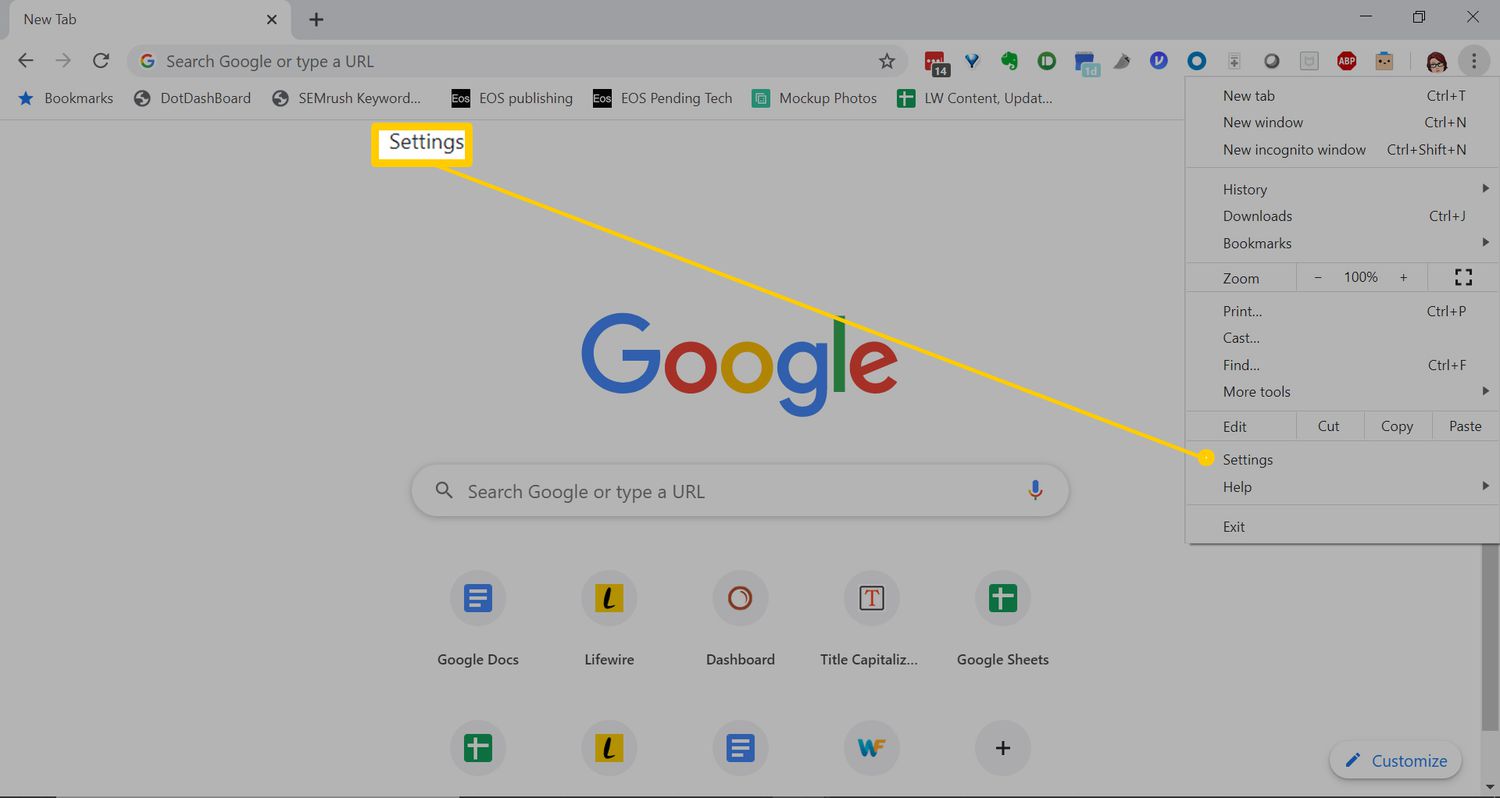
Access Settings: In the top-right corner of the Chrome window, you will find the three-dot menu icon. Click on this icon to reveal a dropdown menu. From the menu, select "Settings." This action will open a new tab in Chrome dedicated to settings and customization options.
-
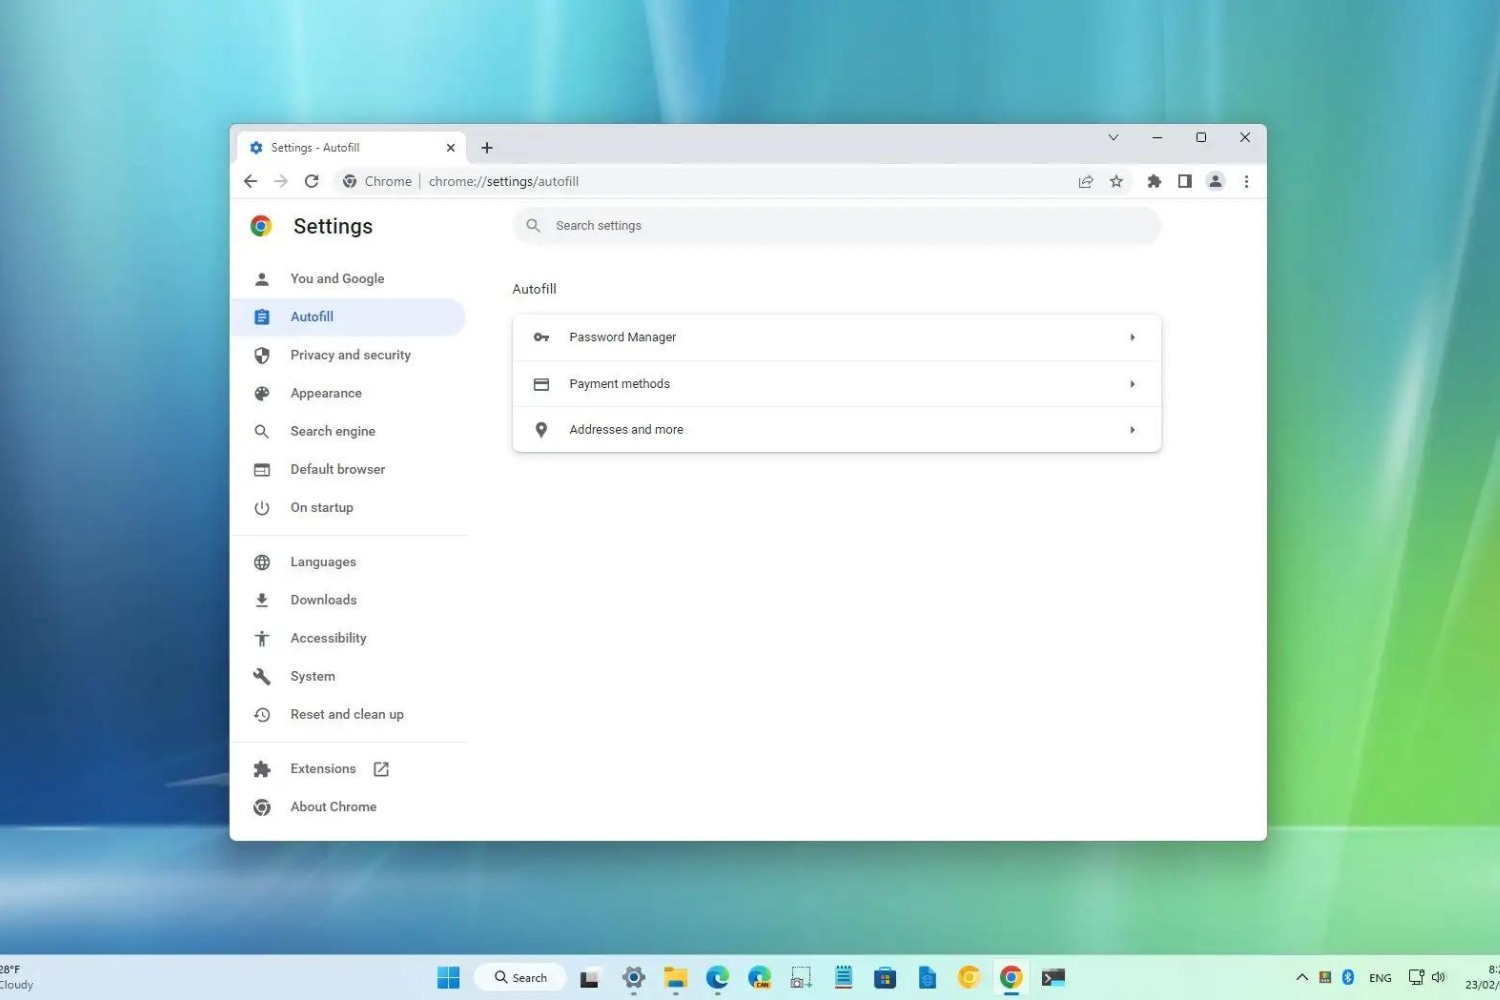
Navigate to Autofill Settings: Within the Settings tab, you will find a list of categories on the left-hand side. Look for and click on the "Autofill" option. This will take you to the Autofill settings page, where you can manage various autofill-related preferences.
By following these simple steps, you can easily access the Chrome settings and navigate to the Autofill section, laying the groundwork for configuring autofill to streamline your browsing experience. With the settings menu now at your fingertips, you are ready to delve into the next steps of the autofill setup process, bringing you closer to harnessing the convenience and efficiency of this feature.
Step 2: Click on "Autofill"
Upon reaching the Autofill settings page in Chrome, you will be presented with a range of options to customize your autofill preferences. This step is pivotal in fine-tuning the autofill feature to align with your specific needs and browsing habits. By clicking on "Autofill," you gain access to a wealth of customization options that allow you to manage and edit the information Chrome automatically fills in for you.
Managing Addresses and More
When you click on "Autofill," you will typically encounter subcategories such as "Addresses and more" or "Payment methods," depending on the device and version of Chrome you are using. These subcategories enable you to manage the personal information that Chrome can automatically populate into online forms. By clicking on "Addresses and more," you can review, add, edit, or remove saved addresses, ensuring that the autofill feature is equipped with the most up-to-date and accurate information.
Fine-Tuning Payment Methods
In the "Payment methods" section, you can manage the credit or debit card details that Chrome can autofill when you encounter payment forms during online transactions. This includes the ability to add new cards, edit existing ones, or remove outdated payment information. By clicking on "Payment methods," you can maintain a streamlined and secure collection of payment options, making online shopping and transactions more efficient and convenient.
Exploring Additional Autofill Options
Depending on your Chrome version and device, you may also encounter additional autofill options, such as managing passwords and other sign-in information. These options allow you to control how Chrome handles and autofills your login credentials, further enhancing your browsing convenience and security.
By clicking on "Autofill" and exploring the available customization options, you can tailor the autofill feature to suit your preferences and ensure that it seamlessly integrates with your browsing activities. This level of control empowers you to optimize your autofill settings, making your online interactions more efficient and personalized.
With the autofill settings now within your grasp, you are well on your way to harnessing the full potential of this feature. The next steps will guide you through the process of adding or editing autofill information, further refining your browsing experience and maximizing the benefits of autofill in Chrome.
Step 3: Add or Edit Autofill Information
Upon reaching the Autofill settings page in Chrome, you gain the ability to add or edit autofill information, empowering you to customize the data that Chrome automatically fills in for you. This step is crucial in ensuring that the autofill feature is equipped with accurate and up-to-date information, tailored to your specific needs and preferences.
Adding New Information
To add new autofill information, such as addresses or payment methods, simply click on the respective category within the Autofill settings. For example, if you wish to add a new address, navigate to the "Addresses and more" section and look for the option to add a new address. By clicking on this option, you can input the relevant details, such as your name, street address, city, state, and zip code, ensuring that Chrome can seamlessly populate this information into online forms when needed.
Similarly, if you need to add a new payment method, such as a credit card, you can navigate to the "Payment methods" section and look for the option to add a new card. Here, you can enter the cardholder's name, card number, expiration date, and other pertinent details, expanding Chrome's autofill capabilities to include the new payment method.
Editing Existing Information
In the event that your existing autofill information requires updates or modifications, Chrome provides a straightforward editing process. Within the Autofill settings, locate the specific entry you wish to edit, whether it's an address, payment method, or other autofill data. By selecting the edit option associated with the entry, you can make the necessary changes, such as updating a phone number, changing a card's expiration date, or refining any other details to ensure accuracy and relevance.
By adding new information and editing existing entries, you can fine-tune Chrome's autofill capabilities to reflect your current and evolving personal and payment details. This level of customization ensures that the autofill feature remains a reliable and efficient tool, seamlessly integrating with your browsing activities and simplifying the completion of online forms and transactions.
With the ability to add or edit autofill information, you are empowered to maintain a dynamic and personalized autofill database within Chrome, optimizing your browsing experience and streamlining your interactions with online forms and payment portals. This level of control over your autofill data underscores the versatility and user-centric nature of Chrome's autofill feature, enhancing your overall browsing convenience and efficiency.
Step 4: Turn Autofill On or Off
After customizing your autofill information and preferences, the final step in configuring autofill in Chrome involves the ability to turn the autofill feature on or off. This pivotal setting allows you to exert precise control over when and how Chrome populates forms with your saved information, aligning the autofill behavior with your browsing habits and privacy considerations.
Enabling Autofill
To enable autofill in Chrome, you can navigate to the Autofill settings and locate the master toggle switch that activates the feature. This switch, often positioned at the top of the Autofill settings page, allows you to turn on autofill with a simple click. Once enabled, Chrome will automatically fill in forms with your saved information, streamlining the completion of online forms and transactions.
Disabling Autofill
Conversely, if you prefer to disable autofill for any reason, Chrome provides a straightforward option to turn off the feature. By accessing the same master toggle switch within the Autofill settings, you can deactivate autofill with a quick click, halting the automatic population of forms with your saved information. This level of control ensures that you can opt out of autofill whenever necessary, preserving your privacy and browsing preferences.
Tailoring Autofill for Specific Data Types
In addition to the master toggle switch, Chrome offers granular control over autofill for specific data types, such as addresses, payment methods, and passwords. Within each subcategory of autofill data, you may find individual toggle switches that allow you to enable or disable autofill for that particular data type. This level of customization empowers you to fine-tune autofill behavior based on your specific needs and preferences, ensuring that Chrome operates in alignment with your browsing habits.
By mastering the ability to turn autofill on or off, you gain the flexibility to harness the convenience of autofill when it suits your needs while retaining the autonomy to disable it when desired. This level of control underscores Chrome's commitment to user-centric browsing experiences, allowing you to optimize the autofill feature to seamlessly integrate with your online interactions.
With the autofill feature now fully configured and tailored to your preferences, you are poised to enjoy a more efficient and personalized browsing experience, empowered by Chrome's versatile autofill capabilities.
Conclusion
In conclusion, mastering the setup of autofill in Chrome empowers users to streamline their browsing experience, save time, and enhance convenience when interacting with online forms and payment portals. By following the step-by-step process outlined in this guide, users can access Chrome's settings, customize autofill preferences, and fine-tune the autofill feature to align with their specific needs and browsing habits.
The ability to add, edit, and manage autofill information, including addresses, payment methods, and passwords, provides a level of control that ensures the accuracy and relevance of the autofill data. This customization not only optimizes the autofill feature but also enhances security and efficiency when completing online transactions and filling out forms.
Furthermore, the flexibility to turn autofill on or off, both at a master level and for specific data types, empowers users to exert precise control over when and how Chrome populates forms with saved information. This level of customization underscores Chrome's commitment to user-centric browsing experiences, allowing individuals to tailor the autofill feature to seamlessly integrate with their online interactions.
By leveraging the power of autofill in Chrome, users can expedite the checkout process during online shopping, simplify the completion of online forms, and ensure that frequently used information is readily available whenever needed. Whether managing multiple accounts, engaging in frequent online transactions, or simply seeking to optimize browsing efficiency, the ability to configure and customize autofill in Chrome proves to be a valuable asset.
In essence, setting up autofill in Chrome represents a simple yet impactful way to enhance the browsing experience, offering a seamless and efficient solution for managing personal information across various online platforms. As users navigate the digital landscape, the convenience and control afforded by Chrome's autofill feature serve as a testament to the browser's commitment to empowering individuals with tools that prioritize convenience, security, and personalization.