Introduction
Setting up autofill on Chrome can significantly streamline your browsing experience by automatically populating forms with your personal information, saving you time and effort. Whether you're filling out shipping addresses, payment details, or other repetitive fields, Chrome's autofill feature can be a game-changer in simplifying your online interactions.
By configuring autofill, you can ensure that your frequently used information, such as your name, address, and credit card details, are readily available whenever you need them. This not only eliminates the hassle of manually entering the same information repeatedly but also reduces the likelihood of errors, making your online transactions more efficient and accurate.
In this guide, we'll walk you through the step-by-step process of setting up autofill on Chrome. You'll learn how to add, edit, and manage your autofill information, as well as enable autofill for payment methods. By the end of this tutorial, you'll be equipped with the knowledge to harness the full potential of Chrome's autofill feature, empowering you to navigate the web with greater ease and convenience.
Step 1: Open Chrome and go to Settings
To begin setting up autofill on Chrome, the first step is to open the Chrome browser on your computer or mobile device. Once Chrome is launched, you'll need to navigate to the Settings menu, where you can access the autofill options and customize your autofill preferences.
On Desktop:
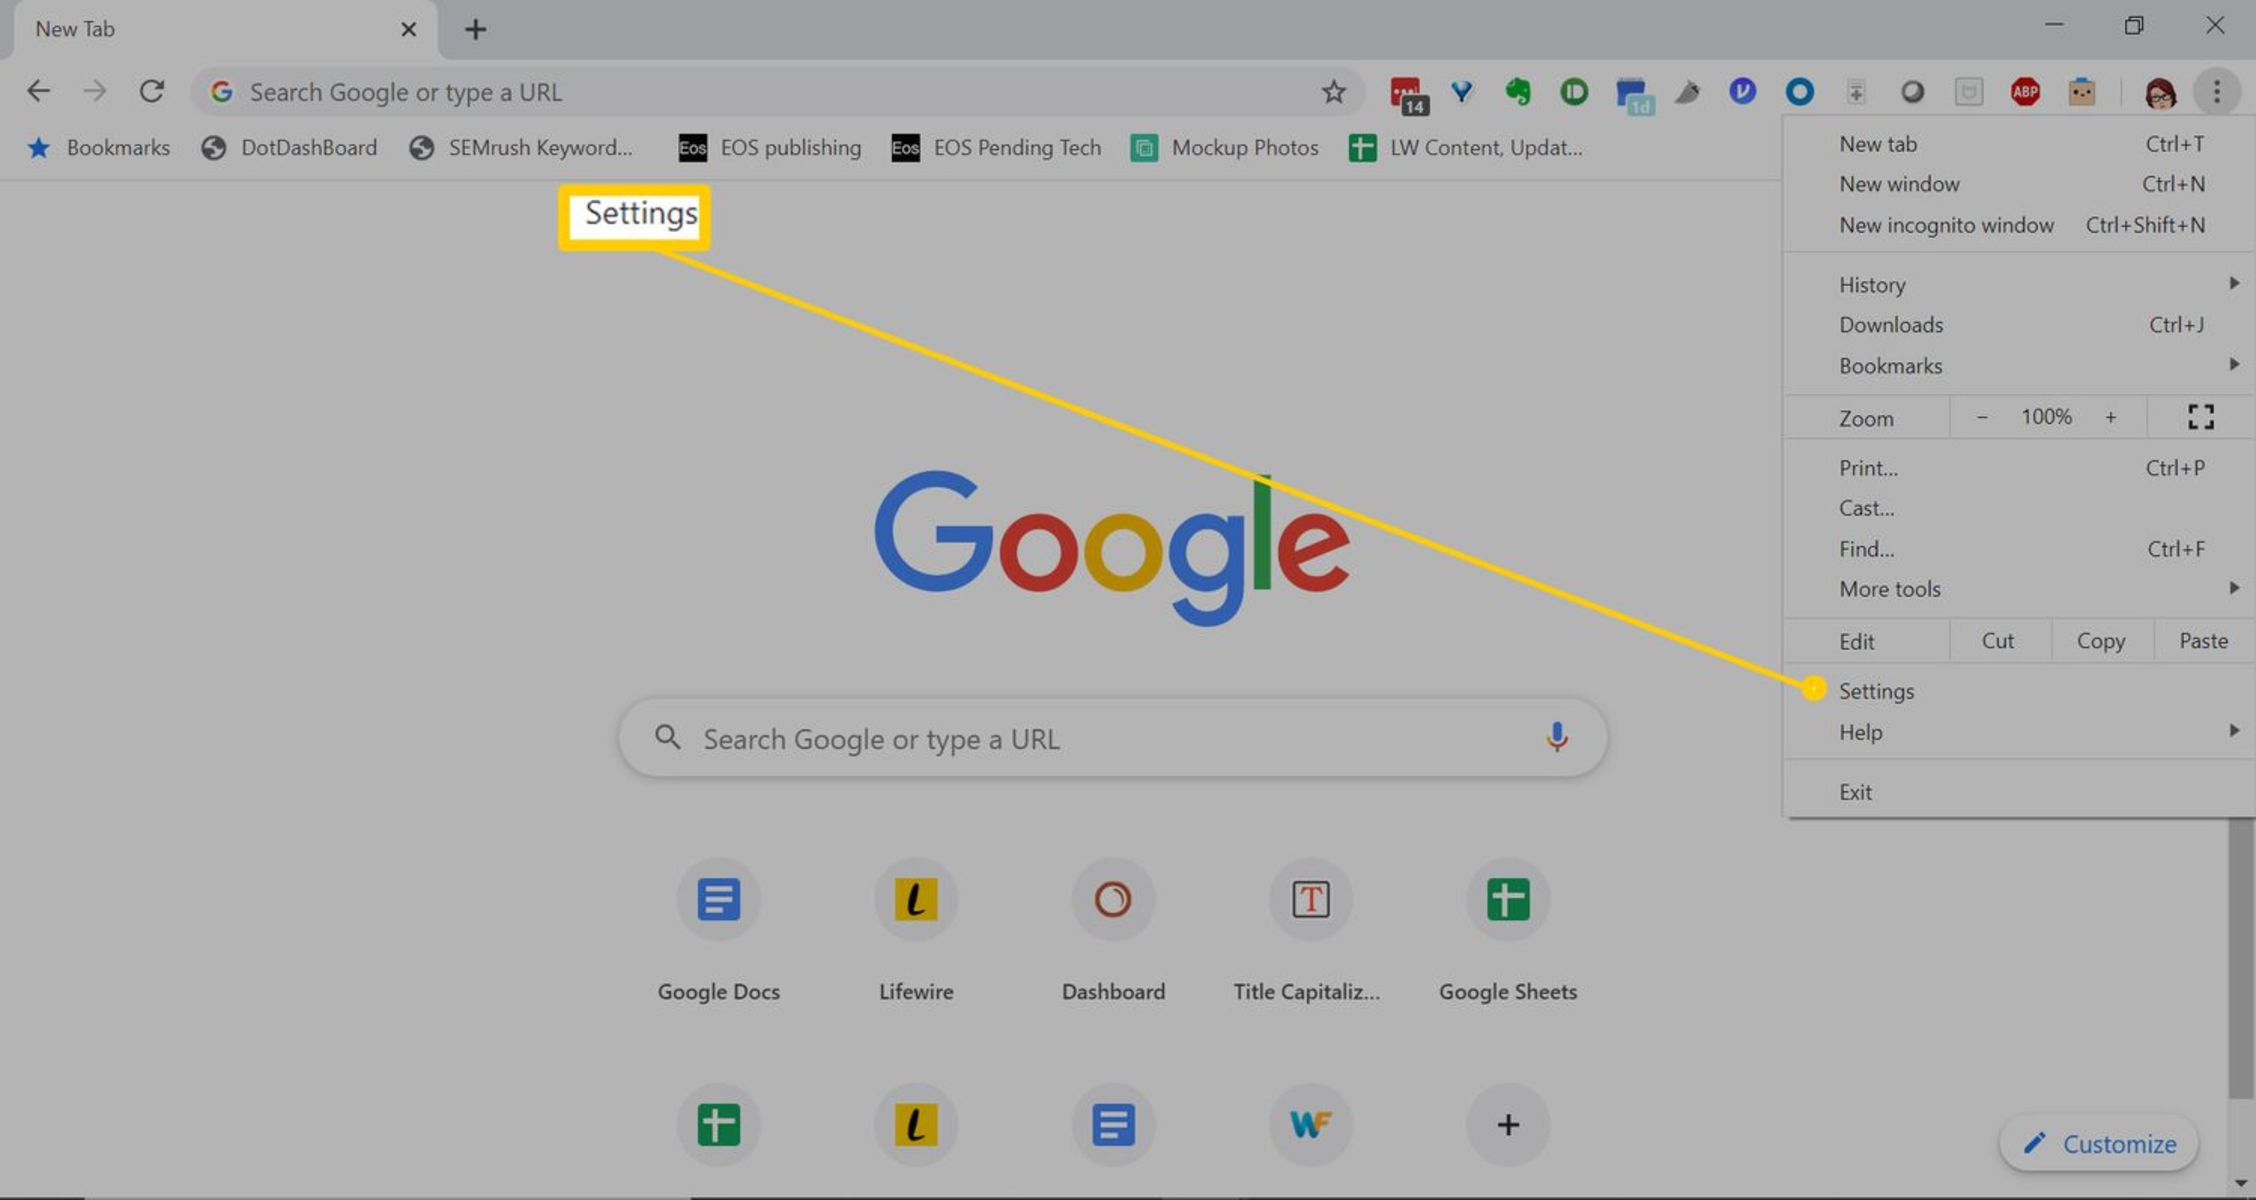
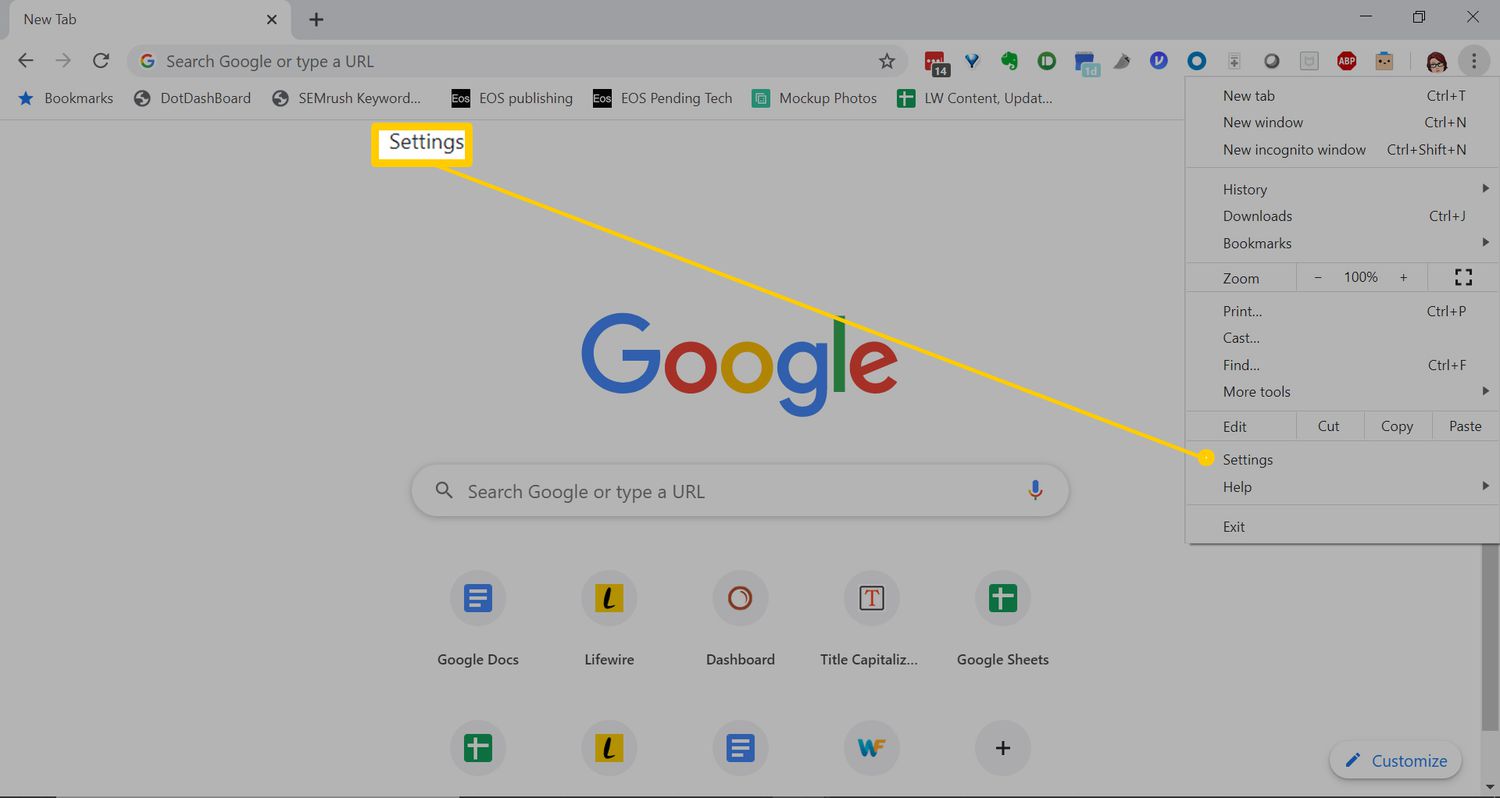
If you're using Chrome on a desktop or laptop, you can access the Settings menu by clicking on the three vertical dots located in the top-right corner of the browser window. This will open a dropdown menu, where you should select "Settings" near the bottom of the list. Alternatively, you can type "chrome://settings/" in the address bar and press Enter to directly access the Settings page.
On Mobile:
For mobile users, the process is slightly different. After opening the Chrome app on your smartphone or tablet, tap on the three vertical dots in the top-right corner of the screen to reveal the menu. From there, select "Settings" to proceed to the next step.
Once you've successfully accessed the Settings page, you're ready to move on to the next step in the process of setting up autofill on Chrome.
By following these simple instructions, you can easily navigate to the Settings menu in Chrome, laying the groundwork for configuring autofill and optimizing your browsing experience.
Step 2: Click on Autofill
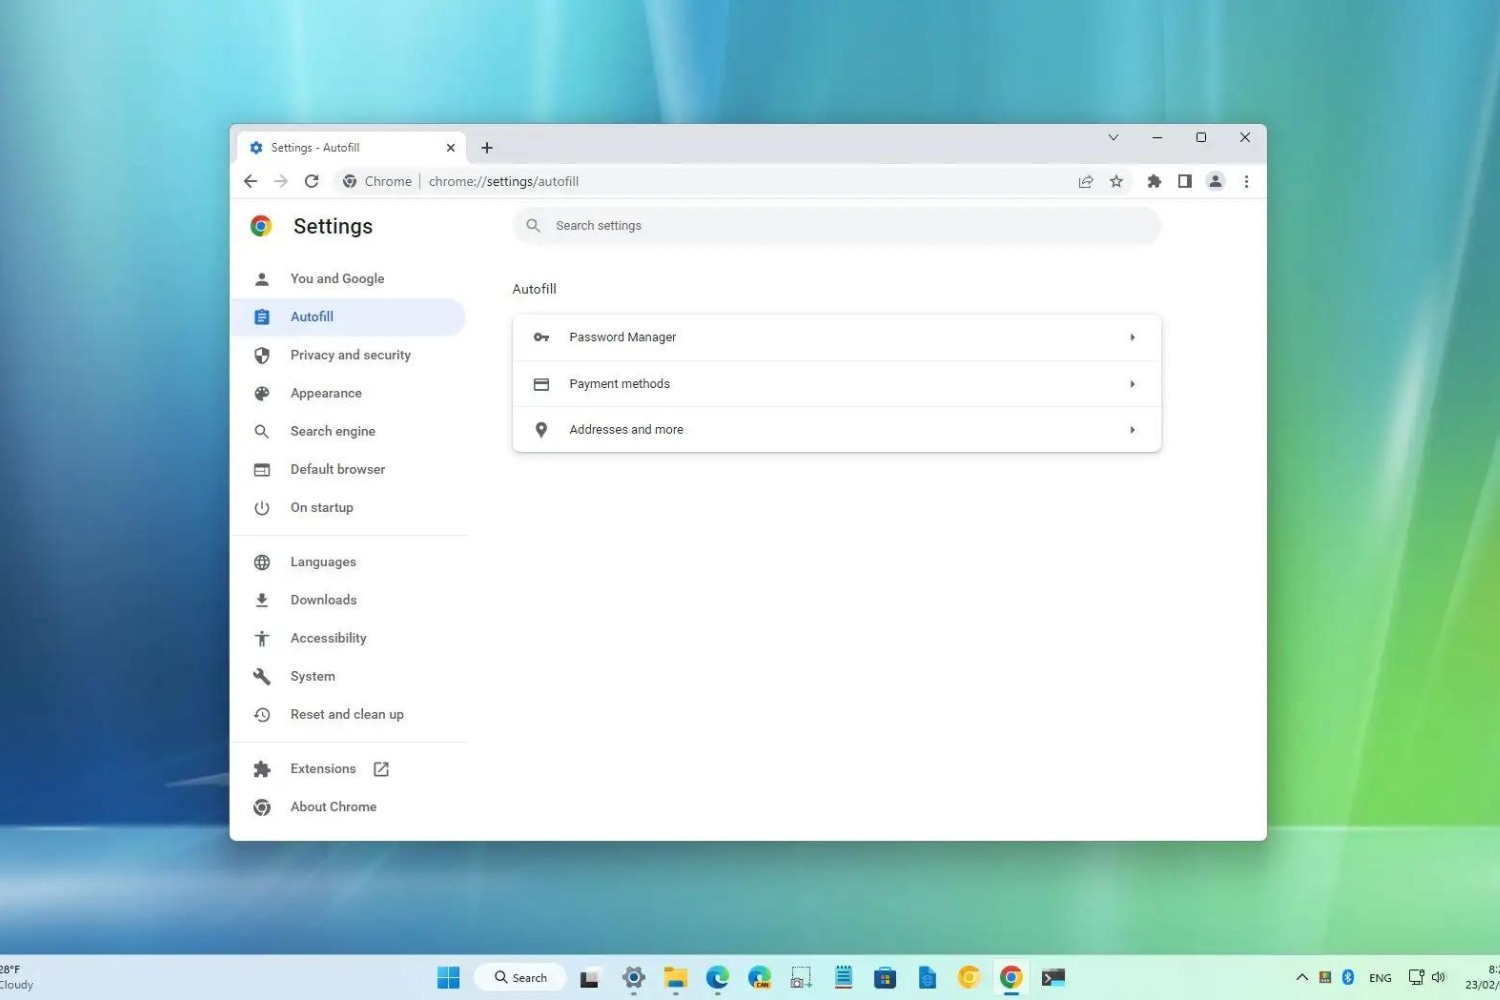
After accessing the Settings menu in Chrome, the next crucial step in setting up autofill is to locate and click on the "Autofill" option. This feature allows you to manage and customize the autofill settings according to your preferences, enabling you to streamline the process of filling out forms and entering information on websites.
Upon clicking on the "Autofill" option within the Settings menu, you will be presented with a range of autofill settings and options that you can tailor to suit your specific needs. These settings typically include options for managing addresses, payment methods, passwords, and more, providing you with the flexibility to configure autofill based on your browsing habits and requirements.
In the "Autofill" section, you may find subsections such as "Addresses and more" and "Payment methods," each offering the ability to add, edit, or remove the corresponding autofill information. By clicking on these subsections, you can delve deeper into customizing your autofill data, ensuring that the information you frequently use is readily available whenever you need it.
Furthermore, within the "Autofill" settings, you may also have the option to enable or disable the autofill feature, giving you full control over its functionality. This allows you to toggle autofill on or off based on your preferences, providing a convenient way to manage this feature according to your browsing and privacy preferences.
By clicking on the "Autofill" option and exploring the available settings, you are taking a significant step towards harnessing the full potential of Chrome's autofill feature. This empowers you to streamline your online interactions, minimize repetitive data entry, and enhance your browsing efficiency.
In summary, clicking on the "Autofill" option within the Chrome Settings menu opens the door to a wealth of customization options, allowing you to tailor the autofill feature to align with your specific needs and browsing habits. This pivotal step sets the stage for optimizing your autofill experience and reaping the benefits of a more seamless and efficient browsing journey.
Step 3: Add or edit your information
Once you have accessed the Autofill settings in Chrome, the next essential step is to add or edit your personal information. This includes details such as your name, address, phone number, and email, which can be conveniently stored and automatically filled in when required. This feature not only saves time but also ensures accuracy and consistency across various online forms.
To add new information, you can simply click on the "Add" button within the respective section, whether it's for addresses, payment methods, or other autofill data. This action prompts a form where you can input the relevant details, such as your full name, street address, city, state, zip code, credit card number, expiration date, and more. By providing this information, you are creating a repository of data that Chrome can use to autofill forms on your behalf.
In the event that your existing information needs to be updated or corrected, Chrome offers the flexibility to edit the stored data. By selecting the "Edit" option next to the information you wish to modify, you can make the necessary changes, ensuring that your autofill details remain accurate and up to date.
Furthermore, Chrome's autofill feature allows you to manage multiple sets of information, making it convenient for users who may have different billing addresses, shipping addresses, or payment methods. This versatility enables you to seamlessly switch between various profiles or sets of data, catering to different scenarios and online transactions.
By adding or editing your information within Chrome's autofill settings, you are effectively building a personalized database of details that can be leveraged to streamline your online interactions. This not only simplifies the process of filling out forms but also enhances the security of your data by reducing the need for manual input, which can be prone to errors.
In summary, the ability to add or edit your information within Chrome's autofill settings empowers you to create a tailored repository of data that can be automatically populated in online forms. This feature not only saves time and effort but also contributes to a more efficient and accurate browsing experience.
Step 4: Enable Autofill for payment methods
Enabling Autofill for payment methods in Chrome can significantly streamline the checkout process when making online purchases. By storing and automatically populating your credit card details, Chrome's Autofill feature eliminates the need to manually enter payment information for each transaction, saving time and reducing the likelihood of errors. This step-by-step guide will walk you through the process of enabling Autofill for payment methods, empowering you to make secure and efficient online payments.
-
Access Autofill Settings: To begin, navigate to the Autofill section within Chrome's Settings menu. Once there, locate the "Payment methods" subsection, which is specifically designed for managing and storing credit card information.
-
Add Payment Methods: Within the "Payment methods" section, you have the option to add new credit cards for Autofill. By clicking on the "Add" button, you can input the relevant credit card details, including the card number, expiration date, cardholder name, and billing address. Chrome securely stores this information, ensuring that it is readily available when you proceed to make online payments.
-
Edit or Remove Payment Methods: Chrome also allows you to edit or remove existing payment methods as needed. If your credit card details change or if you wish to remove outdated information, simply select the "Edit" or "Remove" option next to the respective payment method.
-
Enable Autofill for Payment Methods: Once your payment methods are added or updated, ensure that the Autofill feature for payment methods is enabled. This setting allows Chrome to automatically populate the payment details on checkout pages, streamlining the payment process and enhancing convenience.
-
Verify Autofill Functionality: After enabling Autofill for payment methods, it's beneficial to test the feature on an e-commerce website. When prompted to enter payment information during a transaction, Chrome should automatically populate the credit card details from the stored information, demonstrating the successful activation of Autofill for payment methods.
By following these steps, you can effectively enable Autofill for payment methods in Chrome, optimizing your online shopping experience and simplifying the checkout process. This feature not only saves time but also contributes to a more secure and seamless payment workflow, allowing you to make purchases with confidence and efficiency.
Step 5: Manage Autofill settings for addresses and more
Managing Autofill settings for addresses and more in Chrome provides users with the flexibility to customize and organize their personal information for seamless form completion and online interactions. This step delves into the intricacies of fine-tuning Autofill settings to cater to specific address management and other related data, empowering users to optimize their browsing experience.
Customizing Address Information
Within the Autofill settings, users can conveniently manage and organize address information for efficient form completion. By clicking on the "Addresses and more" subsection, users can add, edit, or remove addresses based on their individual needs. This functionality is particularly beneficial for individuals who frequently ship items to different locations, such as home, work, or alternate addresses. By customizing and storing multiple addresses, users can effortlessly select the appropriate address when completing shipping forms, eliminating the need for manual input and streamlining the checkout process on e-commerce websites.
Exploring Additional Autofill Data
In addition to addresses, Chrome's Autofill feature may offer the ability to manage other types of information, such as phone numbers, email addresses, and more. This expanded functionality allows users to store and automatically populate a diverse range of data, further enhancing the convenience and efficiency of online form completion. By managing additional Autofill data, users can ensure that various fields across different websites are effortlessly filled in, reducing the burden of repetitive typing and minimizing the potential for input errors.
Enhancing Security and Privacy
While managing Autofill settings for addresses and more, users can also prioritize security and privacy by reviewing and organizing their stored information. Chrome provides options to securely store and encrypt Autofill data, safeguarding sensitive details from unauthorized access. Additionally, users have the flexibility to remove outdated or unnecessary information, ensuring that their Autofill repository remains current and relevant. By actively managing Autofill settings, users can maintain a balance between convenience and security, leveraging the feature to streamline their browsing experience while upholding data protection standards.
Streamlining Online Interactions
By meticulously managing Autofill settings for addresses and additional data, users can tailor their browsing environment to align with their specific needs and preferences. This level of customization not only saves time and effort but also contributes to a more organized and efficient online experience. Whether it's completing shipping forms, entering contact details, or populating various fields across the web, the ability to manage Autofill settings for addresses and more empowers users to navigate the digital landscape with ease and precision.
In summary, the process of managing Autofill settings for addresses and more in Chrome offers users a comprehensive toolkit for optimizing their personal information management. By customizing address details, exploring additional Autofill data, prioritizing security and privacy, and streamlining online interactions, users can harness the full potential of Chrome's Autofill feature, elevating their browsing efficiency and convenience.
Conclusion
In conclusion, mastering the art of setting up and managing autofill on Chrome can revolutionize the way you interact with the web. By seamlessly integrating your personal information into online forms and transactions, Chrome's autofill feature empowers you to navigate the digital landscape with unparalleled ease and efficiency.
Through the step-by-step process outlined in this guide, you've gained the knowledge and skills to leverage Chrome's autofill feature to its fullest potential. From adding and editing your personal information to enabling autofill for payment methods and managing autofill settings for addresses and more, you've unlocked the key to streamlining your online interactions and enhancing your browsing experience.
By embracing autofill, you've transcended the tedious and error-prone task of manually entering repetitive information, such as addresses, payment details, and contact information. Instead, you've embraced a smarter, more efficient approach that not only saves time but also reduces the likelihood of input errors, contributing to a smoother and more accurate browsing journey.
Furthermore, by actively managing autofill settings and prioritizing security and privacy, you've struck a balance between convenience and data protection. This proactive approach ensures that your personal information is securely stored and readily available when needed, while also safeguarding it from unauthorized access.
As you embark on your autofill-enabled browsing adventures, remember that the knowledge and skills you've acquired here serve as a gateway to a more streamlined and enjoyable online experience. Whether you're making seamless online purchases, completing forms with a few clicks, or effortlessly managing multiple addresses, Chrome's autofill feature stands as your trusted ally in the digital realm.
In essence, by embracing and mastering the art of autofill on Chrome, you've taken a significant step towards reclaiming your time, enhancing your browsing efficiency, and navigating the web with confidence and convenience. So go forth, armed with the power of autofill, and embark on a browsing journey that's tailored to your needs and optimized for seamless interactions.