Introduction
Google Chrome's autofill feature is a convenient tool that saves time and effort by automatically populating online forms with your personal information, such as your name, address, and email address. This feature is especially handy for frequently visited websites where you need to input the same information repeatedly. However, there are times when you may need to update or modify the email address that Chrome autofills for you. Whether you have a new email address or simply want to remove an outdated one, knowing how to manage your autofill email addresses can streamline your browsing experience.
In this article, we will explore the step-by-step process of changing your Google Chrome autofill email address. You will learn how to access the autofill settings, add a new email address, and edit or remove existing ones. By mastering these techniques, you can ensure that Chrome autofill accurately reflects your current contact information, making online form submissions a breeze. So, let's dive into the world of Chrome autofill and take control of your email addresses!
Accessing Chrome Autofill Settings
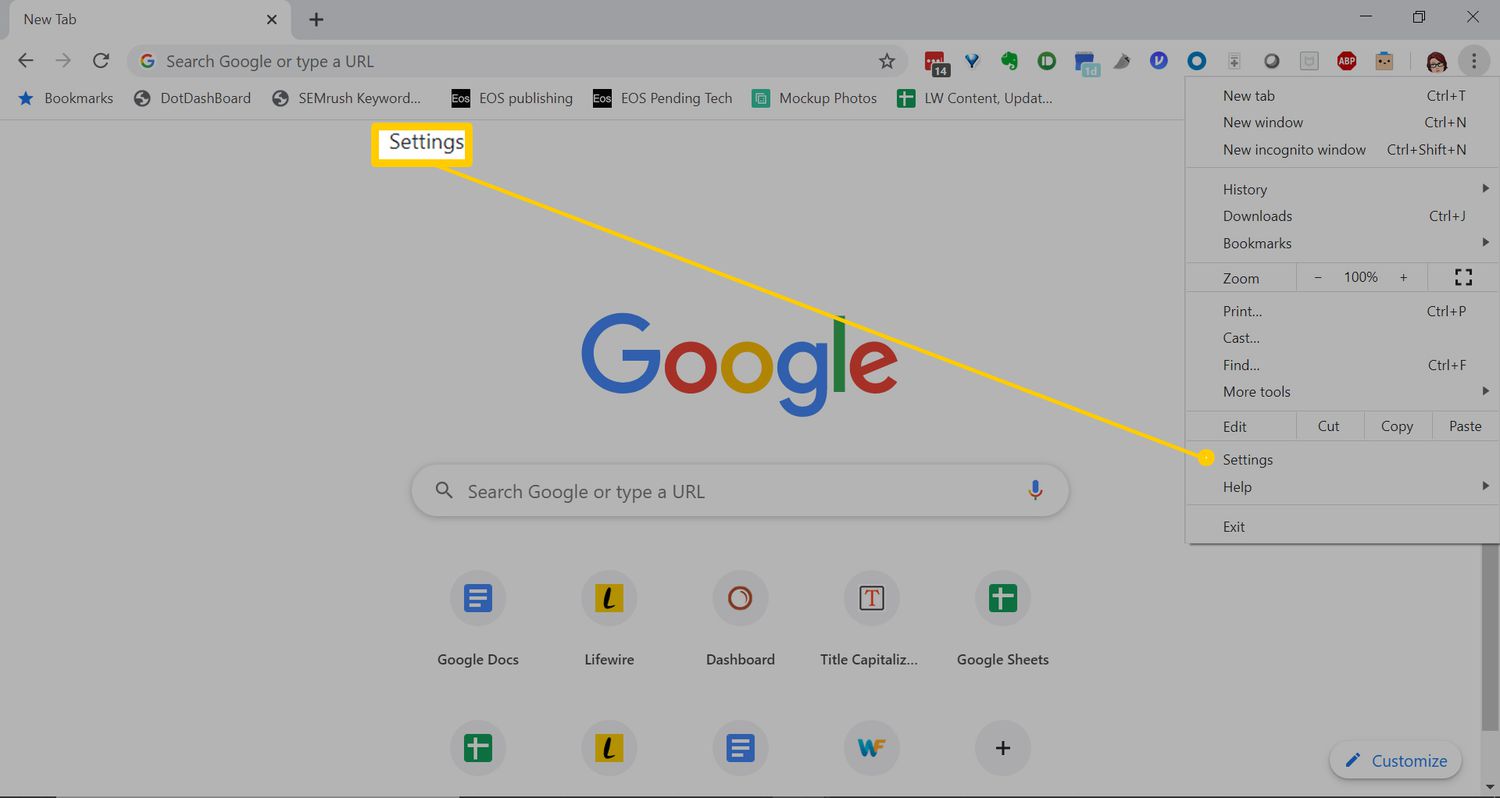
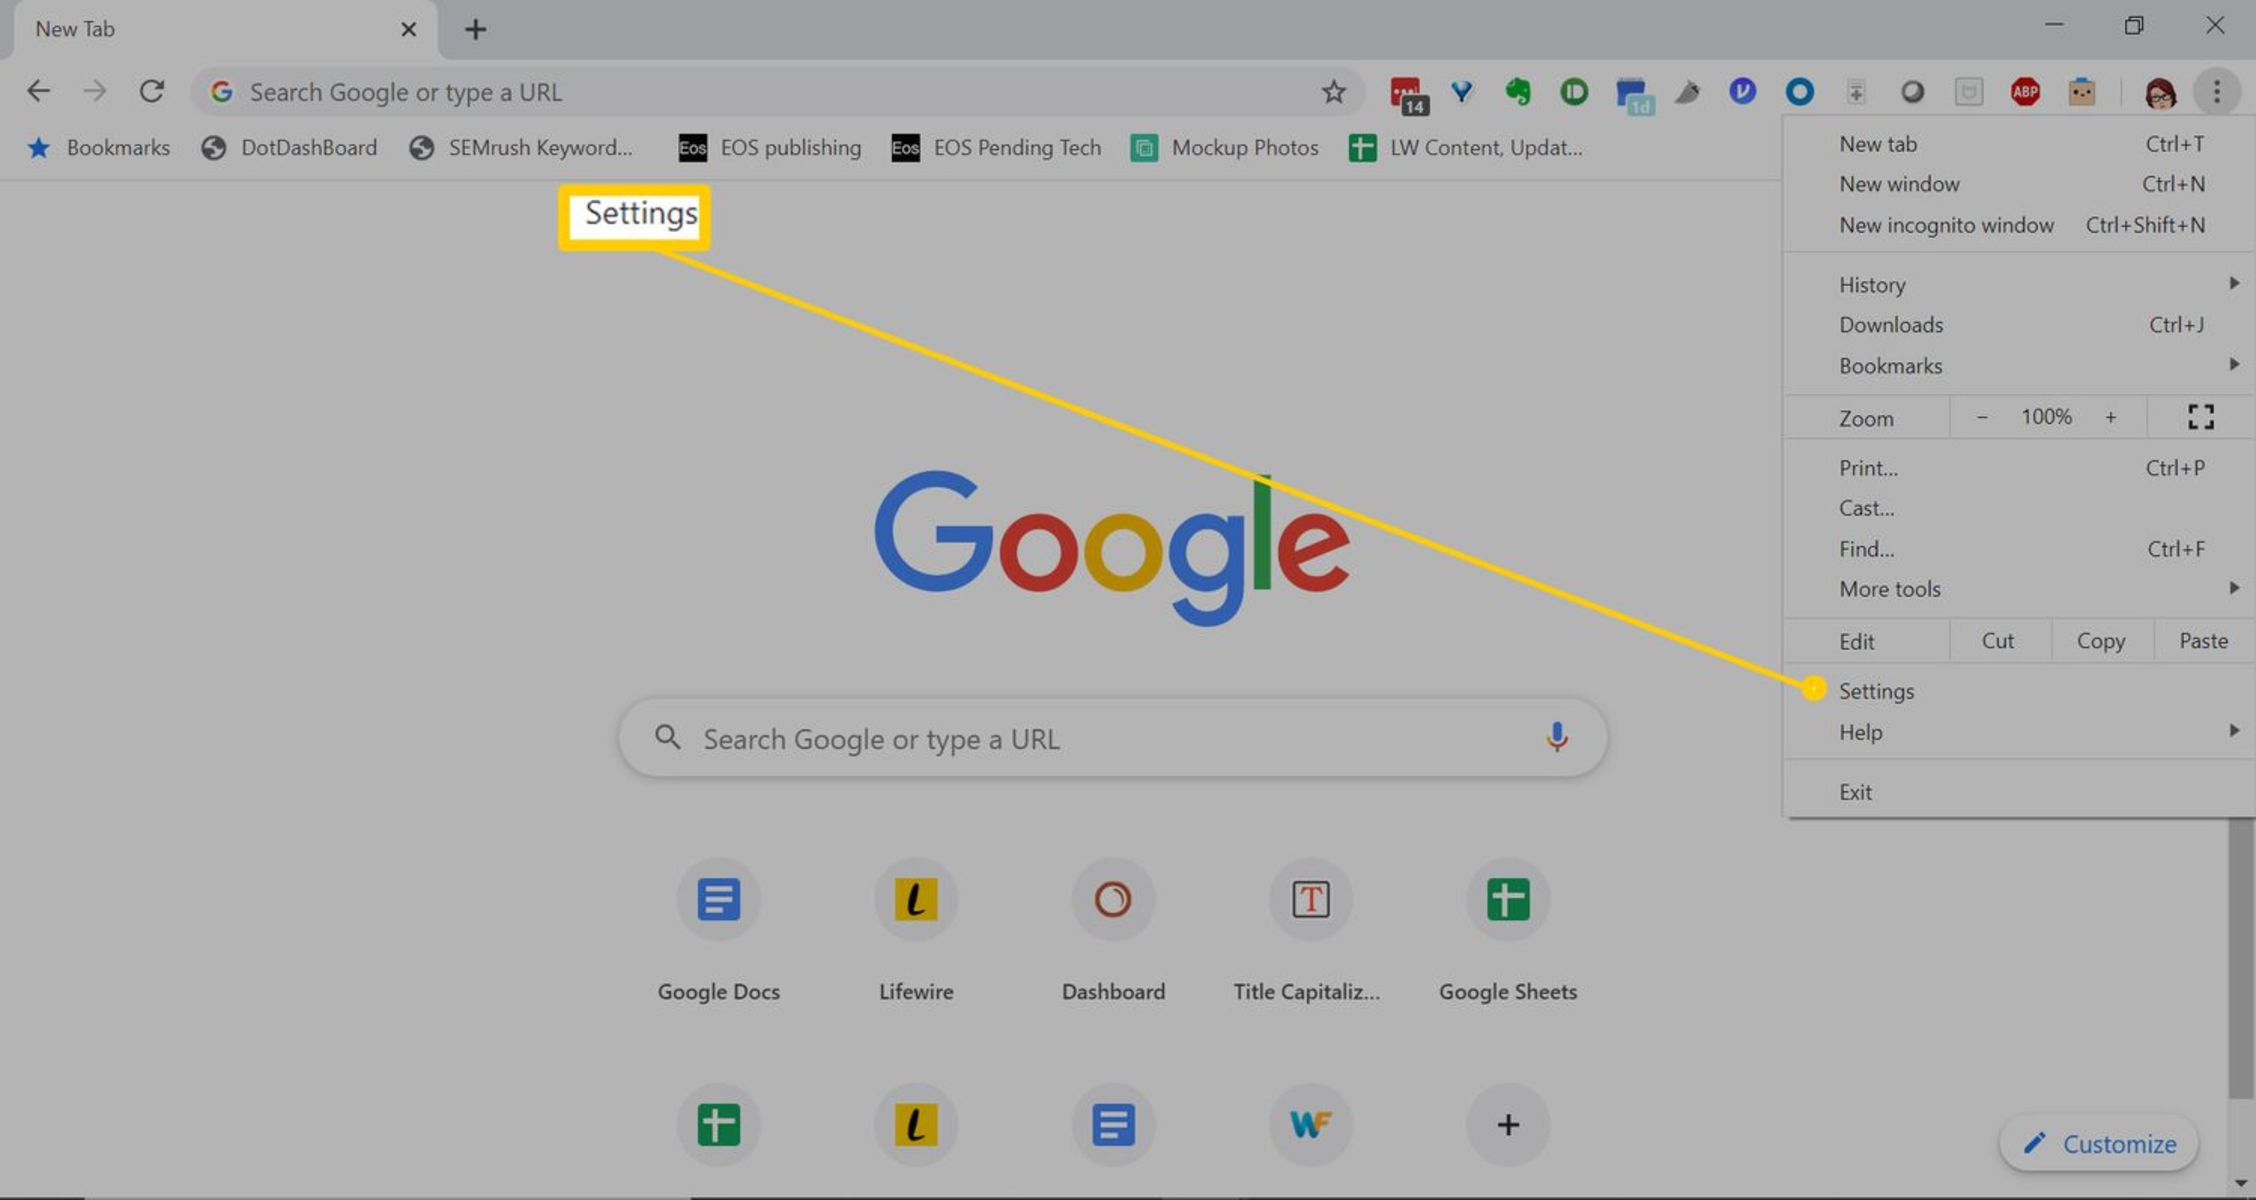
Accessing the Chrome autofill settings is the first step in managing your email addresses. To begin, open Google Chrome on your computer. In the top-right corner of the browser window, click on the three vertical dots to open the Chrome menu. From the menu, select "Settings" to access the browser's settings panel.
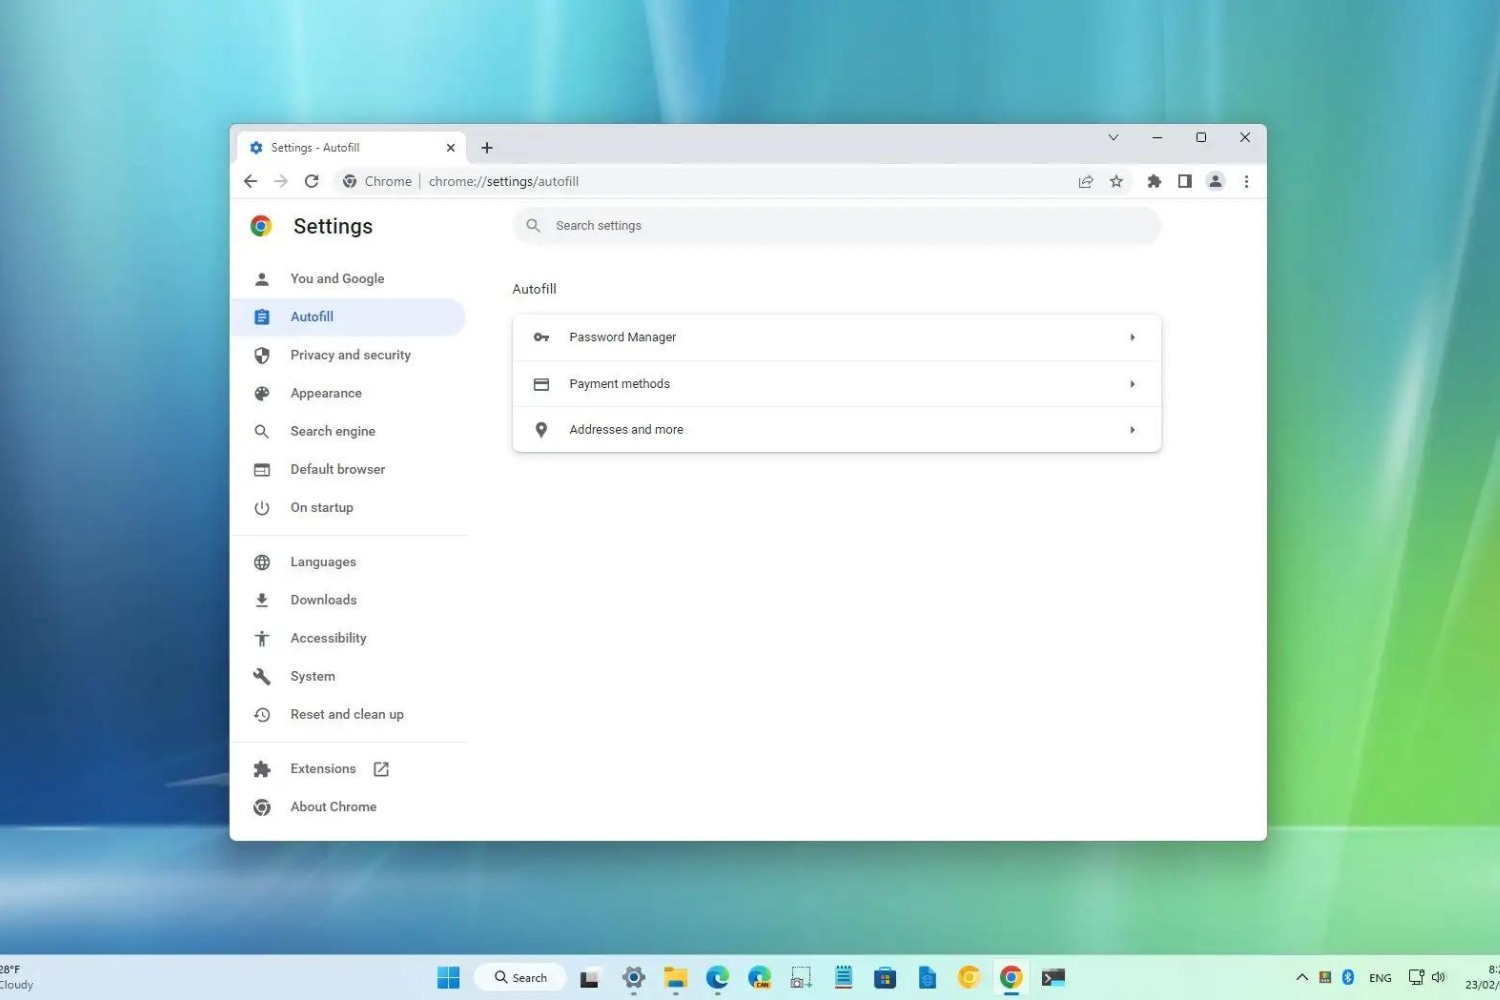
Once you are in the Settings menu, scroll down and click on "Advanced" to reveal additional options. Under the "Passwords and forms" section, you will find the "Autofill settings" button. Click on this button to access the autofill settings.
Upon clicking the "Autofill settings" button, a new window will open, displaying various autofill options, including addresses, credit cards, and passwords. To manage your email addresses, focus on the "Addresses" section. Here, you can view and edit the email addresses that Chrome autofills for you.
By following these simple steps, you can easily access the Chrome autofill settings and prepare to add, edit, or remove email addresses as needed. This initial stage sets the foundation for customizing your autofill preferences and ensuring that your email addresses are up to date and accurate.
Accessing the Chrome autofill settings is a straightforward process that empowers you to take control of your browsing experience. With this knowledge in hand, you are ready to proceed to the next steps of managing your autofill email addresses.
Adding a New Email Address to Autofill
Adding a new email address to Google Chrome's autofill feature is a simple yet valuable task that can enhance your browsing efficiency. Whether you've created a new email account or want to include an additional email address for autofill convenience, Chrome makes the process straightforward.
To begin, ensure you have accessed the Chrome autofill settings as outlined in the previous section. Once you are in the "Addresses" section of the autofill settings, look for the option to add a new email address. You will likely see an "Add" or "Add address" button – click on this to initiate the process.
Upon clicking the "Add" button, a form will appear, prompting you to enter the details of the new email address. Start by typing the email address into the designated field. Next, you may have the option to input additional information such as the recipient's name or any associated details that can aid in identifying the email address when autofilled.
After entering the necessary information, review the details to ensure accuracy. Once you are satisfied with the input, click "Save" or any similar option to add the new email address to Chrome's autofill database.
By following these steps, you have successfully added a new email address to Chrome's autofill feature. This means that when you encounter online forms requiring an email address, Chrome will now offer the newly added email address as an autofill option, saving you time and effort in manually entering the information.
Adding a new email address to Chrome's autofill feature is a practical way to keep your browsing experience tailored to your current needs. Whether it's a personal or professional email account, having it readily available for autofill can streamline your online interactions and contribute to a more efficient workflow.
With the ability to add new email addresses to Chrome's autofill, you have expanded your control over how the browser manages your personal information. This flexibility ensures that your browsing experience remains personalized and optimized to suit your evolving requirements.
Editing or Removing Existing Email Addresses
Once you have accessed the Chrome autofill settings and added new email addresses, you may also need to edit or remove existing ones. This can be necessary if you have updated your email address, no longer use a particular email account, or simply want to declutter the autofill options presented by Chrome. Fortunately, Chrome provides a straightforward process for managing existing email addresses within the autofill feature.
To begin editing or removing an existing email address, navigate to the Chrome autofill settings as previously outlined. Once you are in the "Addresses" section, you will see a list of the email addresses currently stored for autofill purposes. Locate the email address you wish to edit or remove within this list.
To edit an existing email address, look for an "Edit" or "Modify" option next to the email entry. Click on this option to access the details of the email address. You can then make the necessary changes, such as updating the email itself or modifying any associated information. After making the desired edits, be sure to save the changes to update the email address within Chrome's autofill database.
If you wish to remove an existing email address from Chrome's autofill, look for a "Remove" or "Delete" option next to the email entry. Click on this option to initiate the removal process. Chrome may prompt you to confirm the deletion to ensure that you intend to remove the selected email address. Once confirmed, the email address will be removed from Chrome's autofill database, and it will no longer appear as an autofill option when encountering online forms.
By mastering the process of editing or removing existing email addresses from Chrome's autofill feature, you can ensure that your autofill options remain accurate and relevant to your current needs. Whether it's updating personal contact information or decluttering outdated entries, having the ability to manage existing email addresses within Chrome's autofill empowers you to maintain a streamlined and personalized browsing experience.
With the knowledge and capability to edit or remove existing email addresses from Chrome's autofill, you have gained greater control over how the browser manages your personal information. This flexibility allows you to tailor your autofill preferences to align with your evolving requirements, contributing to a more efficient and personalized browsing experience.
Conclusion
In conclusion, mastering the management of your email addresses within Google Chrome's autofill feature empowers you to streamline your browsing experience and ensure that your personal information is accurately and efficiently populated in online forms. By understanding how to access the autofill settings, add new email addresses, and edit or remove existing ones, you have gained valuable insights into customizing Chrome's autofill to suit your current needs.
The ability to add new email addresses to Chrome's autofill provides a practical solution for incorporating additional email accounts or updating your contact information. Whether it's a new personal email address, a professional account, or any other email you frequently use, having them readily available for autofill simplifies the process of completing online forms, saving you time and effort.
Furthermore, the capability to edit or remove existing email addresses within Chrome's autofill ensures that your autofill options remain relevant and up to date. This flexibility allows you to adapt to changes in your contact information, ensuring that outdated or unused email addresses do not clutter the autofill suggestions presented by Chrome. By managing your autofill email addresses effectively, you can maintain a clean and personalized browsing experience tailored to your preferences.
Ultimately, the knowledge and skills acquired in managing Chrome's autofill email addresses contribute to a more efficient and personalized browsing experience. By taking control of how Chrome populates your email addresses in online forms, you can navigate the web with greater ease and convenience, focusing on your tasks and interactions without the hassle of repeatedly entering the same information.
As you continue to explore the capabilities of Google Chrome's autofill feature, remember that staying proactive in managing your autofill preferences can significantly enhance your browsing efficiency. Whether it's adding new email addresses, updating existing ones, or decluttering outdated entries, your ability to customize Chrome's autofill ensures that your online interactions are seamless and tailored to your specific needs.
In conclusion, by mastering the management of your email addresses within Chrome's autofill, you have unlocked the potential to optimize your browsing experience, making online form submissions a breeze and allowing you to focus on what matters most during your web interactions.