Introduction
Google Toolbar is a powerful browser extension that offers a plethora of features to enhance your browsing experience. From quick access to Google search and page translation to convenient bookmarking and spell checking, the Google Toolbar is a versatile tool that can streamline your online activities. While it was originally designed for Internet Explorer, you can still enjoy its benefits on Google Chrome by following a few simple steps. In this article, we will guide you through the process of showing the Google Toolbar in Chrome, allowing you to harness its full potential within your favorite browser.
Whether you're a seasoned internet user or just getting started, the Google Toolbar can be a valuable addition to your browsing toolkit. By integrating seamlessly with Chrome, it provides a seamless way to access various Google services and tools without leaving the webpage you're on. With its user-friendly interface and customizable options, the Google Toolbar empowers you to tailor your browsing experience to suit your specific needs and preferences.
Now, let's delve into the steps required to bring the Google Toolbar to the forefront of your Chrome browser, unlocking a world of convenience and efficiency at your fingertips.
Step 1: Install Google Toolbar Extension
To begin the process of integrating the Google Toolbar into your Chrome browser, the first step is to install the Google Toolbar extension. Follow these simple instructions to seamlessly add this powerful tool to your browsing arsenal:
-
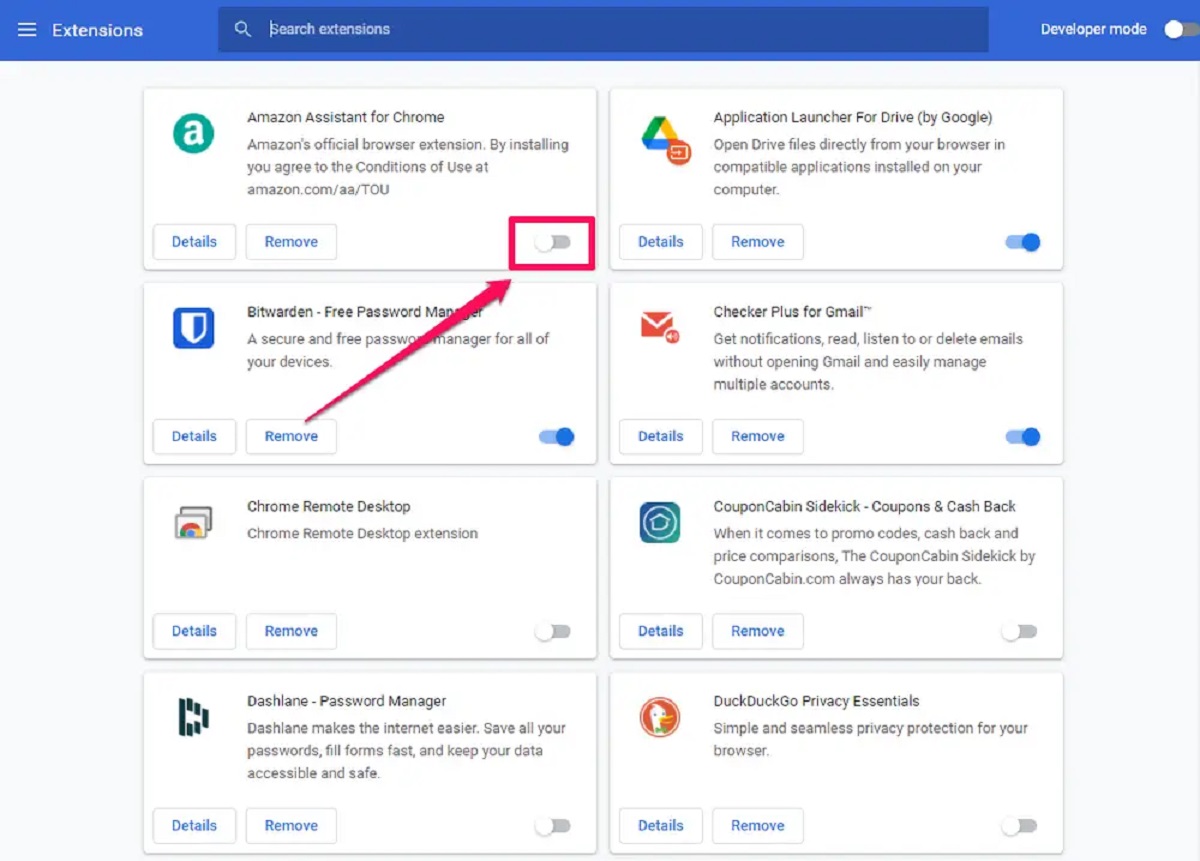
Open Chrome Web Store: Launch your Google Chrome browser and navigate to the Chrome Web Store. This can be done by clicking on the three-dot menu icon in the top-right corner of the browser window and selecting "More tools" followed by "Extensions." Alternatively, you can directly type "chrome://extensions/" in the address bar and hit Enter.
-
Search for Google Toolbar: Once you're in the Chrome Web Store, use the search bar at the top-left corner to search for "Google Toolbar." Press Enter to initiate the search.
-
Select the Google Toolbar Extension: From the search results, locate the official Google Toolbar extension and click on it to view more details.
-
Add to Chrome: On the extension's page, click the "Add to Chrome" button. A confirmation dialog will appear, asking for your permission to add the extension. Click "Add extension" to proceed with the installation.
-
Wait for Installation: Chrome will begin downloading and installing the Google Toolbar extension. Once the installation is complete, a notification will appear, confirming that the extension has been added to your browser.
By following these steps, you have successfully installed the Google Toolbar extension in your Chrome browser. This marks the first crucial stage in bringing the powerful features and functionalities of the Google Toolbar to your browsing experience. With the extension now in place, you are ready to move on to the next step and ensure that the Google Toolbar is easily accessible whenever you need it.
Now that you have the Google Toolbar extension installed, the next step is to pin it to your Chrome browser for quick and convenient access. Let's proceed to the next section to learn how to accomplish this seamlessly.
Step 2: Pin Google Toolbar to Chrome
Pinning the Google Toolbar to your Chrome browser ensures quick and effortless access to its array of features and tools. By following these straightforward steps, you can seamlessly integrate the toolbar into your browsing environment, allowing for enhanced productivity and convenience.
-
Locate the Google Toolbar Icon: After installing the Google Toolbar extension, you will notice its icon appearing in the top-right corner of your Chrome browser, next to the address bar. The icon typically resembles the familiar Google logo, serving as a visual indicator of the toolbar's presence.
-
Pin the Toolbar to Chrome: To pin the Google Toolbar for easy access, simply right-click on the toolbar's icon. A context menu will appear, presenting various options related to the extension. From the menu, select the "Pin" or "Pin to Chrome" option. This action will affix the toolbar to the browser interface, ensuring that it remains readily accessible whenever you need it.
-
Confirm the Pinning: Upon selecting the "Pin" option, you will notice the Google Toolbar icon becoming a permanent fixture in the top-right corner of your Chrome browser. It will remain visible and easily accessible, allowing you to harness its functionalities without navigating through multiple menus or settings.
By pinning the Google Toolbar to your Chrome browser, you have effectively streamlined your access to its diverse features, including quick searches, page translation, and bookmarking. This simple yet impactful customization ensures that the toolbar is prominently displayed, empowering you to leverage its capabilities with utmost ease and efficiency.
With the Google Toolbar now pinned to your Chrome browser, you are poised to explore its customizable settings and tailor its functionalities to align with your browsing preferences. Let's proceed to the next section to delve into the process of customizing the Google Toolbar settings, allowing you to personalize your browsing experience to suit your unique needs and interests.
Step 3: Customize Google Toolbar Settings
Customizing the Google Toolbar settings empowers you to tailor its functionalities to align with your specific browsing habits and preferences. By delving into the customization options, you can optimize the toolbar to serve as a personalized hub for accessing various Google services and tools seamlessly. Let's explore the process of customizing the Google Toolbar settings to unlock its full potential within your Chrome browser.
-
Access Toolbar Options: To begin customizing the Google Toolbar, click on the toolbar icon in the top-right corner of your Chrome browser. This action will reveal a dropdown menu, presenting a range of options and features. Locate and click on the "Options" or "Settings" link within the dropdown menu to access the toolbar's customization interface.
-
Explore Customization Features: Upon accessing the toolbar options, you will be presented with a series of customization features and settings. These may include options to adjust the search preferences, enable or disable specific toolbar functionalities, and personalize the appearance of the toolbar to suit your visual preferences.
-
Adjust Search Settings: Within the toolbar options, you can fine-tune the search settings to align with your preferred search engine and language. This allows you to seamlessly conduct searches directly from the toolbar using your preferred search parameters, enhancing the efficiency of your browsing experience.
-
Enable/Disable Features: Depending on your usage preferences, the toolbar customization interface may offer the ability to enable or disable specific features such as spell check, page translation, and bookmarking. By toggling these options based on your needs, you can streamline the toolbar's functionalities to cater to your specific requirements.
-
Personalize Appearance: The customization interface may also provide options to personalize the appearance of the toolbar, including the display of specific tools and buttons. This allows you to declutter the toolbar interface by displaying only the tools that are most relevant to your browsing activities, creating a streamlined and tailored user experience.
-
Save Customization Preferences: Once you have adjusted the toolbar settings to align with your preferences, ensure to save your customization preferences. This will solidify the changes you've made, ensuring that the toolbar operates in accordance with your personalized settings during your browsing sessions.
By customizing the Google Toolbar settings, you have effectively tailored its functionalities to complement your browsing habits and requirements. This personalized approach enhances the toolbar's utility, allowing you to seamlessly access Google services and tools in a manner that aligns with your unique preferences and browsing patterns. With the toolbar now customized to suit your needs, you can navigate the digital landscape with enhanced efficiency and convenience, leveraging the power of the Google Toolbar to elevate your browsing experience.