Introduction
Welcome to the world of web browsing, where the internet serves as a gateway to a vast array of information, entertainment, and communication. One of the most popular web browsers, Google Chrome, offers a seamless and user-friendly experience, allowing users to navigate the digital landscape with ease. However, even the most reliable tools encounter hiccups from time to time. If you find yourself facing sluggish performance, unresponsive pages, or other browsing issues, fear not! There are several simple yet effective methods to refresh Chrome and restore its optimal functionality.
In this article, we will delve into the step-by-step process of refreshing Chrome, ensuring that you can continue to surf the web with speed and efficiency. Whether you're a seasoned internet enthusiast or a casual user, these techniques will empower you to troubleshoot common browser issues and revitalize your browsing experience.
So, if you've noticed Chrome behaving a bit sluggishly, freezing up, or displaying errors, it might be time to give it a little tune-up. By following the methods outlined in this guide, you can address various issues that may be hindering Chrome's performance. From clearing cache and cookies to updating the browser and resetting its settings, we've got you covered.
Now, let's roll up our sleeves and embark on a journey to rejuvenate your Chrome browsing experience. With a few simple steps, you'll be well on your way to enjoying a smoother, faster, and more responsive web browsing experience. Let's dive in and explore the techniques that will breathe new life into your Chrome browser!
Clearing Cache and Cookies
When it comes to troubleshooting browsing issues, clearing the cache and cookies is often the first line of defense. Over time, as you navigate the web, Chrome accumulates temporary files and data from websites you visit. While these elements are designed to enhance your browsing experience by speeding up page loading and retaining site preferences, they can also lead to performance issues and conflicts.
To address these issues, clearing the cache and cookies can work wonders. Here's how you can do it:
-
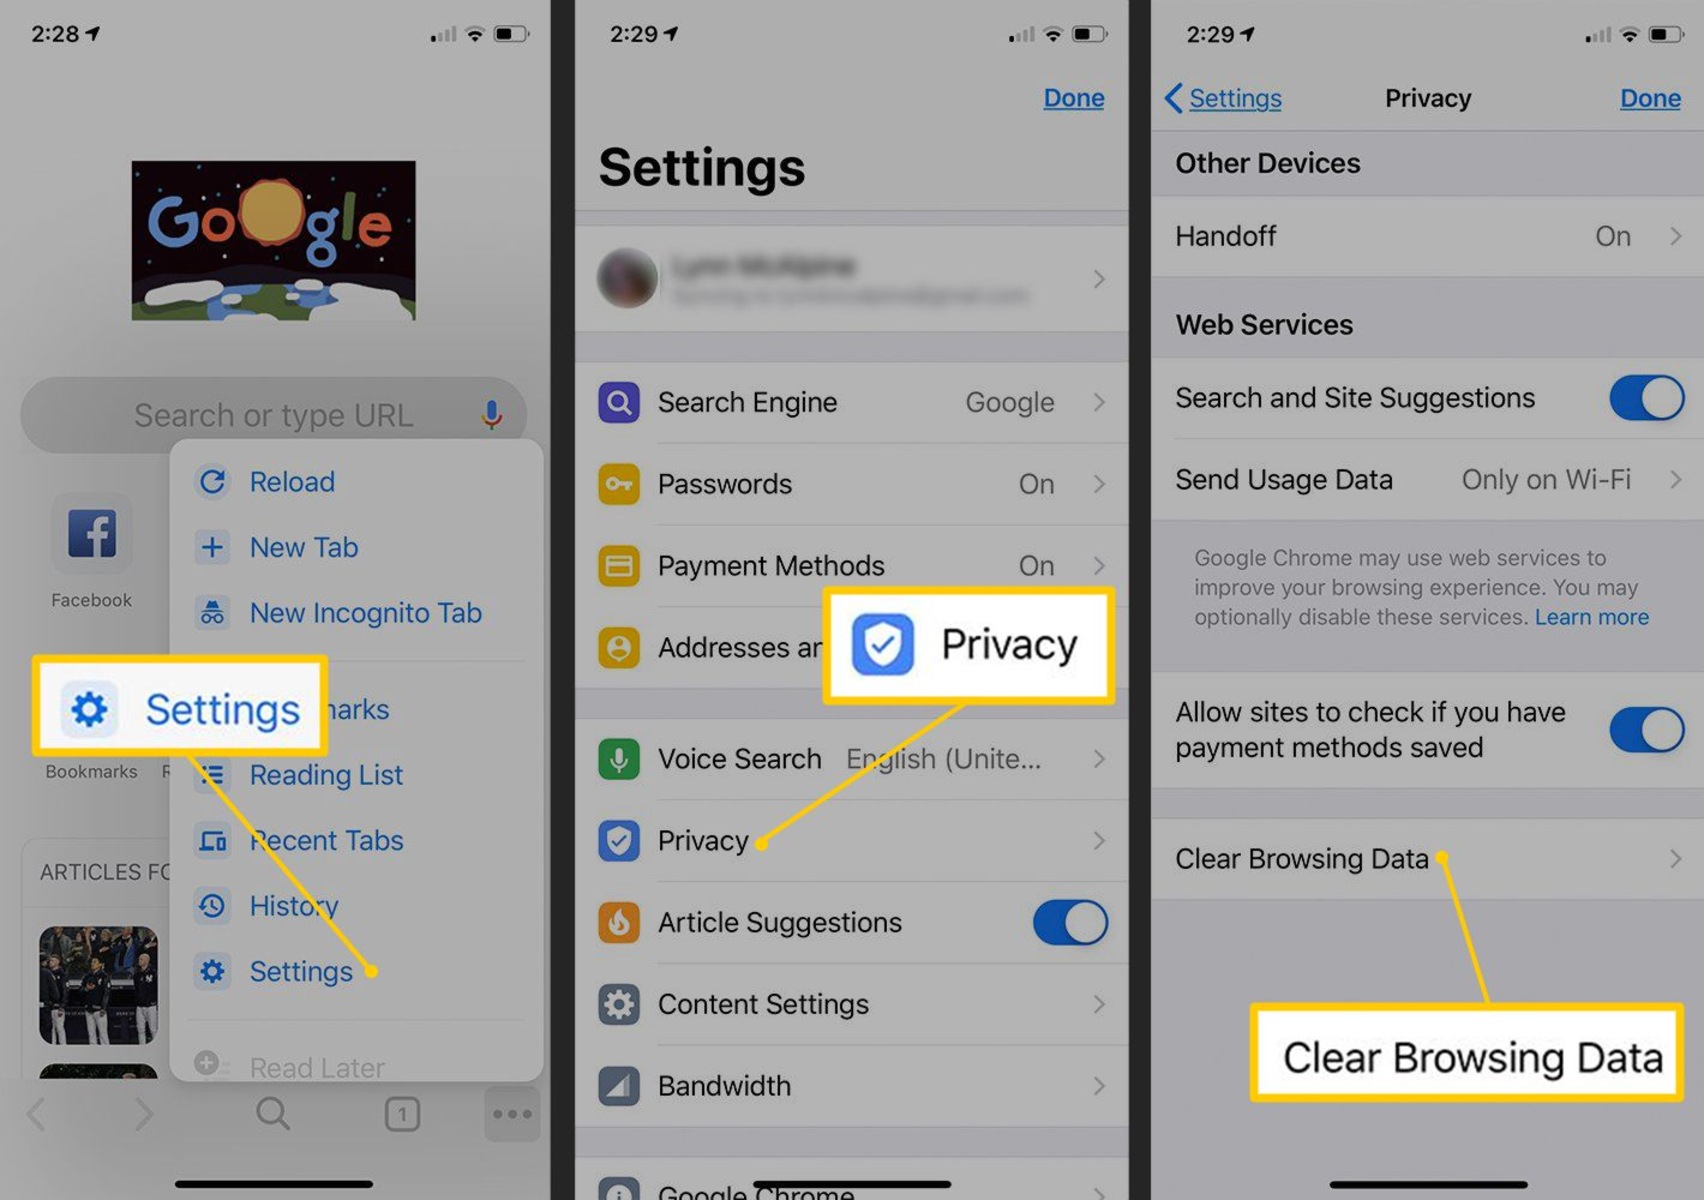
Accessing Chrome's Settings: Start by opening Chrome and clicking on the three-dot menu icon in the top-right corner of the window. From the dropdown menu, select "Settings" to access the browser's configuration options.
-
Navigating to Privacy and Security: Within the Settings menu, scroll down and click on "Privacy and security" in the left-hand sidebar. This will open a range of privacy-related options, including those for clearing browsing data.
-
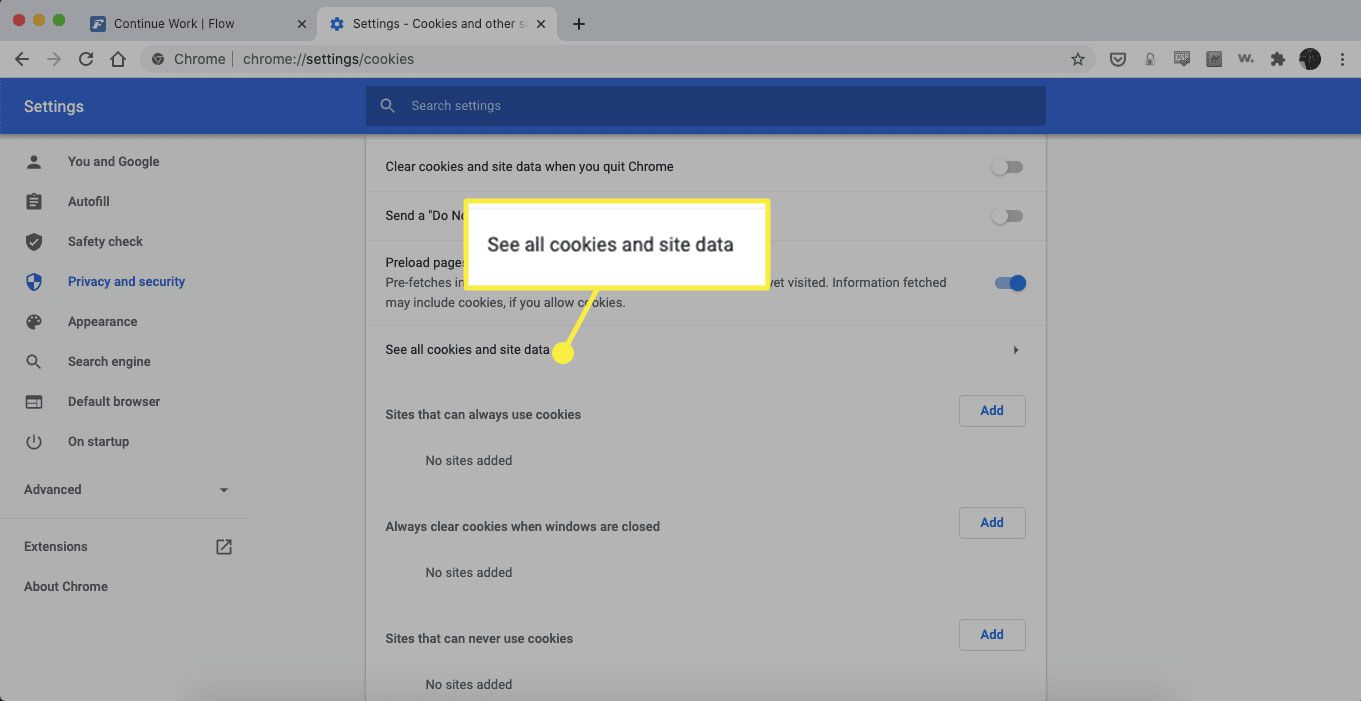
Clearing Browsing Data: Under the "Privacy and security" section, click on "Clear browsing data." This will open a window where you can select the types of data to clear. Ensure that "Cookies and other site data" and "Cached images and files" are checked.
-
Choosing the Time Range: You can also choose the time range for which you want to clear the data. Options include "Last hour," "Last 24 hours," "Last 7 days," "Last 4 weeks," and "All time." Select the appropriate time range based on your needs.
-
Initiating the Clearing Process: Once you've made your selections, click on the "Clear data" button to initiate the process. Chrome will then remove the selected browsing data, including cookies and cached files.
By clearing the cache and cookies, you effectively remove the clutter that may be hindering Chrome's performance. This can lead to faster page loading, smoother navigation, and the resolution of certain browsing issues. Additionally, clearing cookies can help address login problems and site-specific errors, as it removes stored site data that may be outdated or conflicting.
In essence, clearing the cache and cookies is a simple yet powerful way to refresh Chrome and address common browsing issues. By incorporating this routine maintenance task into your browsing habits, you can ensure that Chrome continues to deliver a seamless and efficient web surfing experience.
Disabling Extensions
Extensions are powerful add-ons that enhance Chrome's functionality, allowing users to customize their browsing experience with a wide range of features and tools. While these extensions can be incredibly useful, they can also contribute to performance issues and conflicts, especially when multiple extensions are installed. Disabling extensions can be a valuable troubleshooting step to identify and address browsing issues.
Here's how you can disable extensions in Chrome:
-
Accessing the Extensions Menu: Start by opening Chrome and clicking on the three-dot menu icon in the top-right corner of the window. From the dropdown menu, hover over "More tools" and then select "Extensions." This will open the Extensions page, where you can view all installed extensions.
-
Disabling Extensions: On the Extensions page, you'll see a list of all the extensions currently installed in Chrome. To disable an extension, simply toggle off the switch next to the respective extension. This action will temporarily deactivate the extension without uninstalling it.
-
Testing Chrome's Performance: After disabling the extensions, take some time to browse and assess Chrome's performance. Pay attention to page loading times, responsiveness, and overall stability. By temporarily disabling extensions, you can determine whether any of them are contributing to browsing issues.
-
Enabling Extensions: If you notice an improvement in Chrome's performance after disabling extensions, you can systematically re-enable them one by one to identify the specific extension causing the issue. This process of elimination can help pinpoint the problematic extension and take appropriate action, such as updating, reinstalling, or removing it.
Disabling extensions in Chrome provides a systematic approach to troubleshooting browsing issues related to extensions. By temporarily deactivating extensions, you can isolate their impact on Chrome's performance and identify any potential conflicts or resource-intensive behavior. This method empowers users to take control of their browsing experience and ensure that extensions contribute positively to Chrome's functionality.
In essence, the ability to disable extensions in Chrome serves as a valuable tool for diagnosing and addressing browsing issues. By leveraging this feature, users can maintain a streamlined and efficient browsing experience, free from the potential disruptions caused by problematic extensions.
Updating Chrome
Keeping your web browser up to date is crucial for ensuring optimal performance, security, and compatibility with the latest web technologies. Google regularly releases updates for Chrome, addressing bugs, introducing new features, and enhancing overall stability. By updating Chrome to the latest version, you can take advantage of these improvements and mitigate potential browsing issues.
Here's how you can update Chrome to the latest version:
-
Accessing Chrome's Settings: Open Chrome and click on the three-dot menu icon in the top-right corner of the window. From the dropdown menu, select "Settings" to access the browser's configuration options.
-
Navigating to About Chrome: Within the Settings menu, scroll down and click on "About Chrome" in the left-hand sidebar. This will initiate a check for updates and display the current version of Chrome installed on your system.
-
Checking for Updates: Upon accessing the "About Chrome" section, Chrome will automatically check for available updates. If a new version is available, Chrome will begin downloading and installing the update in the background.
-
Relaunching Chrome: Once the update is downloaded and ready to install, you will see a prompt to relaunch Chrome to apply the update. Click on the "Relaunch" button to restart the browser and complete the update process.
By following these steps, you can ensure that Chrome is running the latest version, equipped with the most recent enhancements and security patches. Additionally, updating Chrome can address known issues and vulnerabilities, providing a more secure and reliable browsing experience.
It's important to note that Chrome updates are typically applied automatically in the background. However, manually checking for updates can be beneficial, especially if you want to ensure that you are running the latest version or if you encounter browsing issues that may be resolved by an update.
In addition to updating Chrome on your desktop or laptop, it's equally important to keep the Chrome app on your mobile devices up to date. By regularly updating Chrome across all your devices, you can maintain a consistent and secure browsing experience, regardless of the platform you're using.
In essence, updating Chrome is a fundamental maintenance task that contributes to the overall health and performance of the browser. By staying current with the latest version of Chrome, you can enjoy an optimized browsing experience, complete with the latest features and security enhancements.
Resetting Chrome Settings
Resetting Chrome settings can serve as a comprehensive solution for addressing persistent browsing issues and restoring the browser to its default state. This process can effectively resolve a wide range of problems, including erratic behavior, unresponsive pages, and configuration conflicts. By resetting Chrome settings, you can eliminate potential sources of instability and streamline the browsing experience.
Here's how you can reset Chrome settings:
-
Accessing Chrome's Settings: Begin by opening Chrome and clicking on the three-dot menu icon in the top-right corner of the window. From the dropdown menu, select "Settings" to access the browser's configuration options.
-
Navigating to Advanced Settings: Within the Settings menu, scroll down and click on "Advanced" to reveal additional configuration options.
-
Resetting Chrome Settings: Under the "Reset and clean up" section, click on "Restore settings to their original defaults." This action will open a confirmation dialog outlining the changes that will occur when resetting Chrome settings.
-
Confirming the Reset: Review the information presented in the confirmation dialog, which includes the restoration of default search engine settings, homepage, new tab page, and tabbed browsing settings. If you're ready to proceed, click on the "Reset settings" button to initiate the process.
-
Observing the Impact: After resetting Chrome settings, take some time to browse and assess the browser's performance. Pay attention to page loading times, the responsiveness of web pages, and the overall stability of the browsing experience.
By resetting Chrome settings, you effectively revert the browser to its original state, eliminating potential configuration conflicts and restoring default preferences. This process can address issues related to browser customization, extensions, and inadvertent changes to critical settings. Additionally, resetting Chrome settings can provide a fresh start, allowing you to troubleshoot persistent problems without the need for extensive manual adjustments.
It's important to note that resetting Chrome settings does not remove bookmarks, browsing history, or saved passwords. These elements remain intact, ensuring that your essential browsing data is preserved throughout the reset process. However, custom settings, preferences, and configurations will be reset to their default values, offering a clean slate for troubleshooting and optimization.
In essence, resetting Chrome settings is a powerful tool for resolving persistent browsing issues and restoring the browser to a stable and reliable state. By leveraging this feature, users can address complex problems and streamline their browsing experience with ease.