Introduction
Clearing the cache on your Chrome browser for iPhone can be a simple yet effective way to resolve various browsing issues and enhance the overall performance of the app. Over time, the cache, which consists of temporary files and data, can accumulate and potentially lead to slow loading times, unresponsive pages, or even display outdated content. By clearing the cache, you can ensure that your browsing experience remains smooth and efficient.
In this guide, we will walk you through the step-by-step process of clearing the cache on the Chrome app for iPhone. Whether you're encountering sluggish performance, experiencing website display issues, or simply aiming to free up storage space on your device, understanding how to clear the cache can be a valuable skill. By following these instructions, you can effectively refresh your browser and enjoy a seamless browsing experience on your iPhone.
Let's dive into the process of clearing the cache on Chrome for iPhone, empowering you to take control of your browsing environment and optimize the performance of your favorite browser.
Step 1: Open Chrome app
To begin the process of clearing the cache on your Chrome browser for iPhone, you first need to launch the Chrome app on your device. This can be done by locating the familiar Google Chrome icon on your home screen or within your app library. Once you've located the icon, simply tap on it to open the app.
Upon launching the Chrome app, you will be greeted by the familiar interface, featuring the omnibox – the address bar at the top of the screen – where you can enter website addresses or search queries. Additionally, you will find the navigation bar at the bottom, providing quick access to various features such as tabs, the home button, and the menu.
As the Chrome app opens, take a moment to ensure that you are running the latest version of the browser. Keeping your app updated is essential for accessing new features, security enhancements, and performance improvements. To check for updates, navigate to the "App Store" on your iPhone, tap on your profile picture in the top right corner, and scroll down to find the available updates for your installed apps. If an update for Chrome is available, simply tap the "Update" button next to the app to ensure you have the most recent version installed.
Once you have confirmed that you are running the latest version of Chrome, you are ready to proceed with the next steps to clear the cache and optimize your browsing experience. With the Chrome app open and updated, you are now prepared to access the settings menu and initiate the cache-clearing process.
With the Chrome app successfully launched and updated, you are now ready to delve into the subsequent steps, which will guide you through the process of clearing the cache on your iPhone's Chrome browser.
Step 2: Access the settings menu
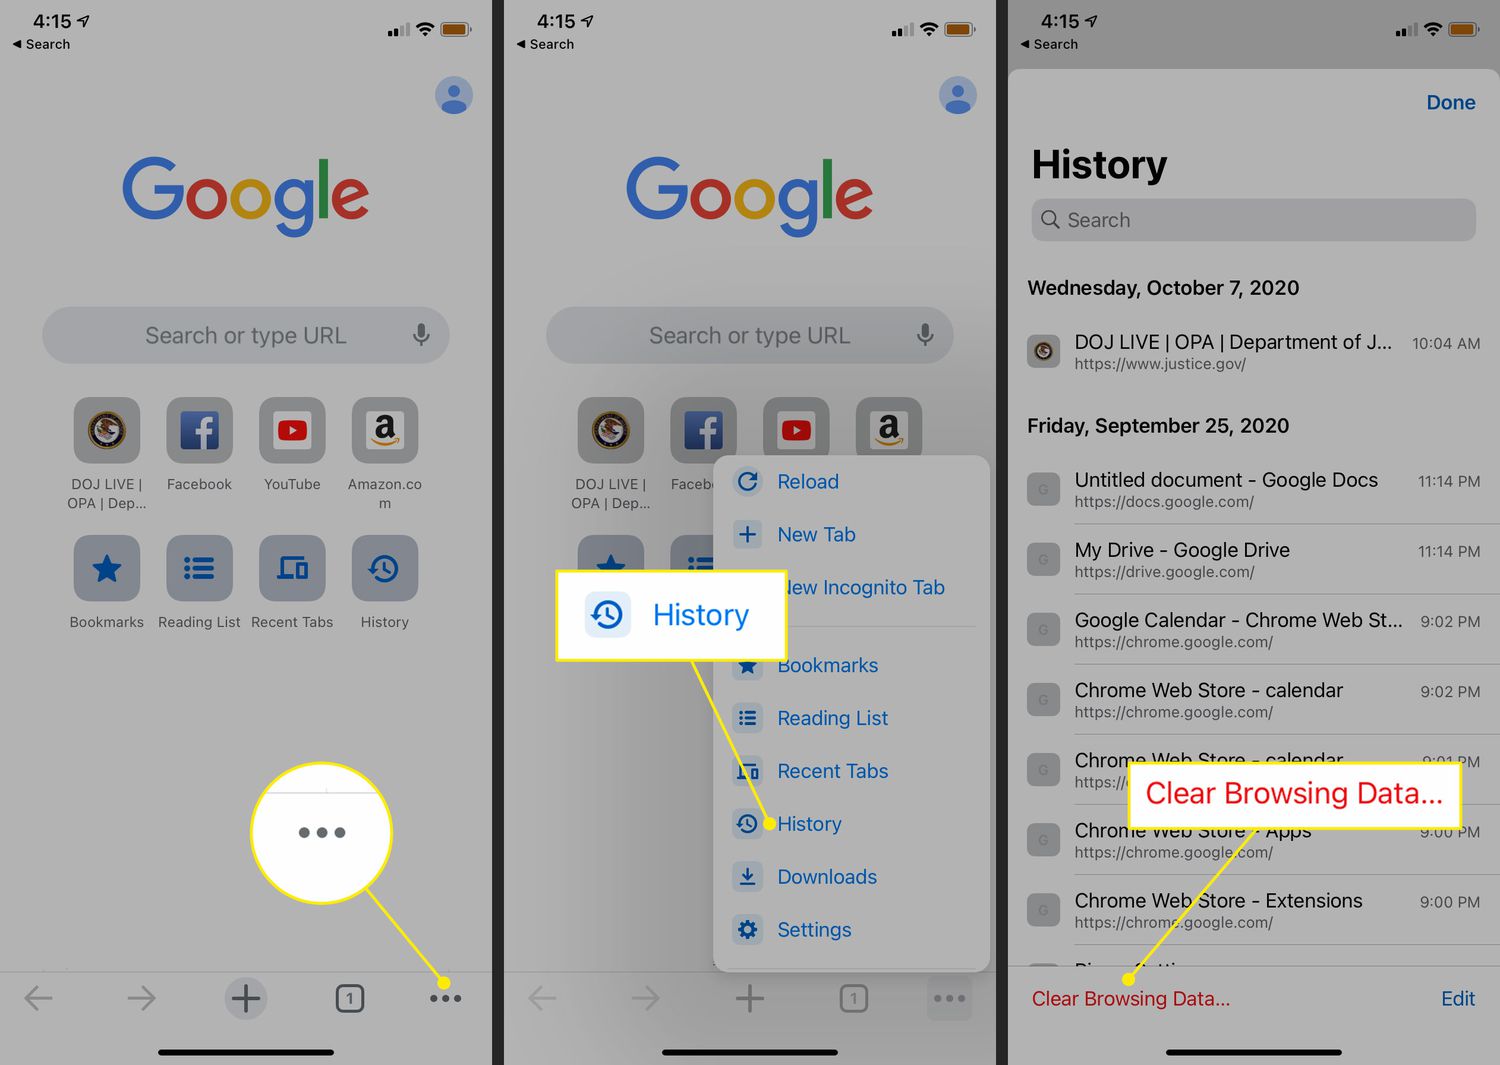
After launching the Chrome app on your iPhone, the next crucial step in clearing the cache involves accessing the settings menu. This menu serves as the gateway to various browser configurations and options, allowing you to customize your browsing experience and manage essential features. To access the settings menu, follow these straightforward instructions:
-
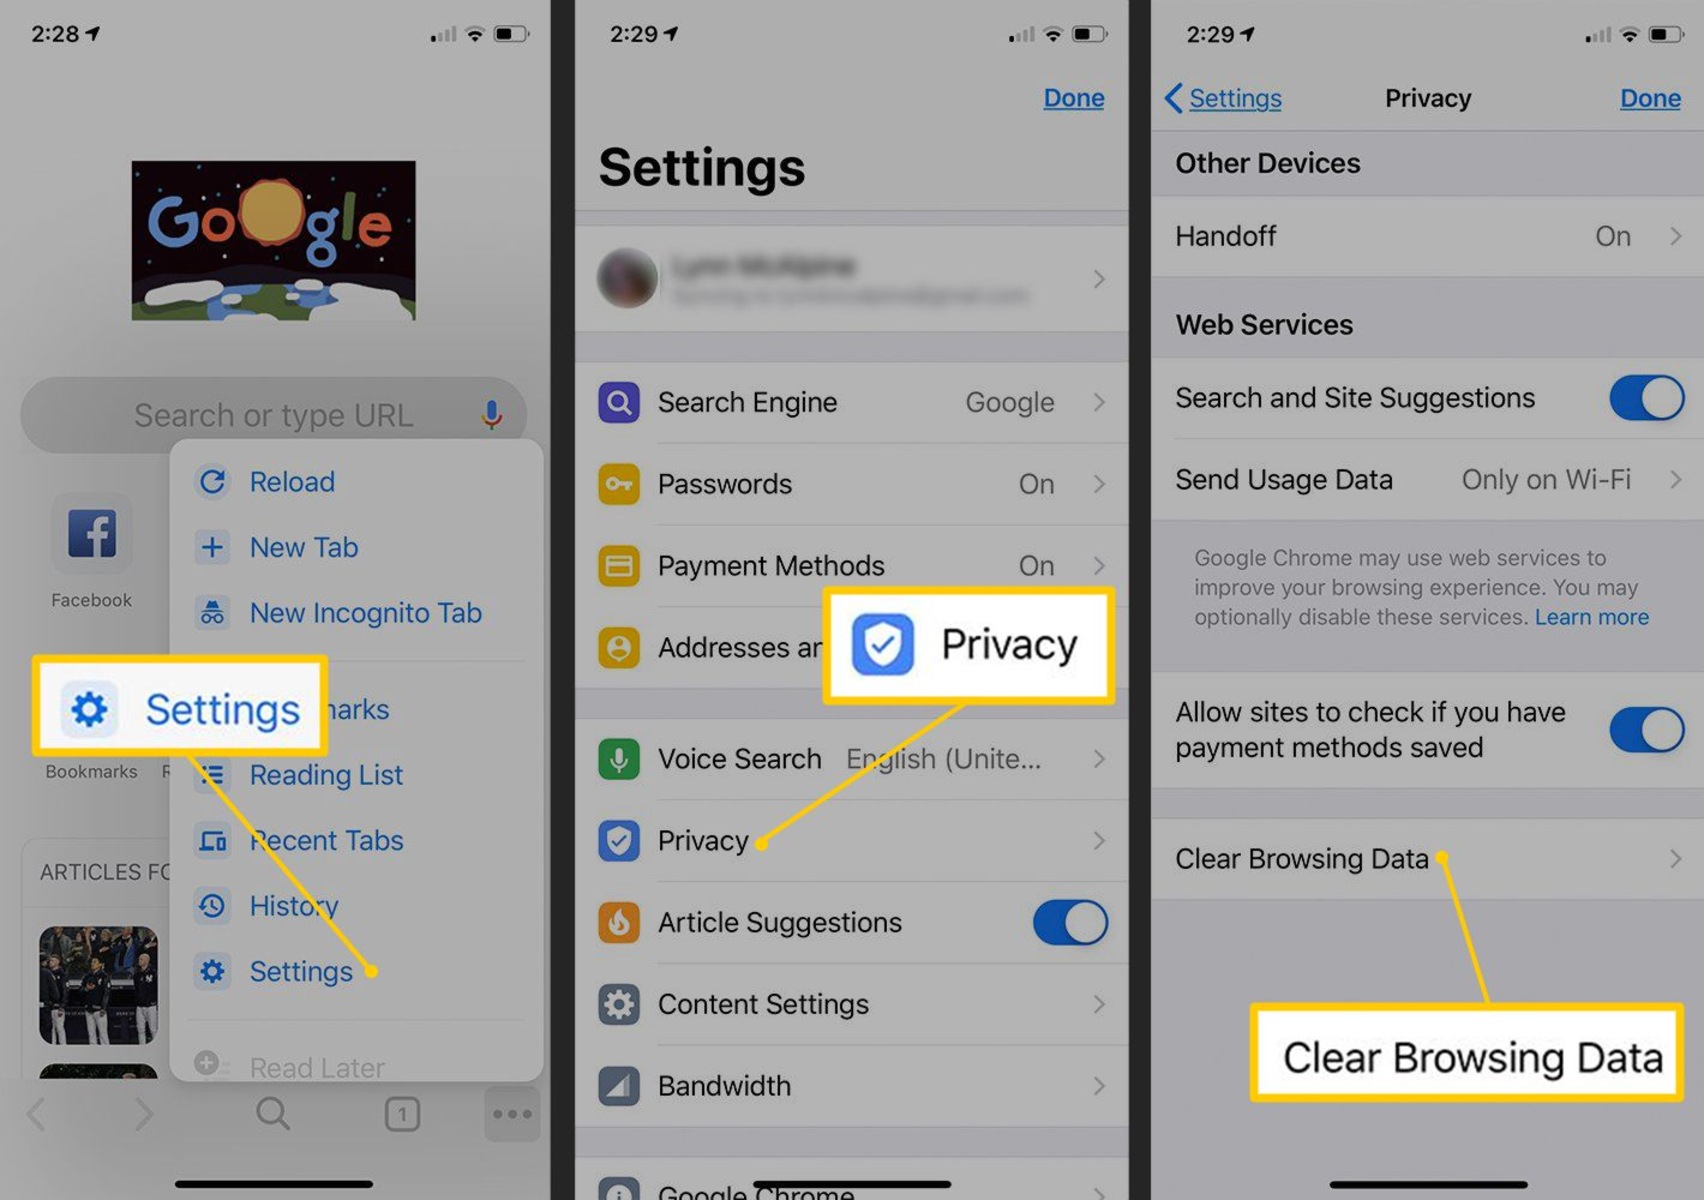
Look for the three-dot icon: Located in the top-right corner of the Chrome app, you will find a distinctive three-dot icon. This icon serves as the entry point to the browser's settings and additional functionalities. Tap on this icon to reveal a dropdown menu containing a range of options and settings.
-
Navigate to the "Settings" option: Within the dropdown menu, scroll through the available options until you locate the "Settings" entry. This selection will lead you to a dedicated settings interface, where you can explore and adjust various aspects of the Chrome browser to suit your preferences and requirements.
-
Explore the settings interface: Upon selecting "Settings," you will be presented with a comprehensive array of configuration options, including general settings, privacy and security features, accessibility preferences, and more. Take a moment to familiarize yourself with the available settings, as they offer valuable insights into the capabilities of the Chrome browser and enable you to tailor the app to your specific needs.
By successfully accessing the settings menu, you have positioned yourself to proceed with the subsequent steps, ultimately leading to the effective clearing of the cache on your Chrome browser for iPhone. With the settings menu at your disposal, you are now primed to delve into the cache-clearing process, ensuring that your browsing data remains optimized and your app functions at its best.
With the settings menu accessed, you are now poised to advance to the next phase of the cache-clearing process, which involves initiating the removal of accumulated browsing data from your Chrome app. This pivotal step will enable you to selectively clear the cache and enhance the performance of your browser, setting the stage for a seamless and efficient browsing experience on your iPhone.
Step 3: Clear browsing data
Upon accessing the settings menu in your Chrome app for iPhone, the next crucial step in optimizing your browsing experience involves clearing the accumulated browsing data. This process allows you to selectively remove temporary files, cookies, and other cached information, ultimately refreshing your browser and potentially resolving performance issues. Follow these detailed instructions to effectively clear your browsing data:
-
Select "Privacy" or "Privacy and Security": Within the settings menu, locate and tap on the option labeled "Privacy" or "Privacy and Security." This selection will lead you to a dedicated interface where you can manage various privacy-related settings and clear your browsing data.
-
Choose "Clear Browsing Data": Once you have accessed the privacy settings, look for the option titled "Clear Browsing Data" or a similar entry that pertains to managing your browsing history, cookies, and cached images and files. Tap on this option to proceed to the next step.
-
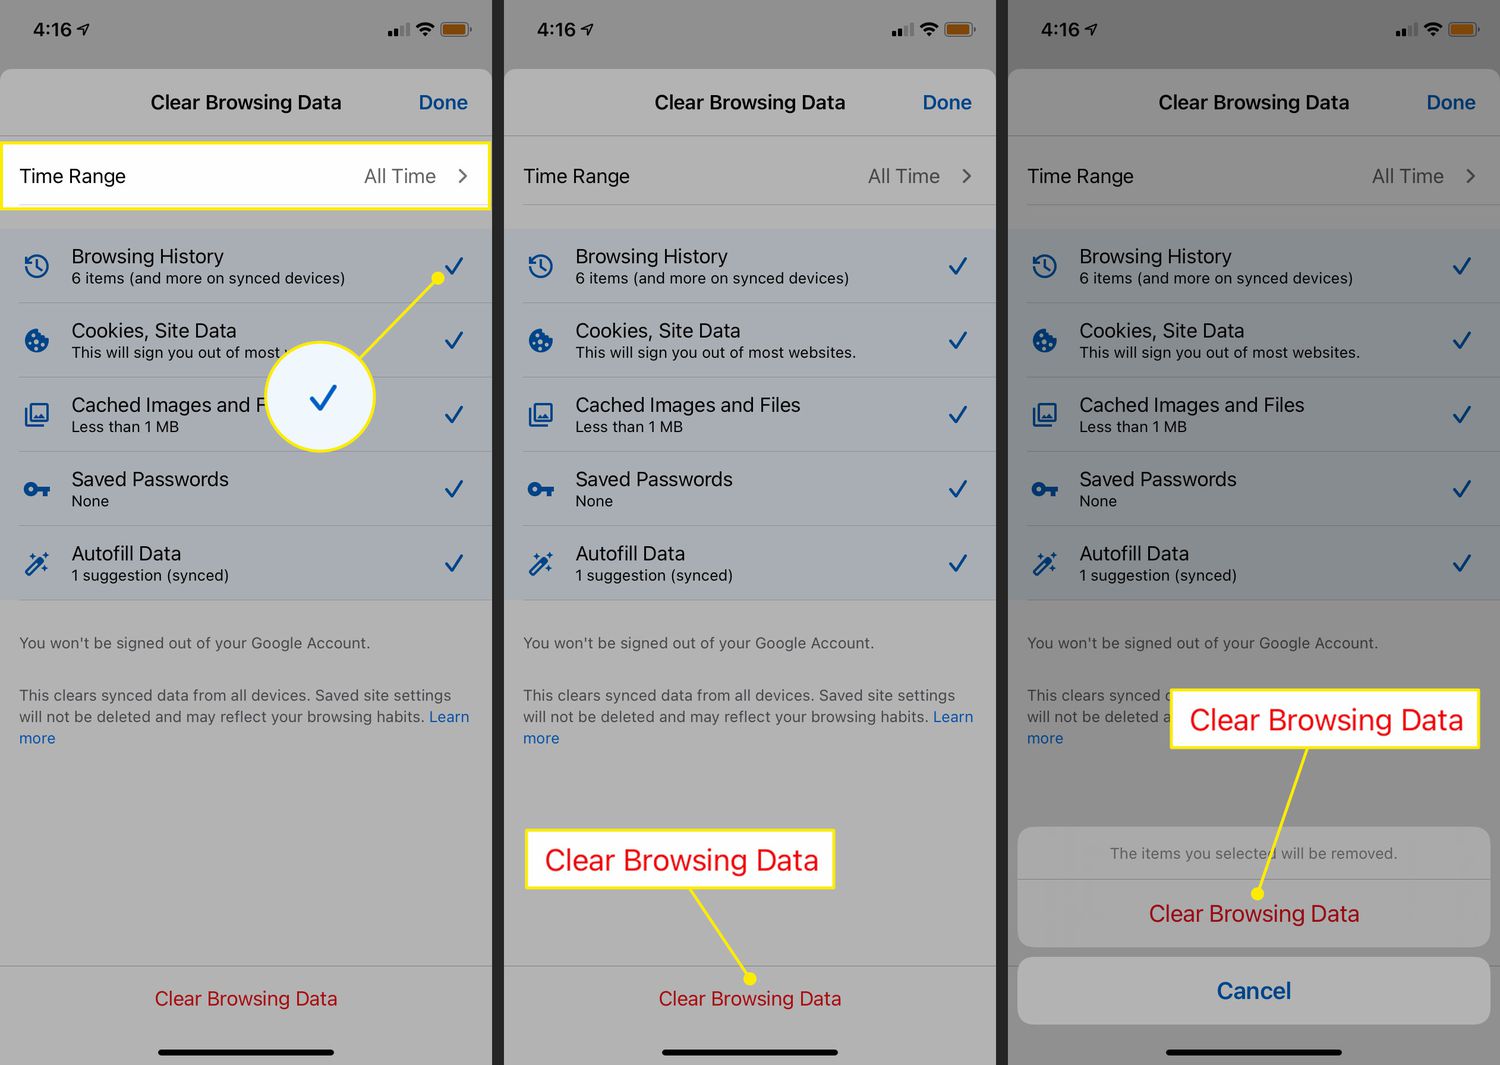
Customize the data to be cleared: Upon selecting "Clear Browsing Data," you will be presented with a list of data categories that you can choose to clear. These categories typically include browsing history, cookies, cached images and files, saved passwords, and more. To optimize the clearing process, carefully select the data categories that you wish to remove from your browser.
-
Adjust the time range: In some instances, you may have the option to specify the time range for which you want to clear the selected data. This feature allows you to target browsing data from a specific period, such as the past hour, day, week, or month. Adjust the time range according to your preferences to ensure that the cache is effectively cleared for the desired duration.
-
Initiate the clearing process: After customizing the data categories and time range, proceed to initiate the clearing process by tapping the appropriate button or option. Depending on your selections, the Chrome app will begin removing the specified browsing data, effectively clearing the cache and refreshing your browser.
By following these detailed instructions, you can effectively clear the accumulated browsing data from your Chrome app for iPhone, ensuring that your browser remains optimized and responsive. With the browsing data successfully cleared, you are now prepared to proceed to the final steps, which involve selectively clearing the cache and cookies to further enhance the performance of your Chrome browser on your iPhone.
Step 4: Select the data to clear
After accessing the "Clear Browsing Data" option in the privacy settings of your Chrome app for iPhone, you will be presented with a crucial step in the cache-clearing process: selecting the specific data to clear. This step allows you to customize the cache-clearing process by choosing the types of data you want to remove from your browser. By carefully selecting the data categories, you can effectively target and refresh your browsing environment, potentially resolving performance issues and ensuring a seamless user experience.
When presented with the option to select the data to clear, you will typically encounter a list of categories that encompass various aspects of your browsing data. These categories may include:
-
Browsing History: This category encompasses the record of websites you have visited during your browsing sessions. Clearing your browsing history can be beneficial for privacy reasons and can potentially resolve issues related to outdated or conflicting website data.
-
Cookies: Cookies are small pieces of data stored by websites on your device to remember your preferences and enhance your browsing experience. However, clearing cookies can be advantageous in scenarios where websites are not functioning correctly or when you want to remove stored login credentials.
-
Cached Images and Files: Cached images and files are temporary data stored by websites to facilitate faster loading times upon revisiting the same sites. However, clearing these cached resources can be beneficial if you encounter issues with outdated or corrupted images and files during your browsing sessions.
-
Saved Passwords: If you have chosen to save passwords for various websites in your Chrome app, you may have the option to clear these saved credentials. This can be useful if you want to refresh your login information or enhance the security of your browsing data.
-
Autofill Form Data: Autofill data includes saved form entries such as addresses, payment information, and other input fields. Clearing this data can be advantageous if you want to refresh your autofill suggestions or address any issues related to incorrect or outdated form entries.
When presented with these data categories, carefully consider your specific requirements and the issues you may be experiencing with your browsing sessions. By selecting the appropriate data categories to clear, you can effectively target and refresh your browsing environment, potentially resolving performance issues and ensuring a seamless user experience on your iPhone's Chrome browser.
With the data categories selected, you are now prepared to proceed to the final step, which involves initiating the cache-clearing process to refresh your browser and optimize its performance.
Step 5: Clear cache and cookies
After customizing the data categories and time range, you are now poised to initiate the final phase of the cache-clearing process: clearing the cache and cookies from your Chrome app for iPhone. This pivotal step allows you to selectively remove cached files and cookies, ultimately refreshing your browser and potentially resolving performance issues. Follow these detailed instructions to effectively clear the cache and cookies on your Chrome browser:
-
Select "Cached Images and Files": Within the list of data categories, ensure that the option for "Cached Images and Files" is selected. This crucial step targets the temporary files stored by websites to facilitate faster loading times. By clearing these cached resources, you can refresh your browser and potentially address issues related to outdated or corrupted cached data.
-
Choose "Cookies and Site Data": In addition to clearing cached images and files, it is essential to select the option for "Cookies and Site Data." Cookies are small pieces of data stored by websites on your device, serving various purposes such as remembering login credentials, site preferences, and shopping cart contents. However, clearing cookies can be beneficial for addressing website display issues, login problems, and ensuring a clean browsing environment.
-
Initiate the clearing process: After ensuring that the options for cached images and files, as well as cookies and site data, are selected, proceed to initiate the clearing process. This action will prompt the Chrome app to remove the specified cached resources and cookies, effectively refreshing your browser and potentially resolving performance-related issues.
By following these detailed instructions, you can effectively clear the cache and cookies from your Chrome app for iPhone, ensuring that your browser remains optimized and responsive. With the cache and cookies successfully cleared, you have taken a proactive step towards enhancing the performance of your Chrome browser, setting the stage for a seamless and efficient browsing experience on your iPhone.
With the cache and cookies successfully cleared, you have effectively optimized your Chrome browser for iPhone, ensuring that your browsing data remains refreshed and your app functions at its best. This proactive approach to managing your browsing environment empowers you to maintain a seamless and efficient user experience, free from the potential issues associated with accumulated cached data and cookies.
Conclusion
In conclusion, mastering the process of clearing the cache on your Chrome browser for iPhone empowers you to take control of your browsing environment and optimize the performance of your favorite browser. By following the step-by-step instructions outlined in this guide, you have gained valuable insights into the essential process of clearing the cache and cookies, ultimately ensuring that your browsing data remains refreshed and your app functions at its best.
Clearing the cache on your Chrome app for iPhone offers a multitude of benefits, ranging from resolving performance issues to ensuring a seamless and efficient browsing experience. By selectively removing accumulated browsing data, including cached images and files, cookies, and other temporary resources, you can effectively refresh your browser and potentially address issues related to slow loading times, unresponsive pages, or outdated content. This proactive approach to managing your browsing environment empowers you to maintain a seamless and efficient user experience, free from the potential issues associated with accumulated cached data and cookies.
Furthermore, understanding how to access the settings menu, clear browsing data, and selectively remove cached resources and cookies provides you with the knowledge and tools to troubleshoot browsing issues and enhance the overall performance of your Chrome browser. By customizing the cache-clearing process and targeting specific data categories, you can effectively address privacy concerns, resolve website display issues, and ensure that your browsing environment remains optimized for seamless user experiences.
As you continue to explore the capabilities of your Chrome app for iPhone, remember the importance of keeping your browser updated to access new features, security enhancements, and performance improvements. Regularly clearing the cache and cookies can contribute to maintaining a responsive and efficient browsing experience, allowing you to enjoy the full potential of your favorite browser on your iPhone.
In essence, by mastering the process of clearing the cache on your Chrome app for iPhone, you have equipped yourself with a valuable skill that can significantly impact your browsing experience. Whether you're troubleshooting performance issues, addressing website display concerns, or simply aiming to free up storage space on your device, the ability to clear the cache and cookies empowers you to maintain a seamless and efficient browsing environment, ensuring that your Chrome browser functions optimally on your iPhone.