Introduction
Welcome to our guide on how to download the Sync 3 update! If you own a vehicle with Sync 3, you have the opportunity to enhance its functionality and enjoy the latest features by updating the software. The Sync 3 update brings improved performance, bug fixes, and new capabilities to your vehicle’s infotainment system.
Updating your Sync 3 software is a simple process that allows you to stay up-to-date with the latest advancements and improvements. Whether you want to take advantage of new entertainment options, optimize navigation features, or benefit from improved voice recognition, the Sync 3 update has you covered.
In this article, we will walk you through the step-by-step process of checking for updates, preparing for the update, downloading the update, and installing it on your vehicle’s Sync 3 system. We will also provide troubleshooting tips for common issues that may arise during the update process.
Before we dive into the details, it’s worth mentioning that updating the Sync 3 software requires a USB drive with sufficient storage capacity and a stable internet connection. It’s also important to ensure that your vehicle’s battery is adequately charged throughout the update process.
Now, let’s get started with checking for updates to see if there’s a new version of the Sync 3 software available for your vehicle. By keeping your system up-to-date, you can enjoy a seamless and enhanced driving experience.
Checking for Updates
Before you can download and install the Sync 3 update, you need to check if there is a new version available for your vehicle. Follow these steps to check for updates:
- Start your vehicle and ensure that your infotainment system is fully booted up.
- Connect your USB drive to one of the available USB ports in your vehicle. Make sure the drive has enough free space to accommodate the update.
- On your infotainment screen, navigate to the Settings menu. Depending on your vehicle model, the location of the Settings menu may vary.
- Select the System tab or a similar option that provides access to system settings.
- In the System menu, look for a Software Update or Check for Update option. Select it to initiate the update check.
- If there is an update available, your Sync 3 system will display the details of the update, including the version number and a brief description of the improvements.
- Confirm that you want to proceed with the update by following the on-screen prompts. It may take a few minutes for your system to prepare for the update.
If there are no updates available, your Sync 3 system is already up-to-date. It’s recommended to periodically check for updates to ensure you are benefiting from the latest features and bug fixes.
Once you have confirmed that there is an update available for your Sync 3 system, you can proceed to the next section to learn how to prepare for the update process. Remember to keep your USB drive connected throughout the update process as it will be used to store and install the update files.
Preparing for the Update
Before you begin the Sync 3 update process, there are a few important steps you need to take to ensure a smooth installation. Here’s what you need to do:
- Review the system requirements: Check the Ford website or your vehicle’s manual to confirm that your vehicle is eligible for the Sync 3 update. Some older models may not support the latest software versions.
- Backup your data: It’s always a good idea to back up any personal data or settings on your Sync 3 system before performing an update. This ensures that if anything goes wrong during the update process, you won’t lose any valuable information.
- Charge your vehicle’s battery: It’s essential to have a fully charged battery or keep your vehicle connected to a power source throughout the update. This helps prevent any unexpected power interruptions that could potentially disrupt the installation process.
- Ensure a stable internet connection: For a successful update, you’ll need a reliable and uninterrupted internet connection. If your vehicle is parked in an area with a weak or unstable signal, consider moving to a location with better connectivity.
Additionally, familiarize yourself with the update process by reading through the instructions provided by Ford or the Sync 3 support documentation. This will give you a better understanding of what to expect during the installation and help you troubleshoot any potential issues that may arise.
By completing these preparatory steps, you are setting yourself up for a hassle-free update experience. With your data backed up, a fully charged battery, and a stable internet connection, you’re now ready to proceed to the next section to download the Sync 3 update.
Downloading the Sync 3 Update
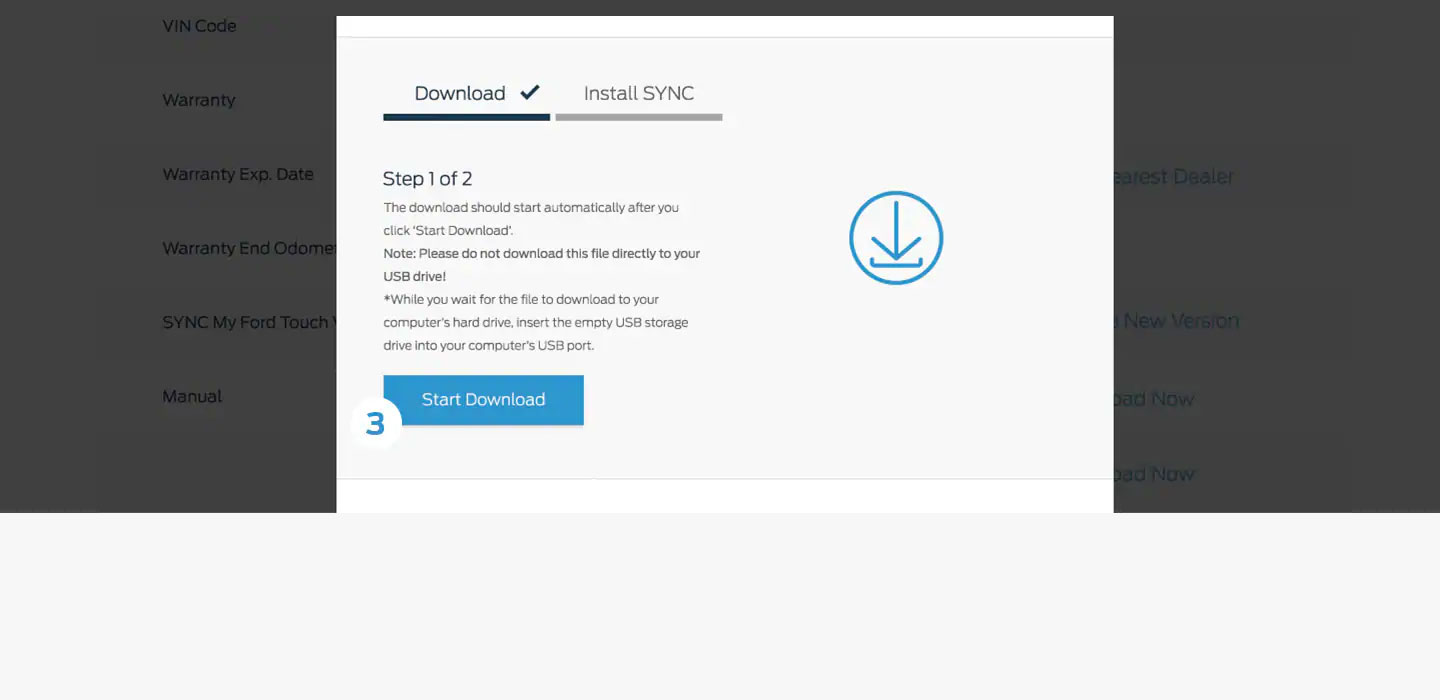
Once you have completed the necessary preparations, it’s time to download the Sync 3 update to your USB drive. Follow these steps to download the update:
- Visit the official Ford website or the Sync 3 support page to find the latest software update for your vehicle.
- Locate the download link or button for the update, and click on it.
- Ensure that you are downloading the correct update for your vehicle’s make, model, and year.
- Save the downloaded file to your computer or a designated location.
- Insert your USB drive into your computer and make sure it is recognized.
- Format the USB drive to the appropriate file system if necessary (FAT32 is commonly used).
- With the USB drive formatted, copy and paste the downloaded update file onto the USB drive.
- Once the file transfer is complete, safely eject the USB drive from your computer.
Make sure that the USB drive is free from any other files or folders except for the Sync 3 update file. This ensures that the system recognizes the update properly during installation.
Congratulations! You have successfully downloaded the Sync 3 update to your USB drive. In the next section, we will guide you through the installation process to bring the latest software enhancements to your vehicle’s infotainment system.
Installing the Update
Now that you have the Sync 3 update downloaded onto your USB drive, it’s time to install it on your vehicle’s infotainment system. Follow these steps to complete the installation:
- Start your vehicle and ensure that the infotainment system is fully booted up.
- Insert the USB drive containing the Sync 3 update into one of the available USB ports in your vehicle.
- Your vehicle’s system will automatically detect the update on the USB drive and prompt you to start the installation. Select “Yes” or “Install” to proceed.
- The installation process may take some time, during which your infotainment system may restart multiple times. Do not turn off the vehicle or remove the USB drive during this time.
- Follow any on-screen prompts or instructions that may appear. These may include accepting license agreements, confirming the update version, or selecting specific options for the update process.
- Once the installation is complete, your system will notify you and may prompt you to restart the vehicle. Follow any remaining on-screen instructions to finalize the update.
- After restarting, remove the USB drive from the USB port. Your Sync 3 system should now be updated with the latest software version.
During the installation process, it’s normal for the infotainment system to display a progress bar or other visual indicators. This helps you track the installation progress and assures you that the update is working as expected.
Once the update is installed, take a moment to explore the new features and enhancements that the updated Sync 3 software brings to your vehicle. Enjoy the improved performance, bug fixes, and additional functionalities that help enhance your driving experience.
If you encounter any issues or problems during the installation process, refer to the troubleshooting section in this guide or consult the official Ford or Sync 3 support resources for assistance.
Troubleshooting Common Issues
While updating the Sync 3 software is generally a straightforward process, it’s possible to encounter some common issues along the way. Here are a few troubleshooting tips to help you overcome potential hurdles:
- If the USB drive is not recognized: Ensure that the USB drive is formatted correctly and that it does not contain any other files or folders except for the Sync 3 update file. Try using a different USB drive if the issue persists.
- If the installation process does not start: Restart your vehicle and try the installation process again. If the problem persists, double-check that you have downloaded the correct update file for your specific vehicle model and year.
- If the update gets stuck or takes excessively long: Sometimes, updates may take longer than expected. However, if the installation process seems to be stuck for an extended period, restart your vehicle and try the update process again. If the issue persists, consult the official Ford or Sync 3 support resources for further assistance.
- If the infotainment system displays error messages: Make note of any error messages or error codes that appear on the screen. These messages can provide valuable information for troubleshooting. Take a screenshot or write down the exact wording of the error message and consult the official support resources for guidance.
- If new features or functions are not working: After the update, if you notice that certain features or functions are not working as expected, perform a system reset. Consult the vehicle’s manual or the Sync 3 support documentation for instructions on how to carry out a system reset.
It’s important to note that if you are experiencing persistent issues or difficulties during the update process, it’s recommended to seek assistance from authorized service centers or consult the official support channels provided by Ford or Sync 3.
By following these troubleshooting tips, you can overcome common obstacles and ensure a successful update of your Sync 3 system.
Conclusion
Congratulations! You have reached the end of our guide on how to download the Sync 3 update. By following the steps outlined in this article, you are now equipped with the knowledge to keep your vehicle’s infotainment system up-to-date and enjoy the latest features and improvements.
We started by checking for updates on your Sync 3 system, ensuring that you are aware of any new software versions available. Then, we delved into the preparation phase, emphasizing the importance of backing up data, charging your vehicle’s battery, and ensuring a stable internet connection.
After preparing for the update, we discussed the process of downloading the Sync 3 update onto a USB drive. We highlighted the need to verify the correct update for your specific vehicle model and year, as well as explained the steps to transfer the update file onto the USB drive.
Finally, we covered the installation process, guiding you through the necessary steps to install the update on your vehicle’s infotainment system. We also provided troubleshooting tips for common issues that may arise during the update process.
Remember, if you encounter any difficulties or have further questions, consult the official Ford or Sync 3 support resources for additional assistance. They have a wealth of knowledge and resources to help you navigate any challenges you may face.
With the latest Sync 3 update installed, enjoy the improved performance, enhanced features, and smoother operation of your vehicle’s infotainment system. Stay connected and entertained while on the road, and take full advantage of the advanced capabilities that Sync 3 has to offer.
Thank you for choosing our guide as your companion for updating your Sync 3 system. Safe travels!