Introduction
Welcome to our step-by-step guide on how to download photos from Google Drive to your iPhone. Google Drive is a popular cloud storage service that allows you to store and access files from anywhere, including your iPhone. Whether you want to save a memorable photo taken with your Android device or share an image that was shared with you through Google Drive, this guide will walk you through the process.
With just a few simple steps, you’ll be able to quickly download photos from Google Drive to your iPhone and have them readily available in your Photos app. This will enable you to view, edit, and share these images without the need for an internet connection.
Downloading photos from Google Drive to your iPhone is a convenient way to access and enjoy your favorite memories on the go. Whether it’s a family vacation photo album, a collection of breathtaking landscapes, or treasured moments with loved ones, having these photos easily accessible on your iPhone ensures that you can relive those special moments whenever and wherever you want.
In this guide, we’ll walk you through the step-by-step process of downloading photos from Google Drive to your iPhone. You don’t need any technical expertise to follow along, as we’ll provide clear instructions and visual aids to help you along the way.
So, let’s get started and learn how to download photos from Google Drive to your iPhone!
Step 1: Open the Google Drive app on your iPhone
The first step in downloading photos from Google Drive to your iPhone is to open the Google Drive app. If you haven’t already installed the app, you can download it for free from the App Store. Once the app is installed on your iPhone, follow these simple steps:
- Locate the Google Drive app icon on your iPhone’s home screen. It is represented by a triangular logo with different shades of blue.
- Tap on the Google Drive app icon to open it.
- Upon opening the app, you will need to sign in with your Google account credentials. If you don’t have an account, you can create one for free by tapping on the “Create account” link.
- After signing in, you will be taken to the main screen of the Google Drive app, where you can access all your files and folders.
The Google Drive app provides a user-friendly interface that makes it easy to navigate and manage your files. From here, you can upload, download, and organize your photos and other documents.
By opening the Google Drive app on your iPhone, you have taken the crucial first step towards downloading your photos. Now, let’s move on to the next step and locate the specific photo you want to download.
Step 2: Locate the photo you want to download
Now that you have successfully opened the Google Drive app on your iPhone, it’s time to locate the specific photo you want to download. Follow these steps to find your desired photo:
- On the main screen of the Google Drive app, you will see a list of your files and folders. If you have organized your photos into specific folders, you can navigate to the relevant folder.
- Scroll through the list or use the search bar at the top of the screen to find the photo you want to download. You can search by file name or any relevant keywords associated with the photo.
- If the photo is stored in a folder, tap on the folder to access its contents.
- Continue scrolling or searching until you locate the specific photo you wish to download. The thumbnail or preview of the photo should give you a clear indication of its content.
Google Drive allows you to store a wide variety of file types, including photos of different formats. Keep in mind that the app supports common image formats such as JPEG, PNG, and GIF. If your photo is in a different format, you may encounter compatibility issues.
With these simple steps, you can easily find the photo you want to download from Google Drive. Once you’ve located the photo, it’s time to move on to the next step and initiate the download process. Let’s proceed to step 3.
Step 3: Select the photo you want to download
Now that you have found the photo you want to download from Google Drive on your iPhone, it’s time to select it. Follow these easy steps to proceed:
- Tap on the photo you wish to download to open it. This will display a full-size view of the image, allowing you to confirm that it’s the correct photo before downloading it.
- If you need to view the photo in larger detail or want to examine it closely, you can zoom in or out on the photo using the pinch-to-zoom gesture on your iPhone screen.
- If you have multiple photos you want to download, you can select multiple photos by tapping and holding on the first photo and then tapping on additional photos to add them to your selection.
- To deselect a photo, simply tap on it again. This allows you to change your selection if needed.
By selecting the photo you want to download, you are one step closer to having it saved on your iPhone. Once you have made your selection, it’s time to proceed to the next step and access the download options.
Now that you have selected the photo, let’s move on to step 4 and explore the different options available for downloading the photo from the Google Drive app.
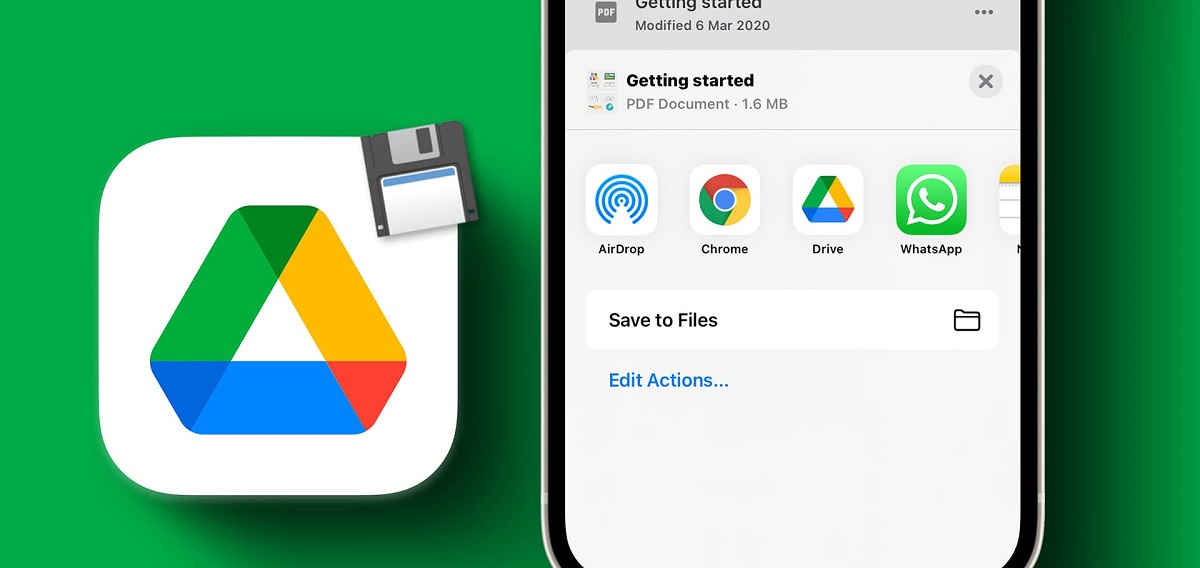
Step 4: Tap the three-dot menu icon
After selecting the photo you want to download from Google Drive on your iPhone, the next step is to access the download options. To do this, follow these straightforward steps:
- In the top-right corner of the screen, you will see a three-dot menu icon. Tap on this icon to open the menu.
- By tapping on the three-dot menu icon, a drop-down menu will appear with a variety of options to choose from.
- Among the options in the menu, look for the one that says “Save Image” or “Download.” The exact wording may vary depending on the version of the Google Drive app you are using.
- Tap on the “Save Image” or “Download” option to initiate the download process.
When you tap the three-dot menu icon, it opens up a world of possibilities for managing and manipulating the selected photo. From here, you can also choose to share the photo, move it to a different folder within Google Drive, or even delete it if you no longer need it.
Remember, tapping the three-dot menu icon is an important step in downloading the photo from Google Drive to your iPhone. Once you have selected the desired option, let’s move on to the next step and access the Photos app on your iPhone to complete the download process.
Step 5: Choose the “Save Image” option
After tapping on the three-dot menu icon in the Google Drive app on your iPhone, a drop-down menu appears with various options. The next step is to choose the “Save Image” option to download the selected photo. Follow these simple steps:
- Scan through the options in the drop-down menu that appears after tapping the three-dot menu icon.
- Look for the “Save Image” option in the menu. It is usually located towards the top of the list, but the exact position may vary depending on the version of the Google Drive app you are using.
- Tap on the “Save Image” option to initiate the download process.
Choosing the “Save Image” option will instruct the Google Drive app to download the selected photo and save it to your iPhone’s local storage. This means that the photo will no longer be exclusively stored on Google Drive but will also be accessible in your iPhone’s Photos app.
The “Save Image” option ensures that the photo becomes readily available for viewing, editing, and sharing directly through your iPhone’s native Photos app. It streamlines the process and eliminates the need to constantly access Google Drive to access the photo.
By selecting the “Save Image” option, you have taken a vital step in securely downloading and storing the photo to your iPhone. Now, let’s move on to step 6 and access the Photos app to complete the download process.
Step 6: Open the Photos app on your iPhone
After choosing the “Save Image” option in the Google Drive app, the selected photo is downloaded and saved to your iPhone’s local storage. The next step is to open the Photos app on your iPhone, where you can find and manage your downloaded photo. Follow these straightforward steps:
- Locate the Photos app on your iPhone’s home screen. The app icon resembles a multicolored flower or a stylized sunflower.
- Tap on the Photos app icon to open it.
- Once the Photos app is open, you will be taken to the main screen, where you can find your entire photo library categorized into different albums and sections.
- The recently added photos are usually displayed in the “Photos” tab at the bottom of the screen. Tap on the “Photos” tab to view the most recently added images.
- Scroll through the photos or use the search bar at the top of the screen to find the recently downloaded photo from Google Drive.
Opening the Photos app is essential to access and manage the downloaded photo on your iPhone. The Photos app provides various features and options to organize, edit, and share your photos, ensuring that your downloaded photo is readily accessible whenever you need it.
Now that you have successfully opened the Photos app on your iPhone, let’s move on to the next step and locate and view the downloaded photo.
Step 7: Find and view the downloaded photo in your Photos app
After opening the Photos app on your iPhone, the final step is to locate and view the downloaded photo that you saved from Google Drive. Follow these simple steps:
- In the Photos app, navigate to the section where the recently added photos are displayed. This is usually the “Photos” tab located at the bottom of the screen.
- Scroll through the photos or use the search bar at the top of the screen to find the downloaded photo.
- Once you have located the downloaded photo, tap on it to view it in full size.
- You can use gestures, such as pinch-to-zoom, to zoom in or out on the photo for a closer look.
- You can swipe left or right to browse through other photos in the same section or album.
The Photos app provides a user-friendly interface that allows you to easily find and view your downloaded photo. Additionally, you have a range of options to organize your photos into albums and share them with friends and family.
Now that you have successfully found and viewed the downloaded photo in the Photos app, congratulations! You have completed the process of downloading a photo from Google Drive to your iPhone. The photo is now readily accessible on your device, allowing you to enjoy, edit, and share it as desired.
This concludes our step-by-step guide on how to download photos from Google Drive to your iPhone. We hope this guide has been helpful in assisting you with the process. Remember, Google Drive provides a convenient way to store and access your files in the cloud, ensuring that your important photos are safe and accessible from anywhere.
Thank you for following along, and happy downloading!
Conclusion
Downloading photos from Google Drive to your iPhone is a simple and convenient process that allows you to have your favorite memories readily available at your fingertips. Through the steps outlined in this guide, you can easily access, download, and view your photos in just a few simple taps.
The Google Drive app provides a user-friendly interface that makes it easy to navigate and manage your files, including photos. By opening the app, locating the desired photo, and selecting the “Save Image” option, you can seamlessly download the photo to your iPhone’s local storage.
Once downloaded, you can find and view the photo in the Photos app on your iPhone. The Photos app offers various features to organize, edit, and share your downloaded photos with ease. Whether you want to create albums, apply filters, or share your photos with friends and family, the Photos app has you covered.
With the ability to download photos from Google Drive to your iPhone, you can take your cherished memories with you wherever you go. This allows you to relive special moments, share experiences, and enjoy your photos even when you don’t have an internet connection.
We hope this step-by-step guide has been helpful in assisting you with the process of downloading photos from Google Drive to your iPhone. Now, you can confidently save and access your favorite photos whenever and wherever you want.
Thank you for following along, and we wish you many enjoyable moments as you explore and download photos from Google Drive to your iPhone!