Introduction
Downloading files from Google Drive to your iPhone can be a simple and convenient way to access your important documents, photos, and videos on the go. Whether you need to download a presentation for a business meeting or save a family photo album to your device, Google Drive offers a seamless solution.
In this guide, we will walk you through the steps to download files from Google Drive to your iPhone. By following these simple instructions, you will be able to access your files anytime, anywhere, even when you are offline.
Google Drive is a cloud storage platform that allows users to store and share files online. It offers a range of benefits, including ample storage space, easy file organization, and the ability to collaborate with others. With the Google Drive app installed on your iPhone, you can easily access and download your files with just a few taps.
Whether you are a student, a professional, or a casual user, downloading files from Google Drive to your iPhone can be extremely useful. It gives you the flexibility to work on your files even when you are away from your computer and ensures that your important documents are always within reach.
In the following sections, we will guide you step by step on how to download files from Google Drive to your iPhone. Let’s get started!
Step 1: Open the Google Drive app
To begin the process of downloading files from Google Drive to your iPhone, you need to have the Google Drive app installed on your device. If you haven’t already done so, you can download and install the app from the App Store.
Once the Google Drive app is installed, locate the app icon on your iPhone’s home screen and tap on it to open it. The app icon resembles a triangle in different shades of green with a white background.
Upon opening the Google Drive app, you will be prompted to sign in using your Google account credentials. If you already have a Google account, enter your email address and password to sign in. If you don’t have a Google account, you can easily create one by following the on-screen instructions.
Once you are signed in to the Google Drive app, you will have access to all your files stored in Google Drive. The app interface is user-friendly and intuitive, allowing you to navigate and manage your files with ease.
With the Google Drive app open on your iPhone, you are now ready to proceed to the next step and start downloading files from Google Drive.
Step 2: Tap on the file you want to download
With the Google Drive app open on your iPhone, you will see a list of your files and folders. Take a moment to browse through your files and locate the one you want to download.
To find the specific file, you can use the search bar at the top of the screen or scroll through the list manually. The files are arranged in chronological order, with the most recently modified files appearing at the top.
Once you have found the file you want to download, simply tap on it to open it. The file will open in a preview mode, allowing you to view its content before downloading it to your device.
Google Drive supports a wide range of file types, including documents, spreadsheets, presentations, images, videos, and more. Whether you are downloading a PDF document, a Word file, or a JPEG image, the process is the same.
If you want to download multiple files at once, you can tap and hold on the first file to select it, and then tap on the other files you want to download. The selected files will be highlighted, and you can proceed to the next step to download them all at once.
Once you have identified and tapped on the file or files you want to download, it’s time to move on to the next step and initiate the download process.
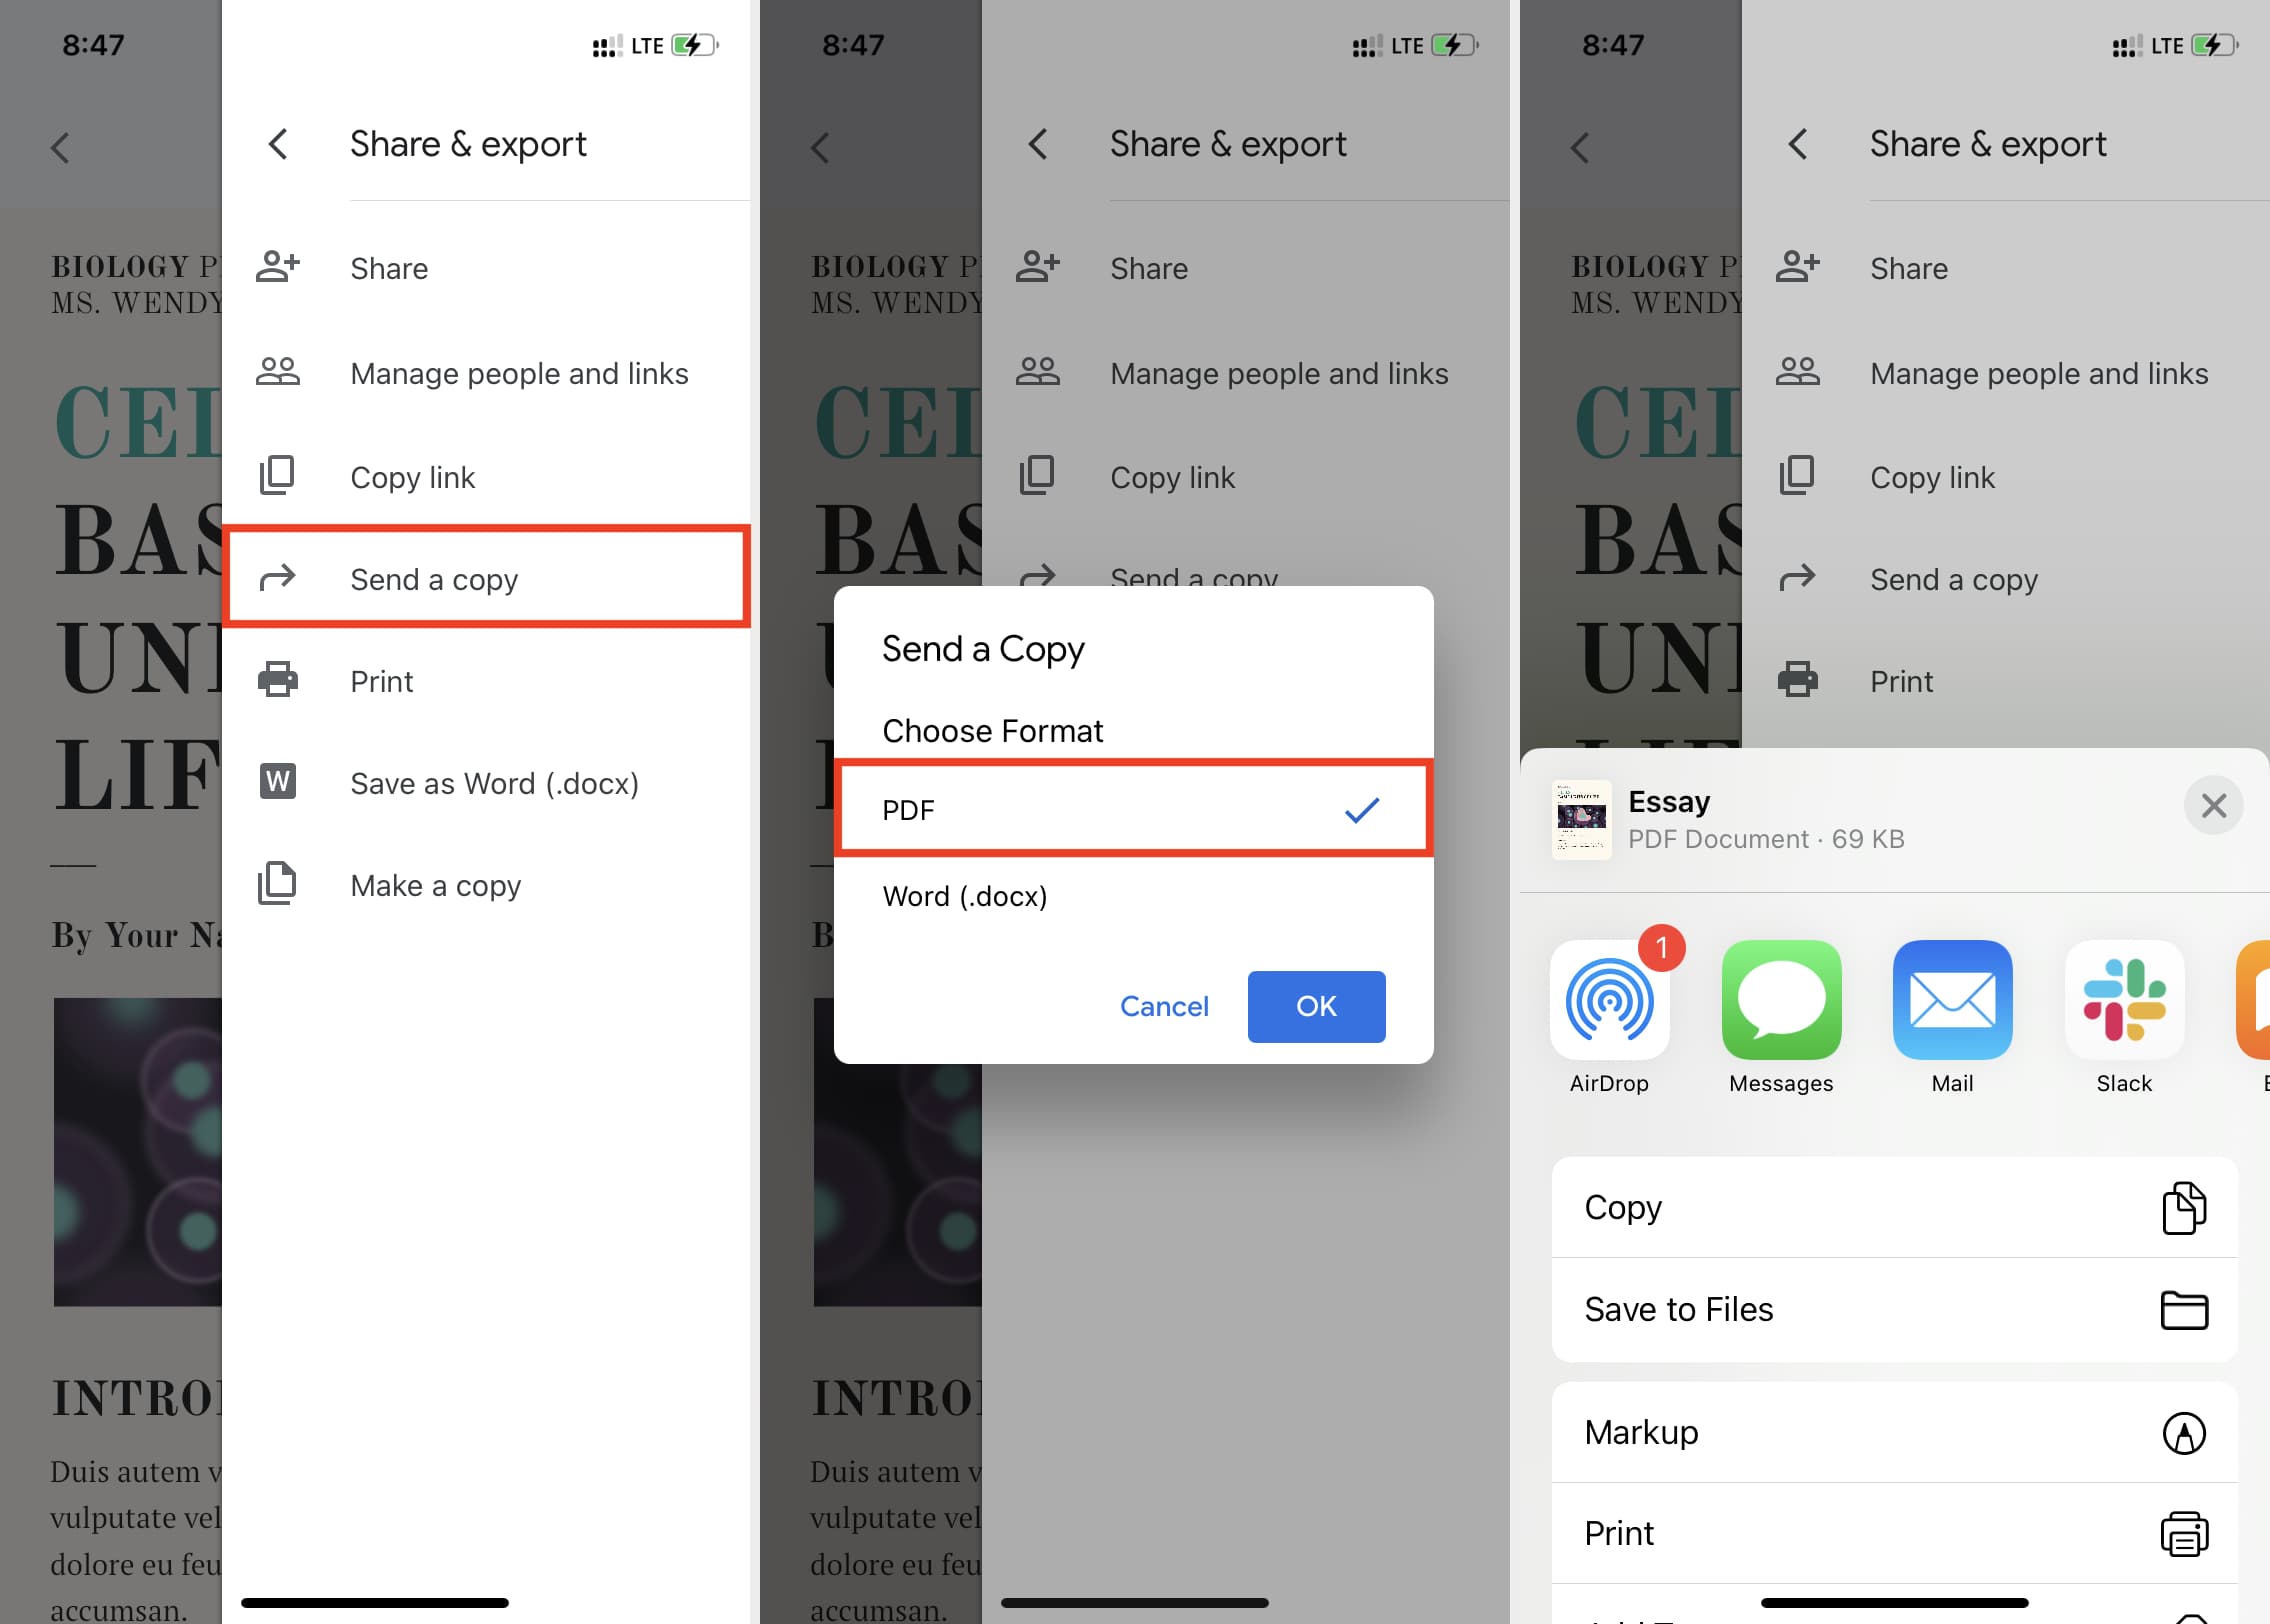
Step 3: Tap the vertical ellipsis icon (three dots)
After selecting the file or files you want to download, you need to access the options menu in order to proceed with the download process. To do this, tap on the vertical ellipsis icon (three dots) located at the top-right corner of the screen.
When you tap on the ellipsis icon, a dropdown menu will appear with various options related to the selected file or files. This menu provides you with several actions you can take, including downloading, sharing, renaming, moving, and more.
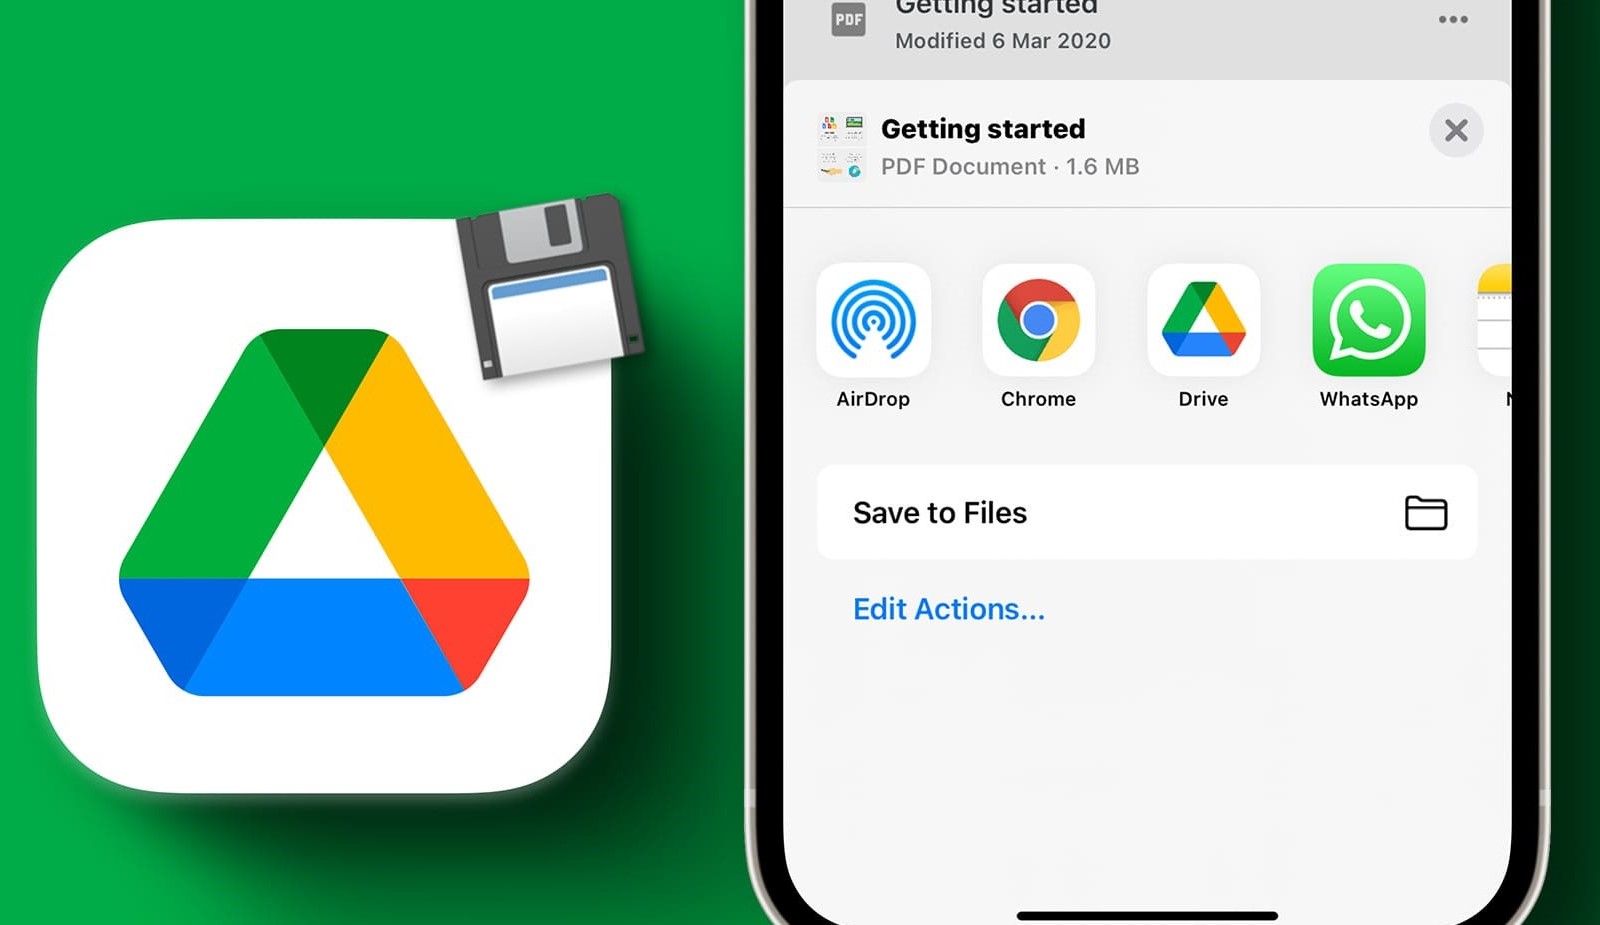
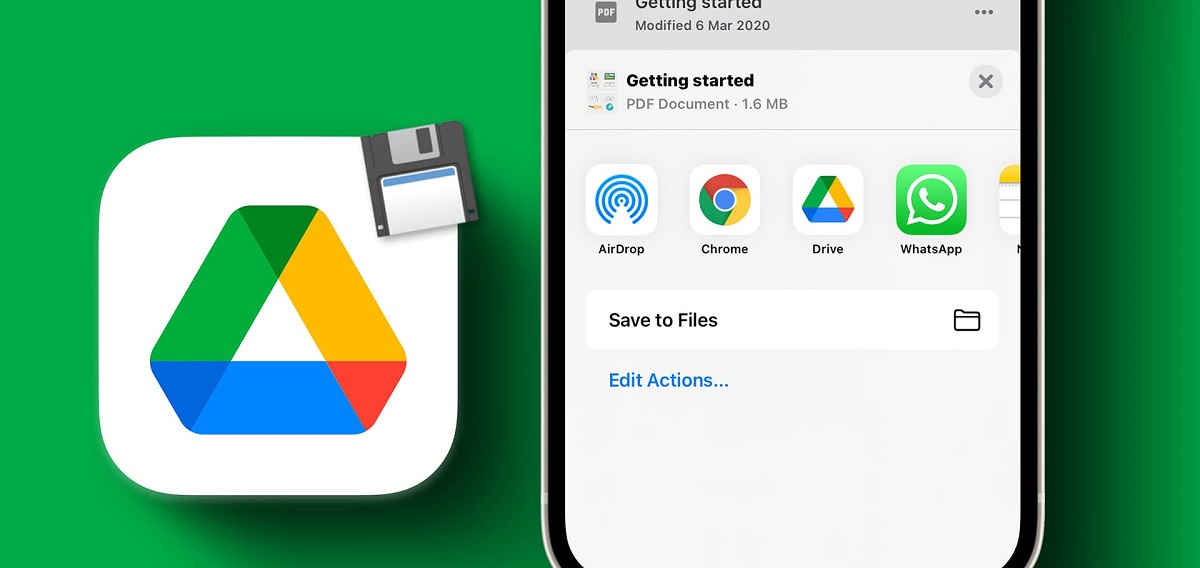
In the dropdown menu, locate and tap on the “Send a copy” option. This option allows you to send a copy of the file to another app or save it to your device for offline access.
By tapping on “Send a copy,” you are indicating your intent to download the selected file or files from Google Drive to your iPhone.
It’s worth mentioning that the specific appearance and location of the vertical ellipsis icon may vary depending on the version of the Google Drive app you have installed on your device. However, it is typically recognizable by its three vertically aligned dots and is commonly found in the top-right corner of the screen.
Now that you have tapped on the vertical ellipsis icon and accessed the options menu, you are ready to proceed to the next step and choose how you want to save the file to your iPhone.
Step 4: Tap “Send a copy”
After accessing the options menu by tapping on the vertical ellipsis icon, you will see a dropdown menu with various actions related to the selected file or files. In this step, locate and tap on the “Send a copy” option.
Tapping on “Send a copy” will bring up a list of available actions to perform with the selected file or files. These actions may include sharing the file, renaming it, moving it to a different folder, and more.
However, for the purpose of this guide, we are focusing on downloading the file to your iPhone. By selecting “Send a copy,” you are indicating your intention to save a copy of the file to your device.
It’s important to note that the wording and placement of the “Send a copy” option may vary slightly depending on the version of the Google Drive app you are using. However, it will typically be prominently displayed as one of the primary actions you can take with the selected file.
Now that you have tapped on “Send a copy” and chosen to save a copy of the file to your device, you can proceed to the next step and select the location where you want to save the file on your iPhone.
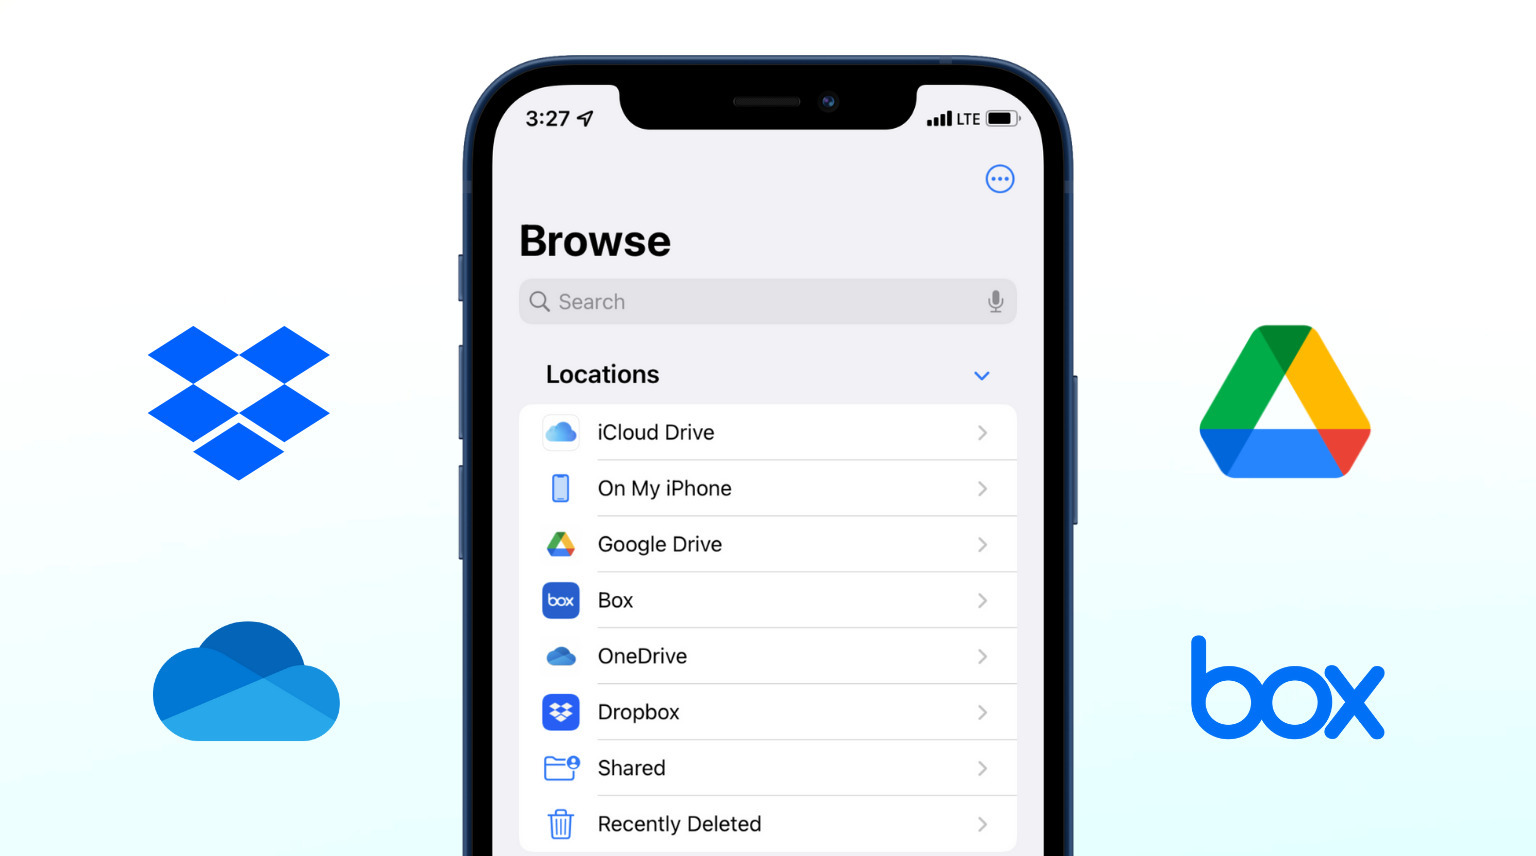
Step 5: Choose “Save to Files”
Once you have selected the “Send a copy” option for the file you want to download, a list of available actions will appear. From this list of actions, locate and tap on the “Save to Files” option.
By choosing “Save to Files,” you are indicating that you want to save the downloaded file to a specific location within the Files app on your iPhone.
The Files app on your iPhone serves as a central hub for managing and organizing your files. It allows you to create folders, move files, and access files from various cloud storage services, including Google Drive.
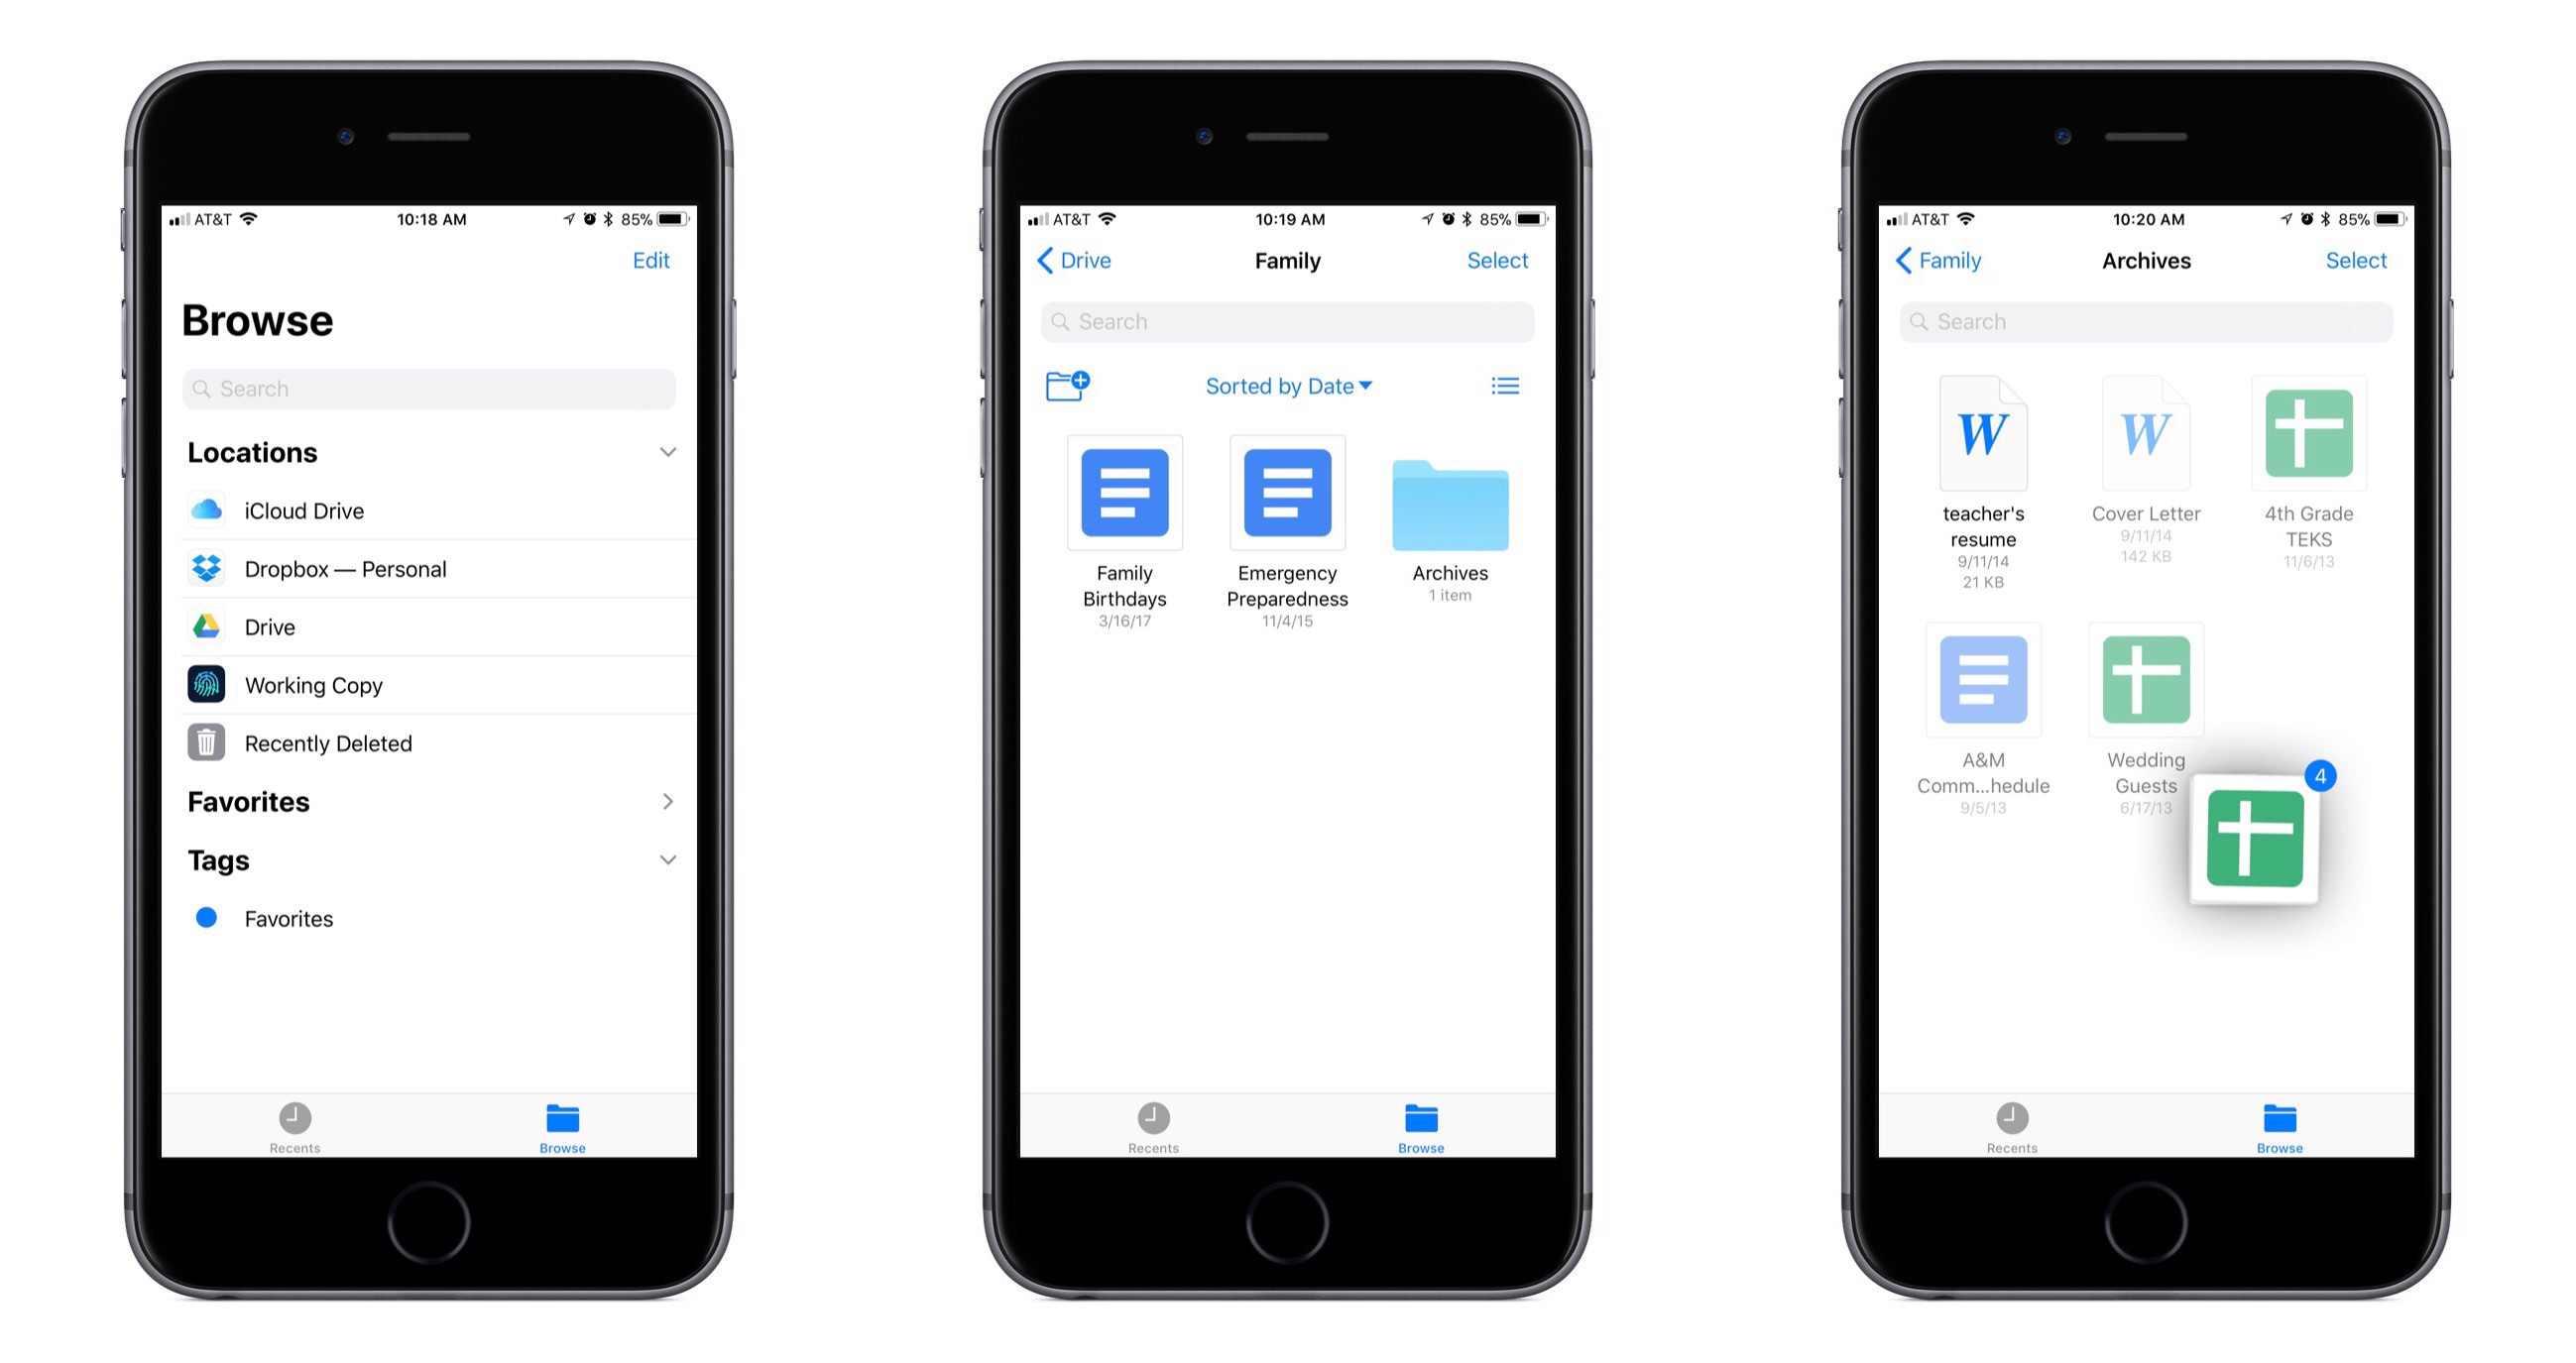
After tapping on “Save to Files,” a screen will appear displaying your available storage locations within the Files app. These locations may include iCloud Drive, On My iPhone (local storage), and other cloud storage services that you have connected to your device.
Navigate through the available storage locations and select the folder or location where you want to save the downloaded file. If you don’t have a specific folder in mind, you can choose the “On My iPhone” option to save the file directly to your device’s local storage.
It’s important to note that the specific structure and appearance of the Files app may vary depending on your iOS version and device settings. However, the basic functionality and options should remain consistent across different versions.
Now that you have chosen “Save to Files” and selected the location where you want to save the file on your iPhone, you are ready to move on to the next step and finalize the download process.
Step 6: Select the destination folder in the Files app
After choosing “Save to Files” in the previous step, the Files app will open, displaying your available storage locations and folders. Now it’s time to select the destination folder where you want to save the downloaded file.
Browse through your available storage locations and folders to find the desired destination folder. You can tap on any folder to open it and view its contents. If you want to save the file in the root directory of a storage location, you can simply choose that storage location without navigating through any folders.
If you have a specific folder in mind and you can’t find it in the current location, you can tap on the “Browse” button at the bottom of the screen. This will allow you to navigate through different storage locations and folders until you find the desired destination folder.
When you locate the destination folder, tap on it to select it as the location where you want to save the downloaded file. The selected folder will be highlighted, indicating that it is the designated destination for the file.
It’s worth noting that if you want to save the file in a new folder that doesn’t currently exist, you can create a new folder within the Files app. To create a new folder, tap on the “New Folder” button (usually represented by a “+” symbol) and follow the on-screen prompts to name and create the folder.
Once you have selected the destination folder for the downloaded file, you are ready to proceed to the final step and initiate the file download process.
Step 7: Tap “Save” to start downloading the file
After selecting the destination folder in the previous step, you are now just a few taps away from completing the download process. To initiate the download, locate and tap the “Save” button, usually located at the top-right or bottom-right corner of the screen within the Files app.
When you tap “Save,” the downloading process will begin, and you will see a progress indicator indicating the status of the download. The speed of the download will depend on the size of the file and your internet connection speed, so it may take a few moments to complete.
Once the download is complete, you will receive a notification confirming that the file has been successfully saved to the selected folder in the Files app. You can then tap on the notification to open the file directly or navigate to the destination folder within the Files app to access your downloaded file.
It’s important to note that the downloaded file will be available for offline access, which means you can open and view it even without an internet connection. This can be particularly useful when you’re on the go or in situations where internet connectivity is limited.
With the file successfully downloaded and saved to your desired location, you have completed the process of downloading files from Google Drive to your iPhone. You can now access and utilize the downloaded file at any time, whether you’re working on a presentation, showcasing photos, or viewing important documents on the go.
Now that you know how to download files from Google Drive to your iPhone, you can make the most out of this convenient feature and seamlessly access your files wherever you are.
Conclusion
Downloading files from Google Drive to your iPhone has never been easier. With just a few simple steps, you can have your important documents, photos, and videos readily accessible on your device, even when you’re offline.
In this guide, we walked you through the process of downloading files from Google Drive to your iPhone. From opening the Google Drive app to selecting the destination folder in the Files app, each step was carefully explained to ensure a seamless downloading experience.
With the Google Drive app installed on your iPhone, you have the power to access, manage, and download your files at your fingertips. Whether you’re a student, a professional, or a casual user, the ability to download files from Google Drive to your iPhone offers flexibility and convenience in accessing your important files on the go.
Remember that the Files app on your iPhone serves as a central hub for organizing and managing your downloaded files. You can create folders, move files, and access various cloud storage services, including Google Drive, all from one place.
Whether you’re downloading a PDF document for an important meeting, saving a memorable photo album to cherish, or accessing a video for entertainment purposes, the steps outlined in this guide can be applied to any file type in Google Drive.
So, why wait? Start taking advantage of the seamless integration between Google Drive and your iPhone by downloading your files and having them accessible anytime, anywhere.
Now that you have successfully learned how to download files from Google Drive to your iPhone, you can confidently navigate through your files and enjoy the convenience of having your important documents and media readily available right in the palm of your hand.